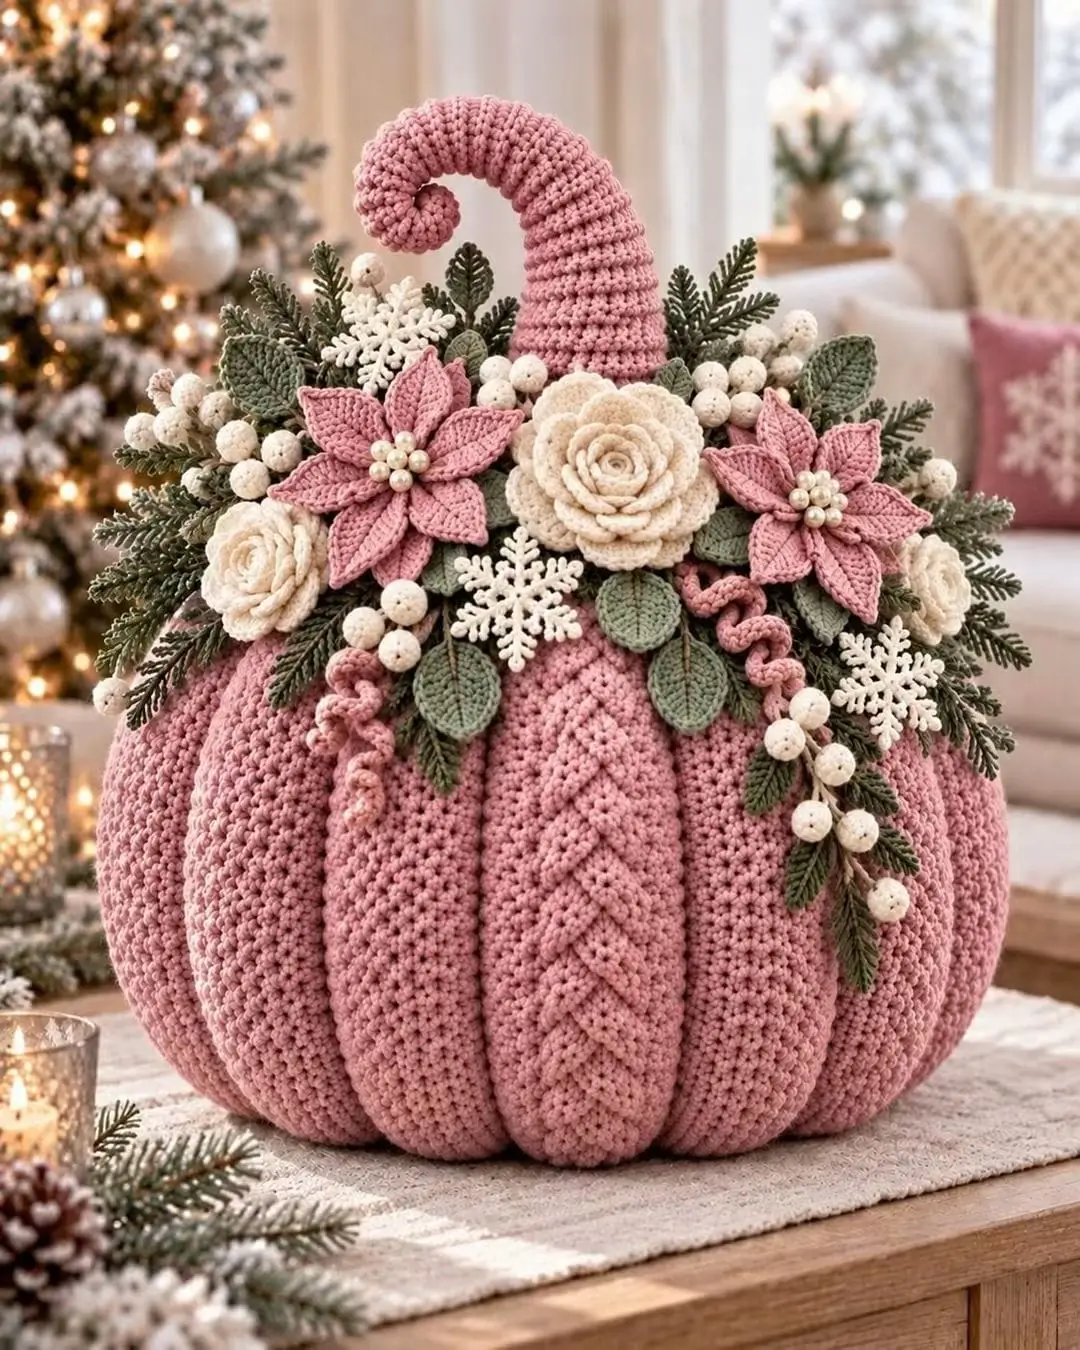
A pumpkin does not normally carry poinsettias, roses, snowflakes, berries, and evergreen sprays around its stem; that floral crown defines this design. This crochet pumpkin centerpiece pattern recreates the reference with a dusty-pink ribbed pumpkin, curled stem, cream roses, pink poinsettias, sage leaves, white berries, and winter foliage. The project uses stuffed crochet construction combined with separately made botanical decorations.
The Design: What Makes This Crochet Pumpkin Different
The pumpkin body depends on deep vertical ribs rather than color changes. Separate raised sections create the segmented shape, while firm stuffing keeps those channels visible instead of allowing the body to become a smooth sphere.
A second structural decision is the oversized curved stem. Its hook-like profile rises well above the floral arrangement and becomes part of the silhouette rather than functioning as a small finishing detail.
Finally, the botanical crown hides much of the pumpkin’s upper opening. Large cream roses and pink poinsettias form the focal layer; sage leaves, berries, snowflakes, curled vines, and evergreen sprays fill the spaces behind them. The most common failure with a crochet Christmas pumpkin is attaching decorations before shaping the body. Complete and stuff the pumpkin first so every floral component can be positioned against its final curvature.
Project Info at a Glance
| Skill Level | Construction | Suggested Size | Main Hook | Best For |
|---|---|---|---|---|
| Intermediate/Advanced | Stuffed body + sewn appliqués | Approx. 28–35 cm wide | 4–5 mm | Christmas centerpiece, mantel décor, seasonal display |
The photograph does not provide a physical scale, so its exact dimensions cannot be verified from the image alone. Published crochet pumpkin patterns vary substantially: small cotton versions can measure about 5 cm, while documented larger versions reach approximately 13 × 14.5 cm before changing yarn or scaling the construction. The 28–35 cm target here is an adaptation for the oversized centerpiece proportions shown in the reference.
Materials and Tools
Yarn
- Dusty pink — worsted or aran — approximately 400–550 g for pumpkin, stem, and curls.
- Cream — DK or worsted — approximately 100–150 g for roses, snowflakes, and berries.
- Sage green — DK or worsted — approximately 70–100 g for broad leaves.
- Dark olive green — DK — approximately 80–120 g for evergreen foliage.
The yarn amounts are working allowances for a large decorative centerpiece rather than measured consumption from the photographed item. Published pumpkin patterns demonstrate how widely yarn requirements change with scale; one documented cotton pumpkin series uses 75 g of its primary yarn for a 13 × 14.5 cm version.
Tools
- 4–5 mm crochet hook for the pumpkin body
- 2.5–3.5 mm crochet hook for flowers and foliage
- Polyester fiberfill — approximately 500–700 g
- Tapestry needle
- Stitch markers
- Scissors
- Pearl beads for poinsettia centers, optional
- Floral wire, optional for the tall stem and foliage
If the centerpiece will be accessible to small children, omit beads and other detachable decorative components.
Abbreviations
- MR — magic ring
- ch — chain
- sl st — slip stitch
- sc — single crochet
- hdc — half double crochet
- dc — double crochet
- tr — treble crochet
- inc — increase
- dec — decrease
- BLO — back loop only
- FLO — front loop only
- st/sts — stitch/stitches
- FO — fasten off
For an invisible decrease, insert the hook through the front loops of the next two stitches, yarn over, pull through both front loops, then complete the single crochet.
Pattern — Step by Step
The centerpiece is assembled from a large stuffed pumpkin followed by the stem and decorative motifs. Make the pumpkin body first because its finished circumference determines how many flowers, leaves, and foliage sprays are required.
Pumpkin Body
Yarn: dusty pink.
Use a hook small enough to create a dense fabric that prevents stuffing from showing between stitches.
R1: 6 sc in MR. (6)
R2: Inc ×6. (12)
R3: (sc, inc) ×6. (18)
R4: (2 sc, inc) ×6. (24)
R5: (3 sc, inc) ×6. (30)
R6: (4 sc, inc) ×6. (36)
R7: (5 sc, inc) ×6. (42)
For this oversized centerpiece, continue increasing beyond the standard 42-stitch amigurumi plateau.
R8: (6 sc, inc) ×6. (48)
R9: (7 sc, inc) ×6. (54)
R10: (8 sc, inc) ×6. (60)
R11: (9 sc, inc) ×6. (66)
R12: (10 sc, inc) ×6. (72)
R13–R27: Sc around. (72)
Begin stuffing after approximately R20. Add stuffing in small sections and distribute it against the outer wall.
R28: (10 sc, dec) ×6. (66)
R29: (9 sc, dec) ×6. (60)
R30: (8 sc, dec) ×6. (54)
R31: (7 sc, dec) ×6. (48)
R32: (6 sc, dec) ×6. (42)
R33: (5 sc, dec) ×6. (36)
R34: (4 sc, dec) ×6. (30)
Stuff firmly. Keep the center slightly flatter than the sides so the floral crown has a stable seating area.
R35: (3 sc, dec) ×6. (24)
R36: (2 sc, dec) ×6. (18)
R37: (sc, dec) ×6. (12)
R38: Dec ×6. (6)
Fasten off. Leave a 30 cm tail and close the remaining opening.
Creating the Pumpkin Ribs
The smooth stuffed body now needs the deep vertical channels visible in the reference.
Thread approximately 150 cm of dusty-pink yarn onto a strong tapestry needle. Insert the needle through the bottom center and bring it out at the top center.
Wrap the yarn down the outside of the pumpkin, following a straight line back to the bottom. Pass the needle through the center again and pull until a clear groove forms.
Repeat around the pumpkin to create approximately 10–12 segments.
Keep the spacing as even as possible. Alternate from one side of the pumpkin to the opposite side instead of working every channel sequentially around the circumference.
Secure the shaping yarn at the bottom.
Raised Decorative Rib Panels
The photographed pumpkin includes pronounced vertical ridges with a braided appearance. Surface crochet can add this texture after shaping.
Join dusty-pink yarn at the bottom of one rib.
Work surface slip stitches upward inside the channel toward the top.
For a broader raised line, return beside the first line and work a second row of surface slip stitches.
Repeat on selected ribs rather than every channel. The alternation between plain and raised segments gives the body more definition.
Tall Curved Pumpkin Stem
Yarn: dusty pink.
R1: 6 sc in MR. (6)
R2: Inc ×6. (12)
R3: (sc, inc) ×6. (18)
R4: (2 sc, inc) ×6. (24)
R5–R20: Sc around. (24)
Stuff the lower stem firmly and the upper stem more lightly.
R21: (2 sc, dec) ×6. (18)
R22–R28: Sc around. (18)
R29: (sc, dec) ×6. (12)
R30–R38: Sc around. (12)
Begin forming the hook by placing several decreases along one side while keeping the opposite side unchanged.
R39: Dec ×2, sc in remaining 8 sts. (10)
R40: Sc around. (10)
R41: Dec, sc in remaining 8 sts. (9)
R42–R46: Sc around. (9)
Curve the lightly stuffed upper section while working. Optional floral wire can be inserted inside the stem for additional support.
R47: (sc, dec) ×3. (6)
R48: Dec ×3. (3)
Fasten off and close. Leave a 30 cm tail for attachment.
Large Cream Rose — Make 1
Yarn: cream.
Ch 51.
Row 1: Dc in 4th ch from hook, *ch 1, sk 1 ch, dc in next ch*. Repeat across.
Row 2: Ch 3, turn. Work 5 dc into each ch-1 space across.
Fasten off with a 40 cm sewing tail.
Beginning at one end, roll the strip tightly for the first few petals and progressively more loosely toward the outer edge.
Sew through the foundation edge several times to lock the spiral.
Shape the outer petals outward with your fingers before attaching the flower.
Medium Cream Roses — Make 2
Ch 37.
Row 1: Dc in 4th ch from hook, *ch 1, sk 1, dc in next ch*. Repeat across.
Row 2: Work 5 dc into each ch-1 space.
Fasten off with a long tail.
Roll and sew the strip into a rose.
Pink Poinsettia — Make 2
Yarn: dusty pink.
Make the petals individually and sew them around a small central ring.
Large Petal — Make 6 per flower: Ch 9.
Starting in the second ch from hook work:
sl st, sc, hdc, dc, tr, dc, hdc, sc.
Work 3 sc into the final chain and continue down the opposite side:
sc, hdc, dc, tr, dc, hdc, sc, sl st.
Fasten off with a 15 cm tail.
Small Petal — Make 5 per flower: Ch 7.
Starting in second ch work:
sl st, sc, hdc, dc, hdc, sc.
Work 3 sc at the tip and mirror the sequence down the second side.
Fasten off.
Arrange six large petals as the lower layer. Place five small petals between them as the upper layer.
Sew securely through the center.
Add several pearl beads to the center if the centerpiece is intended only as adult-access decorative décor.
Sage Leaves — Make 8 to 12
Yarn: sage green.
Ch 11.
Starting in second ch from hook:
sl st, sc, hdc, dc, dc, tr, dc, dc, hdc, sc.
Work 3 sc in the final chain.
Continue down the opposite side:
sc, hdc, dc, dc, tr, dc, dc, hdc, sc, sl st.
Fasten off with a long sewing tail.
For the raised center line visible in the reference, work surface slip stitches along the foundation chain from the base toward the tip.
Evergreen Sprays — Make 10 to 16
Yarn: dark olive green.
Ch 26 for the main branch.
Sl st in the second chain and in the next 2 chains.
At the next position, ch 5.
Sl st back along the branch chain and return to the main stem.
Move down one main-stem chain.
Ch 6, then sl st back toward the stem.
Alternate short branches between both sides of the central chain.
Increase branch length gradually toward the middle, then shorten the final branches near the base.
Fasten off with a 20 cm sewing tail.
White Berry — Make 18 to 28
Yarn: cream.
R1: 6 sc in MR. (6)
R2: Inc ×6. (12)
R3: Sc around. (12)
Add a very small amount of stuffing.
R4: Dec ×6. (6)
Fasten off and close.
Leave a 15 cm tail for attaching the berry to a stem or foliage cluster.
Berry Branches
Ch 20–30 with cream or olive yarn.
Sl st back along the chain to make a firm cord.
Make several shorter branch chains at irregular intervals.
Sew one cream berry to the end of each branch.
Create clusters of approximately 4–7 berries rather than attaching every berry independently to the pumpkin.
Crochet Snowflake — Make 3
Yarn: cream.
Ch 6 and join with sl st to form a ring.
Round 1: Ch 3, dc in ring, ch 3; repeat until six paired sections have been formed. Join.
Round 2: Sl st into first ch-space. *Sc in space, ch 7, sc in same space, ch 4.* Repeat in each of the six spaces.
Round 3: In each ch-7 loop work: sc, ch 3, sl st in first ch, sc, ch 5, sl st in first ch, sc, ch 3, sl st in first ch, sc.
Sl st toward the next arm and repeat around.
Fasten off.
Block the snowflakes before attaching them so all six arms remain visible.
Pink Corkscrew Vines — Make 3 to 5
Yarn: dusty pink.
Ch 35.
Starting in second chain from hook, work 3 sc in every chain.
The strip will curl automatically as stitches accumulate.
Fasten off with a 20 cm tail.
For a looser curl, work 2 sc rather than 3 sc into selected chains.
Building the Floral Crown
The arrangement should be assembled in layers. Attaching the flowers first leaves insufficient room for the evergreen foliage and makes the finished crown look compressed.
Begin by pinning the tall pink stem at the back-center of the pumpkin. It should lean slightly forward and curve toward the front without touching the large cream rose.
Arrange the evergreen sprays next. Point some upward around the stem and others outward over the sides.
Add the sage leaves in small groups. Keep several visible beneath each major flower.
Place the large cream rose slightly off-center. The two pink poinsettias should sit to its left and right rather than forming a perfectly straight row.
Position the smaller cream roses lower in the arrangement.
Add berry sprays, snowflakes, and pink corkscrews only after the primary flowers are secured.
Assembly
- Complete the pumpkin body, stuff it firmly, and create 10–12 evenly spaced vertical channels.
- Sew the tall curved stem into the top center using several passes through both the stem base and pumpkin fabric.
- Attach the dark-green evergreen sprays around the stem, beginning with the tallest pieces at the back.
- Add sage leaves beneath the planned flower positions and leave their pointed ends visible.
- Sew the large cream rose near the upper front center and secure its base at a minimum of four points.
- Attach both pink poinsettias and the smaller cream roses around the central flower.
- Add the cream berry sprays between flowers and foliage without covering the primary petals.
- Sew the blocked snowflakes onto open areas where their six-point shapes remain visible.
- Attach the pink corkscrew vines so they fall downward over the pumpkin’s upper ribs.
- Weave all remaining tails into matching stitches and check every decorative attachment before displaying the centerpiece.
The completed centerpiece should have a firmly segmented pumpkin base, one tall curved stem, a layered floral crown, trailing curls, and foliage extending beyond the pumpkin’s upper circumference.
7 Technical Tips for This Crochet Pumpkin Centerpiece
- Ribs disappearing: Stuff the pumpkin before tightening the shaping strands. If the fiberfill is added afterward, it can push shallow channels outward and reduce the segmented appearance.
How to Make Deep Pumpkin Ribs
The shaping yarn does more work than the body stitches when creating the reference silhouette. A normally stuffed sphere will not develop deep channels simply because surface stitches have been added.
Divide the circumference before tightening anything. Twelve sections produce relatively narrow ribs; ten sections create broader pumpkin segments.
Pass the needle through the central axis for every channel. Pull until a groove forms, secure the tension temporarily, then move to the opposite side of the pumpkin.
Alternating sides distributes compression more evenly. Working clockwise around the body can gradually pull the stuffing and central opening toward one direction.
Once all channels have approximately equal depth, secure the shaping yarn permanently at the bottom.
How to Shape the Curved Stem
The stem is unusually tall relative to the pumpkin. Its lower section therefore needs enough stability to remain upright beneath its own weight.
Firm stuffing works for a smaller version. For a centerpiece approaching 30 cm or more, an internal support can make the curve easier to maintain.
If using floral wire, fold both wire ends back on themselves before inserting them so no sharp end presses directly against the crochet fabric. Surround the support with stuffing.
Bend the upper stem gradually rather than creating one sharp angle. The reference forms a broad arch followed by a tighter inward curl near the tip.
Positioning the Crochet Flowers
Start with the largest cream rose because it establishes the focal point. Position it slightly away from the exact center so the tall stem remains visible behind it.
The two pink poinsettias should create a wide triangular composition with the central rose. Keep their outer petals clear of the rose rather than stacking all three flowers directly on top of one another.
Smaller cream roses fill the lower left and right areas. Their reduced diameter prevents the crown from becoming a uniform band of equally sized flowers.
Pin every flower before sewing. Rotate the pumpkin and inspect it from the front and both sides before committing to the final placement.
Making the White Berry Sprays
Use several berries per branch instead of sewing isolated balls throughout the arrangement. Clustering creates a clearer botanical structure and reduces the number of individual attachment points.
Vary branch lengths slightly. The outer berries should sit at different heights rather than forming a straight line.
Keep the berries relatively small compared with the flowers. Their function is to fill narrow spaces and add light-colored accents between dark evergreen sprays.
If the centerpiece is displayed around children or pets, crochet and sew the berries directly rather than adding hard beads or other detachable centers.
Making a Smaller Version
The body can be reduced by stopping the increase sequence earlier. A 42-stitch plateau produces a much smaller pumpkin than the 72-stitch centerpiece body.
Published crochet pumpkin patterns confirm the wide scale available through yarn and stitch-count changes. One free Ravelry design offers six sizes from approximately 5 × 4.5 cm through 13 × 14.5 cm, while another 5 cm pumpkin uses sport-weight cotton and a 2.5 mm hook. :chatgpt-content-reference{index=”0″}
Reduce the flower count along with the body. A smaller pumpkin may need one cream rose, one poinsettia, four leaves, two berry sprays, and several evergreen branches rather than the full arrangement.
Choosing Yarn for the Flowers and Foliage
A smooth yarn gives the botanical pieces clearer edges. The pumpkin can use a softer worsted or aran yarn, while the flowers and leaves can be made with DK yarn and a smaller hook.
Published decorative flower patterns use a broad range of materials. A documented crochet rose-and-leaf design uses aran cotton with a 4 mm hook, while detailed rose leaves are also made with fine 4-ply yarn and a 2 mm hook. :chatgpt-content-reference{index=”1″}
Poinsettias can also be scaled dramatically through material choice. Published versions range from worsted yarn with a 6 mm hook to fine thread flowers made with hooks around 0.8–1.2 mm. :chatgpt-content-reference{index=”2″}
For this centerpiece, keeping the floral yarn slightly thinner than the pumpkin yarn helps the petals and leaves remain distinct.
Keeping the Centerpiece Stable
A large floral crown raises the center of gravity. Keep the bottom of the pumpkin broad and relatively flat during stuffing.
Before closing the body, press the stuffing outward around the lower perimeter while leaving the bottom-center area slightly less rounded. The pumpkin should sit without rolling when placed on a flat table.
Position heavier flowers toward the center rather than attaching all large decorations to one side. The tall stem should emerge close to the central axis even if its curved tip bends forward.
After assembly, place the centerpiece on its intended surface and test stability from several directions. Reposition any exceptionally heavy decoration if the pumpkin begins leaning.
Crochet Snowflakes for the Winter Arrangement
The cream snowflakes break up the dense flowers and foliage with open negative space. Keep them flat and relatively thin so they remain distinct from the stuffed berries.
Published snowflake patterns demonstrate several useful scales. One free Ravelry design uses DK yarn and a 3.5 mm hook, while finer snowflakes can be made with crochet thread and a 1 mm hook. :chatgpt-content-reference{index=”3″}
A four-round snowflake is enough for this arrangement. More elaborate motifs can disappear behind the evergreen branches and make assembly unnecessarily bulky.
Block each motif separately. Pin all six arms at matching angles and allow the snowflake to dry completely before sewing it to the pumpkin.
Conclusion
Finish the pumpkin body and establish its ribs before making final decisions about the floral crown, because the completed curvature determines where every rose, poinsettia, leaf, and berry spray will sit. Build the arrangement from the back forward: tall stem, evergreen foliage, broad leaves, primary flowers, then smaller winter details. Record the body stitch count and number of shaping channels if a matching centerpiece will be made later. Save this crochet pumpkin centerpiece pattern to Pinterest and share the completed version on Instagram with #PinkChristmasPumpkin. For your centerpiece, will the large cream rose remain the central flower, or will you replace it with a third pink poinsettia?









