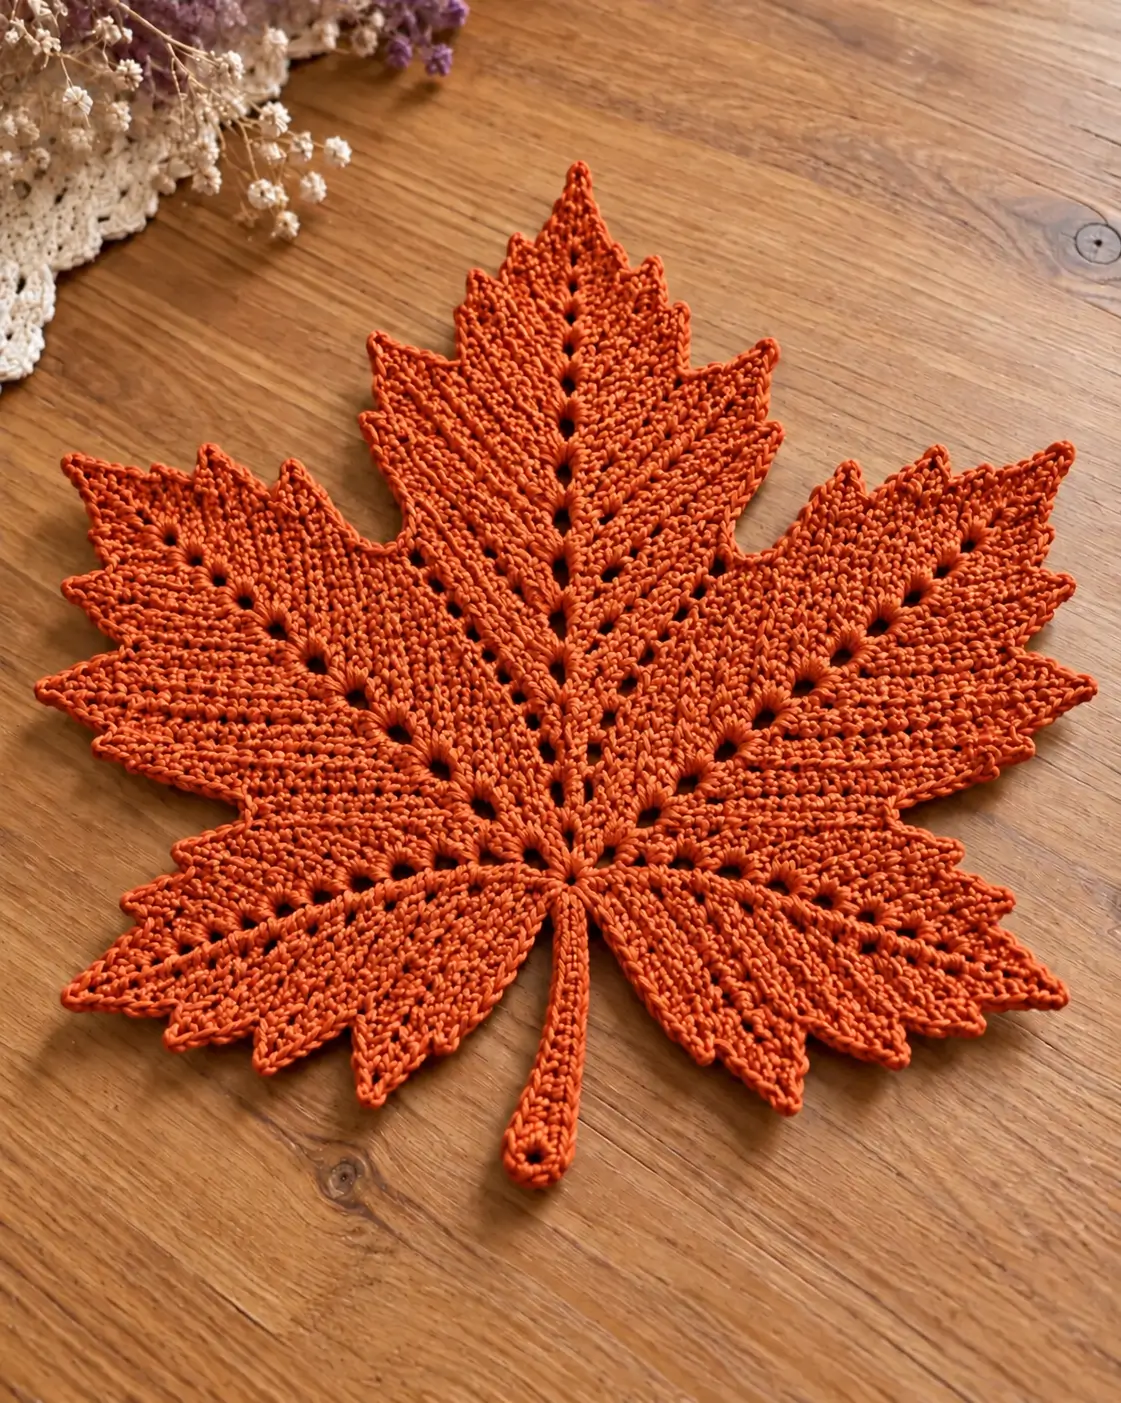
A maple leaf needs five dominant lobes, deep valleys, and a stem aligned with the central point; change those proportions and the silhouette stops reading as maple. This crochet maple leaf placemat pattern recreates the burnt-orange reference as a single-color table mat with pointed sections, open vein lines, dense textured stitches, and an extended stem. Use firm cotton yarn and a hook appropriate to the chosen yarn weight.
The Design: What Makes This Maple Leaf Different
The reference is considerably more structured than a small autumn appliqué. Five main lobes radiate from a compact lower center: one tall central lobe, two broad side lobes, and two lower lobes. Smaller points between those sections create the serrated maple outline.
The second structural feature is the vein system. Narrow open spaces run from the center toward each major lobe, dividing the dense fabric into directional sections. Raised stitches beside those openings make the veins more pronounced without requiring a contrasting yarn.
The third feature is the long narrow stem. It continues directly from the central vein and balances the broad upper half of the crochet maple leaf. A common construction error is making the lower lobes too large. That shifts the silhouette toward a generic star rather than a maple leaf.
Project Info at a Glance
| Skill Level | Construction | Suggested Size | Hook | Best For |
|---|---|---|---|---|
| Intermediate | One-piece shaped motif | Approx. 25–30 cm | 3.5–4 mm | Placemat, table mat, centerpiece, fall décor |
The photograph does not provide an exact physical scale, so its finished dimensions cannot be verified from the image alone. Published maple-leaf patterns show how strongly yarn and hook choice affect size. One sport-weight cotton version made with a 3.5 mm hook measures approximately 18 × 15 cm, while a published thread placemat measures approximately 25 cm across. Larger placemat versions can reach roughly 40 × 48 cm when made with very thick yarn.
Materials and Tools
Yarn
- Burnt orange — DK, sport, or light worsted cotton — allow approximately 50–80 g for one large table motif.
For a firm result similar to the reference, mercerized cotton or another smooth cotton yarn is a practical choice. A documented maple leaf made with category 2 mercerized cotton and a 3.5 mm hook uses approximately 32–34 m for an 18 × 15 cm motif. Increase the yarn allowance when making the larger placemat version.
Tools
- 3.5–4 mm crochet hook
- Tapestry needle
- Scissors
- 8–10 locking stitch markers
- Measuring tape
- Blocking mat
- Rust-resistant blocking pins
Abbreviations
- ch — chain
- sl st — slip stitch
- sc — single crochet
- hdc — half double crochet
- dc — double crochet
- tr — treble crochet
- dtr — double treble crochet
- sp — space
- st/sts — stitch/stitches
- RS — right side
- WS — wrong side
- BLO — back loop only
- FO — fasten off
Invisible decreases are unnecessary because this project is a flat botanical motif rather than a stuffed crochet piece.
Crochet Maple Leaf Placemat Pattern — Step by Step
The following construction is designed around the visible structure of the reference. The leaf develops from a compact central junction into five separately shaped lobes. Open chain spaces create the major vein lines.
Central Base
Yarn: burnt orange.
Ch 6.
Join with a sl st to form a small ring.
Round 1: Ch 1, work 12 sc into ring. Join with sl st. (12)
Round 2: Ch 3, dc in same st, 2 dc in each st around. Join. (24)
Round 3: Ch 1, sc in next 3 sts, ch 2, sk 1 st, sc in next 3 sts; repeat around while distributing five major ch-2 spaces.
The five open spaces establish the directions of the central, upper-side, and lower-side lobes.
Place a marker in every ch-2 space before continuing.
Central Lobe Foundation
Join the working yarn at the ch-2 space directly opposite the stem position.
Row 1: Ch 3, work 5 dc across the central section. Turn.
Row 2: Ch 3, dc in first st, dc across, 2 dc in final st. Turn.
Row 3: Ch 3, dc in each st across. Turn.
Row 4: Ch 3, 2 dc in first st, dc across to final st, 2 dc in final st. Turn.
Continue widening gradually until the central lobe reaches approximately one third of the intended total leaf width.
Central Lobe Vein
The reference contains a narrow opening through the center of each major section.
Next Row: Work dc across to the two center stitches, ch 2, sk 2 sts, then continue dc across. Turn.
Following Row: Dc across, work 2 dc around the ch-2 space, then continue to the end.
Repeat this open-space treatment every second or third row while shaping the lobe.
The openings should form a nearly straight line toward the tip.
Central Lobe Point
Begin decreasing the width after the central lobe reaches its broadest section.
Decrease Row 1: Sl st into first st, ch 3, dc across, leaving final st unworked. Turn.
Decrease Row 2: Repeat the same reduction.
Continue narrowing at both edges until approximately 5 stitches remain.
Tip Row: Ch 2, work hdc, dc, tr, dc, hdc across the remaining section.
Final Point: Ch 3, sl st into second ch from hook, sl st into next ch, then sl st into the center of the tip.
Fasten off.
The central lobe should be the longest point on the finished maple leaf.
Upper Left Lobe
Join yarn at the upper-left marked ch-2 space.
Row 1: Ch 3, work 5 dc across the available base stitches. Turn.
Row 2: Ch 3, 2 dc in first st, dc across, 2 dc in final st. Turn.
Row 3: Ch 3, dc across to center, ch 2, sk 2 sts, continue dc across.
Row 4: Dc across, working 2 dc into the ch-2 space.
Continue for several rows, widening until this lobe reaches approximately 80–85% of the width of the central lobe.
Begin decreasing at both outer edges.
Finish with a pointed tip using:
hdc, dc, tr, ch 2, sl st in second ch from hook, dc, hdc.
Fasten off.
Upper Right Lobe
Join yarn at the corresponding upper-right ch-2 space.
Repeat the upper-left lobe instructions.
Count every row so both upper side lobes contain the same number of shaping rows.
Fold the leaf loosely along its central vein after completing this section. The two upper lobes should overlap closely in length and width.
Lower Left Lobe
Join yarn at the lower-left marked space.
Row 1: Ch 3, work 4 dc across the section. Turn.
Row 2: Ch 3, 2 dc in first st, dc across, 2 dc in final st. Turn.
Row 3: Dc across to center, ch 1, sk 1 st, continue dc across.
Row 4: Dc across, working one dc into the ch-1 space.
Continue widening for fewer rows than used on the upper lobes.
Begin narrowing while the section is still substantially shorter than the upper side lobe.
Finish with a sharp point.
Fasten off.
Lower Right Lobe
Repeat the lower-left lobe instructions at the corresponding right-side space.
The two lower lobes should angle outward and slightly downward rather than extending horizontally.
Fasten off.
Secondary Points
The reference includes smaller teeth between the five major lobes. These points make the outline more botanical and prevent large rounded gaps.
Join yarn in a valley between two major lobes.
Row 1: Ch 1, sc, hdc, 2 dc, hdc, sc across the available edge stitches.
Turn.
Row 2: Sl st in first st, sc, hdc, dc, hdc, sc, leaving the final stitch unworked.
Turn.
Row 3: Sl st, hdc, dc, ch 2, sl st in second ch from hook, hdc, sl st.
Fasten off.
Repeat wherever a secondary point is required between major lobes.
Outer Serrations
Join yarn at the base of one lower lobe.
Work evenly around the complete leaf perimeter.
Along straight sections, use one sc in each edge stitch or row end.
At a small point work:
(sc, hdc, ch 2, sl st in second ch from hook, hdc, sc).
At a major point work:
(hdc, dc, ch 3, sl st in second ch from hook, sl st in next ch, dc, hdc).
At deep valleys between lobes, use a sl st or tight sc.
This change in stitch height produces sharp tips without adding a separate decorative border.
Raised Central Vein
Place the leaf right side up.
Join yarn at the center base where the five sections meet.
Surface sl st directly toward the central lobe.
Follow the line of openings created during construction.
Keep the surface loops relaxed. Tight surface crochet can pull the center lobe inward and cause the entire leaf to cup.
Continue almost to the terminal point.
Fasten off on the wrong side.
Side Veins
Return to the central junction.
Surface sl st diagonally toward the tip of the upper-left lobe.
Stop approximately 1–2 cm before the point.
Fasten off.
Repeat for the upper-right, lower-left, and lower-right lobes.
These raised lines should meet at the same central junction. Avoid crossing one vein over another.
Stem
Join yarn at the center base of the leaf.
Ch 24.
Starting in the second chain from the hook:
Sl st in next 3 ch, sc in next 5 ch, hdc in next 10 ch, sc in remaining chains.
Work 5 sc into the final attachment area and rotate to the opposite side of the foundation chain.
Work back along the second side:
sc, hdc across the middle section, sc near the tip, then sl st into the final 3 sts.
At the end of the stem, work 3 sc around the tip for a rounded finish.
Return to the leaf base and join with a sl st.
Fasten off, leaving a 15 cm tail.
Creating the Dense Ribbed Texture
The reference leaf has pronounced stitch direction running from each vein toward the outer perimeter. Surface crochet can reinforce that effect after the basic leaf has been completed.
Join the yarn close to a major vein.
Work a line of relaxed surface slip stitches parallel to the vein, stopping before the outer serrated edge.
Add a second line approximately one stitch away if additional texture is required.
Do not cover the entire leaf with raised lines. The contrast between flat stitches, vein openings, and selected ridges produces more definition than continuous surface crochet.
Assembly and Finishing
- Lay the completed maple leaf right side up on a blocking mat.
- Pin the central lobe first so its point aligns directly with the stem.
- Position the upper-left and upper-right lobes at matching angles.
- Pin both lower lobes, checking that neither extends farther downward than its opposite section.
- Shape every secondary point individually rather than pulling the entire outer edge at once.
- Straighten the central vein and confirm that all four side veins meet at the same lower junction.
- Pin the stem directly below the central lobe and correct any sideways twist.
- Weave yarn tails through at least 4–5 cm of matching stitches on the wrong side.
- Wet-block or damp-block according to the yarn manufacturer’s care instructions.
- Allow the leaf to dry completely before removing the pins and measuring the final dimensions.
The finished piece should have one dominant central point, four substantial side lobes, smaller serrated points, five visible vein directions, and a stem aligned with the central axis.
7 Technical Tips for a Better Crochet Maple Leaf
- Central lobe leaning: Mark the center stitch before beginning the tallest section. A vein displaced by only two or three stitches can make the entire upper point appear crooked after blocking.
How to Keep a Large Crochet Maple Leaf Flat
A large shaped motif behaves differently from a small appliqué. Each lobe contains increases, decreases, chain spaces, and edge stitches, so small tension differences accumulate across the width.
Check the leaf on a flat surface before finishing every major section. The fabric does not need to be completely flat before blocking, but no lobe should form a deep cup or pronounced ruffle.
Cupping generally indicates insufficient fabric along the outer edge. Rippling indicates excess fabric. Blocking can correct moderate distortion but should not be used to disguise a major stitch-distribution problem.
For the final block, start with the central axis. Pin the central lobe and stem first, then work outward in symmetrical pairs.
How to Make the Maple Leaf Larger
The simplest method is changing yarn weight and hook size. Published patterns demonstrate a wide range: a sport-weight maple leaf made with a 3.5 mm hook measures about 18 × 15 cm, while placemat designs made with much thicker yarn can approach 40 × 48 cm.
For a medium table mat, use firm DK or light-worsted cotton and a 3.5–4 mm hook. For a substantially larger placemat, use heavier cotton with a corresponding hook.
Changing only the hook while keeping thin yarn can create loose openings and reduce stitch definition. Changing yarn and hook together maintains a denser surface.
Make one test lobe or a smaller leaf before committing to several matching placemats.
How to Make a Smaller Maple Leaf
For garlands, coasters, or appliqués, switch to sport-weight cotton and a 3–3.5 mm hook. A documented sport-weight pattern using a 3 mm hook produces a leaf approximately 11.5 × 5 cm, while another sport cotton design using 3.5 mm measures approximately 18 × 15 cm.
Thread crochet can reduce the dimensions further. A smaller leaf still needs the same visual hierarchy: central lobe longest, upper side lobes substantial, and lower lobes shorter.
Do not remove one of the five primary sections merely to reduce the dimensions. Scale the complete structure instead.
Choosing Yarn for a Maple Leaf Placemat
Cotton is particularly useful for a crochet maple leaf placemat because it produces crisp points and responds predictably to blocking. Mercerized cotton adds additional stitch definition to the raised veins.
Sport yarn produces a relatively delicate motif. DK gives the leaf more body without making the outer points excessively thick. Worsted cotton works for a substantial table mat but requires careful attention to hook size.
A very soft acrylic can work for decorative leaves, although sharp points may relax after blocking. Fuzzy yarn obscures the vein openings and serrated outline, so a smooth yarn is a better match for the photographed texture.
Whichever fiber is selected, crochet a small swatch and wash it before beginning if the finished piece will be used regularly on a dining table.
Using the Leaf as a Placemat
A placemat needs more stability than a hanging decoration. Keep the center relatively dense and avoid extremely tall three-dimensional stitches beneath the area where a plate will sit.
The raised vein lines should provide texture without creating large ridges. If the surface crochet becomes too thick, restrict the raised treatment to the outer half of each lobe.
For a complete table set, make every leaf with the same yarn, hook, row counts, and blocking dimensions. Small differences become much more visible when several motifs are positioned together.
Burnt orange closely matches the photographed piece, but rust, mustard, deep red, olive, and cream can be combined across a set while retaining the same construction.
Blocking the Pointed Lobes
Point definition depends heavily on blocking. Damp the finished leaf according to the care instructions for the selected yarn and place it on a measured blocking surface.
Pin the central tip first. Move down to the two upper side points, then the two lower points. Add pins to the smaller serrations only after the five primary lobes are balanced.
Do not pull one side farther simply to create a sharper point. Corresponding left and right sections should remain close in length.
Pin the valleys inward to emphasize the separation between lobes. This step has a major effect on the finished maple silhouette.
Allow the piece to dry fully before removing any pins.
Making a Set of Autumn Maple Leaves
Once the first leaf is complete, record the yarn weight, hook size, central-lobe row count, side-lobe row counts, stem length, and blocked dimensions.
Use those measurements rather than relying on visual comparison for subsequent leaves. Maintaining the same lobe row counts produces a more consistent table set.
Color can change without altering the pattern. A set using burnt orange, mustard, brick red, and muted olive creates variation while retaining matching dimensions.
For a table centerpiece rather than individual placemats, overlap three or five leaves with their stems pointing toward the center. Keep raised sections away from locations intended for glasses or serving dishes.
Conclusion
Block the five major lobes before judging the final silhouette because the deep valleys and sharp points become more defined after shaping. Keep the central lobe longest, align the stem directly beneath it, and use the open vein spaces as reference lines when comparing the left and right halves. For a matching table set, record the hook, yarn, row counts, and blocked measurements from the first successful leaf before beginning the next one. Save this crochet maple leaf placemat pattern to Pinterest and share the finished piece on Instagram with #CrochetMapleLeafPlacemat. Will your next leaf use the same burnt orange or a second autumn shade such as mustard or deep red?









