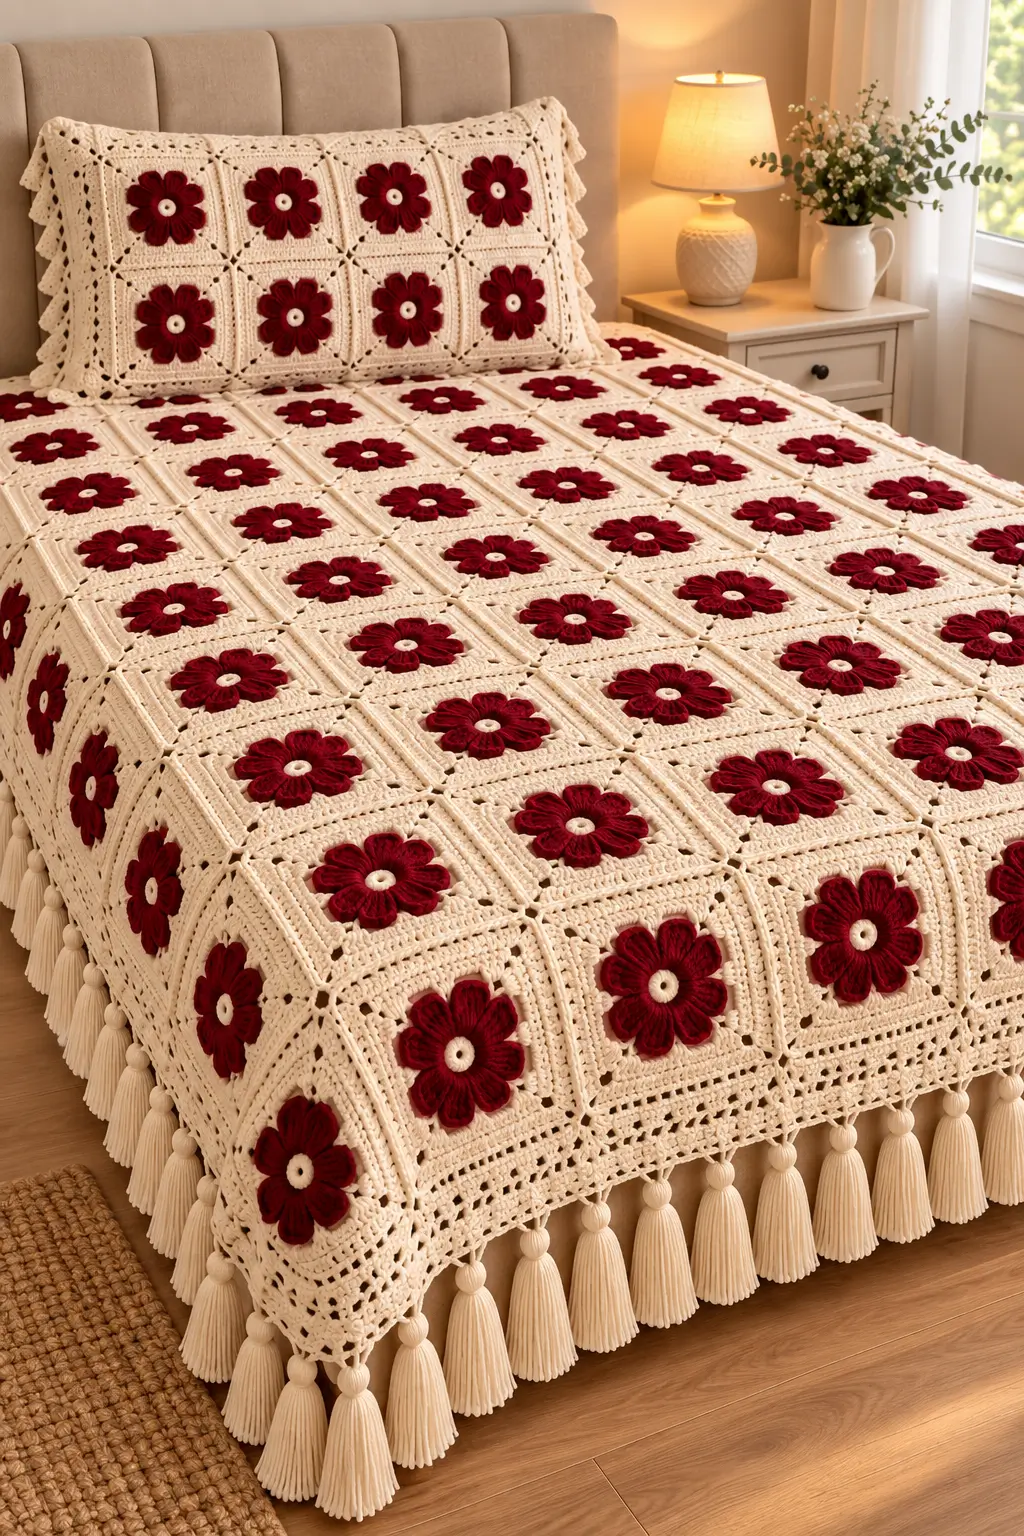
Eight burgundy petals have to remain distinct after the cream square is built around them; that is the defining construction problem in this design. This flower granny square blanket pattern uses DK yarn, a 4.5 mm hook, raised floral motifs, and a tassel border to create a configurable bedspread. The project suits intermediate crochet skills, and its modular construction makes damaged or worn squares individually replaceable.
The Design: What Makes the Burgundy Flower Square Different
The photograph uses contrast more aggressively than a conventional multicolor granny square. Burgundy is confined almost entirely to the raised flower, while cream controls the center, square background, joins, border, and tassels. That separation makes the petals readable from across a room.
Eight petals are used in this photo-inspired version rather than the 12-petal construction found in some published daisy patterns. The burgundy flower granny square below builds eight broad petals before converting the circular motif into a square.
A second structural decision is the open corner. Small chain spaces prevent the cream frame from visually overpowering the flower. A common mistake in a 3D flower granny square is adding too little space behind thick petals; the resulting square cups inward instead of blocking flat.
Project Info at a Glance
| Skill Level | Time | Finished Size | Hook | Best For |
|---|---|---|---|---|
| Intermediate | Modular; varies by grid | Customizable | 4.5 mm | Bedspread, throw, pillow sham |
The 4.5 mm hook and DK/#3 combination works well for a structured floral blanket. Because individual tension, yarn fiber, and motif construction change the final dimensions, crochet one complete sample square and block it before calculating the finished bedspread size.
Materials and Tools
Yarn
For the photo-inspired bedspread, calculate yarn from one completed and blocked sample square before purchasing the entire quantity.
- Cream/ivory — DK/#3 — approximately 1,800–2,400 g for a large bedspread — cotton or cotton-blend DK
- Deep burgundy — DK/#3 — approximately 600–900 g — cotton or cotton-blend DK
- Cream tassel yarn — DK/#3 — included in the cream allowance when sufficient yardage remains
These bedspread quantities are working estimates because the photographed textile cannot be weighed or measured. The final amount depends on square dimensions, mattress size, border width, yarn fiber, gauge, and tassel density.
Tools
- 4.5 mm crochet hook
- Tapestry needle
- Scissors
- Locking stitch markers
- Blocking mats
- Rust-resistant blocking pins
- Measuring tape
- Cardboard tassel template, approximately 14–16 cm long
Abbreviations
- MR — magic ring
- sc — single crochet
- hdc — half double crochet
- dc — double crochet
- tr — treble crochet
- sl st — slip stitch
- ch — chain
- sp — space
- st/sts — stitch/stitches
- BLO — back loop only
- yo — yarn over
Invisible decreases are primarily an amigurumi technique and are not required for this flat floral motif.
Flower Granny Square Blanket Pattern
Work the flower and square in joined rounds. This construction is a photo-inspired interpretation designed around the visible eight-petal flower, cream center, square background, openwork border, and tassel finish.
Cream Flower Center
Yarn: cream.
R1: MR, ch 1, 8 sc into MR; join with sl st to first sc. (8)
R2: Ch 1, 2 sc in each st around; join. (16)
Fasten off and weave the tail securely through the reverse side.
The small cream disk should remain visibly separate from the burgundy petals. If it becomes too large, the flower loses the tight ring-shaped center visible in the reference design.
Burgundy Petals
Yarn: deep burgundy.
Join burgundy to any stitch of R2.
R1: Ch 1, sc in same st, *ch 5, skip 1 st, sc in next st*; repeat around to create 8 ch-5 spaces. Join with sl st. (8 spaces)
R2: Sl st into first ch-5 sp. Work *(sc, hdc, 3 dc, hdc, sc)* in each ch-5 sp around. Join with sl st. (8 petals)
R3: Working behind the petals, *ch 5, sl st around the base connection between adjacent petals* eight times. Join. (8 spaces)
R4: In each rear ch-5 sp work *(sc, hdc, 2 dc, tr, 2 dc, hdc, sc)*. Repeat around. (8 rear petals)
Fasten off. Leave a 15 cm tail if extra anchoring is required.
The second petal layer provides additional depth without increasing the visible flower diameter excessively. Keep both layers loose enough to lie above the cream square rather than being pulled into it.
Cream Foundation Behind the Flower
Yarn: cream.
Join cream into one rear loop between petals.
R1: Ch 1, *sc in rear connection, ch 3* around; join. (8 ch-3 spaces)
R2: Sl st into first space, ch 3, 2 dc in same space, ch 1; *3 dc in next space, ch 1* around; join.
R3: Work *(3 dc, ch 2, 3 dc)* into each selected corner space, with 3 dc in each intermediate space and ch 1 between groups. Position the four corners evenly, two petal spaces apart.
The four corner points should align with the spaces between petals rather than cutting directly through a petal center. Marking the corner positions before crocheting this round helps maintain symmetry.
Cream Square Frame
Yarn: cream.
R4: Sl st to corner. Ch 3, 2 dc, ch 2, 3 dc in corner; *ch 1, 3 dc in each side space to next corner, ch 1, (3 dc, ch 2, 3 dc) in corner*. Repeat around; join.
R5: Repeat the established square structure, adding one additional 3-dc group to each side as the square expands.
R6: Ch 1, sc in each dc and each ch-1 space; in each corner ch-2 space work *(sc, ch 2, sc)*. Join.
Fasten off and weave in the yarn end.
Measure the square without stretching it. Every subsequent motif should finish within approximately 2–3 mm of the blocked sample dimension. Small differences become significant when ten or more motifs are joined across one row.
Making the Remaining Blanket Squares
Make enough identical motifs for the required mattress coverage. The exact number should be calculated from the blocked dimensions of your own square rather than estimated from the photograph.
Measure the mattress or desired blanket dimensions first. Divide the required finished width by the blocked square width, then repeat the calculation for the length.
For example, if one blocked square measures 15 cm and the motif grid contains 12 squares across and 14 squares down, the main square field will measure approximately 180 × 210 cm before accounting for joining and the outer border.
Always calculate the border separately. An 8–12 cm border on each side can add 16–24 cm to the total width and length.
Joining the Granny Squares
Yarn: cream.
Block all motifs before joining. Arrange them with the flowers facing upward and check that every corner is oriented consistently.
Place two adjacent squares together and use a flat slip-stitch join through corresponding edge stitches. One stitch on the first motif should match one stitch on the second motif.
Complete all joins running in one direction first. Rotate the assembled panel and crochet the perpendicular joins.
Do not pull the joining yarn tighter than the square edges. A tight seam shortens the grid line and causes the finished blanket to fold or ridge where the motifs meet.
Outer Crochet Border
Yarn: cream.
R1: Attach cream at any corner. Sc evenly around the complete blanket, working *(sc, ch 2, sc)* at each corner.
R2: Ch 3; dc in each st around. Work *(2 dc, ch 2, 2 dc)* in every corner.
R3: *Dc in next 3 sts, ch 1, skip 1 st* around, adjusting the repeat only where necessary to arrive cleanly at each corner.
R4: Sc in each dc and ch-1 sp. Work *(sc, ch 3, sc)* at the four corners.
R5: *Dc, ch 1, skip 1 st* across each side. Add any adjustment stitches symmetrically rather than concentrating them in one area.
R6: Sc around, placing 3 sc in each corner space.
Continue alternating openwork rounds with stabilizing solid rounds until the border measures approximately 8–12 cm or reaches the required proportion.
Lay the blanket flat after every two border rounds. Ruffling indicates too many stitches. Corners pulling inward indicate insufficient stitches or excessive tension.
Large Cream Tassels
Yarn: cream.
Cut approximately 25–35 strands measuring 30–34 cm for each tassel. Keeping the strand count identical produces a consistent border.
Fold the yarn bundle around a 14–16 cm template. Pass a strong yarn strand through the top fold and knot it tightly.
Remove the bundle from the template. Wrap another strand several times around the complete bundle approximately 2 cm below the top.
Tie securely, hide the knot inside the tassel, then trim the lower strands to an even length.
Make three test tassels before producing the entire set. Attach them temporarily to the border and hang that section over the side of a bed. If the border stretches significantly, reduce the strand count or increase the spacing.
Once the test is satisfactory, make the remaining tassels using the same template, strand count, and wrapping position.
Matching Flower Granny Square Pillow Sham
The photographed set includes a coordinated pillow front using the same burgundy flowers and cream square frames.
Make eight matching motifs and arrange them in two rows of four. Block every square to the same dimensions used for the bedspread.
Join the motifs using the same flat slip-stitch technique. Add cream border rounds until the panel reaches the required pillow dimensions.
The reverse can be made from additional crochet panels or constructed from fabric. An envelope-style back provides access to the pillow insert without placing a zipper directly against the crochet motifs.
Using the same motif dimensions for both pieces maintains the visual relationship between the pillow and bedspread.
Assembly
- Block every flower square to the same measured dimensions.
- Arrange the squares on a flat surface with all flowers facing upward.
- Join squares into horizontal or vertical strips using cream yarn.
- Join those strips across the second axis to complete the blanket grid.
- Lay the panel flat and check every four-square intersection for bunching or distortion.
- Work the first stabilizing border round around the complete grid.
- Add alternating solid and openwork border rounds to the planned width.
- Make one test tassel and confirm its length and weight against the border.
- Produce the remaining tassels to the same measurements and attach them at evenly measured intervals.
- Weave all tails through several reverse-side stitches, trim the ends, and complete the final blocking.
The finished bedspread consists of a stable floral grid, structured cream perimeter, and evenly spaced tassels.
7 Technical Tips for a Better Flower Granny Square Blanket
- Control square distortion: Block every motif to within 2–3 mm of the master square. A 5 mm difference repeated across 12 motifs can shift the finished edge by approximately 6 cm.
- Prevent petal collapse: Leave enough slack in the rear chain spaces for the burgundy petals to remain above the cream foundation. Rear chains worked too tightly pull the flower inward and can produce a cupped motif.
- Close the center firmly: Tighten the magic ring before weaving in the cream center tail. An inadequately secured MR can enlarge after repeated washing and leave an unintended opening.
- Mark all four corners: Identify the corner positions before converting the flower into a square. Moving one corner by a petal interval makes the flower appear rotated inside its frame.
- Control the joining ridge: Keep joining slip stitches at the same tension as the motif edges. Tight joining stitches shorten the seam and cause the blanket to fold along the grid.
- Watch for border ruffling: Count the stitches along equivalent sides after the first border round. Excess stitches produce waves, while insufficient stitches pull the corners inward.
- Test tassel weight: Attach three finished tassels to one section before making the complete set. Dense cotton tassels can stretch an openwork border when the blanket hangs over the edge of a bed.
Planning the Finished Bedspread Size
The safest way to size this project is to work backward from the mattress. Measure the width and length of the top surface, then decide how far the blanket should hang down each side.
Next, crochet and block one complete flower square. Record its exact dimensions. Divide the required motif-field width and length by those measurements and round to whole squares.
Do not include the tassels when calculating functional coverage. Treat them as decorative extensions beyond the finished crochet border.
The same method works when adapting the design into a throw. Fewer squares reduce both yarn consumption and project weight while preserving the proportions of the original flower motif.
Keeping the Burgundy Flowers Consistent
Consistency depends more on repeatable measurements than speed. Make the cream centers in one batch, then complete the burgundy petal sections before moving to the square backgrounds. Batch production makes changes in tension easier to spot.
Measure the flower diameter after the first five motifs. If later flowers become larger, check the height of the double and treble crochet stitches rather than changing the stitch count.
Keep the same burgundy dye lot across the visible blanket surface when possible. A large grid places identical colors directly beside each other, making differences between dye lots more apparent.
Finally, keep one completed blocked motif beside the work area as a physical reference. Compare new squares against it before adding them to the joining pile.
Finishing the Blanket
After the final tassel is attached, inspect the reverse side for loose ends and joining tails. Thread each remaining tail through several stitches on the reverse, change direction once, then trim only after the yarn is secure.
Complete a final blocking based on the care requirements of the selected yarn. Measure opposite edges and diagonals to check that the large rectangle remains square.
Block one complete sample before committing yarn to the full bedspread. Record its width, weight, flower diameter, and cream-to-burgundy yarn consumption; those four measurements provide the most useful basis for calculating materials. Then determine the grid required for your mattress and keep every motif at the same gauge. Photograph the completed flower granny square blanket pattern from directly above to show the joining geometry, then save the project to Pinterest or share the finished arrangement on Instagram with #BurgundyFlowerGrannyBlanket. Would you keep all eight petals in one burgundy shade or use a darker burgundy for the rear petal layer?









