Introduction
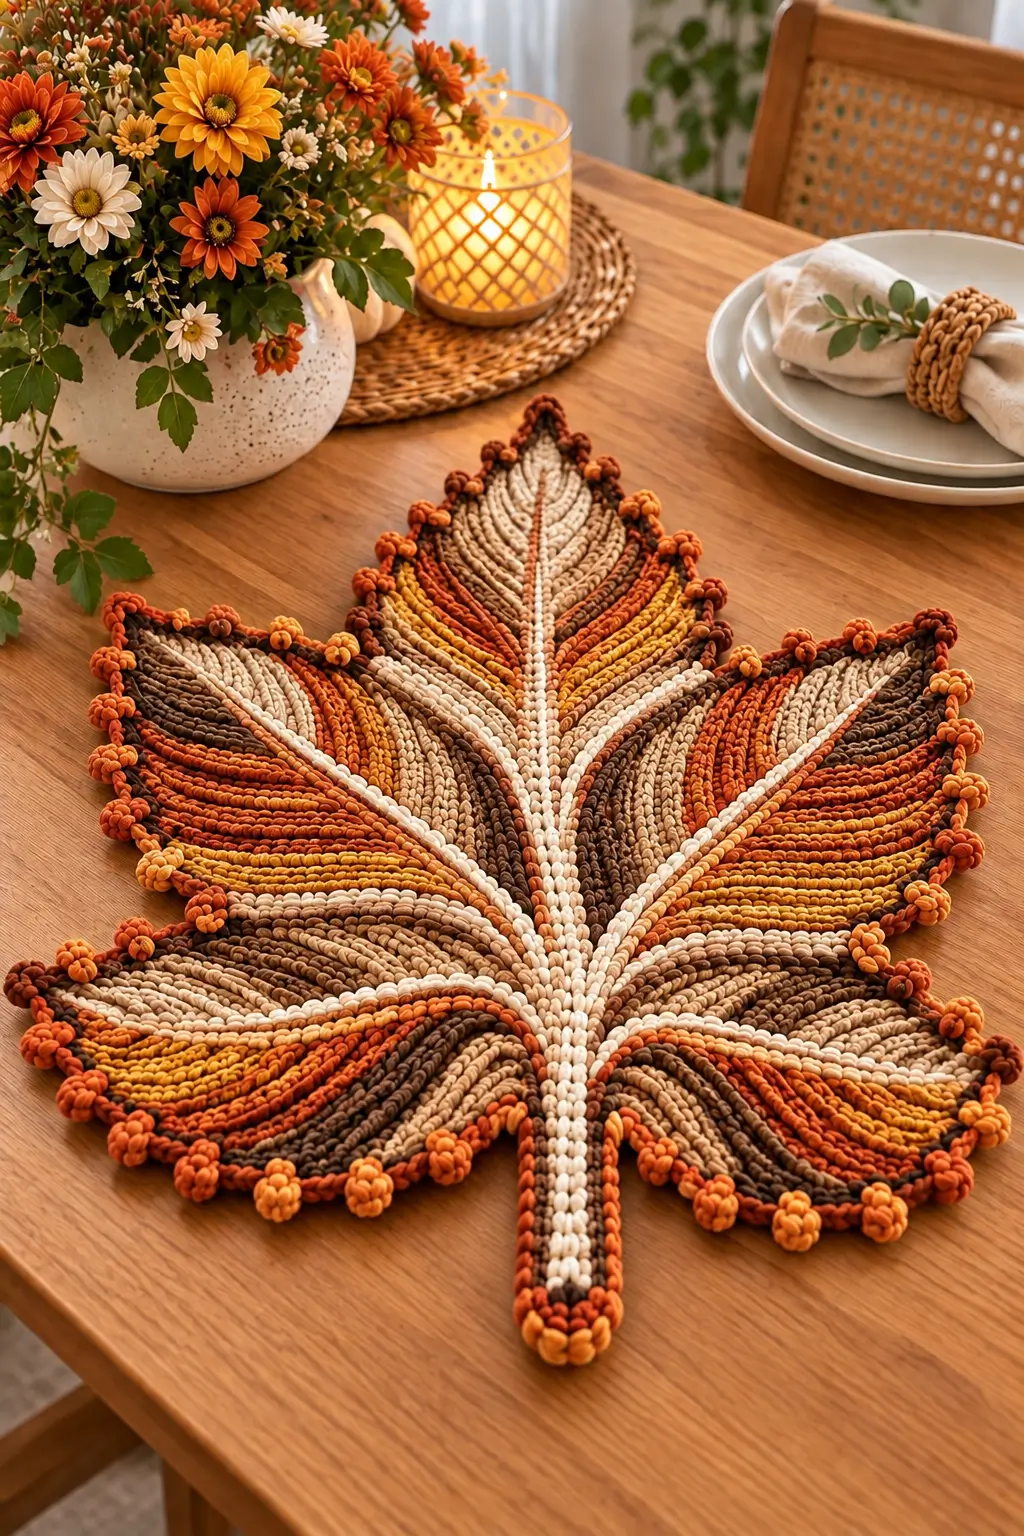
Five pointed lobes and a long central vein are what stop this project from turning into a generic crochet leaf. This maple leaf crochet table mat uses cream, beige, brown, burnt orange and golden yellow to divide the leaf into raised autumn-colored sections. The photographed piece is substantially larger than a standard appliqué, making it suitable as a table centerpiece or decorative mat. This version uses a measurement-based construction so the proportions can be scaled without claiming an exact pattern from the photograph.
The Design: What Makes This Maple Leaf Different
The silhouette depends on five major lobes. The central lobe is the longest, the upper side lobes are slightly shorter, and the two lower lobes spread outward to establish the broad base. Deep valleys between them keep the outline recognizable as a maple leaf.
Color placement provides the second structural feature. Instead of using random autumn stripes, cream lines radiate outward from the center and separate sections of brown, beige, orange and yellow. This creates the appearance of branching leaf veins.
The third feature is texture. Rows run along the direction of each lobe, creating raised channels from the center toward the outer points.
A common failure with a crochet maple leaf rug is adding too many stitches around the outer edge. Excess fabric produces waves and weakens the sharp valleys between the five lobes.
Project Info at a Glance
| Skill Level | Construction | Finished Size | Hook | Best For |
|---|---|---|---|---|
| Intermediate | Flat shaped motif | Adjustable | Match hook to chosen yarn | Table centerpiece, autumn décor, decorative mat |
The photographed project cannot be measured directly. For reference, published maple-leaf crochet patterns range from approximately 10.5 cm motifs to 25.5 × 23 cm placemat-size leaves. A larger table mat should therefore be scaled from gauge and target dimensions rather than copied from those smaller stitch counts.
Materials and Tools
Yarn
A smooth cotton or cotton-blend yarn gives the leaf enough definition for the individual color channels and vein lines. Use one yarn family across all colors so differences in fiber thickness do not distort the sections.
- Cream — main vein and highlight color
- Light beige — secondary neutral sections
- Medium brown — shadow sections
- Dark brown — high-contrast sections
- Burnt orange — primary autumn color
- Golden yellow — highlight sections
- Rust orange — outer edging and decorative bobbles
For a placemat-sized version, worsted-weight cotton is a practical starting point. For a substantially larger decorative rug, a thicker yarn can be substituted, but the hook must be changed to maintain a firm, flat fabric.
Tools
- Crochet hook matched to yarn and gauge
- Yarn needle
- Scissors
- Locking stitch markers
- Measuring tape
- Rust-resistant blocking pins
- Blocking mat
- Optional non-slip backing if the finished piece will be used on the floor
Abbreviations
- ch — chain
- sc — single crochet
- hdc — half double crochet
- dc — double crochet
- tr — treble crochet
- sl st — slip stitch
- st/sts — stitch/stitches
- inc — increase
- BLO — back loop only
- RS — right side
- WS — wrong side
Invisible decreases are unnecessary for the flat leaf body; controlled skipped stitches and decreases at the lobe edges provide cleaner flat shaping.
Gauge and Size Planning
Make a minimum 12 × 12 cm swatch before beginning the full leaf. Use the same yarn, hook and primary stitch intended for the finished project.
Wash and dry the swatch according to the yarn label. Measure the central 10 cm and record both stitch and row gauge.
Next, decide the target height of the leaf from the top of the center lobe to the end of the stem.
Divide the main leaf body into five sections:
- One long central lobe
- Two medium upper-side lobes
- Two broad lower lobes
- One narrow stem
The center lobe should remain the dominant point. If the side lobes become equally long, the finished outline loses the hierarchy visible in a maple leaf.
Pattern — Step by Step
Central Foundation
Yarn: cream.
Begin at the lower center where the stem meets the leaf body.
Chain a foundation long enough to reach the intended tip of the central lobe, excluding the final edging.
Starting in the second chain from the hook, work sc along one side of the foundation.
At the final chain, work additional stitches into the same chain to turn around the point.
Continue along the opposite side of the foundation chain.
This creates a narrow central strip that functions as the primary vein.
Do not make the strip excessively wide. The photograph uses a narrow cream center line compared with the surrounding colored sections.
Central Maple Leaf Lobe
Yarn: cream, beige, brown, orange and yellow.
Work outward from both sides of the central foundation.
Increase gradually through the lower portion so the lobe becomes wider as it approaches its middle.
After reaching the planned maximum width, begin reducing the increase rate.
Near the upper third, decrease at both outer edges to form the taper.
Finish the top with a defined point rather than a rounded cap.
A useful stitch-height progression near a point is:
sc, hdc, dc, tr, point, tr, dc, hdc, sc.
Use a short chain or picot at the highest stitch if a sharper tip is required.
Central Color Sections
The photographed leaf uses elongated wedges rather than horizontal stripes.
Begin with cream along the center vein.
Introduce light beige beside the cream.
Add burnt orange and golden yellow through selected sections.
Place brown near several outer areas to increase contrast.
Each color section should narrow as it approaches either the central vein or outer point. Avoid rectangular color blocks.
Carry no unused yarn across long distances on the reverse. Fasten and rejoin colors where necessary so the back remains manageable.
Upper Left Lobe
Yarn: mixed autumn palette.
Join yarn at the left side of the central body approximately below its midpoint.
Work outward while increasing along both sides of the new section.
Keep the inner edge connected to the central body.
Continue until the lobe reaches approximately three-quarters to four-fifths of the visual length of the central lobe.
Begin tapering.
Use progressively shorter rows or controlled decreases to form the pointed end.
Finish with a sharp tip.
Fasten off.
Upper Right Lobe
Yarn: mixed autumn palette.
Repeat the upper-left construction on the opposite side.
Mirror the shaping rather than copying color placement exactly.
The photograph uses balanced geometry but intentionally varied color sections. A perfectly mirrored color sequence can make the mat look more graphic and less organic.
Measure both upper lobes before working the border.
The distance from the center vein to each tip should be close enough to preserve visual balance.
Lower Left Lobe
Yarn: cream, beige, brown, rust and golden yellow.
Join yarn below the upper-left lobe.
Increase more rapidly than for the upper lobe because the lower section needs additional width.
Work outward and slightly downward.
Maintain a deep valley between the upper and lower lobes.
After reaching maximum width, taper toward the lower-left point.
The lower lobe should be broad but shorter than the center point.
Fasten off after completing the tip.
Lower Right Lobe
Yarn: mixed autumn palette.
Mirror the structural shaping of the lower-left lobe.
Check the width against the opposite side every few rows.
Do not rely only on row counts if color changes alter tension. Measure the actual fabric.
Taper gradually toward the final point.
Fasten off.
Creating the Deep Valleys
The spaces between lobes require deliberate shaping.
As a row approaches a valley, change from taller stitches to shorter stitches:
dc, hdc, sc, sl st.
Begin the next rising edge with the reverse sequence:
sl st, sc, hdc, dc.
If the valley begins to ripple, reduce the number of stitches placed in the lowest section.
If it pulls upward and refuses to lie flat, add a controlled stitch before the next rising edge.
Make adjustments symmetrically where possible.
Raised Cream Veins
Yarn: cream.
The strong vein network is one of the defining features of the photographed mat.
Start at the center base.
Surface crochet or slip stitch along the central line toward the top point.
Return to the center.
Create one diagonal vein toward each upper lobe.
Add another vein toward each lower lobe.
The result should create five primary divisions radiating from one central junction.
Keep surface stitches loose enough that the fabric remains flat. Tight slip stitches can shorten the leaf body and make the lobes curl upward.
Secondary Vein Texture
Yarn: matching colors or cream.
Work smaller raised lines parallel to selected color sections.
These can be created with surface slip stitches or by working sections through one loop during the main construction.
Direct each line toward a lobe point.
Avoid adding lines perpendicular to the primary veins because that changes the visual flow seen in the reference image.
Outer Maple Leaf Border
Yarn: rust orange or dark brown.
Join yarn near the base of the leaf.
Work sc evenly around the first lower lobe.
At the point, work:
sc, ch 2, sl st into the second chain from the hook, sc.
Continue toward the first valley.
Reduce stitches inside the valley if the edging begins to wave.
Work upward around the next lobe.
Repeat the pointed treatment at each major tip.
Continue around all five lobes until reaching the opposite side of the base.
Check the mat on a flat surface before fastening off.
Decorative Bobble Edging
Yarn: burnt orange and golden yellow.
The reference image includes small rounded decorative elements distributed around the perimeter.
Work these as compact bobbles or popcorn-style clusters at measured intervals.
For a compact bobble, work several partially completed dc stitches into one location, then close their remaining loops together.
Secure with the following stitch.
Space the bobbles farther apart along straight edges and slightly closer near broad curves if required.
Do not place a large bobble directly inside a deep valley. Extra bulk there can soften the indentation that defines the lobes.
Alternate rust and golden-yellow accents where desired.
Crochet Stem
Yarn: cream, brown and rust.
Join yarn at the central base of the leaf.
Chain to the desired stem length.
Starting in the second chain from the hook, work sc back toward the leaf.
Work around the base and continue along the opposite side of the chain to create a narrow two-sided stem.
Add a second row if more width is required.
Work cream through the center if matching the photographed vein structure.
Finish both outer sides with brown or rust.
Round the lower end with several stitches distributed through the final chain.
Fasten off and weave the tail into the reverse side.
Stem Border
Yarn: rust orange.
Join yarn at one side of the stem where it meets the main leaf.
Work sc down the outer edge.
Place two or three stitches around the bottom curve.
Continue up the opposite side.
Join at the leaf body.
Check that the stem lies directly on the center axis. A stem that angles left or right makes an otherwise symmetrical leaf appear distorted.
Blocking the Maple Leaf
Blocking is particularly important for this design because five separate points and four deep valleys must hold their positions.
Lay the finished piece on a blocking surface.
Align the stem and central lobe along one straight imaginary axis.
Pin the center point first.
Pin the two upper-side points at equal distances from the center line.
Repeat with the two lower points.
Only after those five points are positioned should the valleys be pinned.
Shape each valley inward without overstretching the stitches.
Pin the stem last.
Allow the piece to dry completely before removing the pins.
Assembly and Finishing
- Lay the completed maple leaf flat and confirm that all five major lobes are clearly defined.
- Compare the upper-left and upper-right lobe lengths and correct minor shaping differences during blocking.
- Repeat the measurement for the two broad lower lobes.
- Check that all cream vein lines meet at the same visual center near the base of the leaf.
- Secure every color-change tail on the reverse without pulling the surrounding stitches tighter.
- Complete the rust-colored perimeter and check every valley for unwanted ruffling.
- Add the decorative bobbles only after the primary border lies flat.
- Finish the stem and align it with the central lobe before blocking.
- Block all five points and four valleys into their final positions.
- Add an appropriate non-slip backing if the project will be placed on a smooth floor rather than used as a table mat.
The finished project should have five defined maple points, a centered stem, radiating cream veins and alternating autumn-colored sections.
7 Technical Tips
- Prevent rounded maple points: Increase stitch height toward each tip and reduce it immediately afterward. Working the same stitch height across the entire lobe produces a rounded fan instead of a defined point.
- Control rippling: Lay the project flat after every major lobe. If the outer edge forms waves, too many stitches have been added and the excess should be corrected before the border is worked.
- Protect the valleys: Use shorter stitches and fewer border stitches at the deepest point between two lobes. Adding clusters in a valley fills the indentation and weakens the maple silhouette.
- Keep the veins flat: Surface slip stitches should match the resting length of the fabric underneath them. Tight surface crochet can shorten a section by several centimeters on a large mat.
- Control color tension: Measure each lobe after changing yarn colors. Even yarns sold in the same nominal weight can behave differently enough to shift a large point out of alignment.
- Place bobbles after shaping: Complete and inspect the plain outer border before adding raised clusters. Bobbles can hide a tension problem that would be easier to correct at the sc-border stage.
- Align the stem precisely: Mark the center of the lower edge before attaching or extending the stem. A displacement of even 2–3 cm becomes conspicuous on a large symmetrical autumn crochet leaf mat.
Color Placement Guide
The photograph uses color direction as part of the construction rather than treating each lobe as one solid shade.
Keep cream concentrated around the primary veins and central sections. Place light beige next to cream to create a gradual transition before introducing stronger colors.
Use burnt orange through several large wedges, especially toward the outer half of each lobe. Add golden yellow in narrower sections so it remains an accent rather than dominating the mat.
Place medium and dark brown beside cream or orange to create strong separation between adjacent channels.
Do not mirror every color exactly from left to right. Keep the lobe dimensions balanced while allowing the internal color sequence to vary.
How to Scale the Pattern
A maple leaf motif can be enlarged only to a limited degree by changing yarn and hook size. For a substantial table centerpiece, additional rows are usually needed as well.
Start by selecting the desired overall leaf width. Use the washed gauge swatch to calculate how many stitches are required across the broadest lower section.
Increase all major dimensions proportionally: central-lobe length, side-lobe length, lower-lobe width and stem length.
Do not enlarge only the center lobe. Doing so creates a narrow spear-shaped leaf rather than the broad maple profile shown in the photograph.
Likewise, increasing only the lower lobes makes the leaf bottom-heavy.
Make a paper outline at the target size if necessary. Place the crochet over that outline during construction and compare the five points after every major shaping section.
Conclusion
The five-lobe silhouette should control every construction decision in this maple leaf crochet table mat. Establish the central vein first, keep the two upper lobes shorter than the center point, broaden the lower pair, and preserve deep valleys before adding decorative edging. Make a gauge swatch and choose the target width before calculating a large version; enlarging a small appliqué without checking proportions can distort the leaf. Block the completed piece with all five points pinned independently, then add non-slip backing when floor use requires it. Share the finished autumn color arrangement on Pinterest or Instagram with #AutumnMapleLeafCrochet. Which section would you emphasize most: burnt orange, golden yellow or dark brown? “`1









