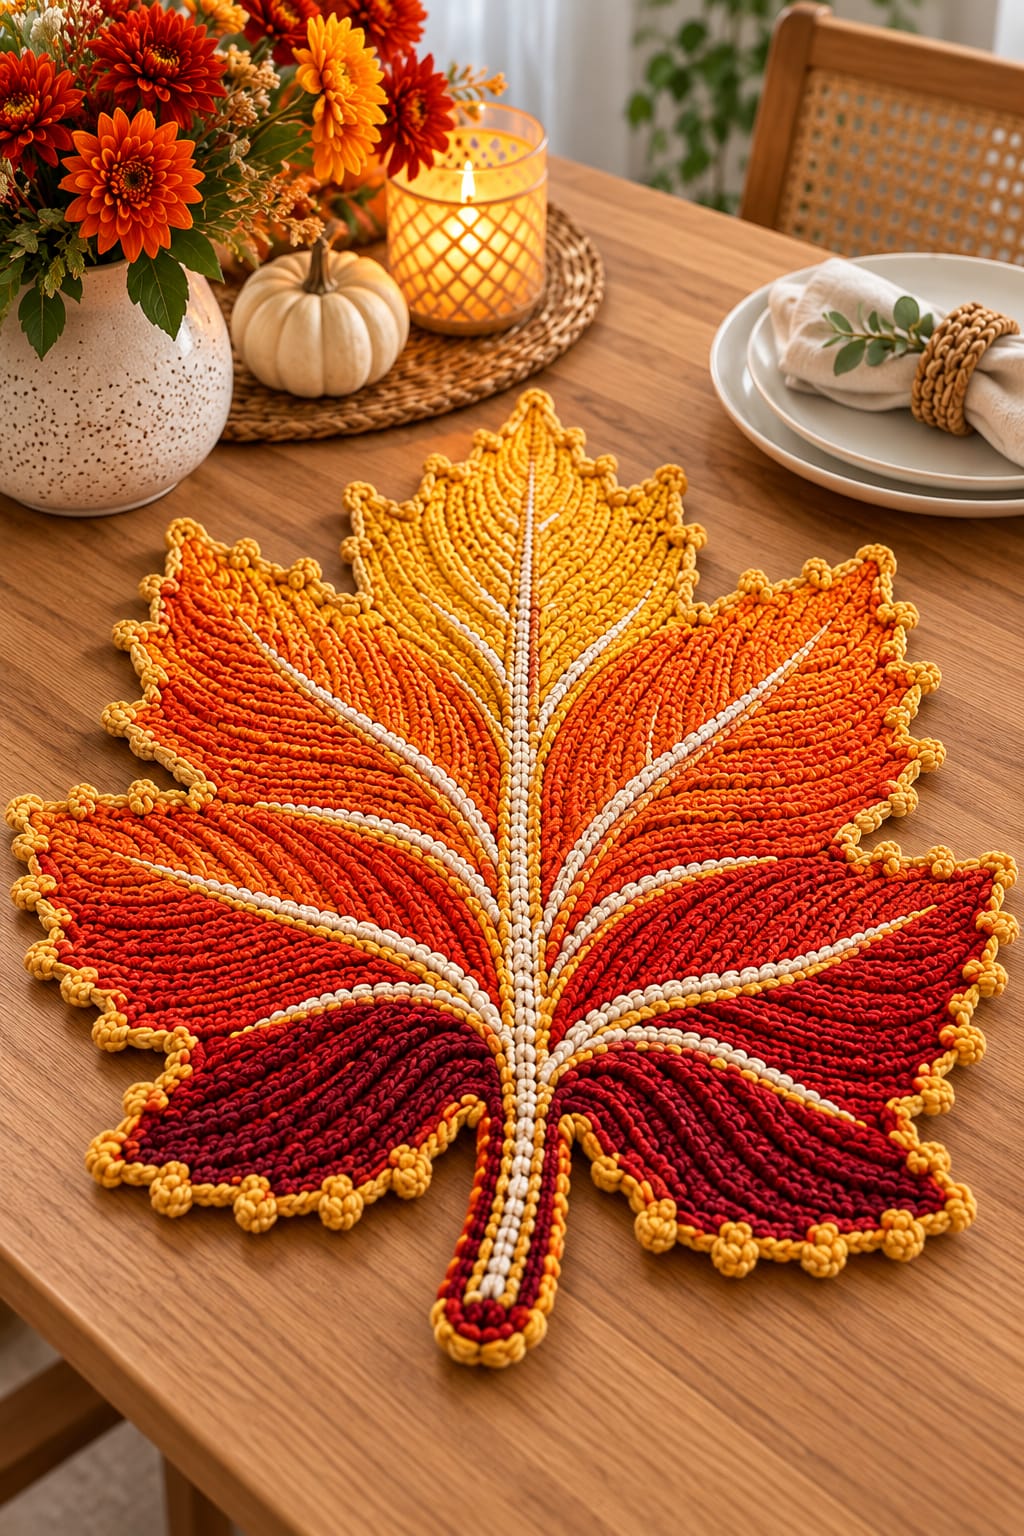
A maple leaf stops reading correctly when its five lobes lose their hierarchy: the center must rise highest, the upper sides must spread widest, and the two lower lobes must turn toward the stem. This crochet maple leaf placemat pattern recreates that structure with graduated burgundy, red, orange and golden-yellow sections, cream raised veins and a mustard picot-style border. Worked in cotton, it makes a substantial autumn table mat for fall or Thanksgiving settings.
The Design: What Makes This Autumn Maple Leaf Different
Color follows the anatomy of the leaf rather than appearing as random stripes. Burgundy occupies the lower lobes, red and burnt orange move through the middle, and golden yellow finishes the central point. The progression makes the leaf appear to be changing color from base to tip.
Raised cream veins provide the second defining feature. One central vein runs from the stem to the top point, while four major side veins branch toward the principal lobes. These lines divide a large crochet surface into recognizable leaf sections.
The perimeter uses small mustard points instead of a heavy lace border. This preserves the jagged maple silhouette. The main technical failure with a large crochet maple leaf placemat is uncontrolled edge increases, which produce waves instead of crisp points.
Project Info at a Glance
| Skill Level | Time | Finished Size | Hook | Best For |
|---|---|---|---|---|
| Intermediate | Approx. 6–9 hours | Approx. 35–38 cm wide | 4–5 mm | Fall tables, Thanksgiving place settings and centerpieces |
A finished width around 35–38 cm is an appropriate target for a full placemat. Published maple-leaf placemats include an Aran-weight version measuring approximately 14.5 × 15 inches with a 5 mm hook. Smaller worsted-cotton leaves can measure about 10 × 9 inches with a 3.5 mm hook. Final dimensions depend on yarn, gauge and blocking.
Materials and Tools
Yarn
- Burgundy — worsted-weight cotton — approximately 25–35 g.
- Deep red — worsted-weight cotton — approximately 25–35 g.
- Burnt orange — worsted-weight cotton — approximately 30–40 g.
- Golden yellow — worsted-weight cotton — approximately 25–35 g.
- Cream — worsted-weight cotton — approximately 15–20 g for raised veins.
- Mustard — worsted-weight cotton — approximately 15–20 g for the border.
A smooth cotton yarn gives the raised lines and pointed edges better definition. One published worsted-cotton maple leaf uses approximately 85–91 m of yarn with a 3.5 mm hook, while a larger Aran-weight placemat lists approximately 139 m with a 5 mm hook.
Tools
- 4–5 mm crochet hook
- Stitch markers
- Tapestry needle
- Scissors
- Tape measure
- Blocking mat
- Rust-resistant blocking pins
Abbreviations
- ch — chain
- sc — single crochet
- hdc — half double crochet
- dc — double crochet
- tr — treble crochet
- sl st — slip stitch
- inc — increase
- dec — decrease
- st/sts — stitch/stitches
- sp — space
- sk — skip
- BLO — back loop only
Keep decreases compact at the valleys between lobes. Loose decreases make those indentations round and weaken the maple-leaf silhouette.
Autumn Crochet Maple Leaf Placemat Pattern
This is a photo-inspired construction rather than a transcription of another designer’s pattern. The project uses separately shaped lobe sections, coordinated color changes, surface-crochet veins and a final pointed border.
Central Foundation
Yarn: burgundy.
Ch 17.
Row 1: Sc in second ch from hook and across (16).
Row 2: Ch 1, turn, sc across (16).
Row 3: Ch 1, turn, 2 sc in first st, sc across to final st, 2 sc in final st (18).
Row 4: Ch 1, turn, sc across (18).
Row 5: Ch 1, turn, 2 sc in first st, sc across to final st, 2 sc in final st (20).
Row 6: Ch 1, turn, sc across (20).
Mark the midpoint of the foundation. Every major section should radiate away from this central position.
Central Upper Lobe
Begin with burnt orange and change gradually to golden yellow.
Join yarn to the center section.
Row 1: Ch 1, sc across the selected center stitches.
Row 2: Ch 1, turn, 2 sc in first st, sc across to final st, 2 sc in final st.
Row 3: Sc across.
Row 4: Repeat Row 2.
Rows 5–8: Sc across.
Change from orange to golden yellow.
Row 9: Ch 1, turn, sc2tog, sc across to final 2 sts, sc2tog.
Row 10: Sc across.
Rows 11–18: Repeat Rows 9–10 four times.
Continue decreasing at both edges every other row until 3 stitches remain.
Final Row: Sc3tog.
Fasten off.
This point should extend farther from the center than every other lobe.
Upper Left Lobe
Yarn: burnt orange.
Join yarn to the upper-left section, leaving a distinct valley between this lobe and the central point.
Row 1: Sc evenly across the selected stitches.
Row 2: Ch 1, turn, 2 sc in first st, sc across to final st, 2 sc in final st.
Row 3: Sc across.
Row 4: Repeat Row 2.
Rows 5–8: Sc across.
Row 9: Ch 1, sc2tog, sc across to final 2 sts, sc2tog.
Row 10: Sc across.
Repeat Rows 9–10 until 3 stitches remain.
Final Row: Sc3tog.
Fasten off.
Upper Right Lobe
Yarn: orange.
Repeat the upper-left lobe instructions on the opposite side.
Use exactly the same number of rows. Measure from the center to both tips before fastening off permanently.
Middle Left Lobe
Yarn: deep orange changing to red.
Join yarn below the upper-left lobe.
Row 1: Sc across the selected section.
Row 2: Ch 1, turn, 2 sc in first st, sc across, 2 sc in final st.
Row 3: Sc across.
Row 4: Repeat Row 2.
Rows 5–7: Sc across.
Change to red.
Row 8: Ch 1, sc2tog, sc across to final 2 sts, sc2tog.
Row 9: Sc across.
Repeat Rows 8–9 until 3 stitches remain.
Final Row: Sc3tog.
Fasten off.
Middle Right Lobe
Yarn: burnt orange changing to red.
Repeat the middle-left lobe instructions as a mirror image.
Keep the point at approximately the same horizontal level as its partner.
Lower Left Lobe
Yarn: deep red changing to burgundy.
Join yarn at the lower-left portion of the foundation.
Row 1: Sc across.
Row 2: Ch 1, turn, 2 sc in first st, sc across, 2 sc in final st.
Row 3: Sc across.
Row 4: Repeat Row 2.
Rows 5–6: Sc across.
Change to burgundy.
Row 7: Ch 1, sc2tog, sc across to final 2 sts, sc2tog.
Row 8: Sc across.
Repeat the decrease sequence until 3 stitches remain.
Final Row: Sc3tog.
Fasten off.
Lower Right Lobe
Work as for the lower-left lobe.
Use the same red-to-burgundy color transition and identical row count.
Fasten off.
Adding Smaller Maple Points
The large lobes establish the overall structure, but the photograph also has smaller teeth along the perimeter.
Join the appropriate body color along an outer edge.
Work sc toward the position of the first small point.
At that position work:
(Hdc, dc, tr, ch 2, sl st in second ch from hook, tr, dc, hdc) in the same edge space.
Continue in sc toward the next point.
Repeat around the outer edges where additional serrations are required.
Keep these points substantially shorter than the seven main lobe tips.
Central Cream Vein
Yarn: cream.
The central vein runs continuously from the stem through the center of the leaf and toward the highest yellow point.
Insert the hook at the lower center and pull up a cream loop.
Work surface slip stitches through the center line toward the upper point.
Keep the stitches loose enough for the leaf to remain flat.
Stop approximately 1 cm before the upper point.
Fasten off on the back.
Upper Side Veins — Make 2
Yarn: cream.
Begin near the lower center beside the main vein.
Surface crochet diagonally toward each upper side lobe.
Follow the direction of the stitches rather than crossing the fabric horizontally.
Stop approximately 1–2 cm before each lobe tip.
Fasten off.
Lower Side Veins — Make 2
Repeat the surface-crochet technique toward the two lower lobes.
Keep the beginning points close together at the center. The five major veins should appear to originate from one junction.
Secondary Vein Branches
The photographed leaf includes narrow cream lines branching from the main veins.
Join cream yarn at a major vein.
Work a short line of surface slip stitches diagonally toward the edge.
Each branch should measure approximately 3–6 cm depending on its location.
Add branches symmetrically on both sides without filling every available row.
Fasten off and weave the tails into the back.
Maple Leaf Stem
Begin with burgundy and reserve cream for the central stripe.
Join burgundy yarn at the lower center.
Ch 27.
Starting in the second chain from the hook, sc in each chain back toward the leaf.
Work along the opposite side of the foundation chain.
At the bottom tip, work 3 sc around the final chain.
Join to the leaf with sl st.
Fasten off.
Attach cream yarn at the center of the stem and work surface slip stitches from the bottom tip upward until the line joins the main central vein.
Mustard Pointed Border
Yarn: golden mustard.
Join yarn at the bottom of the stem.
Work sc evenly around the stem and complete leaf perimeter.
At each large outer point work:
(Sc, ch 2, sc) in the point stitch.
At smaller decorative points work:
(Sc, ch 3, sl st in first ch, sc) in the same edge space.
At a deep inner valley, work sc2tog when necessary to pull the edge inward.
Continue around the entire leaf.
Join with sl st.
Fasten off and weave in the tail.
Optional Knotted Border Detail
The reference image has rounded mustard details around the perimeter. These can be reproduced with compact picot clusters.
At every second or third outer-edge interval work:
Ch 3, sl st in first ch.
For a larger rounded point:
Ch 4, 2 sc in second ch from hook, sl st into next 2 chains.
Return to the border and continue in sc.
Do not add a cluster to every stitch. Excessive border stitches will make the leaf ruffle.
Creating the Autumn Color Gradient
The color sequence is part of the design rather than an arbitrary yarn change. Keep the darkest burgundy around the stem and lower lobes. Move into deep red across the lower-middle sections, then burnt orange through the broad side lobes. Golden yellow belongs primarily in the upper central section.
Change colors at the end of a row whenever possible. Complete the final yarn-over of the preceding stitch with the new color so the transition remains compact.
For a softer transition, alternate old and new colors across two rows. For example, work one row mostly in red with selected orange stitches, followed by a predominantly orange row.
Do not carry five colors continuously around the entire project. Cut and weave unused colors when they will not be required for several rows; otherwise the reverse side becomes bulky.
Blocking the Crochet Maple Leaf
- Dampen the finished leaf according to the yarn manufacturer’s care instructions.
- Place the leaf face up on a blocking mat and straighten the cream central vein first.
- Pin the highest golden-yellow point directly above the stem.
- Pin the two upper side lobes at matching angles.
- Position the middle orange-red lobes so the overall width is balanced.
- Pull the two burgundy lower lobes outward and slightly downward.
- Pin every deep valley toward the center to separate the major lobes.
- Shape each small mustard border point individually rather than stretching the whole edge.
- Straighten the stem and check that its cream stripe aligns with the central vein.
- Allow the placemat to dry completely before removing the pins.
The blocked piece should lie flat with a clearly visible central axis, balanced side lobes and sharply defined valleys.
7 Technical Tips for a Better Autumn Maple Leaf
- Prevent a crooked central vein. Mark the center of the foundation before shaping any lobes. The cream vein should form one visual line from the stem to the highest yellow point.
- Stop the mustard border from ruffling. Add extra stitches only at convex points and reduce stitches inside deep valleys. A border that gains stitches continuously will no longer lie flat.
- Keep paired lobes symmetrical. Record the row count for the first side lobe and repeat it exactly on the opposite side. A difference of two rows is noticeable on a 35–38 cm placemat.
- Avoid tight surface crochet. Lay the leaf flat after every 5–7 cm of cream vein stitching. If the fabric curls toward the vein, remove those stitches and work them with less tension.
- Protect the autumn gradient. Change colors at consistent structural positions rather than at random points. Uneven transitions can make one side of the leaf appear darker or visually heavier.
- Keep the valleys deep. During blocking, pin each indentation separately toward the center. Pinning only the outer tips allows the valleys to relax into a rounded outline.
- Control stem proportions. Aim for a finished stem approximately 2–3 cm wide on a 35–38 cm placemat. A substantially wider stem competes visually with the lower burgundy lobes.
Using the Maple Leaf as a Fall Placemat
Place the dining plate over the broad central portion while leaving several colored points exposed around the sides. The stem can face the diner or point toward the center of the table depending on the place-setting layout.
For a coordinated Thanksgiving set, keep the cream veins and mustard border identical while varying the body colors. One leaf can move from burgundy to orange, another from brown to gold, and a third from olive green to mustard.
Use the same yarn brand and hook size across the entire set. Even when row counts match, changing yarn construction can alter the width and stiffness enough to make the placemats noticeably different.
The piece can also function as a fall centerpiece beneath a vase, decorative pumpkin or flameless candle arrangement. Do not assume a decorative crochet placemat is suitable as a hot pad unless the selected fiber and finished thickness are appropriate for that purpose.
How to Make a Smaller or Larger Maple Leaf
For a smaller decorative leaf, use sport-weight cotton with a 3–3.5 mm hook. Published sport-cotton maple leaves can finish around 7 × 6 inches, making that combination better suited to coasters, appliqués and smaller table decorations.
For a standard place setting, worsted or Aran cotton with a 4–5 mm hook produces a more substantial surface. A published Aran-weight maple leaf placemat measures approximately 14.5 × 15 inches with a 5 mm hook.
When resizing, maintain the relative lengths of every lobe. Do not simply add rows to the central point. The upper side lobes, lower lobes, stem and vein branches all need proportional adjustments.
Finishing the Raised Veins
Inspect the reverse side before the final blocking. Cream yarn tails should be woven into nearby cream surface stitches or into body stitches of a similar shade where possible.
Do not pull the tails tightly after weaving. Surface crochet already places additional tension across the colored fabric, and tightening the ends can create small puckers.
Check the junction where all major veins meet. If several cream lines create excessive bulk at one point, weave their tails in different directions rather than stacking every end beneath the central vein.
Once the veins lie flat, complete the final blocking and shape every mustard point while the cotton remains damp.
Conclusion
Build the leaf around its vein structure rather than treating the cream lines as decoration added without reference points. The central vein establishes the axis, the side veins determine the major lobe angles, and the mustard border sharpens the finished silhouette. Before making a complete table set, finish and block one autumn crochet maple leaf placemat pattern as a gauge sample and record its final width, lobe row counts and color-change positions. Save the finished design to Pinterest or share your table setting on Instagram with #AutumnGradientMapleLeaf. For this specific leaf, would you keep the burgundy-to-yellow gradient or reverse it so the darkest color appears at the upper point?









