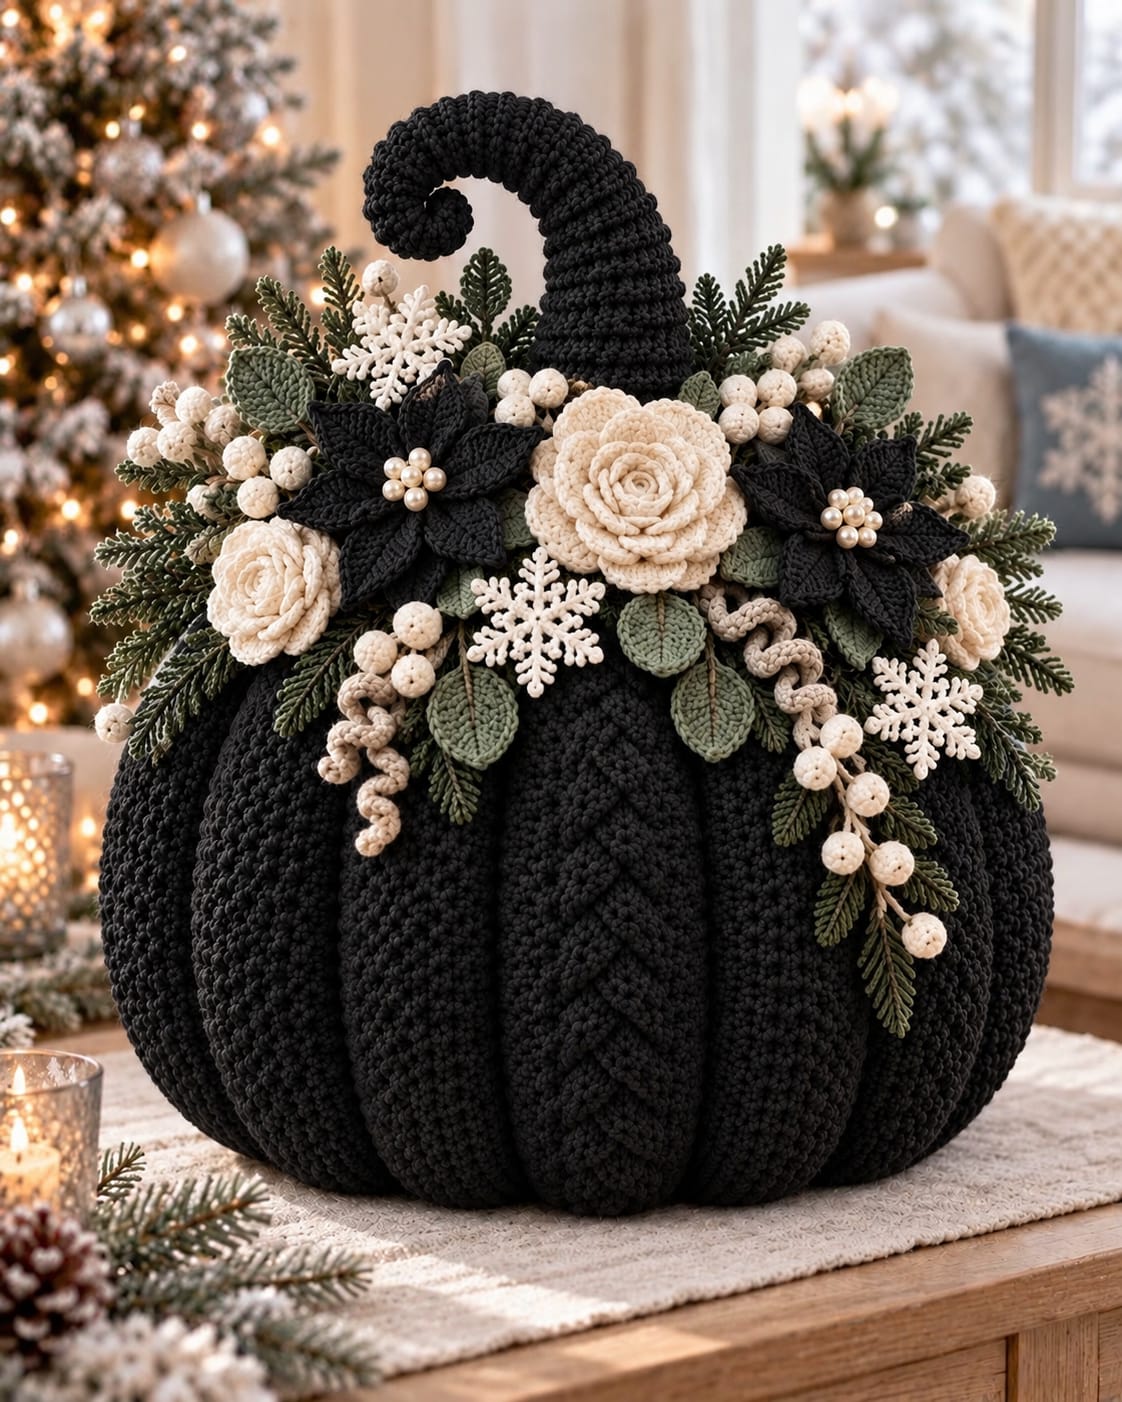
A black pumpkin topped with a curled stem, poinsettias, roses and snowflakes has to solve two structural problems at once: deep pumpkin ribs and enough crown support for a heavy floral arrangement. This black crochet pumpkin pattern uses a stuffed ribbed body, reinforced curved stem and separately crocheted winter decorations. The finished piece is designed as a large Christmas centerpiece rather than a small amigurumi pumpkin.
The Design: What Makes This Winter Pumpkin Different
The photographed pumpkin is unusually wide and heavily segmented. Eight pronounced ribs run vertically from the crown to the base, creating the rounded pumpkin profile without relying only on stuffing. A dark monochrome body also makes the cream flowers, sage leaves and white berries more visible.
The second structural feature is the oversized curled stem. A normal narrow pumpkin stalk would disappear behind the floral arrangement, so this version uses a thick stuffed tube with internal shaping.
Finally, the crown combines several types of crochet Christmas decoration: black poinsettias, cream roses, snowflakes, leaves, berries and spiral vines. Keeping those elements separate allows each component to be positioned after the crochet pumpkin centerpiece has been stuffed and shaped.
Project Info at a Glance
| Skill Level | Time | Finished Size | Hook | Best For |
|---|---|---|---|---|
| Intermediate/Advanced | Approx. 12–16 hours | Approx. 30–35 cm wide | 4.5–5 mm | Christmas centerpiece and winter decor |
The photograph does not provide a physical scale, so the 30–35 cm measurement is a target for this photo-inspired version rather than a measurement taken from the pictured object. Published crochet pumpkins range from approximately 5 cm miniatures to 15-inch decorative versions, demonstrating how strongly yarn, construction and stuffing affect finished dimensions.
Materials and Tools
Yarn
- Black — worsted-weight yarn — approximately 350–450 g for the pumpkin body, stem and black flowers.
- Cream — worsted or DK yarn — approximately 80–100 g for roses, berries and snowflakes.
- Sage green — DK/worsted yarn — approximately 50–70 g for leaves.
- Dark forest green — approximately 50–70 g for evergreen-style foliage.
- Beige — approximately 20 g for spiral vines.
Tools
- 4.5–5 mm crochet hook
- 3–3.5 mm hook for smaller flowers and snowflakes
- Polyester fiberfill
- Yarn needle
- Stitch markers
- Scissors
- Long upholstery needle for pumpkin shaping
- Optional craft wire for the curved stem
- Pearl-style beads for flower centers
If wire is used inside the stem, keep both ends folded and completely enclosed so no sharp end can work through the crochet fabric.
Abbreviations
- MR — magic ring
- sc — single crochet
- hdc — half double crochet
- dc — double crochet
- tr — treble crochet
- inc — increase
- dec — decrease
- sl st — slip stitch
- ch — chain
- BLO — back loop only
- FLO — front loop only
- st/sts — stitch/stitches
Use an invisible decrease when reducing the stuffed sections: insert the hook through the front loops of the next two stitches, yarn over and complete one single crochet through both loops.
Black Crochet Pumpkin Pattern — Step by Step
This is a photo-inspired construction rather than a transcription of another designer’s pattern. Published crochet pumpkins use both flat ribbed panels and spiral amigurumi construction. This version uses a large stuffed form followed by external shaping because the photographed pumpkin has especially deep vertical divisions.
Large Pumpkin Body
Yarn: black.
Work in a continuous spiral. Place a marker in the first stitch of every round.
R1: 6 sc in MR (6).
R2: Inc ×6 (12).
R3: (Sc, inc) ×6 (18).
R4: (2 sc, inc) ×6 (24).
R5: (3 sc, inc) ×6 (30).
R6: (4 sc, inc) ×6 (36).
R7: (5 sc, inc) ×6 (42).
R8: (6 sc, inc) ×6 (48).
R9: (7 sc, inc) ×6 (54).
R10: (8 sc, inc) ×6 (60).
R11: (9 sc, inc) ×6 (66).
R12: (10 sc, inc) ×6 (72).
For this large centerpiece, continue the six-stitch increase sequence:
R13: (11 sc, inc) ×6 (78).
R14: (12 sc, inc) ×6 (84).
R15: (13 sc, inc) ×6 (90).
R16–R34: Sc around (90).
The long plateau creates the broad body required for pronounced external ribs.
Begin decreasing.
R35: (13 sc, dec) ×6 (84).
R36: (12 sc, dec) ×6 (78).
R37: (11 sc, dec) ×6 (72).
R38: (10 sc, dec) ×6 (66).
R39: (9 sc, dec) ×6 (60).
R40: (8 sc, dec) ×6 (54).
Begin stuffing firmly. Keep the outer surface rounded but do not compress the fiberfill into a hard ball.
R41: (7 sc, dec) ×6 (48).
R42: (6 sc, dec) ×6 (42).
R43: (5 sc, dec) ×6 (36).
R44: (4 sc, dec) ×6 (30).
R45: (3 sc, dec) ×6 (24).
Add the final stuffing. Leave a shallow depression at the top for the stem and floral crown.
R46: (2 sc, dec) ×6 (18).
R47: (Sc, dec) ×6 (12).
R48: Dec ×6 (6).
Fasten off. Leave a 50 cm tail and close the opening.
Creating the Pumpkin Ribs
The photographed pumpkin has deep divisions rather than shallow decorative lines. Create eight evenly spaced ribs after the body is fully stuffed.
Cut a piece of black yarn approximately 150 cm long and thread it onto a long upholstery needle.
Pass the needle from the bottom center through the pumpkin and out through the top center. Bring the yarn down the outside of the pumpkin and return through the bottom.
Pull until a visible groove forms.
Repeat around the circumference, dividing the body into eight approximately equal segments.
Keep every shaping strand at similar tension. One excessively tight strand will produce a narrow segment beside two oversized ones.
Optional Raised Rib Panels — Make 8
The reference image shows especially substantial vertical ridges. Add narrow surface panels when a more sculptural result is wanted.
Yarn: black.
Ch 31.
Row 1: Sc in second ch from hook and across (30).
Row 2: Ch 1, turn, BLO sc across (30).
Rows 3–5: Repeat Row 2 (30).
Fasten off, leaving a 35 cm tail.
Position each strip over one shaping groove and sew along both long edges. Taper the strip visually by bringing its ends closer together near the crown and base.
Large Curved Stem
Yarn: black.
The stem is intentionally oversized because the flower crown would conceal a conventional pumpkin stalk.
R1: 6 sc in MR (6).
R2: Inc ×6 (12).
R3: (Sc, inc) ×6 (18).
R4: (2 sc, inc) ×6 (24).
R5–R32: Sc around (24).
Stuff gradually as the tube grows. Keep the stuffing lighter near the upper curl.
R33: (2 sc, dec) ×6 (18).
R34–R42: Sc around (18).
R43: (Sc, dec) ×6 (12).
R44–R50: Sc around (12).
R51: Dec ×6 (6).
Fasten off and close.
Insert padded craft wire before closing if a fixed spiral is required. Bend the upper half gradually into a hook-shaped curl. The lower section should remain comparatively straight so it can be anchored firmly to the pumpkin.
Large Cream Rose
Yarn: cream.
Ch 61.
Row 1: Dc in fourth ch from hook, 2 dc in same ch. Work 3 dc in each chain across.
The strip will curl naturally.
Fasten off, leaving a 50 cm sewing tail.
Starting at one end, roll the strip tightly for the central bud. Continue wrapping more loosely to form the outer petals.
Sew through the bottom edge after every complete rotation. The finished rose should measure approximately 9–11 cm across.
Small Cream Roses — Make 3
Ch 41.
Row 1: Work 3 dc into each chain beginning in the fourth chain from the hook.
Fasten off, leaving a long tail.
Roll and sew as for the large rose. Each finished flower should measure approximately 6–7 cm across.
Black Poinsettia Flowers — Make 2
Yarn: black.
Make the flower center:
R1: 6 sc in MR (6).
Do not fasten off.
For each petal, work into one center stitch:
Ch 7.
Beginning in second ch from hook:
Sl st, sc, hdc, dc, hdc, sc.
Sl st back into the same center stitch.
Repeat twice in each center stitch to make 12 pointed petals.
Fasten off, leaving a 30 cm tail.
Sew 5–7 pearl-style beads securely into the center of each flower.
Sage Leaves — Make 10 to 12
Yarn: sage green.
Ch 13.
Starting in second ch from hook:
Sl st, sc, hdc, dc, 4 dc, hdc, sc, sl st.
Ch 2 at the tip.
Work down the opposite side of the foundation chain:
Sl st, sc, hdc, 4 dc, dc, hdc, sc, sl st.
Fasten off, leaving a 20 cm tail.
For the raised central vein, work surface slip stitches along the foundation chain in a slightly darker green or brown.
White Berries — Make 18 to 24
Yarn: cream.
R1: 6 sc in MR (6).
R2: Inc ×6 (12).
R3: Sc around (12).
R4: Sc around (12).
Add a small amount of stuffing.
R5: Dec ×6 (6).
Fasten off and close.
Leave a 15–20 cm tail when the berry will be sewn individually into the arrangement.
Berry Stems
Ch 10–16 with cream or beige yarn.
Sl st back along the chain.
Attach one berry to the end. Group three berries at different heights to form a small branch.
Crochet Snowflakes — Make 3
Yarn: cream. Use a smaller hook for crisp branches.
R1: 6 sc in MR (6).
For each of the six branches:
Ch 7.
Sl st in second ch from hook.
Ch 3, sl st in first ch to create a side picot.
Sl st into the next chain.
Repeat one additional picot.
Sl st down the remaining chains and into the next center stitch.
Repeat until six branches are complete.
Fasten off and block each snowflake before attachment.
Spiral Vines — Make 3
Yarn: beige.
Ch 35.
Work 3 sc in every chain across.
The piece will twist into a spiral automatically.
Fasten off and leave a 20 cm tail.
Evergreen Sprigs — Make 8 to 12
Yarn: dark forest green.
Ch 26.
Working down the chain:
*Ch 4, sl st in second ch from hook and next 2 chains, sl st into next foundation chain.*
Repeat along one side.
Turn the work and repeat along the opposite side of the foundation chain.
Fasten off, leaving a long tail for positioning beneath the flowers.
Assembly
- Shape the fully stuffed pumpkin into eight equal ribs before adding anything to the crown.
- Attach the optional raised black rib panels, keeping their upper ends clear of the central stem opening.
- Sew the curved black stem deeply into the top center using several passes through the pumpkin body.
- Position the large cream rose at the front-center of the crown and pin it before sewing.
- Place one black poinsettia on each side of the central rose, keeping their centers approximately level.
- Add the smaller cream roses around the outside to create an asymmetrical but balanced flower line.
- Insert sage leaves and dark evergreen sprigs beneath the flowers, directing most leaf tips outward.
- Sew the three snowflakes where their complete six-point shapes remain visible instead of burying them beneath flowers.
- Add berry clusters and beige spiral vines to fill spaces between the major decorations.
- Turn the centerpiece through 360 degrees, correct any exposed crown gaps, then secure and weave every remaining yarn tail.
The finished pumpkin should support its floral crown without collapsing, while the curled stem remains visible above the highest flowers.
7 Technical Tips for a Better Crochet Christmas Pumpkin
- Prevent uneven pumpkin ribs. Mark all eight segment positions around the circumference before tightening the first shaping strand. An error of several centimeters at the crown becomes much larger around the widest part of the pumpkin.
- Stop the base from becoming spherical. After stuffing, push the bottom center upward slightly while pulling the top and bottom shaping yarn together. The target profile is wider than it is tall.
- Control black-stitch visibility. Use a pale stitch marker on every round because black yarn makes the first stitch difficult to identify under indoor lighting. Losing one stitch during the 90-stitch plateau shifts the later decrease sequence.
- Prevent stem collapse. Stuff the bottom 10–12 cm more firmly than the curled end. A uniformly soft stem will bend at the pumpkin crown instead of holding a controlled hook shape.
- Keep the flower crown stable. Sew every large rose through at least four points around its base. A single center attachment allows a 9–11 cm flower to rotate or tip forward.
- Protect the snowflake shape. Block each snowflake before sewing and attach it at the center plus two branch tips. Attaching all six tips under tension can distort the symmetry.
- Hide floral assembly tails. Weave each tail at least 4–5 cm through dense crown stitches and reverse direction once. Do not rely on the open flower petals to hold structural yarn ends.
How to Arrange the Winter Flower Crown
Start with the three largest visual elements: the central cream rose and two black poinsettias. Their positions establish the width of the arrangement. Add the smaller cream roses next, but keep them slightly lower than the main flower so the centerpiece has a clear focal level.
Leaves should fill the spaces beneath those flowers rather than sitting directly on top of them. Angle sage leaves downward around the front edge and direct evergreen sprigs outward at the sides. This produces the broad botanical outline visible in the reference design.
Place the white berries after the foliage. Groups of three or five read more clearly than isolated berries. The snowflakes need open background space around their branches, so position them near dark sections of the pumpkin or foliage where the cream yarn has maximum contrast.
Finish with the spiral vines. Their job is to interrupt long vertical gaps without adding another large solid shape.
How to Adjust the Pumpkin Size
A published small amigurumi pumpkin can finish at about 5 cm using sport cotton and a 2.5 mm hook, while other decorative crochet pumpkin patterns produce pieces around 4.5 inches or substantially larger. Size therefore needs to be controlled through yarn, hook, stitch count and stuffing rather than yarn weight alone.
For a smaller version of this centerpiece, stop increasing at 72 stitches and shorten the plateau. Reduce the flower sizes proportionally so the crown does not hide the entire pumpkin.
For a larger floor or table display, continue the standard increase progression beyond 90 stitches in multiples of six. Add enough straight rounds to preserve the broad profile before beginning matching six-stitch decrease rounds.
Do not enlarge the stem independently. Its diameter should remain proportional to the pumpkin body or the top will appear visually heavier than the base.
Choosing Yarn for the Black Pumpkin
Worsted-weight yarn provides enough stitch definition for the large black body without making the project excessively heavy. A recent beginner pumpkin tutorial also uses worsted-weight yarn with a 4.5 mm hook, while other published pumpkin designs use everything from sport cotton with a 2.5 mm hook to bulky yarn with a 6.5 mm hook.
For the photographed effect, select a matte black rather than a glossy yarn. The rib shadows need to remain visible even though the entire pumpkin body uses one color.
Cotton produces crisp flowers and leaves, while a wool or acrylic blend can reduce the weight of a very large stuffed body. When combining fibers, test the flowers against the pumpkin before assembly because different yarn finishes can produce visibly different blacks.
Finishing the Crochet Pumpkin Centerpiece
Set the pumpkin on a flat surface before securing the final decorations. If it rocks, redistribute the stuffing through the base and massage the lowest ribs until several segments make contact with the table.
Check the stem from the front and both sides. The curl should project above the flower line rather than disappearing behind the central rose.
Inspect the black flower petals individually. Because their edges can merge visually with the pumpkin, placing a sage leaf or cream berry cluster behind selected petals improves separation.
Finally, trim no structural tail until the complete arrangement has been checked. A flower that needs repositioning is easier to move while its original sewing tail is still accessible.
Conclusion
Build the pumpkin body and its eight ribs before making the floral crown; the final circumference determines how large the roses, poinsettias and foliage should appear. Next, test the curled stem and central cream rose together before permanently sewing either element into place. That one fitting establishes the height of the complete arrangement. Use the finished black crochet pumpkin pattern as a Christmas table centerpiece, winter mantel decoration or large seasonal display. Save the design to Pinterest or share your finished version on Instagram with #WinterFloralCrochetPumpkin. For this specific black pumpkin, would you keep the cream-and-sage crown or replace the cream roses with deep red Christmas flowers?









