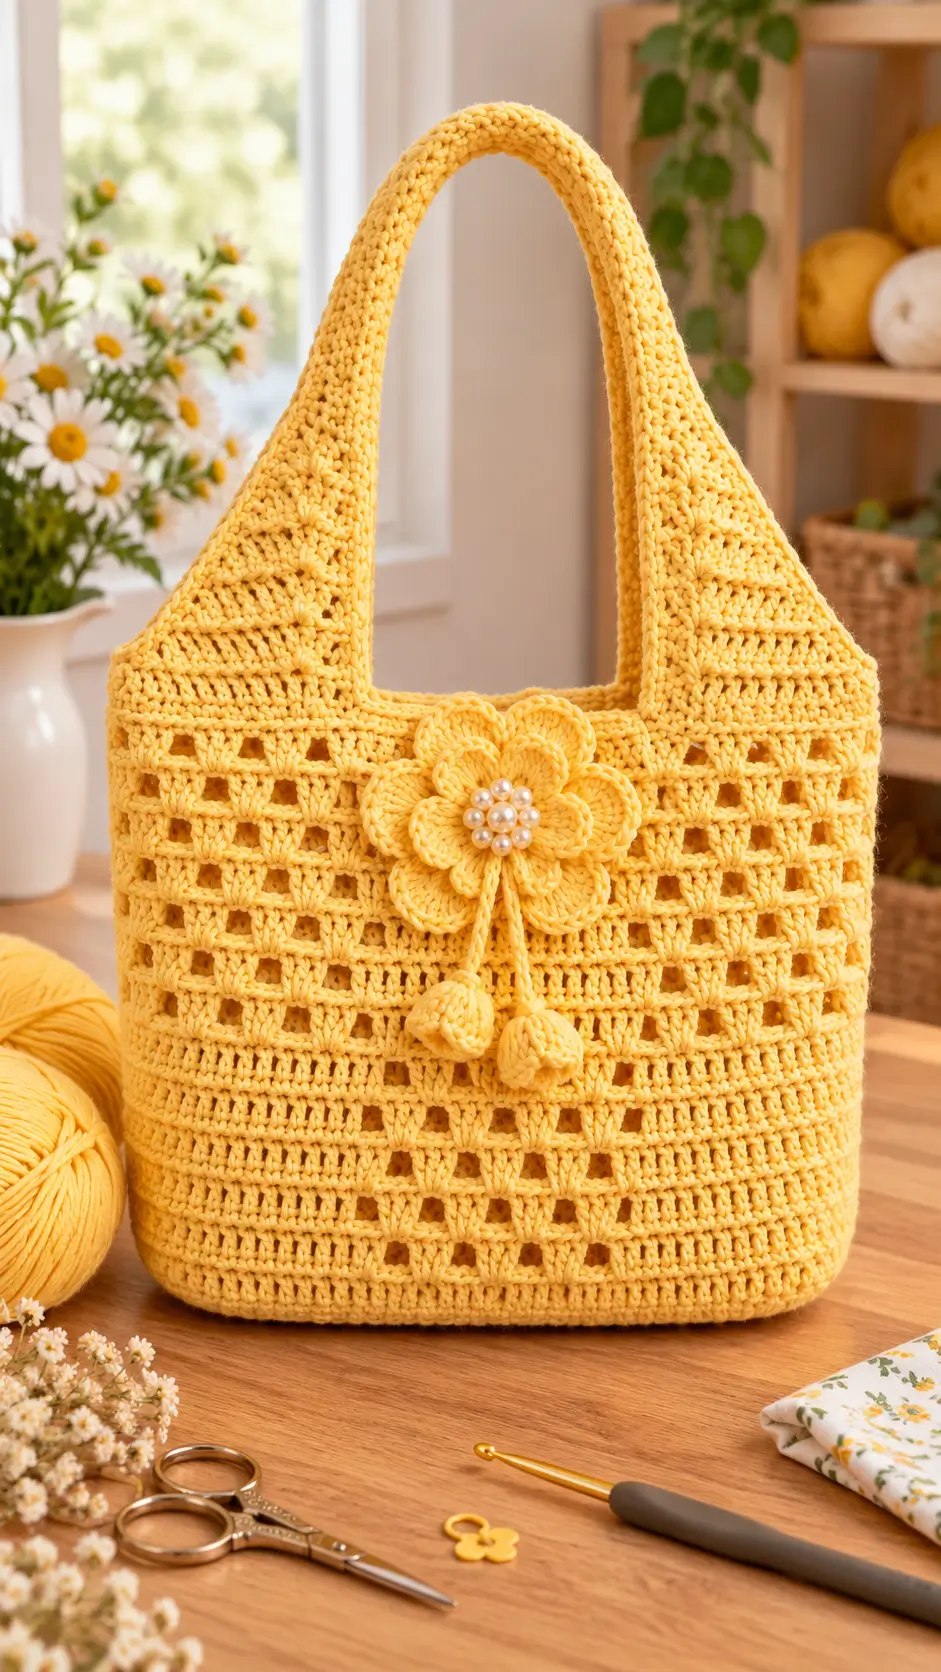
A flower centered between two broad yellow handles changes this bag from a basic grocery net into a structured floral tote. This crochet market bag pattern uses cotton yarn, open square mesh, dense support rows and integrated straps, with a target size near 35 cm wide. The project suits a confident beginner or intermediate crocheter and produces a reusable bag with less stretch than an all-mesh construction.
The Design: What Makes This Flower Market Bag Different
The photographed bag uses openwork selectively rather than turning the entire body into a loose net. Dense crochet at the base limits excessive stretching, while repeated square openings reduce weight through the center. The broad upper sections then transition directly into handles, distributing load across more fabric than a thin chain strap.
A layered flower covers the center front where the two visual halves meet. Its pearl-like center adds contrast without requiring another yarn color. The resulting mesh crochet bag has more structure than many expandable grocery designs, while the broad straps make it read as a crochet shoulder bag.
A common mistake with this shape is making the handle section at the same loose tension as the mesh. Loaded straps can then lengthen substantially. Cotton and firm handle stitches reduce that problem.
Project Info at a Glance
| Skill Level | Time | Finished Size | Hook | Best For |
|---|---|---|---|---|
| Confident beginner/intermediate | Approx. 6–9 hours | Approx. 35.5 × 29 cm body | 5–6 mm | Market trips, yarn and lightweight everyday items |
The finished dimensions are a target reference. Yarn choice, gauge and individual tension will affect the final measurements.
Materials and Tools
Yarn
- Golden yellow — worsted cotton — approximately 250–300 g.
- Golden yellow flower yarn — approximately 15–25 g from the main-yarn allowance.
- Cream or pearl accent — optional beads or sewn crochet knots for the flower center.
Cotton is particularly useful for this construction because the bag needs more stability than a loose grocery net. Yarn consumption changes according to the finished dimensions, hook size, mesh density and handle length.
Tools
- 5–6 mm crochet hook
- Stitch markers
- Yarn needle
- Scissors
- Tape measure
- Optional pearl-style beads for the flower center
- Sewing thread and needle for attaching beads
Do not use loose detachable beads on a bag intended for unsupervised access by very young children.
Abbreviations
- ch — chain
- sc — single crochet
- hdc — half double crochet
- dc — double crochet
- sl st — slip stitch
- sp — space
- st/sts — stitch/stitches
- sk — skip
- rep — repeat
- BLO — back loop only
An invisible decrease is primarily an amigurumi technique and is not required for the main rectangular bag construction.
Crochet Market Bag Pattern — Step by Step
This project is built from a firm rectangular foundation into a joined body, followed by separately shaped upper panels and handles. Decorative elements are added after the structural crochet is complete. Keep the foundation substantially tighter than the decorative mesh.
Bag Base
Yarn: golden yellow.
Foundation: Ch 51.
Row 1: Sc in second ch from hook and across (50).
Rows 2–8: Ch 1, turn, sc across (50).
The resulting strip forms the central bottom of the bag. It should remain flat rather than curling sharply.
Do not fasten off.
Lower Body Setup
Work evenly around the rectangular base.
Round 1: Ch 1, sc around the complete perimeter, placing approximately one sc per row end along each short side and one sc in every stitch along the long edges. Join with sl st.
The precise perimeter count depends on row-end placement, so mark both corners before continuing.
Rounds 2–5: Ch 1, sc in each st around. Join.
These dense rounds form the lower reinforcement and reduce stretching when the bag is loaded.
Lower Square-Mesh Panel
The design uses compact rectangular openings separated by substantial vertical posts. The mesh should remain controlled rather than expanding into large grocery-net openings.
Setup: Adjust the final solid round, if necessary, so the stitch total is divisible by 3.
Round 1: Ch 3, dc in next st, *ch 1, sk 1, dc in next 2 sts* around. Join.
Round 2: Ch 1, sc in each dc and 1 sc in each ch-1 sp around. Join.
Rounds 3–8: Repeat Rounds 1–2 three times.
Keep the ch-1 openings small. Large chain spaces will produce a loose grocery-net appearance instead of the compact square lattice used for this bag.
Middle Solid Band
Rounds 1–4: Ch 1, sc in each st around. Join.
The firm middle band interrupts the lattice and helps control vertical stretching through the center of the bag.
Upper Mesh Panel
Round 1: Ch 3, dc in next st, *ch 1, sk 1, dc in next 2 sts* around. Join.
Round 2: Ch 1, sc in each dc and each ch-1 sp around. Join.
Rounds 3–10: Repeat Rounds 1–2 four more times.
Add or remove one repeat to alter the body height. Measure the bag before beginning the handle section because cotton mesh can lengthen when loaded.
Upper Support Band
Rounds 1–5: Ch 1, sc in every st around. Join.
Fasten off.
This dense band provides a stable anchor for the broad upper panels and handles.
Front Handle Panel
Yarn: golden yellow.
Mark a centered section across one side of the bag approximately 15–18 cm wide.
Join yarn at the first marker.
Row 1: Ch 1, sc across marked section.
Rows 2–5: Ch 1, turn, sc across.
Begin tapering the panel.
Row 6: Ch 1, sc2tog, sc to final 2 sts, sc2tog.
Rows 7–8: Ch 1, turn, sc across.
Row 9: Repeat Row 6.
Rows 10–11: Sc across.
Row 12: Repeat Row 6.
Continue this sequence, working one decrease at each edge every third row, until the panel measures approximately 6–7 cm wide.
Work even in sc until the strap reaches the desired shoulder length.
Do not fasten off if joining directly to the opposite handle section.
Back Handle Panel
Work the back handle panel using the same instructions as the front panel.
Match the number of tapering rows exactly. Lay both handle sections flat before joining them. Even a small difference in row count can cause the finished opening to twist.
Join the handle ends with slip stitches or a firm sewn seam.
For additional stability, work one round of sc or sl st around the complete handle opening.
Layered Crochet Flower
Yarn: golden yellow.
The flower uses overlapping rounded petals to create the dimensional decoration visible at the center front of the bag.
Center: Make a magic ring.
Round 1: 6 sc in MR (6). Join.
First petal layer: *Sl st in next st, ch 3, 3 dc in same st, ch 3, sl st in same st.* Repeat around to create six petals.
For the second layer, attach the yarn behind the first set of petals.
Back Round: *Ch 4, anchor with sl st behind next petal.* Repeat around.
Into each ch-4 space work:
Second-layer petal: Sc, hdc, 4 dc, hdc, sc.
Repeat around.
Fasten off, leaving approximately 25 cm of yarn for sewing the flower to the bag.
For a fuller flower, make a second smaller flower layer and stack the pieces with their petals offset instead of directly aligned.
Flower Center
Sew a cluster of pearl-style beads through the center of the flower. For a completely textile version, replace the beads with small crocheted bobbles or knots.
Secure beads individually rather than passing a single uninterrupted thread through the entire cluster. This prevents one broken thread from releasing every bead.
Decorative Cords — Make 2
Yarn: golden yellow.
Ch 35–45 depending on the required finished length.
Starting in the second chain from the hook, sl st in each chain.
Fasten off and leave a 15 cm tail.
Attach both cords beneath the lower edge of the flower.
Crochet Bud Ends — Make 2
Yarn: golden yellow.
R1: 6 sc in MR (6).
R2: Inc ×6 (12).
R3: (Sc, inc) ×6 (18).
R4: Sc around (18).
R5: Sc around (18).
R6: (Sc, dec) ×6 (12).
R7: Dec ×6 (6).
Add a very small amount of stuffing before R7 if a three-dimensional bud is wanted.
Fasten off. Leave a 15 cm tail and sew one bud to the end of each decorative cord.
Optional Inner Base Reinforcement
A loaded market bag can distort at the bottom before the mesh itself fails. A second crochet rectangle can be added inside the bag when more base structure is required.
Ch 51.
Row 1: Sc in second ch from hook and across (50).
Rows 2–8: Sc across (50).
Fasten off and sew this panel inside the bag over the original foundation. The result is a double-thickness bottom without significantly changing the exterior design.
Assembly
- Lay the completed bag flat and align both side edges before attaching the decoration.
- Check that the handle seam sits at the top rather than rotating toward either side.
- Reinforce each handle opening with a firm round of sc or sl st.
- Position the layered flower at the center front immediately below the handle opening.
- Pin the flower through its center and at several petal points before sewing.
- Sew through the flower center and inner petal edges while leaving the outer petal edges dimensional.
- Attach the two decorative cords beneath the lower flower petals.
- Sew one crochet bud securely to the end of each cord.
- Weave yarn tails through several stitch directions inside dense sections instead of through the open mesh.
- Block the bag flat to align the square openings, then allow it to dry completely before loading it.
The completed bag should have a firm lower body, aligned lattice openings, a centered flower and two equal-length handles.
7 Technical Tips for a Better Crochet Market Bag
- Control oversized mesh openings. Keep every chain space consistent and measure the width after two pattern repeats. A difference of even 5 mm per opening becomes conspicuous across a bag approximately 35 cm wide.
- Prevent handle stretch. Cotton can still lengthen under load when the stitches are loose. Work the handle fabric more firmly than the mesh and reinforce the edges with slip stitches if necessary.
- Stop crooked lattice columns. Place a stitch marker at the beginning of every joined round. Losing one stitch shifts subsequent squares and can create a visible diagonal line through the mesh.
- Prevent the flower from sagging. Attach the decoration through the center plus at least four inner petal points. Sewing only through the center allows a large layered flower to fold forward.
- Match both handles. Count rows rather than comparing straps while they are stretched. Both handles need exactly the same number of shaping and straight rows before joining.
- Watch for base distortion. Stop adding side stitches if the lower fabric begins to flare. The base should lie flat before the mesh section is started.
- Keep yarn tails out of the mesh. Weave every tail through at least 4–5 cm of dense crochet and reverse direction once. Open chain spaces provide too little friction for dependable finishing.
Conclusion
Measure the body before committing to the final handle length because the broad straps depend on proportion as much as stitch choice. A body around 35 cm wide provides a useful reference point, but yarn, gauge and loading can change the finished dimensions substantially. Make a small swatch, test the lattice repeat, then load-test one handle before attaching the flower. That sequence identifies structural problems while corrections are still practical. Save this crochet market bag pattern to Pinterest or share the finished version on Instagram with #FlowerMeshMarketBag. For the closest match to the reference design, keep the flower and bag in the same golden-yellow yarn. Which would you change first: the flower size or the number of square-mesh rows?









