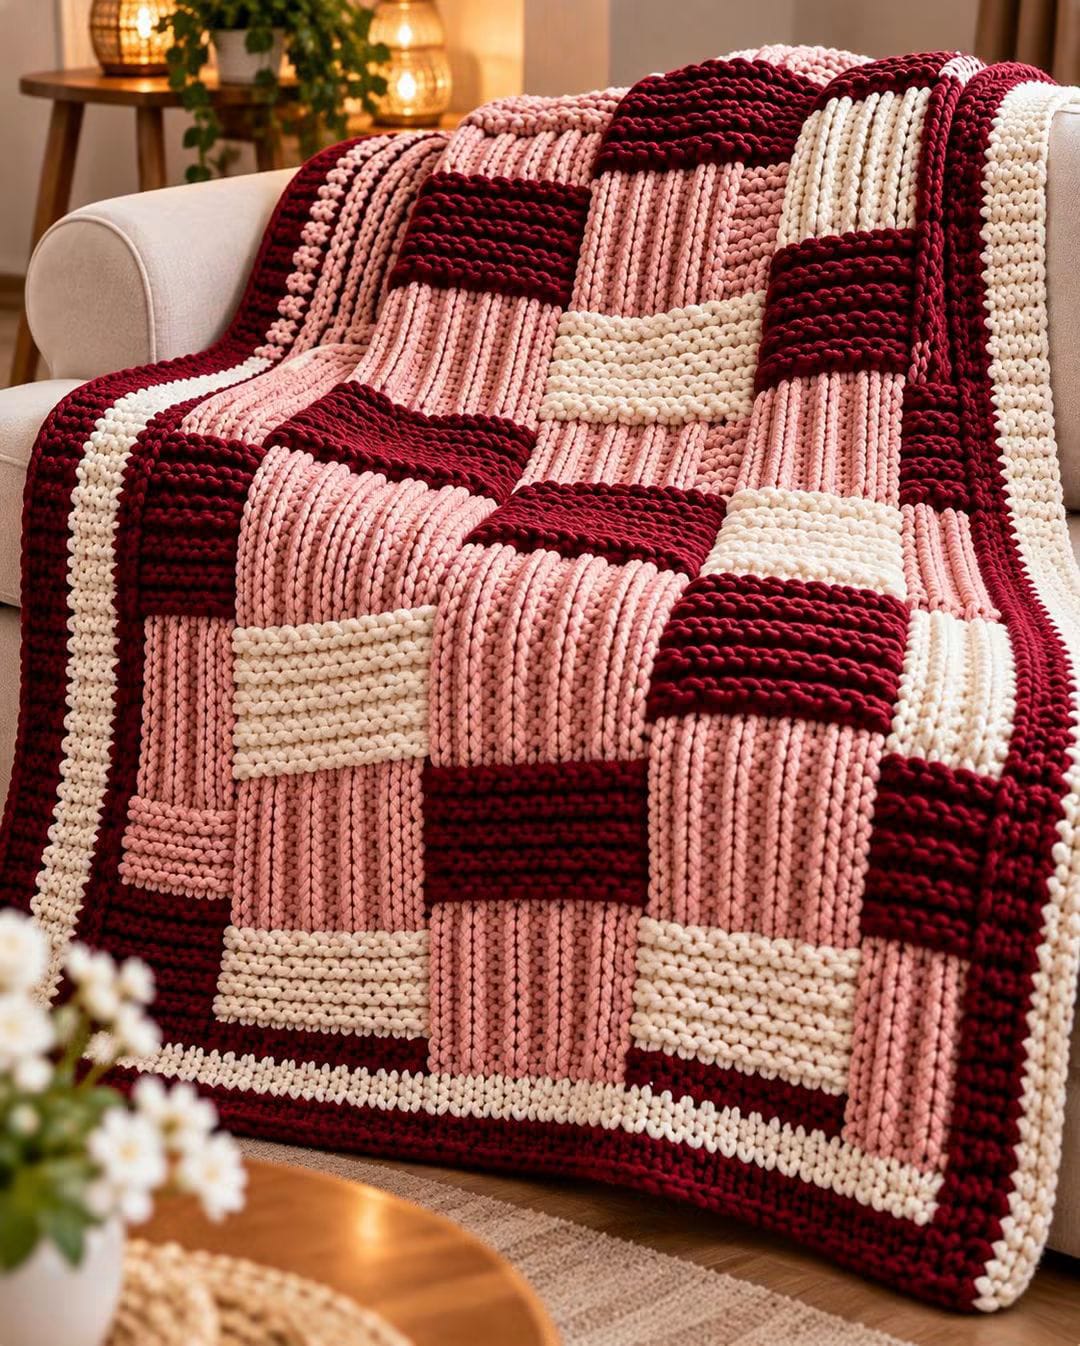
Patchwork normally exposes every mismatch in block size; this blanket turns that problem into its main design feature. This chunky patchwork crochet blanket uses large textured rectangles and squares in dusty pink, deep burgundy and cream, arranged to create an interlocking quilt effect. The construction uses bulky yarn, repeated ribbed panels and a substantial striped border. Make the blocks separately, match their finished measurements, then assemble them into one structured throw.
The Design: What Makes This Patchwork Blanket Different
The blanket is based on large geometric blocks rather than conventional small granny squares. That difference matters. Fewer, larger panels create the oversized patchwork appearance visible in the reference image and allow the raised stitch texture to remain prominent.
Three colors control the composition: dusty pink forms most of the background, burgundy provides strong visual divisions, and cream breaks up the darker blocks. Several panels are rotated 90 degrees before joining. The change in stitch direction makes adjacent pieces look different even when they use the same basic stitch.
The border is also structural. A burgundy outer frame and narrow cream stripe visually connect irregular color blocks and give the finished throw a rectangular outline. The main failure point is inconsistent panel sizing. A difference of 1–2 cm can multiply across an entire row, so every motif should be measured before assembly.
Project Info at a Glance
| Skill Level | Time | Finished Size | Hook | Construction |
|---|---|---|---|---|
| Intermediate | 12–18 hours | Approx. 120 × 150 cm | 6.5 mm | Joined textured blocks |
The 120 × 150 cm measurement creates a practical sofa throw. Published chunky patchwork patterns vary considerably: one documented design measures approximately 104 × 146 cm with 20 cm squares, while another bulky patchwork blanket measures approximately 45 × 60 inches.
Materials and Tools
Yarn
Use bulky or chunky yarn of approximately the same thickness in all three colors.
- Dusty pink bulky yarn — approximately 700–800 g
- Deep burgundy bulky yarn — approximately 600–700 g
- Cream bulky yarn — approximately 350–450 g
Plan for approximately 1,700–1,950 g total. Exact consumption depends on yarn density, stitch height, border width and finished dimensions.
Acrylic or an acrylic blend is practical for a frequently used throw. Chenille can produce an appearance closer to the thick, rounded stitches in the photograph, but its gauge must be checked carefully because chenille yarn can compress substantially.
Tools
- 6.5 mm crochet hook
- Large-eye yarn needle
- Locking stitch markers
- Sharp scissors
- Flexible measuring tape
- Blocking mats, optional
- Rustproof blocking pins, optional
Abbreviations
- ch — chain
- sc — single crochet
- hdc — half double crochet
- sl st — slip stitch
- BLO — back loop only
- FLO — front loop only
- st / sts — stitch / stitches
- RS — right side
- WS — wrong side
The pattern uses back-loop stitches to produce the strong parallel ridges visible across the photographed panels.
Gauge and Block Measurements
Make one test panel before cutting any yarn. The target basic square is approximately 20 × 20 cm after light blocking.
A published chunky patchwork blanket also uses 20 × 20 cm squares and reports a gauge of 13 stitches and 15 rows per 10 cm. Treat that as a reference rather than an automatic gauge because different bulky yarns can produce substantially different measurements.
The exact number of stitches matters less than matching the finished dimensions of every block. Adjust the starting chain or hook size if necessary.
Chunky Patchwork Crochet Blanket Pattern
This blanket is assembled from three basic components: 20 × 20 cm squares, 20 × 40 cm rectangles and selected 40 × 40 cm sections created by joining smaller blocks.
The visual effect comes from changing both color and stitch direction. Some panels should be installed with their ridges running vertically and others horizontally.
Basic Ribbed Square – 20 × 20 cm
Make in dusty pink, burgundy and cream according to the layout.
Foundation: Ch 27, or the number required to reach approximately 20 cm with your yarn.
Row 1: Hdc in second ch from hook and in every ch across. Ch 1, turn.
Row 2: Working BLO, hdc in every st across. Ch 1, turn.
Rows 3–end: Repeat Row 2 until the panel measures approximately 20 cm high.
Fasten off, leaving a 25 cm tail if the block will be sewn to another motif.
Measure across the center rather than along the outer edge. Every square should finish at approximately 20 × 20 cm.
Long Ribbed Rectangle – 20 × 40 cm
The long panels reproduce the extended pink, cream and burgundy sections visible throughout the blanket.
Foundation: Ch enough stitches to measure approximately 40 cm.
Row 1: Hdc in second ch from hook and across. Ch 1, turn.
Row 2: Hdc BLO across. Ch 1, turn.
Rows 3–end: Repeat Row 2 until the rectangle measures approximately 20 cm deep.
Fasten off.
For vertical ribbing, rotate the finished rectangle during assembly. Do not change the stitch pattern simply to change the apparent direction.
Pink Blocks
Dusty pink should occupy approximately half of the interior area because it acts as the dominant background color in the reference design.
Make approximately:
- 8 dusty pink 20 × 20 cm squares
- 6 dusty pink 20 × 40 cm rectangles
Rotate alternate pieces during layout so the ridges switch between horizontal and vertical directions.
Burgundy Blocks
The burgundy sections create the strongest divisions in the design.
Make approximately:
- 7 burgundy 20 × 20 cm squares
- 5 burgundy 20 × 40 cm rectangles
Do not distribute these pieces at perfectly regular intervals. The photographed blanket has a quilt-like arrangement in which burgundy areas interrupt the pink field at different positions.
Cream Blocks
Cream is the accent rather than the dominant color.
Make approximately:
- 5 cream 20 × 20 cm squares
- 3 cream 20 × 40 cm rectangles
Keep cream blocks separated by pink or burgundy wherever possible. Large clusters of cream will change the color balance substantially.
Alternative Raised-Ridge Panel
For a more pronounced texture similar to the thick vertical lines in the image, use slip-stitch ribbing on selected panels.
Foundation: Chain to the required panel width.
Row 1: Sl st loosely in second ch from hook and across. Ch 1, turn.
Row 2: Working BLO, sl st loosely in every st across. Ch 1, turn.
Repeat Row 2 until the required dimension is reached.
Slip-stitch ribbing contracts more strongly than half-double-crochet ribbing. Measure it without stretching. Increase the foundation-chain length when required rather than pulling the completed panel to the target measurement.
Blanket Layout
Lay every completed block on a flat surface before joining. Build a rectangle approximately 100 × 130 cm before the border is added.
Use the following principles rather than repeating identical rows:
- Place dusty pink through the center and across several outer sections.
- Distribute burgundy diagonally through the layout.
- Insert cream panels between strong pink and burgundy areas.
- Rotate neighboring ribbed blocks by 90 degrees.
- Avoid placing more than two identical blocks directly beside one another.
- Keep burgundy available for the outer frame.
Photograph the complete arrangement before joining. That reference prevents blocks from being rotated or moved accidentally during assembly.
Joining the Patchwork Blocks
A flat seam keeps the blanket flexible and allows the geometric layout to remain visible.
Mattress-Stitch Method
Place two blocks side by side with right sides facing upward.
Thread a yarn needle with matching yarn. Pass under one edge loop on the first panel and then the corresponding edge loop on the second.
Continue alternating from side to side. Pull the yarn only until the edges meet. Excessive tension will gather the seam and shorten the finished row.
Join small blocks into larger sections first. Then connect those sections to form full blanket rows.
Crochet Join Option
For a more pronounced patchwork seam, place two pieces with wrong sides together and work single crochet through both edges.
Use burgundy for a visible outline or matching yarn when a quieter seam is preferred.
Work approximately one joining stitch for each row end. If the seam begins to ripple, too many stitches have been added. If it contracts, the joining stitches are too widely spaced or too tight.
Squaring the Joined Blanket
Measure the blanket at the top, middle and bottom after all motifs are connected.
The measurements should be close before the border begins. A border can correct minor inconsistencies, but it cannot compensate for a large difference between opposite edges.
Join burgundy yarn at one corner.
Preparation Round: Sc evenly around the complete blanket. Work 3 sc in each corner.
Along row ends, distribute stitches consistently. Do not automatically place one stitch into every visible ridge because chunky ribbing can require fewer edge stitches than expected.
Join with sl st.
Burgundy and Cream Border
The photographed blanket uses a substantial dark border interrupted by a narrow cream band. This frame is an important part of the design rather than a small finishing edge.
Border Round 1 – Burgundy
Ch 1. Sc in every stitch around, working 3 sc in each corner stitch. Join with sl st.
Border Round 2 – Burgundy
Ch 1. Hdc BLO around. Work 3 hdc in each corner. Join.
Border Round 3 – Burgundy
Repeat Border Round 2.
Border Round 4 – Cream
Change to cream.
Ch 1. Sc around, working 3 sc in each corner. Join.
Border Round 5 – Cream
Sc BLO around. Work 3 sc in each corner. Join.
Border Round 6 – Burgundy
Change back to burgundy.
Hdc around with 3 hdc in each corner.
Border Round 7 – Burgundy
Hdc BLO around, again placing 3 hdc in each corner.
Fasten off and weave in the tail.
Assembly
- Measure every square and rectangle before arranging the blanket.
- Separate the pieces into dusty pink, burgundy and cream groups.
- Lay the complete design on the floor or another large flat surface.
- Rotate selected blocks 90 degrees so neighboring ribbing runs in different directions.
- Photograph the approved arrangement before moving any pieces.
- Join smaller blocks into sections, keeping every seam relaxed and flat.
- Connect those sections into complete rows and then join the rows together.
- Measure opposite edges and correct any obvious seam contraction before adding the frame.
- Work the preparation round followed by the burgundy, cream and burgundy border sequence.
- Weave every yarn tail through several centimeters of fabric, reverse direction and weave through a second section before trimming.
The finished blanket should form a rectangular patchwork field with alternating ridge directions, cream highlights and a dark burgundy frame.
7 Technical Tips for a Better Patchwork Blanket
- Control block-size drift. A 1 cm difference repeated across five motifs produces a 5 cm mismatch at the blanket edge. Measure every completed panel against the same 20 cm template.
- Do not stretch ribbing during measurement. Ribbed crochet can temporarily expand when pulled. Place each motif flat, release all tension and measure through its center.
- Mark the right side. Rotating motifs is intentional, but accidentally reversing one can change the ridge appearance. Put a locking marker on the right side of every finished panel.
- Watch seam tension. A tight joining seam creates a visible valley and shortens one side of the blanket. Pull the joining yarn only until adjacent edges touch.
- Control chenille tension. Loose chenille stitches can develop protruding loops after use. Work a 15 cm test swatch and handle it firmly before committing to the full blanket.
- Pin long seams first. A 40 cm rectangle can shift several centimeters during sewing. Pin both ends and the midpoint before joining the remaining edge.
- Count border corners separately. Missing one of the three corner stitches can pull the border inward. Mark the center corner stitch immediately after completing each corner group.
How to Adjust the Blanket Size
The modular construction makes resizing easier than altering a one-piece blanket.
For a smaller lap blanket, remove one 20 cm block unit from both the width and length. A center measuring approximately 80 × 100 cm can be expanded slightly with the border.
For a larger sofa throw, add one additional 20 cm unit to the width and one or two units to the length. Keep the color proportions similar: approximately half dusty pink, roughly one-third burgundy and the remaining area cream.
For a bed blanket, calculate the required dimensions before crocheting the motifs. Divide the desired center width and length by the finished 20 cm module measurement. Include the border only after determining the central patchwork dimensions.
Choosing Yarn for the Raised Texture
The photographed blanket has thick, rounded stitches with substantial depth. Bulky acrylic, plush polyester or chenille can reproduce that scale more closely than fine yarn.
A published chunky patchwork design uses bulky yarn and a 6.5 mm hook, while super-bulky patchwork blankets may use hooks around 8–10 mm. The correct hook therefore depends on the actual yarn rather than the appearance of the photograph alone.
If substituting super-bulky chenille, make a test square first. Increase the hook size when the fabric becomes rigid and reduce it when the stitches are loose enough to distort the ridges.
Color Placement
The burgundy sections need enough separation to function as visual anchors rather than forming one large dark area. Start with a burgundy block near one corner, move the next toward the center, and continue distributing the darker panels across the blanket.
Dusty pink fills the spaces between those anchors. Rotate pink rectangles frequently because the direction of their ribs is especially visible.
Cream should appear less frequently. Place it where two stronger colors need separation and repeat cream near the border so the interior and outer frame look connected.
Do not attempt to make the left and right halves perfectly symmetrical. The patchwork effect depends on controlled variation.
Blocking and Finishing
Check the yarn label before applying water, steam or heat. Acrylic and polyester yarns can react differently from wool and cotton.
For washable bulky yarn, gently arrange the finished blanket on a large flat surface after washing. Square each corner and align the border without aggressively stretching the ribbing.
Measure both diagonals. Similar diagonal measurements indicate that the blanket is close to square at the corners.
Allow the blanket to dry completely before folding it. Once dry, inspect every join from both sides and weave in any tail that has moved toward the surface.
Care Instructions
Follow the care instructions for the specific yarn used. If all three colors come from different yarn lines, use the care requirements of the most restrictive fiber.
Wash dark burgundy yarn separately or test a swatch first if color transfer is a concern. A blanket containing chenille should not be exposed to unnecessary high heat because heat can alter some synthetic plush fibers.
Store the blanket folded rather than hanging from one edge. The weight of a chunky throw can stretch the upper motifs and joining seams during long-term hanging storage.
Conclusion
The defining feature of this chunky patchwork crochet blanket is not a complicated stitch repeat but the controlled relationship between block size, ridge direction and color placement. Begin with one 20 cm test square, establish the hook and stitch count required for your yarn, then use that measurement for every remaining panel. Assemble the entire pink, burgundy and cream layout on a flat surface before joining anything permanently. Once the center is square, add the striped frame and record the final dimensions for future versions. Save the finished blanket to Pinterest or share the color layout on Instagram with #ChunkyPatchworkBlanket. Which block would you make dominant in a second version: burgundy, dusty pink or cream?









