Introduction
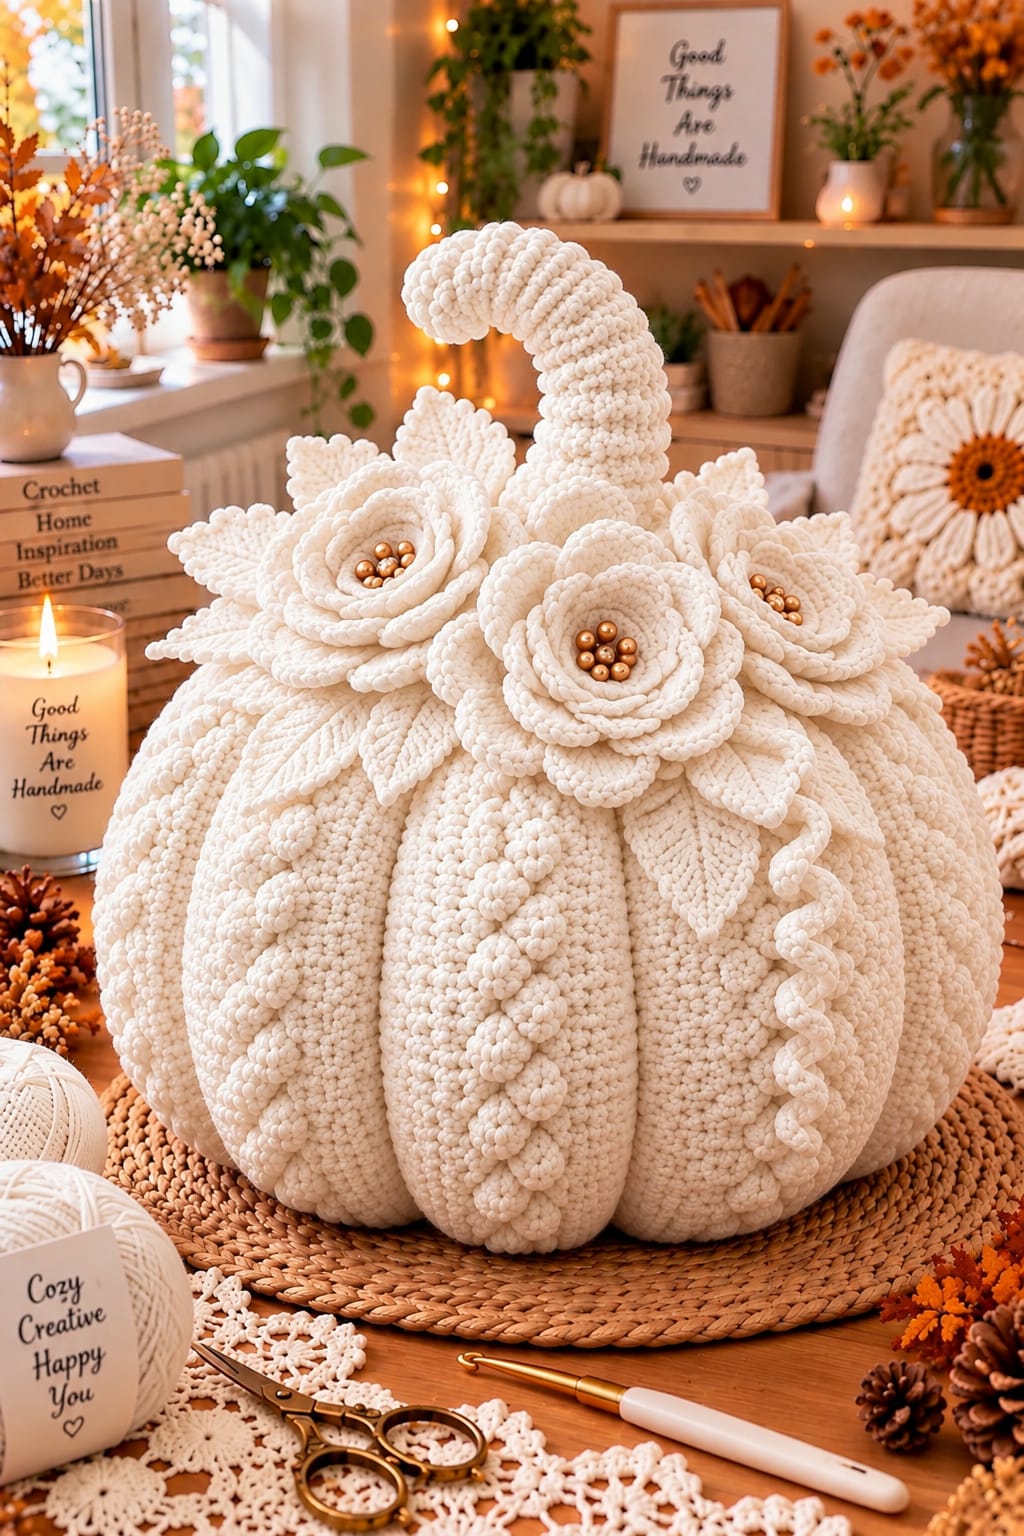
A stem that curves almost halfway across the crown changes the engineering of this pumpkin before the first flower is attached. This giant white crochet pumpkin pattern combines a super-bulky ivory body, eight sculpted lobes, tall hooked stem, three layered flowers, pointed leaves, raised botanical ribs, and curling tendrils. The intermediate project targets approximately 38–45 cm across and functions as a substantial autumn centerpiece.
The Design: What Makes This Floral Pumpkin Different
The pumpkin body is deliberately broad, with eight deep channels separating rounded lobes. External sculpting is necessary because stuffing alone cannot reproduce the pronounced segmentation visible in the reference. Raised ivory cords on selected front lobes add a second level of texture without introducing another yarn color.
The crown uses three dimensional flowers rather than a conventional short stem-and-leaf topper. Each flower is layered so the outer petals remain broad while smaller inner petals create depth. Pointed leaves extend beneath them and disguise attachment stitches.
The third structural decision is the oversized curved stem. Its lower section must be firm enough to remain upright while the upper section needs enough flexibility to bend forward. A common mistake in a floral crochet pumpkin is overstuffing this stem, producing a rigid tube instead of a gradual hook.
Project Info at a Glance
| Skill Level | Time | Finished Size | Hook | Best For |
|---|---|---|---|---|
| Intermediate | 14–20 hours | Approx. 38–45 cm wide | 9 mm body; 4–7 mm details | Fall centerpiece, entry table, seasonal display |
Published crochet pumpkins demonstrate a broad size range. Super-bulky patterns commonly pair category #6 yarn with a 9 mm hook, while documented large decorative pumpkins can reach approximately 38 cm in diameter. The dimensions here are a photo-inspired target rather than a direct measurement from the image.
Materials and Tools
Yarn
- Warm ivory — super-bulky #6 — approximately 450–600 g for the pumpkin body.
- Warm ivory — bulky #5 — approximately 100–140 g for the tall stem.
- Warm ivory — worsted #4 — approximately 120–160 g for flowers, leaves, raised ribs, and tendrils.
Using several yarn weights in one color produces the monochrome appearance while keeping small botanical details from becoming disproportionately thick. Published smaller super-bulky pumpkins may require only about 50 g, so the quantities above are project estimates for the substantially larger photo-inspired centerpiece.
Tools
- 9.0 mm crochet hook for the pumpkin body
- 6.0–7.0 mm crochet hook for the curved stem
- 4.0–5.0 mm crochet hook for flowers
- 4.0 mm crochet hook for leaves and tendrils
- Polyester fiberfill — approximately 700–1,000 g depending on density
- Long upholstery needle
- Large tapestry needle
- Locking stitch markers
- Scissors
- Flexible covered craft wire — optional for the tall stem
- Gold or bronze pearl-style beads — optional
- Strong sewing thread for bead attachment
Abbreviations
- MR — magic ring
- ch — chain
- sc — single crochet
- hdc — half double crochet
- dc — double crochet
- tr — treble crochet
- inc — increase
- dec — decrease
- sl st — slip stitch
- BLO — back loop only
- FLO — front loop only
- st/sts — stitch/stitches
- FO — fasten off
For an invisible decrease, insert the hook through the front loops of the next two stitches, yarn over and pull through both front loops, then complete the single crochet.
Pattern — Step by Step
This is an original construction based on the visible features of the photograph, not a transcription of an existing commercial pattern. Work in a continuous spiral unless a section specifically instructs otherwise.
Giant Pumpkin Body
Yarn: ivory super-bulky #6. Use a 9.0 mm hook.
R1: 6 sc in MR. (6)
R2: Inc ×6. (12)
R3: (Sc 1, inc) ×6. (18)
R4: (Sc 2, inc) ×6. (24)
R5: (Sc 3, inc) ×6. (30)
R6: (Sc 4, inc) ×6. (36)
R7: (Sc 5, inc) ×6. (42)
R8: (Sc 6, inc) ×6. (48)
R9: (Sc 7, inc) ×6. (54)
R10: (Sc 8, inc) ×6. (60)
R11: (Sc 9, inc) ×6. (66)
R12: (Sc 10, inc) ×6. (72)
R13–R27: Sc in every st around. (72)
Check the diameter after several plateau rounds. The body should be broad rather than elongated. Continue only while the fabric remains dense enough to conceal the filling.
R28: (Sc 10, dec) ×6. (66)
R29: (Sc 9, dec) ×6. (60)
R30: (Sc 8, dec) ×6. (54)
R31: (Sc 7, dec) ×6. (48)
Begin stuffing. Fill the outside circumference first, then add fiberfill toward the center.
R32: (Sc 6, dec) ×6. (42)
R33: (Sc 5, dec) ×6. (36)
R34: (Sc 4, dec) ×6. (30)
R35: (Sc 3, dec) ×6. (24)
Add the remaining stuffing. Keep the vertical center slightly compressible because the pumpkin will be pulled inward during sculpting.
R36: (Sc 2, dec) ×6. (18)
R37: (Sc 1, dec) ×6. (12)
R38: Dec ×6. (6)
Fasten off, leaving approximately 60 cm. Thread the tail through the final six stitches and close the opening.
Sculpting the Eight Pumpkin Lobes
Cut approximately 3 m of strong ivory yarn and thread it through a long upholstery needle.
Insert the needle at the bottom center and bring it through the top center. Carry the yarn down the outside of the body and return through the bottom.
Pull until the yarn creates a visible channel.
Repeat at equal intervals until the body is divided into eight broad lobes.
Work around the pumpkin a second time if deeper channels are required. Adjust every strand before knotting because one over-tightened section can make the finished pumpkin lean.
Raised Botanical Rib — Make 3
Yarn: ivory worsted #4.
Ch 42.
Row 1: Beginning in second ch, sl st in each ch across. (41)
Fasten off with a 60 cm sewing tail.
Pin the cord vertically along one front-facing pumpkin lobe.
Form a small side loop approximately every 3–4 cm, alternating left and right. Tack each loop at its base.
Repeat for two additional front lobes.
The decorative ribs should follow the body vertically rather than cross the deep sculpted channels.
Tall Curved Stem
Yarn: ivory bulky #5. Use a 6.0–7.0 mm hook.
R1: 6 sc in MR. (6)
R2: Inc ×6. (12)
R3: (Sc 1, inc) ×6. (18)
R4: (Sc 2, inc) ×6. (24)
R5–R10: Sc around. (24)
R11: (Sc 2, dec) ×6. (18)
R12–R19: Sc around. (18)
R20: (Sc 1, dec) ×6. (12)
R21–R35: Sc around. (12)
Stuff the lower third firmly. Reduce the filling gradually through the middle and use only light stuffing in the curved upper section.
R36: Dec ×6. (6)
Fasten off and close.
If internal support is required, insert flexible covered craft wire before closing. Fold each wire end into a blunt loop and surround it completely with stuffing.
Bend the upper third forward gradually. The curve should begin well above the flower crown rather than forming one sharp elbow.
Large Layered Rose — Make 3
Yarn: ivory worsted #4. Use a 5.0 mm hook.
A 5 mm hook with worsted yarn is a documented combination for rolled crochet roses. This version enlarges the strip to create the substantial flowers visible around the pumpkin crown.
Rose Strip
Ch 54.
Row 1: Beginning in fourth ch from hook, work 2 dc in first ch. *Dc in next ch, 2 dc in next ch.* Repeat across.
Ch 3 and turn.
Row 2: Work 5 dc in first suitable stitch, sl st in next st. *5 dc in next st, sl st in next st.* Repeat across.
Fasten off, leaving approximately 90 cm for assembly.
Forming the Rose
Roll the first 6–8 cm tightly to create the center.
Continue wrapping the strip while allowing each subsequent shell to sit farther from the center.
Use the long yarn tail to sew through the underside after every complete rotation.
The outermost shells should remain mobile enough to resemble separate petals.
Repeat for the remaining two flowers.
Optional Second Outer Petal Layer
For the wider layered flowers shown in the photograph, make 8 separate petals for each rose.
Ch 10.
Beginning in second ch work:
Sl st, sc, hdc, dc, 3 tr, dc, hdc.
Work 3 sc in the final chain and continue down the opposite side using the corresponding stitch sequence.
Fasten off with a 25 cm tail.
Arrange eight petals around the rolled rose and sew only their bases to the underside.
Flower Center Beads
The reference image shows metallic pearl-like centers.
Sew approximately 6–8 gold or bronze beads into the center of each flower using strong thread.
Secure every bead individually. Do not use one loose continuous loop to hold the entire cluster.
Large Pointed Leaf — Make 12 to 16
Yarn: ivory worsted #4. Use a 4.0 mm hook.
Ch 16.
Beginning in second ch:
Side 1: Sl st, sc, hdc, dc, dc, tr, tr, tr, tr, dc, dc, hdc, sc, sl st, sl st.
At the end work (sc, ch 2, sc).
Continue along the opposite side of the foundation chain using the corresponding stitch sequence.
Join at the base.
Leaf Edge
Ch 1 and sc around the leaf.
At the tip work (sc, ch 2, sc).
Fasten off with a 30 cm sewing tail.
Raised Leaf Vein
Join ivory yarn at the leaf base.
Surface sl st along the foundation chain toward the pointed tip.
Fasten off on the wrong side.
Keep the surface stitches relaxed so the center vein does not fold the leaf lengthwise.
Small Leaf — Make 8 to 12
Ch 9.
Beginning in second ch work:
Sl st, sc, hdc, dc, dc, hdc, sc, sl st.
Work 2 sc at the end.
Repeat the sequence down the opposite side.
Fasten off with a 20 cm tail.
Long Curly Tendril — Make 3 to 5
Yarn: ivory worsted #4. Use a 4.0 mm hook.
Ch 45.
Beginning in second ch from hook, work 2 sc in each ch.
The strip will curl as the additional stitches accumulate.
For a stronger spiral, work 3 sc into every fifth chain while keeping 2 sc in the remaining chains.
Fasten off with a 30 cm attachment tail.
Short Tendril — Make 4 to 6
Ch 22.
Beginning in second ch, work 2 sc in each chain.
Fasten off.
Use these shorter spirals near the flowers where a long vine would cover too much of the pumpkin body.
Suggested Component Count
| Component | Quantity | Yarn |
|---|---|---|
| Giant pumpkin body | 1 | Super-bulky ivory |
| Tall curved stem | 1 | Bulky ivory |
| Large layered flowers | 3 | Worsted ivory |
| Outer flower petals | 24 | Worsted ivory |
| Large pointed leaves | 12–16 | Worsted ivory |
| Small leaves | 8–12 | Worsted ivory |
| Raised botanical ribs | 3 | Worsted ivory |
| Long tendrils | 3–5 | Worsted ivory |
| Short tendrils | 4–6 | Worsted ivory |
Positioning the Flower Crown
Attach the stem before positioning the flowers. Its footprint determines how much space remains around the crown.
Place the largest flower slightly right of center. Position a second flower on the left and the third farther back on the right.
Avoid placing all three flower centers on one horizontal line. Staggering their heights creates the layered crown visible in the photograph.
Slide large pointed leaves underneath the flowers. Several should extend horizontally while others point upward beside the stem.
Reserve a few leaves for the front of the crown, where they can overlap the top edges of the pumpkin lobes.
Attaching the Flowers
Thread a long ivory yarn tail through a tapestry needle.
Sew through the base of each rose and a broad area of the pumpkin crown.
Make at least six attachment passes around each large flower.
Do not sew through the outermost petals. They should remain free enough to overlap nearby leaves.
After attaching all three flowers, lift the pumpkin several centimeters above the work surface. Add another concealed attachment stitch wherever a flower shifts noticeably.
Attaching the Leaves
Pin all leaves before sewing.
Attach the lower 2–3 cm of each large leaf beneath a flower.
Add one hidden stitch near the midpoint if the leaf falls forward.
Leave the pointed final third free.
This limited attachment preserves the dimensional crown while still keeping the leaves stable during handling.
Assembly
- Complete the ivory pumpkin body, fill it evenly, close the final six stitches, and check that the base sits flat.
- Sculpt eight deep vertical channels from crown to base, adjusting the tension until all lobes have comparable width.
- Attach the tall ivory stem through a broad area of the crown and confirm that it remains upright before adding flowers.
- Position the three large layered flowers around the stem, keeping their centers at different heights.
- Slide large and small ivory leaves underneath the flowers and sew only their lower sections to the crown.
- Add the three raised botanical ribs to selected front-facing pumpkin lobes without crossing the main sculpted channels.
- Attach long tendrils beneath the flower crown and allow several curls to descend over the pumpkin body.
- Use shorter tendrils to fill narrow gaps between leaves while preserving visible areas of the ivory pumpkin surface.
- Check the stem, flowers, leaves, and vines by lifting and rotating the centerpiece; reinforce any component that moves excessively.
- Weave all remaining tails into matching ivory stitches, reshape the lobes, and place the centerpiece on a flat surface for its final inspection.
The completed centerpiece should show eight broad pumpkin lobes, three dominant ivory flowers, a tall hooked stem, layered pointed leaves, and several raised tendrils without losing the underlying pumpkin silhouette.
7 Technical Tips
- Shallow pumpkin channels: A 40 cm body can remain spherical if the sculpting strands are loose. Pull each of the eight strands until the channel remains visible from approximately 1 m away.
- Overcompressed lobes: Excessive shaping tension produces eight narrow wedges instead of broad pumpkin sections. Stop tightening while every lobe retains a rounded central face.
- Visible stuffing: Super-bulky stitches can separate as the body expands. Reduce the body hook by approximately 1 mm if white fiberfill remains visible through multiple stitch gaps.
- Falling stem: The tall hook creates substantial leverage at its base. Sew through at least 4–5 cm of the lower stem circumference and make several passes through separate crown stitches.
- Rigid stem curve: Packing the entire tube equally firmly prevents the upper section from bending. Keep the upper third lightly filled and shape the curve before permanently closing R36.
- Flattened flower crown: Sewing every petal to the pumpkin removes the layered structure. Secure each flower through its base and central area while leaving the outer petals unattached.
- Stretched tendrils: A spiral tacked continuously against the pumpkin loses its curl. Anchor a long tendril approximately every 5–7 cm and leave the sections between those points free.
Why Super-Bulky Yarn Works for the Body
Super-bulky #6 yarn with a 9 mm hook is an established combination for chunky crochet pumpkins. The thicker yarn builds circumference quickly and creates a surface substantial enough to support the oversized flower crown.
Using the same super-bulky yarn for every botanical component would change the proportions. Leaves would become extremely thick and individual rose petals could lose definition. The pattern therefore moves down to worsted yarn for the crown while retaining the same ivory color.
This change in yarn thickness is functional rather than decorative. One color connects all the components visually, while different stitch scales separate the body, stem, flowers, and foliage.
Creating a Stable Pumpkin Base
Place most of the early stuffing around the outside circumference rather than packing the center first. This supports the lobes while leaving enough central compression for sculpting.
After closing the body, press downward on the crown while supporting the base. A tall sphere is less stable than the compressed profile shown in the reference.
If the finished pumpkin rocks, identify the highest point on the underside and redistribute the nearby stuffing through the fabric before completing the sculpting strands.
Do not attach flowers until the body can remain upright independently.
Making the Stem Hold Its Curve
A lightly stuffed crochet tube can hold a modest curve, but the exaggerated hook in the image may require internal support.
When using craft wire, select a flexible covered type rather than bare sharp wire. Fold both ends into closed loops and pad them with stuffing.
Insert the support before the stem is closed. Shape the lower portion almost vertically, begin the bend above the flowers, then bring the tip forward in a gradual arc.
Do not repeatedly bend the same point after assembly. Concentrated bending can fatigue the internal support and wear the crochet fabric.
Making the Flower Crown Removable
A removable crown can reduce storage space. Crochet an ivory disc approximately 16–18 cm across and leave an opening at the center for the stem.
Sew the three flowers and most leaves to that disc rather than directly to the pumpkin. Place the completed crown around the stem and secure it with concealed yarn ties.
Long tendrils can remain attached to the removable foundation if they begin beneath the flowers. Raised ribs on the pumpkin body should remain permanently attached.
This method also makes it possible to replace the floral crown with another seasonal topper while keeping the same large ivory pumpkin.
Scaling the Pumpkin Down
For a smaller centerpiece, stop the body increases at 60 stitches. Work approximately 11–13 even rounds, then reverse the shaping sequence by removing six stitches on each decrease round.
A medium version can stop at 66 stitches. Keep the same six-point increase logic so the top and bottom remain mathematically balanced.
Reduce the flower count from three to two if the crown becomes crowded. Shorten the stem by removing several 12-stitch rounds from its upper section.
Measure the body before making the flowers. Botanical components should be scaled to the actual finished pumpkin rather than the theoretical stitch count.
Alternative Color Palettes
The monochrome ivory treatment makes stitch texture responsible for most of the detail. Color can be introduced without changing the construction.
For an autumn palette, use warm cream for the body, terracotta flowers, and olive leaves. A softer version can combine ivory with dusty rose flowers and sage foliage.
For stronger contrast, work the pumpkin in charcoal and retain ivory flowers. Another option is a rust body with oatmeal flowers and a dark brown stem.
If the gold bead centers are retained, warm neutrals and muted autumn colors generally provide stronger visual separation than bright primary shades.
Decorative Bead Safety
The metallic spheres visible in the flower centers can be represented with pearl-style craft beads. Attach them only after the flower has been sewn securely to the pumpkin.
Pass strong thread through each bead more than once and knot on the hidden underside of the flower. Individual attachment prevents an entire cluster from releasing if one thread is damaged.
Beads make this project unsuitable as a toy for young children. For a child-safe decorative version, replace them with small crocheted bobbles or tightly embroidered French-knot-style yarn details.
Care and Storage
Follow the washing instructions for the chosen yarn. A giant stuffed centerpiece may be difficult to dry thoroughly after full immersion, so removable flowers and surface spot cleaning can be more practical.
Support the stem during storage. Do not compress its curved upper section underneath the pumpkin body or another heavy object.
Place acid-free tissue or clean fabric between the flower layers if the centerpiece will remain boxed for an extended period. Reshape the leaves and petals after storage rather than pulling directly on their attachment stitches.
Inspect internal wire and decorative beads periodically if either is used.
Finishing the Giant White Crochet Pumpkin
Inspect the centerpiece from the front and directly above before trimming the final yarn tails. All eight channels should remain visible beneath the botanical crown, the three flowers should overlap without forming one solid mass, and the tall stem should rise above them before curving forward. Reposition any tendril that hides an entire pumpkin lobe.
The final giant white crochet pumpkin pattern depends on proportion more than color: a broad body, deep sculpted ribs, oversized hooked stem, three layered flowers, and pointed foliage. Complete the body first and record its actual diameter before sizing the crown.
Share the finished centerpiece on Pinterest or Instagram with #GiantWhiteCrochetPumpkin. Would you keep the entire flower crown ivory or add sage leaves while leaving the pumpkin and roses monochrome?









