Introduction
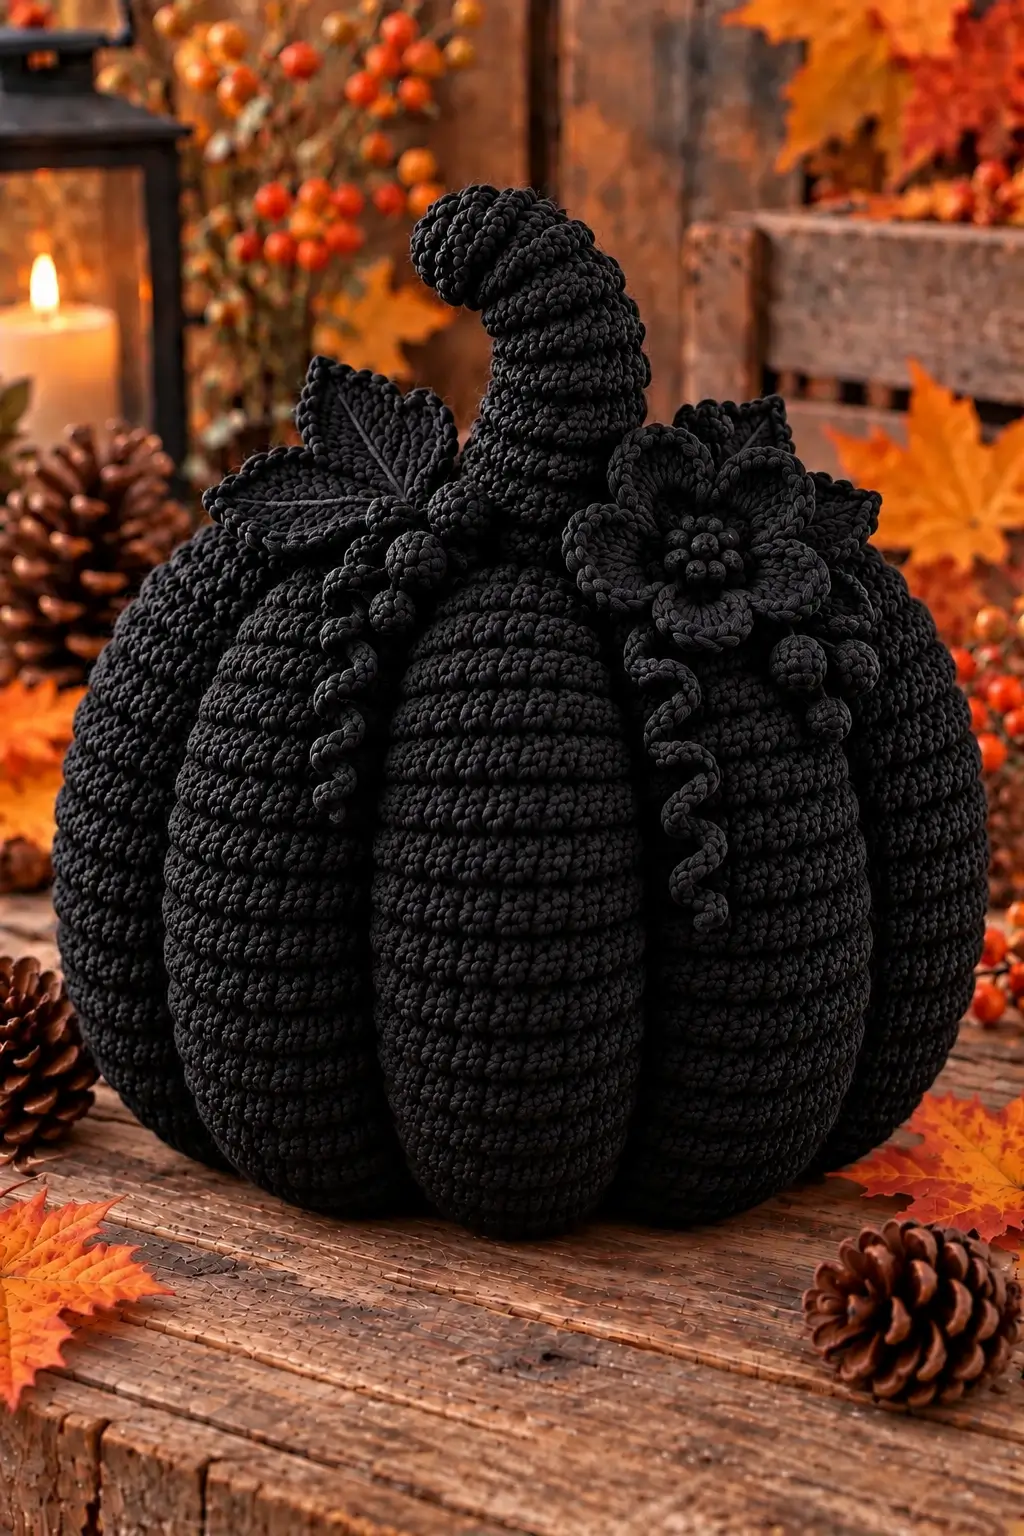
Black yarn hides shallow pumpkin grooves, so this design needs unusually deep ribs to keep its segmented silhouette visible. This black crochet pumpkin pattern combines a large stuffed body with raised texture, eight sculpted sections, a curved stem, layered black flowers, leaves, berries and spiral vines. The finished piece works as substantial autumn or Halloween table, mantel and entryway decor.
The Design: What Makes This Black Crochet Pumpkin Different
The pumpkin depends on depth rather than color contrast. Eight broad sections create the primary silhouette, while raised crochet texture prevents the black surface from appearing flat. External shaping strands pull the stuffed body inward between the sections and produce the deep vertical valleys visible from top to bottom.
The upper decoration is deliberately asymmetrical. A tall curved stem occupies the center, while the crochet pumpkin with flowers places leaves, berries and layered petals around its base. Two spiral vines extend downward over the pumpkin ribs. The combination makes the top structurally busy without covering the segmented body.
The most common failure is insufficient rib depth. A loosely pulled shaping strand disappears against black yarn, particularly in low light.
Project Info at a Glance
| Skill Level | Construction | Finished Size | Hook | Best For |
|---|---|---|---|---|
| Intermediate | Stuffed body with external shaping | Approx. 25–30 cm wide | 4–5 mm reference | Autumn and Halloween decor |
The exact dimensions of the photographed pumpkin cannot be measured from the image. The 25–30 cm target is therefore a reconstruction size rather than a measurement of the photographed object.
Materials and Tools
Yarn
- Black — worsted or heavy-worsted weight — approximately 180–250 g for the pumpkin body.
- Black — approximately 30–50 g for the stem, flowers, leaves, berries and vines.
- Black shaping yarn — approximately 8–10 m of strong matching yarn for forming the ribs.
A matte or lightly textured yarn makes the stitch structure easier to see than an extremely glossy black fiber. Use the same dye lot for the body whenever possible because slight black-to-charcoal differences become visible under strong lighting.
Tools
- 4–5 mm crochet hook
- Polyester fiberfill
- Long upholstery or doll needle
- Tapestry needle
- Stitch markers
- Scissors
- Blocking pins for leaves and flowers
Abbreviations
- MR — magic ring
- ch — chain
- sc — single crochet
- hdc — half double crochet
- dc — double crochet
- tr — treble crochet
- inc — increase
- dec — invisible decrease
- sl st — slip stitch
- bo — bobble stitch
- st/sts — stitch/stitches
- R/Rnd — round
For an invisible decrease, insert the hook through the front loops of the next two stitches, yarn over and complete both loops together as one single crochet.
Pattern Notes
- US crochet terminology is used.
- Work the main body in continuous spirals.
- Place a stitch marker in the first stitch of every round.
- Numbers in parentheses indicate the total stitch count.
- The body reaches a maximum of 42 stitches before the straight middle section.
- External shaping creates the eight deep pumpkin ribs.
- Decorative flowers, leaves, berries and vines are made separately and sewn on last.
Black Crochet Pumpkin Pattern — Step by Step
Large Pumpkin Body
Yarn: black.
R1: 6 sc in MR (6)
R2: inc × 6 (12)
R3: (sc, inc) × 6 (18)
R4: (2 sc, inc) × 6 (24)
R5: (3 sc, inc) × 6 (30)
R6: (4 sc, inc) × 6 (36)
R7: (5 sc, inc) × 6 (42)
R8: sc around (42)
R9: alternate sc and small bobble stitches around while maintaining 42 working positions. (42)
R10: sc around (42)
R11: sc around (42)
R12: repeat the textured bobble placement from R9, offsetting the bobbles so they do not stack directly above the previous textured round. (42)
R13: sc around (42)
R14: sc around (42)
R15: work another offset textured round while maintaining 42 working positions. (42)
R16: sc around (42)
R17: sc around (42)
R18: repeat the textured round. (42)
R19: sc around (42)
R20: sc around (42)
R21: repeat the textured round. (42)
R22: sc around (42)
R23: (5 sc, dec) × 6 (36)
R24: (4 sc, dec) × 6 (30)
R25: (3 sc, dec) × 6 (24)
Begin stuffing firmly. Add fiberfill in small sections and distribute it toward the outer wall rather than leaving one dense lump in the center.
R26: (2 sc, dec) × 6 (18)
Add more stuffing. Keep the pumpkin compressible because the external shaping strands still need to pull through the body.
R27: (sc, dec) × 6 (12)
Finish stuffing before the final decrease.
R28: dec × 6 (6)
Fasten off. Close the remaining opening securely and weave the tail into the interior.
Creating the Eight Deep Pumpkin Ribs
The external shaping is the most important construction stage for this design. Black yarn provides very little color-based definition, so the valleys need enough depth to create visible shadow.
- Thread approximately 1–1.5 m of strong black yarn through a long needle.
- Insert the needle through the bottom center and bring it out through the top center.
- Carry the yarn down the outside of the pumpkin.
- Insert the needle through the bottom center again and bring it back through the top.
- Pull gradually until a distinct vertical groove appears.
- Create a second groove directly opposite the first.
- Add two more grooves at approximately 90-degree intervals.
- Divide each remaining section again to produce eight approximately equal ribs.
- Compare the groove depth from every side before securing the shaping yarn.
- Knot the yarn at the top center where the stem and floral decorations will conceal it.
Massage the stuffing between adjacent grooves after shaping. Each section should remain broad and rounded rather than becoming narrow or pointed.
Tall Curved Stem
Yarn: black.
R1: 6 sc in MR (6)
R2: inc × 6 (12)
R3: sc around (12)
R4: (sc, dec) × 4 (8)
R5–R8: sc around (8)
R9: sc in next 5 sts, sl st in next 3 sts (8)
R10: sc around (8)
R11: sc in next 5 sts, sl st in next 3 sts (8)
R12–R14: sc around (8)
R15: sc in next 4 sts, sl st in next 4 sts (8)
R16–R18: sc around (8)
Fasten off, leaving approximately 35 cm for attachment.
Stuff the lower half moderately. Add progressively less stuffing toward the tip so the stem can curve without forming a sharp fold.
Shaping the Stem Curve
Thread a separate strand of black yarn through the stem from base to tip. Return the yarn down one side and pull lightly until the stem develops a gradual forward curve.
Secure the shaping strand at the base. Do not pull until the stem folds in half; the photographed stem has a continuous arc rather than a hinge.
Large Layered Black Flower
Make 1–2. Yarn: black.
Flower Center
R1: 6 sc in MR (6)
R2: inc × 6 (12)
R3: work 6 small bobbles evenly around, using the spaces between them to create a clustered raised center.
Fasten off if making the petals separately, or continue directly into the first petal layer.
Inner Petals
Work six evenly spaced petals around the center.
For each petal, work:
(sc, hdc, 2 dc, hdc, sc) into the designated petal space.
Slip stitch into the next attachment point before beginning the following petal.
Outer Petals
Create chain spaces behind the inner petal layer.
Into each space work:
(sc, hdc, dc, 2 tr, dc, hdc, sc)
Repeat around to form a larger second layer.
Fasten off, leaving a 30 cm sewing tail.
Small Black Flower
Make 1–2 as needed.
R1: 6 sc in MR (6)
R2: work one petal into each stitch using (sl st, ch 2, 2 dc, ch 2, sl st). Repeat six times.
Fasten off and leave a sewing tail.
Large Pointed Leaves
Make 3–5. Yarn: black.
Foundation: ch 15.
Starting in the second chain from the hook:
Side 1: sl st, sc, hdc, dc in next 7 ch, hdc in next 2 ch, sc, sl st, 3 sc in final ch.
Rotate the foundation chain and work into the unused loops along the opposite side.
Side 2: sl st, sc, hdc in next 2 sts, dc in next 7 sts, hdc, sc, sl st.
Fasten off, leaving approximately 25 cm for sewing.
Raised Leaf Vein
Use surface slip stitches or embroidery to work a central vein from the leaf base toward the point.
Add two or three short diagonal veins on each side. Keep these strands loose enough that the leaf remains flat.
Small Leaves
Make 3–4.
Foundation: ch 9.
Beginning in the second chain:
Side 1: sl st, sc, hdc, dc in next 3 ch, hdc, sc, 3 sc in final ch.
Rotate and work along the opposite side:
Side 2: sc, hdc, dc in next 3 sts, hdc, sc, sl st.
Fasten off and leave a sewing tail.
Black Crochet Berries
Make 5–8.
R1: 6 sc in MR (6)
R2: inc × 6 (12)
R3: sc around (12)
Add a very small amount of stuffing.
R4: dec × 6 (6)
Fasten off and close the opening. Leave approximately 15 cm for attachment.
For smaller berries, omit R2 and work one straight round of six stitches before closing.
Curly Crochet Vines
Make 2–3. Yarn: black.
Long vine: ch 40.
Beginning in the second chain from the hook, work 3 sc in every chain across.
The increase automatically forces the strip into a spiral.
Fasten off and leave a sewing tail.
Short vine: ch 25 and repeat the same 3-sc-per-chain construction.
If the spiral is too tight, work alternating groups of 2 sc and 3 sc instead of three stitches into every chain.
Positioning the Top Decorations
Attach the stem before adding flowers. Position its base over the center point where the eight shaping strands intersect.
Place the largest flower slightly to one side of the stem rather than directly in front of it. Arrange two or three large leaves behind the flower and allow their tips to extend beyond the floral cluster.
Add smaller leaves to the opposite side to balance the composition without making it symmetrical.
Position berries in groups of two or three. The spiral vines should emerge from underneath the floral cluster and fall over separate pumpkin ribs.
Attaching the Stem
Pin the stem to the top center. Check its direction from the front, both sides and the back before sewing.
Using the long stem tail, sew around the complete base. Pass the needle through both the stem fabric and several stitches of the pumpkin body.
Repeat the attachment round if the stem moves when lightly pushed.
Attaching the Leaves
Arrange all leaves before sewing any of them permanently.
Sew only the lower third to half of each leaf to the pumpkin. Leaving the outer portion free creates the raised structure visible around the floral crown.
Position the largest leaves behind the main flower and use smaller leaves to fill gaps near the berries.
Attaching the Flowers
Pin each flower through its center before sewing.
Attach the central section and inner portions of the outer petals. Do not sew the complete outer edge of every petal flat against the pumpkin.
Leaving the petal tips free gives the flower enough depth to remain visible despite the monochrome black palette.
Attaching the Berries and Vines
Sew each berry through its base using several small stitches. Cluster them around the flowers instead of spacing individual berries evenly around the stem.
Attach the top 2–3 cm of each spiral vine beneath a flower or leaf. Leave most of the spiral unattached so it can follow the curve of the pumpkin naturally.
If a vine projects too far from the body, secure one additional point approximately halfway down without flattening the complete spiral.
Assembly
- Stuff and close the main pumpkin body before beginning the decorative components.
- Create eight deep external ribs, working opposite grooves first to keep the body symmetrical.
- Massage the stuffing between the grooves until all eight pumpkin sections are rounded.
- Stuff and shape the curved stem, then sew it over the top-center intersection.
- Pin the large leaves around the stem with their tips pointing outward.
- Add the smaller leaves while keeping the arrangement deliberately asymmetrical.
- Position the largest layered flower over the leaf bases and sew its center securely.
- Add the smaller flowers and berry clusters around the principal flower.
- Attach two or three spiral vines beneath the floral cluster and allow them to fall over separate ribs.
- Weave all remaining tails into the stuffed body and inspect every decoration for secure attachment.
The finished pumpkin should have eight clearly defined ribs, one curved central stem and an asymmetrical cluster of dimensional flowers, leaves, berries and vines.
7 Technical Tips for a Black Crochet Pumpkin
- Work black yarn under strong directional lighting. Poor lighting makes the top loops difficult to distinguish and increases the risk of missed stitches. Place the light above and slightly behind your working hand so the stitch openings cast small visible shadows.
- Count every increase and decrease round. One missing increase shifts the body away from its intended 42-stitch maximum. Count the complete round before moving the marker.
- Stop stuffing before the pumpkin becomes rigid. Excess fiberfill prevents the shaping strands from producing deep valleys. The stuffed body should compress by approximately 2–3 cm under firm hand pressure before rib shaping.
- Establish four opposite grooves before adding the remaining four. Creating eight ribs consecutively in one direction can pull the center off-axis. Divide the pumpkin into quarters first, then divide each quarter again.
- Keep the stem curve gradual. Pulling its shaping strand too hard creates a visible hinge. Adjust the curve over at least 5–7 cm of stem length instead of bending one single round.
- Leave approximately one-third of each flower petal unattached. Sewing every edge to the pumpkin removes the shadows needed to distinguish black petals from the black body. Secure the flower mainly through its center and inner petal sections.
- Secure shaping yarn through at least 3 cm of dense crochet. Short woven tails can loosen as the stuffed body settles. Change the needle direction inside the pumpkin before trimming the yarn.
How to Make the Pumpkin Larger
The 42-stitch body produces a large decorative pumpkin with standard worsted-weight yarn, but yarn thickness changes the finished dimensions substantially. A heavier yarn can increase the size without changing the stitch counts.
For a wider body using the same yarn, add another increase round:
Additional increase round: (6 sc, inc) × 6 (48)
Work additional straight rounds at 48 stitches before beginning the decreases. Reverse the shaping with:
(6 sc, dec) × 6 (42)
Then continue through the existing decrease sequence.
Adding width without adding straight rounds produces a flatter pumpkin. Adding several straight rounds creates a taller body.
How to Make the Raised Texture More Visible
Texture is particularly important when the entire project uses black yarn. Small bobbles, surface crochet and deeply sculpted ribs create highlights and shadows without requiring a second color.
Keep the bobble placement offset from one textured round to the next. Vertical stacks of bobbles can create unintended columns and compete visually with the eight principal ribs.
A second option is to replace selected plain single crochet rounds with back-loop-only stitches. The unused front loops form subtle horizontal ridges across each pumpkin section.
Do not combine every texture technique at maximum density. The vertical pumpkin segments should remain the strongest structural feature.
Choosing Yarn for the Black Pumpkin
Worsted-weight yarn gives the decorative details enough definition without making the flowers disproportionately heavy. Heavy worsted or aran yarn creates a larger body from the same stitch counts.
A 4–5 mm hook is a practical starting range. The final hook size should produce fabric dense enough to hide the white fiberfill.
Test the fabric after four or five rounds. Stretch it gently between two fingers. If the stuffing would be visible through the resulting gaps, use a smaller hook before continuing.
Finishing the Black Crochet Pumpkin
Inspect the pumpkin under side lighting after all components are attached. Each of the eight ribs should remain visible from the top toward the lower edge, and the decorative crown should not conceal more than the upper portion of the body. Adjust the stuffing manually between the shaping strands if one section appears narrower than its neighbors.
For this black crochet pumpkin pattern, make the body before starting any floral components; its final diameter determines the correct scale for the stem, leaves and flowers. Once the pumpkin is shaped, build the largest flower and test it against the top before making the smaller decorations. Share the finished piece on Pinterest or Instagram with #BlackFloralCrochetPumpkin. Would you keep every botanical detail black or add dark green leaves for contrast? “`1









