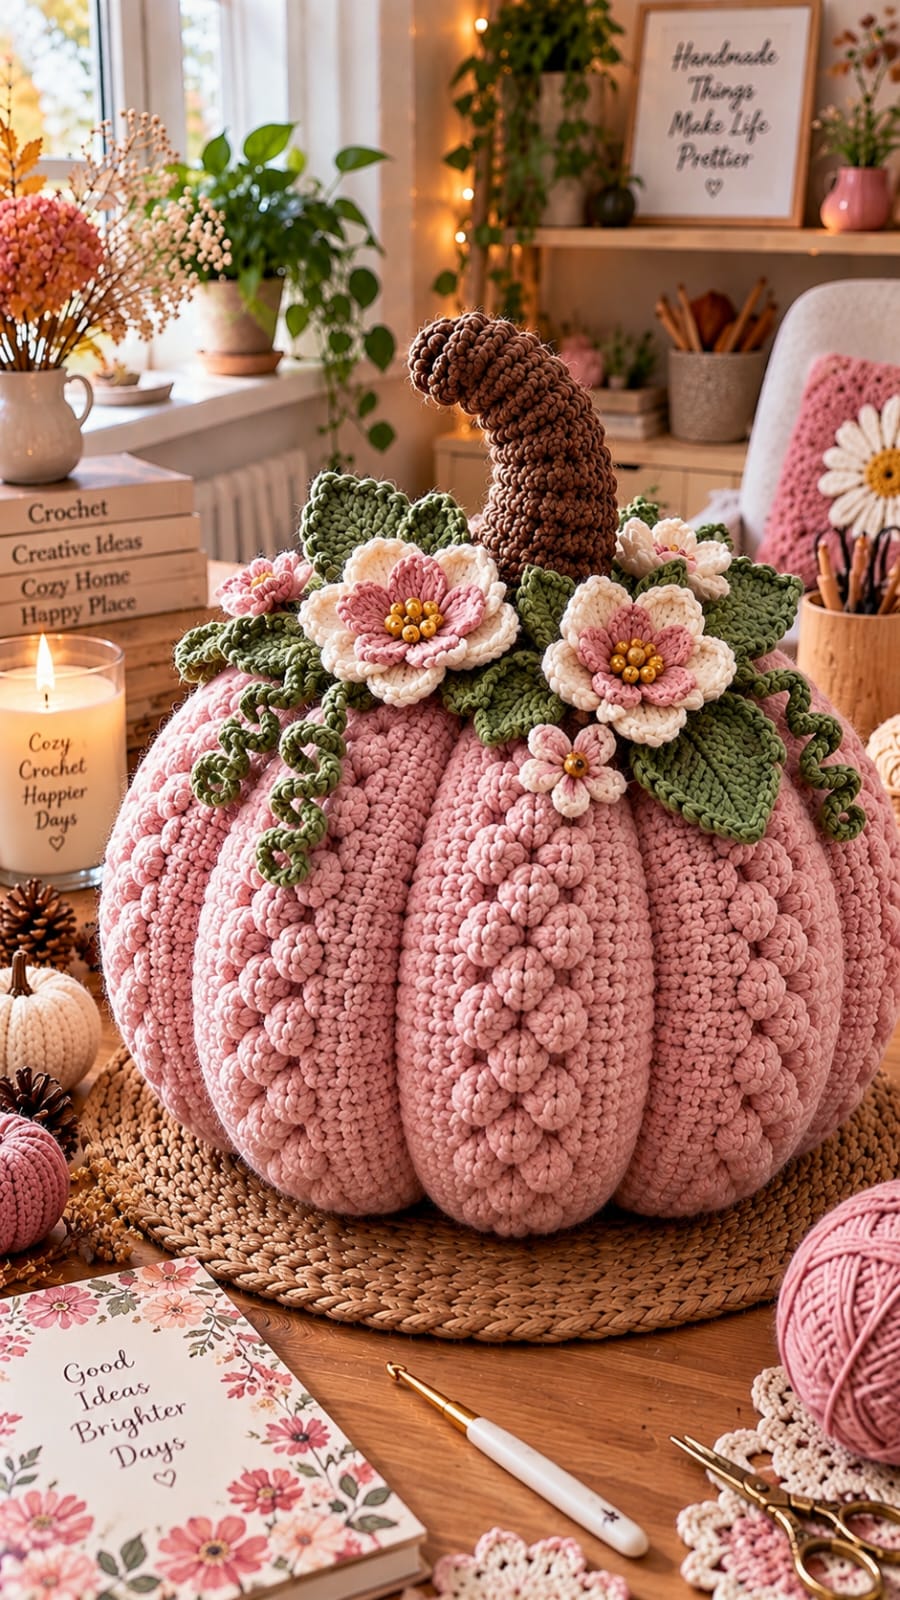
Pink pumpkin ribs disappear quickly when raised flowers cover the wrong part of each lobe. This large pink crochet pumpkin pattern keeps its deep segmentation visible while adding vertical bobble-flower trails, a curved brown stem, olive leaves, layered cream-and-pink blossoms and curling vines. Worked primarily in super-bulky yarn with a 9 mm hook, the finished centerpiece targets approximately 28–32 cm across. Intermediate crochet skills are recommended for sculpting and floral assembly.
What Makes This Pink Crochet Pumpkin Different
The pumpkin begins as one large stuffed body rather than eight individually crocheted wedges. External sculpting strands compress that body into pronounced vertical lobes. This construction keeps the silhouette rounded while producing much deeper channels than stuffing alone.
The second structural decision concerns the embellishment. Raised pink flowers travel vertically along selected lobes but stop short of the grooves. Keeping the channels clear prevents the decorative surface from obscuring the pumpkin shape.
At the crown, broad olive leaves create a platform for layered pink-and-cream flowers. A tall brown stem rises through the center, while green spiral vines descend over several ribs.
A common mistake is attaching the flowers before sculpting. Their positions should be determined only after the final valleys and lobe centers are visible.
Project Info at a Glance
| Skill Level | Time | Finished Size | Body Hook | Construction |
|---|---|---|---|---|
| Intermediate | Approx. 10–14 hours | Approx. 28–32 cm wide | 9 mm | Stuffed body with external sculpting |
The dimensions are targets for this photo-inspired version. Published super-bulky crochet pumpkin patterns commonly use 9 mm hooks, but final dimensions vary considerably with yarn thickness, tension and stuffing density.
Materials and Tools
Yarn
- Dusty pink — super-bulky #6 yarn — approximately 280–350 g for the pumpkin body
- Dusty pink — bulky yarn — approximately 40–60 g for flowers and surface embellishments
- Cream — bulky yarn — approximately 40–60 g for outer flower petals
- Olive green — bulky yarn — approximately 80–100 g for leaves and vines
- Dark brown — bulky yarn — approximately 40–50 g for the curved stem
- Mustard or golden brown — small amount for flower centers
Keep extra pink yarn available if your body grows beyond the target dimensions. Published #6 pumpkin projects show that yarn requirements change sharply with circumference and construction.
Tools
- 9.0 mm crochet hook for the pumpkin body
- 5.0–6.0 mm crochet hook for flowers, leaves and vines
- Polyester fiberfill
- Long upholstery or doll needle
- Tapestry needle
- Locking stitch markers
- Straight pins
- Scissors
- Tape measure
Abbreviations
- MR — magic ring
- ch — chain
- sc — single crochet
- hdc — half double crochet
- dc — double crochet
- tr — treble crochet
- inc — 2 sc in one stitch
- dec — single crochet decrease
- sl st — slip stitch
- st/sts — stitch/stitches
- BO — bobble stitch
For an invisible decrease, insert the hook through the front loops of the next two stitches and complete one single crochet through both loops.
Special Stitch: Five-Loop Bobble
Yarn over, insert the hook into the indicated stitch and pull up a loop. Yarn over and pull through two loops, leaving the unfinished double crochet on the hook.
Repeat four more times in the same stitch.
Yarn over and pull through all remaining loops. Work the following stitch firmly so the bobble projects toward the front.
Large Pink Crochet Pumpkin Pattern
Work the body in a continuous spiral. Mark the first stitch of every round.
Dusty Pink Pumpkin Body
Yarn: dusty-pink super-bulky #6.
R1: 6 sc in MR. (6)
R2: Inc ×6. (12)
R3: (1 sc, inc) ×6. (18)
R4: (2 sc, inc) ×6. (24)
R5: (3 sc, inc) ×6. (30)
R6: (4 sc, inc) ×6. (36)
R7: (5 sc, inc) ×6. (42)
R8–R11: Sc around. (42)
R12: (6 sc, inc) ×6. (48)
R13–R20: Sc around. (48)
R21: (6 sc, dec) ×6. (42)
R22–R24: Sc around. (42)
R25: (5 sc, dec) ×6. (36)
R26: Sc around. (36)
R27: (4 sc, dec) ×6. (30)
Begin stuffing around the outside wall. Keep the body full but compressible.
R28: (3 sc, dec) ×6. (24)
R29: (2 sc, dec) ×6. (18)
Add the remaining stuffing and shape the body into a broad sphere.
R30: (1 sc, dec) ×6. (12)
R31: Dec ×6. (6)
Fasten off. Thread the tail through the front loops of the final six stitches and pull the opening closed.
Sculpting the Deep Pumpkin Ribs
Cut approximately 250 cm of strong matching pink yarn and thread it onto a long needle.
Insert the needle through the bottom center and bring it out at the top center.
Run the yarn down the exterior and return through the bottom center. Pull until the first groove becomes clearly defined.
Create the second groove directly opposite the first.
Add two more grooves at approximately 90-degree intervals. The body is now divided into four broad sections.
Divide each section once more to create eight lobes.
Establish all eight channels before applying maximum tension. Then work around the pumpkin a second time, tightening each groove gradually.
Tie securely at the base and bury the yarn ends inside the body.
Small Pink Bobble Flower — Make 20–26
Yarn: dusty pink.
R1: 6 sc in MR. Join. (6)
R2: Ch 1. Work BO in first stitch, sl st in next stitch. Repeat three times around.
Fasten off and leave approximately 20 cm for sewing.
For selected larger embellishments, begin with 8 sc instead of 6 and make four bobble lobes.
Creating the Vertical Flower Trails
Select three or four alternating pumpkin lobes.
Pin the first flower approximately 4 cm above the bottom of a lobe.
Add the remaining flowers upward with approximately 1–2 cm between them.
Keep the flowers near the center of each lobe. Do not let them cross into the sculpted channels.
Rotate individual flowers slightly rather than arranging every lobe in exactly the same orientation.
Sew through each flower center several times while leaving the bobbles free.
Tall Curved Brown Stem
Yarn: dark brown.
R1: 6 sc in MR. (6)
R2: Inc ×6. (12)
R3–R6: Sc around. (12)
R7: (2 sc, dec) ×3. (9)
R8–R14: Sc around. (9)
Begin adding small amounts of stuffing.
R15: 4 sc, sl st in next 2 sts, 3 sc. (9)
R16: 3 sc, sl st in next 3 sts, 3 sc. (9)
R17–R20: Sc around. (9)
R21: 4 sc, sl st in next 2 sts, 3 sc. (9)
R22–R25: Sc around. (9)
R26: (1 sc, dec) ×3. (6)
R27–R28: Sc around. (6)
Fasten off and close the upper end. Leave a 35 cm tail at the base.
The slip-stitch sections shorten one side and help the tube bend. Stuff lightly enough that the upper stem can form a broad hook rather than a sharp crease.
Large Olive Leaf — Make 5
Yarn: olive green.
Ch 15.
Starting in the second chain from the hook, work:
Sc, hdc, dc, dc, tr, tr, tr, tr, dc, dc, hdc, sc, sc.
Work 3 sc into the final chain.
Continue along the opposite side:
Sc, sc, hdc, dc, dc, tr, tr, tr, tr, dc, dc, hdc, sc.
Join with sl st.
Border Round: Ch 1 and sc around the entire leaf. Work 3 sc into the tip.
Fasten off, leaving approximately 30 cm for attachment.
Pointed Crown Leaf — Make 3
Yarn: olive green.
R1: 6 sc in MR. (6)
R2: Inc ×6. (12)
R3: (1 sc, inc) ×6. (18)
Point 1: Ch 8. Starting in second ch, work sc, hdc, dc, tr, tr, dc, hdc. Sl st into the next available stitch.
Point 2: Ch 7. Work sc, hdc, dc, tr, dc, hdc back toward the center. Sl st into the next available stitch.
Center Point: Ch 10. Work sc, hdc, dc, tr, tr, tr, dc, hdc, sc. Sl st into the next available stitch.
Repeat Point 2 and then Point 1.
Sc evenly around the outer edge, placing 3 sc at each point.
Fasten off with a long sewing tail.
Large Layered Pink and Cream Flower — Make 3
Yarn: mustard center, dusty pink inner petals and cream outer petals.
Flower Center
R1: With mustard, 6 sc in MR. (6)
R2: Inc ×6. (12)
Fasten off mustard.
Pink Inner Petals
Join dusty pink.
R3: Sl st in first stitch. In the next stitch work hdc, 3 dc, hdc. Sl st in next stitch.
Repeat around to create six petals.
Fasten off pink.
Cream Outer Petals
Working behind the pink petals, join cream around the base of one petal.
Ch 5 and sl st around the base of the next petal. Repeat around to form six ch-5 spaces.
Into each ch-5 space work:
Sc, hdc, dc, 3 tr, dc, hdc, sc.
Repeat in all six spaces.
Fasten off, leaving approximately 35 cm for sewing.
Golden Flower Center Bobbles
For the clustered center visible in the reference, make 5–7 tiny mustard bobbles.
Ch 2.
Work 4 unfinished hdc into the second chain from the hook.
Yarn over and pull through all loops.
Fasten off.
Sew the small bobbles close together over the center of the layered flower.
If beads are substituted for crocheted bobbles, treat the finished pumpkin strictly as decorative household art and keep it away from small children.
Small Five-Petal Flower — Make 3
Yarn: pink petals with mustard center.
R1: With mustard, 5 sc in MR. (5)
Change to pink.
R2: In each stitch work sl st, ch 2, 2 dc, ch 2, sl st.
Repeat in all five stitches.
Fasten off, leaving a 20 cm sewing tail.
Green Spiral Vine — Make 4
Yarn: olive green.
Ch 32.
Starting in the second chain from the hook, work 3 sc into each chain.
The chain will begin curling automatically.
For the final 8 chains, work 4 sc into each chain if a tighter lower spiral is required.
Fasten off and leave approximately 25 cm for attachment.
Assembly
- Sculpt the completed pink body into eight evenly spaced lobes before attaching any decoration.
- Center the brown stem over the top closing point and sew through its lower two rounds into the pumpkin body.
- Pin the five largest olive leaves around the stem with their points extending over different lobes.
- Add the remaining pointed leaves between the large leaves to fill visible crown gaps.
- Position the three layered flowers around the front and sides of the stem and sew securely through their centers.
- Add the small five-petal flowers to open spaces between the larger blossoms and foliage.
- Arrange the pink bobble flowers in vertical trails along selected lobe centers and sew each through its center.
- Attach the green spiral vines beneath the foliage and allow them to descend across different pumpkin sections.
- Curve the upper stem gradually and redistribute its stuffing if the bend forms a hard angle.
- Weave every yarn tail through at least 5 cm of matching fabric, reshape the lobes and separate the flower petals by hand.
The completed pumpkin should have eight deep dusty-pink lobes, raised floral trails, a tall hooked brown stem, layered olive foliage, dimensional pink-and-cream flowers and several hanging green vines.
7 Technical Tips for a Floral Crochet Pumpkin
- Shallow ribs: stop adding stuffing when the body is firm but still compresses under both thumbs. An overfilled center prevents the sculpting strands from producing deep valleys.
- Uneven lobes: create the first four grooves at approximately 90-degree intervals before dividing them again. This establishes eight more consistent sections than spacing all grooves consecutively.
- Visible stuffing: stretch a test section before closing the pumpkin. If fiberfill appears between stitches, reduce the hook by approximately 0.5–1 mm.
- Flattened bobble flowers: sew only through the center of each small embellishment. Stitching around its perimeter removes the raised profile.
- Leaning stem: attach through at least two complete stem rounds. A tall stem sewn only through its final round can pivot under its own weight.
- Hidden leaves: keep at least 4–5 cm of each large leaf visible beyond the flower cluster. Too much overlap removes the green separation between pink flowers and the pumpkin body.
- Uncontrolled vines: anchor the first 2 cm of each spiral with two attachment points. The remaining coil should stay free so it can hang naturally across the rib.
How to Get Deep Rounded Pumpkin Lobes
The sculpting yarn needs something to compress. That means the pumpkin should be full before shaping, but the fiberfill cannot be packed into a rigid mass.
Concentrate stuffing in the future lobe centers and use slightly less around the top-to-bottom lines where the grooves will sit.
Make four primary channels first.
View the pumpkin from directly above. Those channels should divide the crown into approximately equal quarters.
Add one groove halfway between each pair. Eight lobe centers should now surround the stem position.
Tighten each channel a little at a time. Stop when the groove is deep but the adjacent sections remain rounded.
Positioning the Floral Trails
The raised pink flowers should reinforce the vertical direction of the ribs rather than compete with it.
Place each trail down the center of a selected lobe.
Do not decorate every section. Leaving several plain lobes gives the eye enough uninterrupted crochet fabric to read the pumpkin shape.
Start the lowest flower approximately 4 cm above the base. Decorations placed directly against the bottom can prevent the pumpkin from sitting level.
Reduce flower size slightly near the top and bottom of a trail. Larger embellishments belong near the widest portion of the body.
Arranging the Crown Flowers
Pin every crown component before sewing.
Place the largest layered flower toward the front of the stem. Position the second flower slightly higher and to one side, then rotate the third so the arrangement does not form a straight horizontal row.
Insert olive leaves behind the flowers rather than covering them with leaves afterward.
Some leaves should point sideways. Others can angle downward over the first few centimetres of a pumpkin lobe.
Keep the stem attachment partly visible. Completely surrounding it with petals removes the visual transition between the brown stem and pink body.
Making the Curved Crochet Stem
The stem requires less stuffing than the pumpkin body.
Add fiberfill in small portions every 2–3 cm while crocheting. Keep the upper third especially flexible.
The shortened slip-stitch sections begin the curve. After attachment, support the stem at its base and bend the upper portion gradually.
A smooth hook shape is preferable to a single sharp fold.
If a crease develops, pull some stuffing away from that point and redistribute it along the surrounding rounds.
Making Consistent Spiral Vines
Three single crochets in each foundation chain produce the basic corkscrew.
The exact curl depends on yarn thickness and tension. If the first vine is too loose, work four sc into each chain for the next one.
Once a vine is complete, hold it by the base and rotate the spiral gently in one direction.
Do not pull it lengthwise. Stretching separates the coils and makes the vine look like a twisted cord rather than a tendril.
Adjusting the Pumpkin Size
Super-bulky #6 yarn with a 9 mm hook is a common combination for chunky crochet pumpkins. Published patterns also demonstrate that the same general category can produce substantially different circumferences depending on construction.
For a smaller photo-inspired version, stop the increase sequence at 30 stitches and shorten the straight body section.
For a medium pumpkin, stop at 36 stitches.
For the large centerpiece, the standard six-stitch progression can reach 42 stitches before additional shaping is introduced.
Any change to body diameter should be reflected in the decorations. A smaller pumpkin requires shorter vines, narrower leaves and fewer bobble flowers.
Yarn Selection for the Photographed Texture
The reference has dense, rounded stitches rather than long fuzzy fibers. Choose a super-bulky yarn with visible stitch definition.
Chenille produces a softer surface but can hide small bobble details. A plied super-bulky acrylic or wool blend gives sharper definition to both the body and sculpted grooves.
The decorative flowers can use a slightly thinner bulky yarn. This prevents the crown from becoming disproportionately heavy.
For the photographed palette, choose dusty or muted pink instead of neon pink. Olive foliage and warm brown then provide enough contrast without overpowering the body color.
Finishing the Pink Crochet Pumpkin
Set the finished pumpkin on a flat table and inspect its base. It should rest on several lobe edges rather than on the central closing point.
Look directly down from above and compare all eight sections. Adjust the stuffing by hand if one lobe appears substantially narrower than its neighbors.
Check that at least two flower trails are visible from the primary viewing angle.
Separate the layered flower petals and pull the olive leaf points outward from beneath them.
Finally, position the vines so their coils remain visible against the pink background rather than disappearing behind the foliage.
Final Notes
Finish the body and its sculpted grooves before deciding exactly how many flowers are required. The actual lobe length gives a better guide for spacing than an estimated diameter, and it prevents unnecessary embellishments from crowding the surface.
For the reference effect, combine a broad dusty-pink body with deep channels, selective raised flower trails and an asymmetrical botanical crown. Keep several ribs relatively plain so the pumpkin structure remains readable beneath the decoration.
Once the large pink crochet pumpkin pattern is complete, photograph it slightly above the crown so the curved stem, flowers, leaves and sculpted ribs appear together. Save the project to Pinterest or share the finished color combination on Instagram with #PinkFloralCrochetPumpkin. For a second version, would you change the cream outer petals to pale peach or keep the pink-and-cream combination?









