Introduction
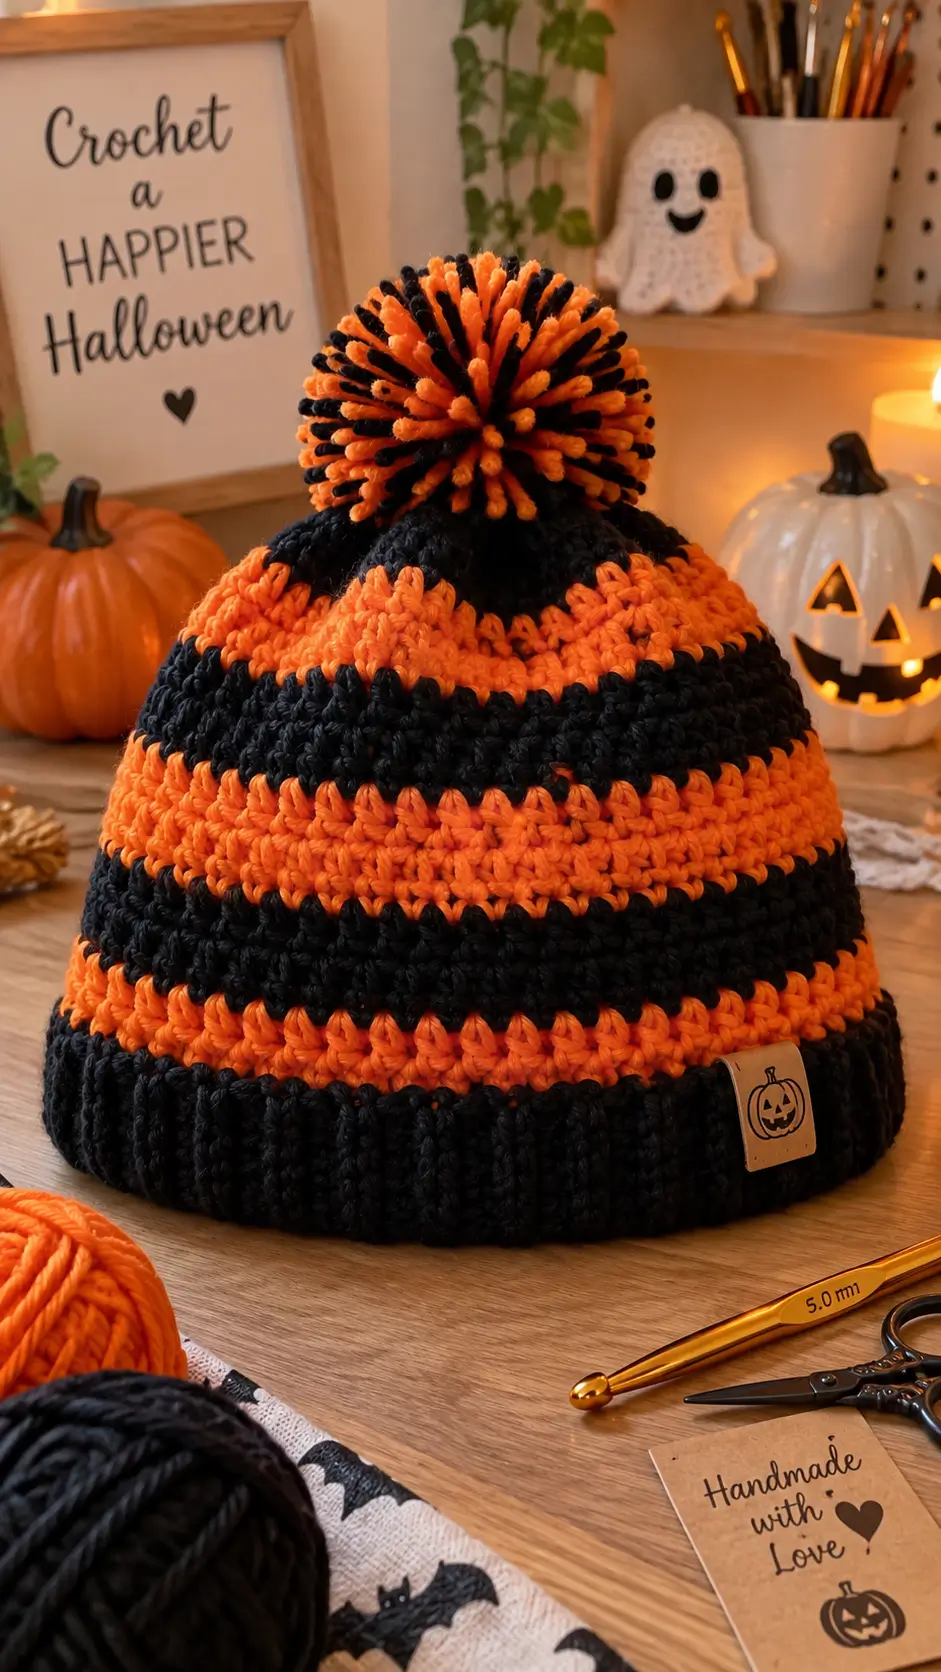
Orange and black bands turn an ordinary beanie into Halloween clothing before a single pumpkin appliqué is added. This Halloween striped crochet beanie uses worsted yarn, a 5 mm hook, a ribbed lower section and an oversized mixed-color pom-pom. The adult version targets roughly 55–57 cm head sizing and suits an advanced beginner. Its limited two-color palette also makes it practical for using partial skeins.
The Design: What Makes This Halloween Beanie Different
Three structural choices control the design. First, the orange and black stripes remain broad enough to read independently instead of producing narrow color noise. Second, a deep black ribbed section anchors the lower edge; ribbing also adds stretch where the hat contacts the head. Third, the orange-and-black pom-pom repeats both body colors rather than introducing a third shade.
The photographed orange and black crochet hat has a visibly rounded upper section, while the lower edge is substantially denser. That proportion matters. A common error in a striped crochet beanie pattern is beginning crown shaping too abruptly, which creates a pointed top under the pom-pom. Here, gradual shaping and controlled gauge keep the crown rounded.
Project Info at a Glance
| Skill Level | Time | Finished Size | Hook | Best For |
|---|---|---|---|---|
| Advanced beginner | Approx. 4–6 hours | Adult, target 55–57 cm head | 5.0 mm | Halloween wear, markets and fall gifts |
Materials and Tools
Yarn
- Pumpkin orange — worsted/category 4 — approximately 40–50 g
- Black — worsted/category 4 — approximately 35–45 g
- Pom-pom allowance — reserve approximately 15–25 g total, depending on diameter and density
Use the same yarn family for both colors where possible. Matching fiber content, twist and thickness keeps the stripe transitions even and prevents one color from producing a noticeably different gauge.
Tools
- 5.0 mm crochet hook
- Yarn needle
- Locking stitch markers
- Sharp scissors
- Flexible measuring tape
- 85–100 mm pom-pom maker or cardboard templates
- Optional faux-leather Halloween tag
No safety eyes or stuffing are required because this project is a wearable crochet hat rather than an amigurumi toy.
Abbreviations
- MR — magic ring
- sc — single crochet
- hdc — half double crochet
- inc — 2 stitches in one stitch
- dec — decrease
- sl st — slip stitch
- ch — chain
- BLO — back loop only
- FPdc — front-post double crochet
- BPdc — back-post double crochet
- st/sts — stitch/stitches
For an invisible decrease, insert the hook through the front loops of the next two stitches before completing them together; this reduces the visible gap produced by a conventional decrease.
Halloween Striped Crochet Beanie Pattern — Step by Step
The instructions below are designed around the visible construction of the pictured hat and standard crochet shaping principles. Check gauge and circumference before completing the full body because yarn substitution can substantially change the finished size.
Crown
Yarn: black. Work with standard six-stitch increase shaping.
R1: 6 hdc in MR. (6)
R2: inc ×6. (12)
R3: (hdc, inc) ×6. (18)
R4: (2 hdc, inc) ×6. (24)
R5: (3 hdc, inc) ×6. (30)
R6: (4 hdc, inc) ×6. (36)
R7: (5 hdc, inc) ×6. (42)
Measure the crown before proceeding. The increase sequence adds six stitches per round, but the actual diameter depends on yarn thickness, hook size and individual tension.
R8: hdc around. (42)
R9: hdc around. (42)
Change to orange at the final yarn-over of R9.
Striped Hat Body
Yarn: pumpkin orange and black.
R10: orange hdc around. (42)
R11: orange hdc around. (42)
R12: orange hdc around. (42)
Change to black.
R13: black hdc around. (42)
R14: black hdc around. (42)
R15: black hdc around. (42)
Change to orange.
R16: orange hdc around. (42)
R17: orange hdc around. (42)
R18: orange hdc around. (42)
Change to black.
R19: black hdc around. (42)
R20: black hdc around. (42)
R21: black hdc around. (42)
Change to orange.
R22: orange hdc around. (42)
R23: orange hdc around. (42)
R24: orange hdc around. (42)
Measure from the center of the crown toward the lower edge at this stage. Add another complete stripe section only when additional depth is required. Changing body length is preferable to altering the established circumference.
The broad three-round color sections reproduce the strong horizontal orange-and-black appearance visible in the reference design.
Ribbed Black Brim
Yarn: black.
R25: black hdc around. (42)
R26: FPdc around. (42)
R27: alternate FPdc, BPdc around. (42)
R28: alternate FPdc, BPdc around. (42)
R29: alternate FPdc, BPdc around. (42)
R30: alternate FPdc, BPdc around. (42)
R31: alternate FPdc, BPdc around. (42)
R32: alternate FPdc, BPdc around. (42)
Slip stitch into the first stitch. Fasten off and leave approximately a 15 cm tail for weaving.
The lower black section should remain noticeably deeper and more textured than the striped body. Reducing the brim to only two or three rounds changes both the fit and the proportions of the finished hat.
Optional Extra-Deep Brim
If additional brim depth is required, continue as follows:
R33: alternate FPdc, BPdc around. (42)
R34: alternate FPdc, BPdc around. (42)
R35: alternate FPdc, BPdc around. (42)
Fasten off. Measure the total hat depth against the intended wearer before finishing the yarn ends.
Orange-and-Black Pom-Pom
Yarn: pumpkin orange and black.
Prepare an 85–100 mm pom-pom maker or two cardboard templates. Wrap orange yarn around sections of the template, then introduce groups of black wraps between the orange. Avoid separating the colors into two complete halves; scattered color groups create the mixed appearance shown in the reference hat.
Continue wrapping until the center is densely filled. Cut around the outer circumference while keeping the wrapped strands under control.
Pass a strong 40 cm strand of yarn around the center. Pull firmly and knot several times before removing the template.
Fluff the strands and trim projecting ends until the pom-pom forms an even sphere. Keep the two long securing tails intact because these attach the pom-pom to the crown.
Optional Faux-Leather Halloween Tag
Position the decorative tag approximately 20–25 mm above the bottom edge of the black brim. Pin it temporarily and check its alignment before sewing.
Use matching sewing thread or fine black yarn through the existing tag holes. Avoid pulling the stitches tightly enough to compress the ribbing because the lower edge needs to retain its stretch.
Assembly
- Close the magic ring firmly and weave the starting tail through several crown stitches.
- Lay the hat flat and check that the orange-to-black transitions follow the same rear seam line.
- Measure the opening and compare it with the intended wearer before finishing the brim.
- Weave orange tails into orange sections and black tails into black sections so contrasting yarn ends remain hidden.
- Thread the two pom-pom securing tails through separate crown spaces approximately 10–15 mm apart.
- Knot the tails securely on the inside so the base of the pom-pom sits directly against the crown.
- Pass each tail through nearby stitches again before making another knot. This distributes the weight of the oversized pom-pom.
- Pin the optional tag to the black brim and check that its position does not restrict the lower edge.
- Sew the tag through its existing holes and bury the thread ends inside the ribbing.
- Trim uneven pom-pom strands only after attachment so its final shape can be judged in relation to the crown.
The finished hat should have a rounded crown, clearly separated orange-and-black bands, a deep black lower section and a centered two-color pom-pom.
7 Technical Tips for a Cleaner Crochet Beanie
- Mark every round. Losing the round boundary by even two stitches moves subsequent color transitions sideways and creates a visible diagonal seam.
- Measure circumference before completing the body. The target adult sizing is approximately 55–57 cm head circumference, but 42 stitches will not produce an identical measurement with every worsted yarn.
- Secure the pom-pom center tightly. A loosely tied center allows individual strands to pull free after trimming or repeated wear.
- Change colors on the final yarn-over. Changing after the stitch is completed leaves a visible segment of the previous color at the beginning of the new stripe.
- Keep the ribbing tension controlled. Excessive tension through R27–R35 can make the opening substantially smaller than the striped body even though both sections contain 42 stitches.
- Position the tag 20–25 mm above the lower edge. Attaching a rigid tag directly across the most elastic portion of the brim can restrict stretch and produce curling.
- Weave contrasting tails for at least 4–5 cm. An orange tail carried underneath black stitches can become visible when the hat stretches during wear.
Finishing the Halloween Striped Crochet Beanie
Check the finished circumference, body depth and pom-pom attachment before trimming the final yarn tails. Record the completed measurements and actual yarn consumption if another size will be made later; those figures provide a more reliable basis for adjustment than stitch count alone.
The Halloween striped crochet beanie can also be modified by changing the stripe width, reducing the pom-pom diameter or extending the black ribbed section. Keep circumference unchanged unless a different head size is required.
Save the finished orange-and-black hat to a Halloween crochet board on Pinterest and share the completed project on Instagram with #HalloweenStripedBeanie. For a second version, compare the oversized mixed pom-pom with a smaller solid-black pom-pom to see which proportion works better with the wide stripes.









