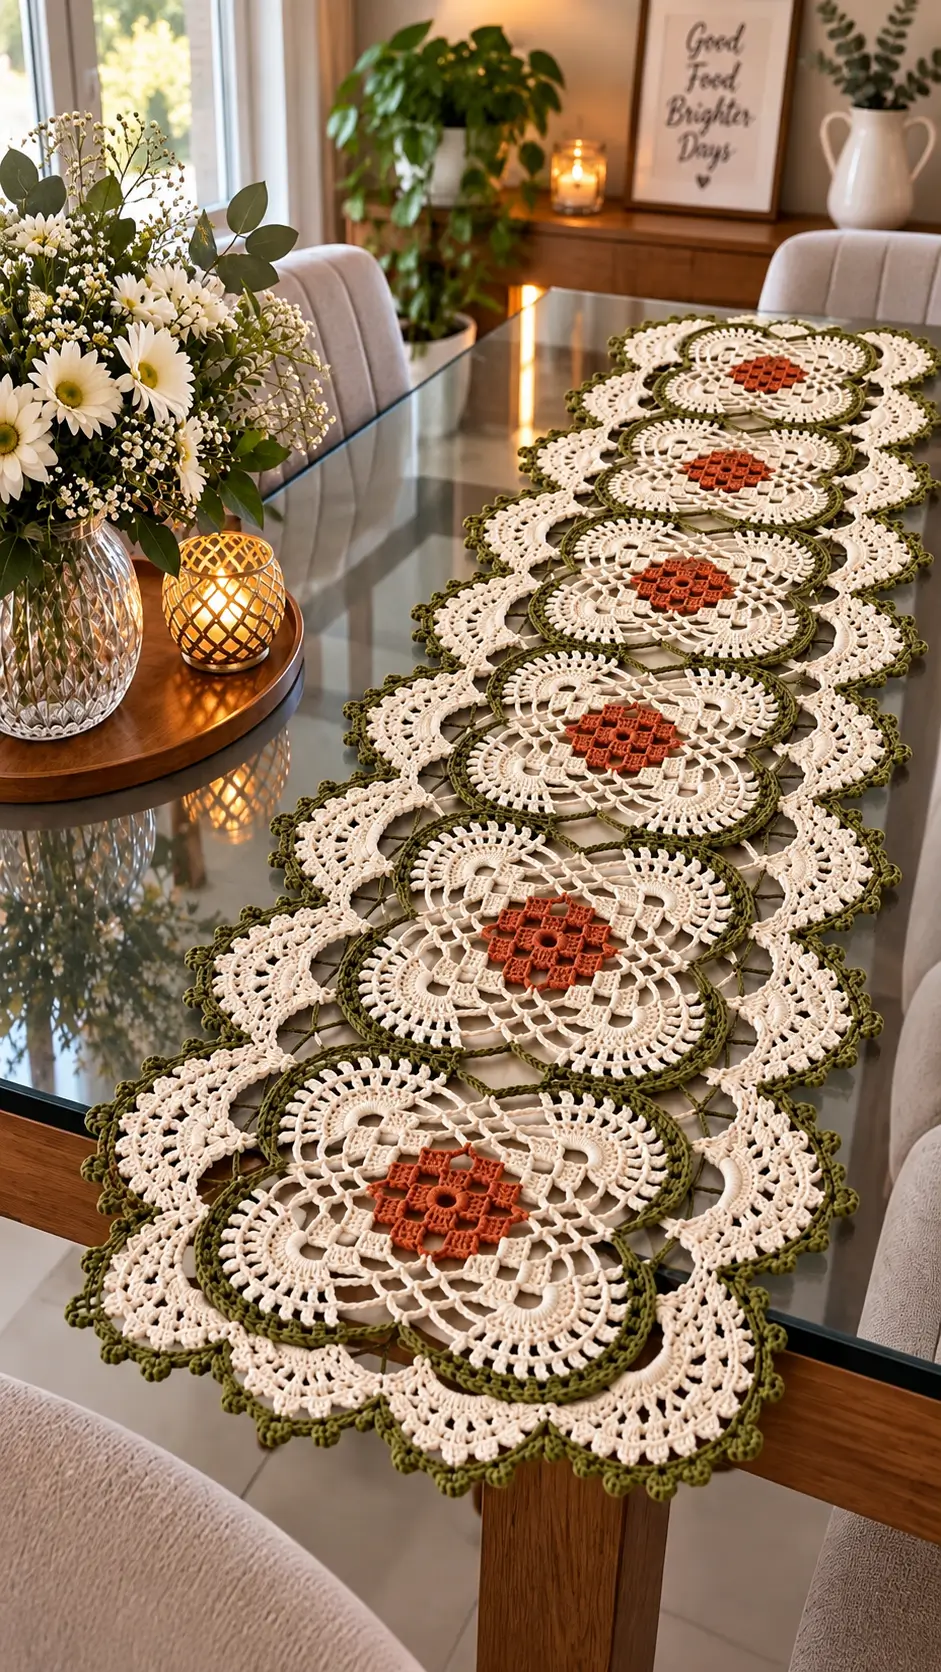
Six terracotta flower centers control the entire geometry of this runner. This floral crochet table runner pattern reconstructs that modular arrangement with sport-weight cotton, a 3 mm hook, and six large lace medallions for a target size of about 38 × 150 cm. It is an intermediate project. Separate motifs make length adjustment practical because one medallion can be added or removed before the border is assembled.
The Design: What Makes This Floral Runner Different
The central strip is based on six large medallions instead of a continuous rectangular stitch repeat. That decision keeps the cream openwork symmetrical while allowing each olive outline to define the edge of an individual flower. Terracotta centers provide a compact visual anchor rather than filling the middle with dense crochet.
Large cream side fans perform two jobs: they widen the crochet flower table runner and interrupt the straight outline created by the central medallions. Olive picots then repeat the center-line color at the outer edge.
The principal construction error in this type of floral motif crochet is uncontrolled expansion. Too many stitches or chain spaces in one round cause a medallion to ripple; too few make it cup. Blocking can correct small tension differences, but it cannot fully correct incorrect stitch mathematics.
Project Info at a Glance
| Skill Level | Time | Finished Size | Hook | Best For |
|---|---|---|---|---|
| Intermediate | 12–18 hours | Approx. 38 × 150 cm | 3.0 mm | Dining tables, consoles, sideboards |
The finished dimensions are a target for this photo-inspired reconstruction. Actual measurements depend on yarn, hook size, tension, motif blocking, and the number of central flowers used.
Materials and Tools
Yarn
- Cream/natural — sport/#2 cotton — approximately 250 g
- Olive green — sport/#2 cotton — approximately 70 g
- Terracotta/rust — sport/#2 cotton — approximately 40 g
A smooth mercerized or tightly spun cotton works well because the design depends on clearly defined chain spaces, petals, and contrasting borders. Keep all three colors in the same yarn line or choose yarns with closely matched thickness and twist.
Tools
- 3.0 mm crochet hook
- Tapestry needle
- Sharp scissors
- Locking stitch markers
- Blocking mats
- Rust-resistant T-pins
- Measuring tape
Abbreviations
- MR — magic ring
- ch — chain
- sc — single crochet
- hdc — half double crochet
- dc — double crochet
- tr — treble crochet
- sl st — slip stitch
- sp — space
- sts — stitches
- sk — skip
- rep — repeat
- picot — ch 3, sl st into first ch
Invisible decreases are not required because this project consists of flat lace motifs rather than stuffed three-dimensional pieces.
Floral Crochet Table Runner Pattern — Step by Step
This is an original photo-inspired construction rather than a transcription of an existing commercial pattern. Gauge and blocking affect the final dimensions, so make and block one complete medallion before producing all six.
Terracotta Flower Center — Make 6
Yarn: terracotta.
R1: 6 sc in MR; join with sl st. (6)
R2: Inc ×6; join. (12)
R3: Ch 3, 2 dc in same st, ch 1; repeat 3-dc groups around while spacing them evenly to establish six compact flower sections. Join.
Change to cream.
R4: Work (sc, hdc, 3 dc, hdc, sc) into each major chain space around to establish six petal sections.
Fasten off the terracotta yarn. Weave the color-change tail toward the dense center instead of carrying it across an open chain space.
Large Cream Lace Medallion — Make 6
Yarn: cream and olive.
Join cream at the tip of a terracotta flower section.
R1: Ch 5, sc into next petal tip; repeat around. Join.
R2: Sl st into first ch-5 sp. Ch 3, 5 dc in same sp, ch 3; work 6 dc in each remaining ch-5 sp with ch 3 between groups. Join.
R3: Ch 1, sc in first dc, ch 5, sk 2 dc, sc in next dc, ch 5; repeat around.
R4: Into each large chain space work (sc, hdc, 3 dc, hdc, sc). Ch 3 between petal groups.
R5: Ch 6 between the central points of consecutive petals, anchoring each chain with sc.
R6: In each ch-6 sp work sc, ch 3, 3 dc, ch 3, sc.
The medallion should remain flat after R6. If the outer edge forms strong waves before blocking, check the number and length of the chain spaces before proceeding.
Olive Medallion Outline — Make 6
Yarn: olive green.
Join olive yarn to any outer cream space.
R1: Sc evenly around the medallion, placing 3 sc at each major outer point.
R2: Ch 1, sc in each sc; at every major point work (sc, ch 2, sc) in the same stitch.
Fasten off with approximately a 20 cm tail when the section will be used for joining. The olive round creates a defined border and supplies stable attachment points between neighboring medallions.
Inner Joining Mesh
Yarn: olive green.
Arrange all six finished medallions in a straight line before joining them. Every terracotta center should sit on the same longitudinal axis.
Join olive at a marked point on the first medallion. Ch 7, then sl st to the corresponding point on the neighboring medallion. Ch 7 and return to the first motif at the next marked attachment point.
Continue the joining process at each junction. The aim is to create open diamond-like connectors instead of sewing complete circular edges together.
Use the same chain count at corresponding junctions throughout the runner. Unequal connectors can rotate individual medallions and gradually pull the runner away from a straight center line.
Large Cream Side Fans — Make 12
Yarn: cream.
Row 1: Attach cream to one outer olive joining point. Ch 5, sc into next marked point.
Row 2: Turn. Work 7 dc into ch-5 sp.
Row 3: Turn. Ch 5, sc between first and second dc; repeat across to create three open loops.
Row 4: Turn. Work 5 dc in each ch-5 sp.
Row 5: Ch 4, sc between dc groups, ch 4; repeat across.
Row 6: Work (sc, hdc, 4 dc, hdc, sc) into each major outer space.
Fasten off. Leave sufficient yarn for attaching the fan securely to the olive framework if the section has been worked separately.
Position six large fans along each long side of the runner, approximately opposite the six central medallions. Pin the complete arrangement before permanently securing any independently made fan sections.
Small Cream Connector Fans
Yarn: cream. Make as required to fill the spaces between the larger side sections.
Row 1: Attach to the olive joining mesh. Ch 5 and sc into the next connector.
Row 2: Turn; work 7 dc in ch-5 sp.
Row 3: Ch 3, sc between the next two dc; repeat across.
Row 4: Work 3 dc into each ch-3 sp.
Fasten off.
These smaller sections fill the transition between neighboring circular medallions. Compare the left and right edges frequently so the same number of connector sections appears in corresponding positions.
End Medallion Treatment — Make 2
The first and sixth medallions require broader end sections because there is no neighboring flower beyond them.
Attach cream to the exposed olive edge.
Row 1: Work three ch-7 loops across the exposed end.
Row 2: Work 7 dc in each loop.
Row 3: Ch 4 between dc groups.
Row 4: Work (sc, hdc, 4 dc, hdc, sc) in each ch-4 space.
Change to olive.
Final Row: Sc across, placing one picot at the top of each cream shell.
Fasten off and weave the tail through dense stitches rather than open mesh.
Olive Outer Border
Yarn: olive green.
Join olive yarn at one end of the completed runner.
R1: Sc around the complete outer perimeter. Work one sc into each stable stitch and distribute additional sc through the chain spaces only as needed to keep the border flat. At deep valleys between fans, use a single anchoring sc rather than densely filling the space.
R2: Sc in next 3 sts, picot, sc in next 3 sts; repeat around. Adjust the repeat only at deep valleys and the short ends.
Join with sl st and fasten off.
Keep picot spacing consistent along both sides. Excess decorative stitches increase the physical length of the border and can produce ruffling even when the underlying motifs lie flat.
Assembly
- Block the medallions. Block all six central motifs individually to matching diameters before joining them.
- Arrange the center line. Position the six medallions in one straight row with every terracotta flower facing the same direction.
- Mark the joins. Place locking stitch markers at corresponding attachment points on neighboring olive rounds.
- Join the motifs. Crochet the olive joining mesh between adjacent medallions without pulling the chains tight.
- Add the large side fans. Attach six along one side before repeating the arrangement on the opposite edge.
- Fill the gaps. Add smaller cream connector fans wherever deep spaces remain between neighboring medallions.
- Complete both ends. Work the expanded cream treatment around the exposed first and sixth medallions.
- Add the border. Crochet the continuous olive outer round while checking after every central motif that the runner remains flat.
- Finish the picots. Add the final olive picot edging and weave all yarn tails through dense stitch sections.
- Block to size. Wet-block the completed runner to approximately 38 × 150 cm, using a measuring tape or blocking line to align all six terracotta centers.
The finished runner should lie flat with six evenly spaced flower centers and approximately symmetrical lace sections on both long edges.
7 Technical Tips for a Flat, Even Runner
- Stop ruffling at the motif stage. If a medallion develops waves greater than approximately 1 cm before blocking, recount the outer chain spaces. Blocking cannot reliably correct substantial excess circumference.
- Mark every joining point. A connector attached one repeat away from its matching position can rotate the medallion. Use paired markers before joining adjacent motifs.
- Keep this project completely flat. No stuffing is required. Padding beneath dimensional flower centers changes the way a finished runner rests on a glass or timber tabletop.
- Measure the center line after every two joins. All terracotta centers should remain on the same axis. Correct a drifting medallion before attaching additional motifs.
- Control tension during the olive rounds. An olive outline worked substantially tighter than the cream motif can make the medallion cup. Compare the diameter before and after adding the contrasting round.
- Pin every major fan point. Match corresponding points on both long sides during blocking. Unequal pin placement can leave one edge wider despite identical crochet counts.
- Weave each tail through at least 4–5 cm of solid crochet. Avoid carrying cut ends through open chain mesh. Dense stitches conceal the tails and provide more resistance against movement during washing.
Adjusting the Table Runner Length
The modular construction makes length changes easier than modifying a continuously crocheted rectangle. For a shorter table, make four or five central medallions instead of six. For a longer dining table, add another complete medallion before working the final side sections and border.
Do not calculate the finished length from an unblocked motif. Block one complete flower first, measure its diameter, and then include the joining distance between motifs. Six medallions that are each only 5 mm larger than expected can add several centimeters to the finished project.
Width can also be adjusted, but changing it requires more care. The large cream fans account for much of the photographed runner’s width. Removing a round from those sections produces a narrower crochet lace table runner without changing the central floral strip.
Blocking the Floral Crochet Table Runner
Blocking is part of the construction rather than an optional finishing step. Cotton lace needs controlled shaping to open the chain spaces and establish matching curves around the side fans.
Wet the finished runner according to the yarn manufacturer’s care instructions and remove excess water without twisting the crochet. Lay the piece on blocking mats. Begin by pinning the six terracotta flower centers along one straight line.
Next, establish the overall length. Work outward from the center rather than stretching one end first. Pin corresponding cream fan points at matching distances on the left and right sides.
Measure the width at several positions along the runner. A target of approximately 38 cm should be treated as a guide rather than a requirement if the chosen cotton produces a different gauge.
Allow the runner to dry completely before removing the pins. Measure it again after release because cotton lace can contract slightly once blocking tension is removed.
Conclusion
Measure the intended table before committing to all six medallions: removing one motif is easier before the side fans and continuous border are attached. After assembly, block the runner against a straight center line and verify both long edges before removing the pins. That final measurement is particularly important with a modular floral crochet table runner pattern, because small joining differences accumulate over six motifs. Save the finished layout to Pinterest and share the completed runner on Instagram with #TerracottaOliveRunner. For the next version, record the blocked diameter of one medallion before changing yarn or hook size. Would you keep all six terracotta centers, or alternate terracotta and olive down the center line?









