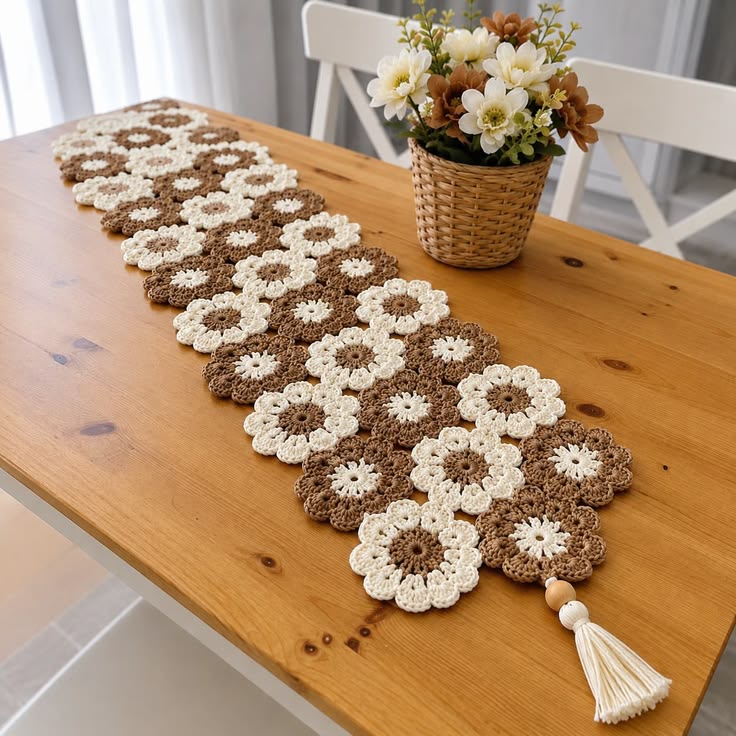
Twenty-four cream-and-taupe flowers replace the usual solid fabric, so every petal also functions as part of the runner’s structure. This flower crochet table runner pattern uses two alternating floral motifs, joined edges, and a single beaded tassel for an asymmetric finish. DK cotton with a 3.5 mm hook creates defined petals without making the runner excessively thick. The modular format also makes its length easy to change before final assembly.
The Design: What Makes This Flower Table Runner Different
The runner has no conventional rectangular background. Individual flowers overlap visually and connect at selected petal points, leaving small openings between motifs. That construction produces an irregular floral edge without adding a separate border.
Two reversed color combinations create the pattern: cream petals with taupe centers and taupe petals with cream centers. Alternating them prevents either shade from dominating the crochet flower table runner. Large rounded petals also provide wider joining areas than narrow botanical petals.
The second distinctive feature is the tassel. Only one visible end carries the wood-bead-and-cotton ornament, which gives the otherwise balanced floral motif table runner an intentionally asymmetric finish. A common construction error is joining every petal. Too many attachment points make the fabric rigid. Connect motifs only where neighboring flowers naturally touch.
Project Info at a Glance
| Skill Level | Time | Finished Size | Hook | Best For |
|---|---|---|---|---|
| Intermediate | 10–14 hours | Approx. 32 × 140 cm | 3.5 mm | Dining tables, coffee tables and sideboards |
The dimensions are a design target for this photo-inspired version. Finished measurements depend on yarn, tension, motif diameter, joining overlap and blocking.
Materials and Tools
Yarn
Choose smooth DK cotton or a cotton-rich yarn with clear stitch definition. The flowers need enough structure for the rounded petals to retain their outlines after the motifs are joined.
- Warm cream: DK cotton — approximately 180–220 g
- Taupe / medium brown: DK cotton — approximately 180–220 g
- Cream tassel yarn: approximately 10–15 g
The quantities above are estimates for a runner containing approximately 24 floral motifs. Keep at least one partial ball of each color until assembly is finished because changing the arrangement may require extra flowers.
Tools
- 3.5 mm crochet hook
- Tapestry needle
- Sharp scissors
- Locking stitch markers
- Blocking mats
- Rust-resistant blocking pins
- Measuring tape
- 1 unfinished wooden bead — approximately 18–22 mm
- 1 small cream or natural bead — approximately 14–18 mm
- Cardboard approximately 12 cm wide for making the tassel
Abbreviations
- MR — magic ring
- ch — chain
- sc — single crochet
- hdc — half double crochet
- dc — double crochet
- tr — treble crochet
- sl st — slip stitch
- sp — space
- sts — stitches
- inc — increase
- rep — repeat
An invisible decrease is not required for these flat motifs because their shaping comes from increases, chain spaces and graduated petal stitches.
Flower Crochet Table Runner Pattern
The instructions below form an original construction inspired by the visible arrangement in the supplied photograph. Crochet the flowers separately, block them to matching dimensions, arrange the complete runner, and join only after the layout has been checked.
Cream Flower With Taupe Center — Make 12
Yarn: taupe center with warm cream petals.
R1: With taupe, make 6 sc in MR. Join with sl st. (6)
R2: Inc ×6. Join. (12)
R3: (1 sc, inc) ×6. Join. (18)
R4: (2 sc, inc) ×6. Join. (24)
The 24-stitch circle establishes the contrasting center visible inside the cream flower.
Change to cream.
R5: Ch 1, sc in same st, *ch 3, skip 2 sts, sc in next 2 sts*. Repeat around, adjusting the final repeat so eight petal foundations are distributed evenly. Join.
R6: Sl st into first ch-3 sp. Work (sc, hdc, 3 dc, hdc, sc) into the same space. Repeat the same petal sequence in every ch-3 sp around. (8 petals)
R7: Working around each petal, place 1 sc in the first sc, 1 hdc in the hdc, 2 dc in each of the center dc stitches, then mirror the sequence down the opposite side. Work 1 sl st between petals.
Fasten off with a 25 cm tail if the flower will be used at a joining position. Otherwise leave a shorter tail for weaving.
The blocked motif should measure approximately 10–12 cm across. Keep all eight petals rounded rather than stretching them into sharp points.
Taupe Flower With Cream Center — Make 12
Yarn: cream center with taupe petals.
R1: With cream, 6 sc in MR. Join. (6)
R2: Inc ×6. Join. (12)
R3: (1 sc, inc) ×6. Join. (18)
R4: (2 sc, inc) ×6. Join. (24)
Change to taupe.
R5: Ch 1, sc in same st, *ch 3, skip 2 sts, sc in next 2 sts*. Repeat around to establish eight petal spaces. Join.
R6: In each ch-3 space work (sc, hdc, 3 dc, hdc, sc). (8 petals)
R7: Work around each petal with sc and dc increases as described for the cream flower. Place one sl st between neighboring petals.
Fasten off.
The cream center should remain clearly visible after the taupe petals are added. If the petal stitches pull over the center, loosen the first and final stitches of each petal.
Optional Smaller Filler Flower — Make 2–4 if Required
The photographed arrangement uses tightly nested flowers, but an actual assembled runner can develop openings depending on gauge. Smaller motifs can close those spaces without forcing the large flowers out of alignment.
Use either color combination.
R1: 6 sc in MR. (6)
R2: Inc ×6. (12)
Change color.
R3: *Sl st in next st, ch 3, 2 dc in next st, ch 3, sl st in next st*. Repeat around. (6 petals)
Fasten off with a 20 cm sewing tail.
Do not make filler flowers automatically. Add them only after arranging all 24 primary motifs.
Blocking the Flower Motifs
Blocking before assembly is critical because every flower also acts as a structural unit. Joining motifs of different diameters causes the runner to bend toward the smaller pieces.
Dampen the flowers according to the yarn manufacturer’s care instructions.
Place one motif on a blocking mat and pin the center first. Position eight additional pins at the tips of the petals.
Target approximately 10–12 cm across each large flower. Record the exact measurement of the first motif and use it as the template for the remaining pieces.
Keep the cream and taupe flowers within approximately 5 mm of the same diameter.
Allow every motif to dry completely before removing the pins.
Planning the Floral Layout
The runner is not assembled as a rigid grid. Flowers shift slightly left and right to create the irregular outline visible in the photograph.
Lay a measuring tape on a large flat surface and mark a target length of approximately 140 cm.
Begin with a loose central line of alternating flowers. Place one cream-petal motif, then one taupe-petal motif, continuing the color alternation along the length.
Add a second line of flowers on alternating sides of that center. Offset each new flower so its center sits near the gap between two motifs in the first line.
Continue building outward until the widest sections measure approximately 30–32 cm.
The outer petals should create an irregular floral silhouette. Do not attempt to form perfectly straight long edges.
Suggested 24-Flower Arrangement
A useful arrangement for the pictured proportions is based on staggered rows rather than equal rectangular rows.
- Section 1: 3 flowers
- Section 2: 4 flowers
- Section 3: 3 flowers
- Section 4: 4 flowers
- Section 5: 3 flowers
- Section 6: 4 flowers
- End section: 3 flowers
This produces 24 motifs while avoiding a hard rectangular outline. Rotate the flowers so neighboring petal valleys meet wherever possible.
Before sewing anything, photograph the complete arrangement from directly above. That reference prevents accidental changes when individual flowers are picked up for joining.
Joining Two Flower Motifs
Place two blocked flowers right side up with their outer petals touching.
Thread a tapestry needle with the color of the motif whose edge will be most visible.
Pass the needle through the back loops of approximately three to five stitches on the first petal and the corresponding stitches of the neighboring petal.
Pull until the petals meet, but stop before the seam causes either flower to cup.
Make a second small attachment at the adjacent petal if the flowers overlap at two points.
Knot the yarn on the wrong side and weave the tail through dense petal stitches.
Each large motif should eventually connect to at least two neighboring flowers. Interior motifs can have three or four connection points.
Join-As-You-Go Alternative
The motifs can also be joined during the final petal round. This method reduces sewing but requires the entire arrangement to be planned before the first connection.
When reaching a petal that must connect to a completed flower, work half of the petal edge.
Remove the hook from the working loop, insert it through the corresponding stitch on the neighboring motif, return the working loop to the hook, and pull it through.
Continue the remaining petal stitches.
Use the same technique at the second contact point.
For a first version of this runner, sewing blocked motifs provides more control over spacing and makes layout corrections easier.
Creating the Irregular Outer Edge
No separate crochet border is required. The eight-petal flowers create the decorative edge themselves.
Outer motifs should therefore remain fully visible rather than being covered by another round of stitches.
When arranging the runner, rotate selected flowers so one full petal projects outward. On the next motif, rotate the flower slightly so a valley rather than a petal occupies the same line.
This variation produces the softly scalloped floral silhouette seen in the photograph.
If one edge looks noticeably empty, reposition a neighboring flower before adding a filler motif. Structural changes are cleaner than adding unnecessary pieces after assembly.
Crochet Hanging Loop for the Tassel
Yarn: cream.
Choose one flower at the end of the runner.
Join cream yarn at the outer tip of its lowest petal.
Row 1: Ch 18.
Row 2: Starting in second ch from hook, sl st in each chain back toward the runner.
Sl st into the original petal attachment point.
Fasten off and weave both tails through the petal.
The resulting cord should measure approximately 5–7 cm depending on tension. It needs enough length to hold the beads and tassel below the floral edge without creating a long dangling extension.
Making the Cream Tassel
Cut a piece of firm cardboard approximately 12 cm wide.
Wrap cream yarn around the cardboard 35–45 times. More wraps create a fuller tassel but also add weight to the end flower.
Thread a separate 25 cm strand beneath the wrapped yarn along one cardboard edge and tie it tightly.
Cut through all strands along the opposite edge.
Remove the bundle from the cardboard.
Wrap another length of cream yarn around the bundle approximately 1.5 cm below the tied top. Make six to eight tight wraps, knot securely, and hide the ends inside the tassel.
Trim the lower strands to approximately 9–10 cm.
Adding the Wooden Beads
Thread the cream hanging cord through the smaller cream or natural bead first.
Add the larger unfinished wooden bead above or below it according to the preferred arrangement. The photograph uses a natural wood accent that separates the crochet flowers from the soft tassel fibers.
Pass the tassel’s upper tie through the same beads and secure it to the crochet cord.
Hide the knot beneath the lower bead if possible.
Check the weight before final trimming. If the end flower pulls sharply downward, reduce the tassel wraps or use lighter wooden beads.
Adjusting the Runner Length
Length changes are made by adding or removing complete flowers rather than modifying stitch counts.
For a short coffee-table runner, 12–16 motifs can produce a compact arrangement.
A medium dining-table version can use approximately 20–24 flowers.
For a long farmhouse table, 28–34 motifs provide additional length while preserving the same construction.
Add flowers in groups rather than extending one narrow line from the end. A new section should contain enough motifs to continue the staggered width of the runner.
Measure the blocked arrangement before joining because neighboring flowers overlap slightly. Multiplying one motif diameter by the total motif count will greatly overestimate the finished length.
Changing the Runner Width
The photo-inspired target is approximately 30–32 cm across the widest sections.
For a narrow runner, arrange flowers primarily in two staggered lines. This works well on smaller tables where a 20–24 cm width is sufficient.
For a wider runner, add a third partial line of flowers along selected sections rather than creating three continuous parallel rows.
Keep the irregular outline visible. A strict three-row rectangle changes the character of the design and increases the number of joins considerably.
Assembly
- Crochet 12 cream-petal flowers with taupe centers and 12 taupe-petal flowers with cream centers.
- Block all 24 motifs to matching diameters and allow them to dry completely.
- Arrange the flowers on a flat surface in staggered sections measuring approximately 30–32 cm wide.
- Alternate the two color combinations while avoiding long uninterrupted lines of either cream or taupe.
- Photograph the final arrangement from directly above before moving the first motif.
- Begin joining near the center of the runner and work toward one end, attaching neighboring petals through their back loops.
- Return to the center and join toward the opposite end while checking the runner against the layout photograph.
- Add one or two smaller filler flowers only where an unsupported opening remains after the primary motifs are connected.
- Attach the cream cord, wooden beads and tassel to one end flower, keeping the ornament centered beneath an outer petal.
- Weave all remaining tails through dense stitches, lightly block the assembled runner, and reshape every outer petal before drying.
The completed runner should behave as one connected textile while retaining visible openings and an irregular eight-petal outline along both sides.
How to Keep the Flowers Flat
Ruffling usually appears when the final petal round contains too much fabric for the diameter of the center. Cupping indicates the opposite problem.
Make one complete test flower before producing the full set.
Place it on a table without stretching it. All eight petals should contact the surface naturally.
If the petals form waves, reduce one double crochet from each petal’s widest section. If the flower cups upward, loosen the chains and petal stitches before changing the stitch count.
Once the test motif lies correctly, use the same hook, yarn and tension for every remaining flower.
How to Maintain the Two-Color Pattern
The neutral palette works because the two motifs reverse the same colors. Neither flower introduces a third dominant shade.
Place a cream-petal flower beside at least one taupe-petal flower whenever possible.
Avoid forming a continuous line of four or five identical motifs. Such a line creates a stripe that is absent from the loose floral arrangement.
When planning the ends, use both color combinations in each final cluster. The tassel end can contain slightly more cream because the cream tassel visually extends that color beyond the crochet.
7 Technical Tips for This Flower Table Runner
- Measure every blocked motif. A flower more than 5 mm smaller than its neighbors pulls the surrounding joins inward. Correct the diameter before assembly rather than stretching it during sewing.
- Mark the first petal. Eight-petal repeats are easy to miscount when the center and petals use similar neutral colors. Place a locking marker in the first completed petal and count all eight before fastening off.
- Join only contacting petals. Sewing around an entire flower edge creates a rigid patch instead of flexible floral fabric. Most interior motifs need approximately three or four small attachment areas.
- Keep each seam under moderate tension. Pulling a 3 cm petal seam too tightly makes both flowers cup toward the join. Stop tightening as soon as the two edges sit together.
- Check the width every 30 cm of assembly. Gradual motif drift can turn a 32 cm runner into a noticeably wider piece at one end. Compare both sides with the center line as joining progresses.
- Limit tassel weight. A heavy bead combination can distort the final flower when the runner lies flat. Keep the finished tassel assembly light enough that the end petal does not stretch by more than approximately 5 mm.
- Weave tails through solid petal stitches. Short tails hidden near open spaces can become visible after washing. Run each tail through approximately 3 cm of dense stitches, reverse direction once, then trim.
Blocking the Completed Runner
The final blocking should correct alignment without removing the natural overlap between neighboring flowers.
Dampen the assembled runner according to the selected yarn’s care instructions. Remove excess water without twisting the motifs.
Place the runner on blocking mats and establish the center line first.
Pin the central flowers, then move outward toward both long edges. Target approximately 30–32 cm across the widest sections.
Establish the length next. For the 24-flower version, aim for approximately 135–145 cm, depending on motif overlap.
Pin only the outer petals that need correction. There is no need to pin every internal petal because the joins already control their positions.
Leave the runner flat until completely dry. Keep the tassel outside the damp blocking area so the strands remain straight.
Choosing Yarn for Defined Flower Petals
Mercerized cotton produces crisp petal edges and a slightly firmer motif. Standard matte cotton gives a softer appearance while retaining enough structure for this design.
Acrylic can also be used, but blocking behavior differs and the flowers may retain less definition around their outer edges.
Avoid highly fuzzy yarn. The design depends on seeing the boundary between cream and taupe as well as the individual petal shapes.
If substituting a heavier worsted yarn, make one flower before planning the complete runner. A larger motif may reduce the number of flowers required substantially.
Alternative Neutral Color Combinations
The same construction can be worked with other two-color combinations while retaining the alternating effect.
Ivory and mocha create a stronger contrast. Cream and oatmeal produce a lighter version. Beige and warm white maintain a very subtle difference, while charcoal and natural cotton produce a more graphic arrangement.
Whatever combination is selected, reverse the colors between the two primary motif types. The color reversal is what creates variation without requiring different flower patterns.
Match the tassel to the lighter shade for the closest interpretation of the photographed runner. A natural unfinished wooden bead works with most neutral palettes.
Finishing
Lay the runner on its intended table after the final blocking. Inspect the silhouette from both long sides.
Outer petals should alternate naturally between projecting points and shallow valleys. If one flower extends much farther than the rest, check whether its joining seam has rotated the motif.
Turn the runner over and inspect every connection. Reinforce any flower held by only one narrow stitch group.
Check the tassel attachment last. The cord should emerge from the center of one outer petal without pulling that petal away from the table.
Trim no additional yarn tails until the runner has been lifted and moved several times. This tests the joining points before the final ends are cut.
Conclusion
This design builds the complete runner from alternating cream-and-taupe flowers rather than covering a solid crochet background. Make one motif in each color arrangement first, block both to the same 10–12 cm diameter, and use those samples to calculate the final number of flowers. Arrange every motif before sewing because spacing controls both the width and the irregular floral outline. Add the beaded tassel only after the main assembly is stable. Save this flower crochet table runner pattern to Pinterest or share the finished version on Instagram with #NeutralFlowerTableRunner. For this specific design, would you keep the single asymmetric tassel or add a matching tassel to the opposite end?









