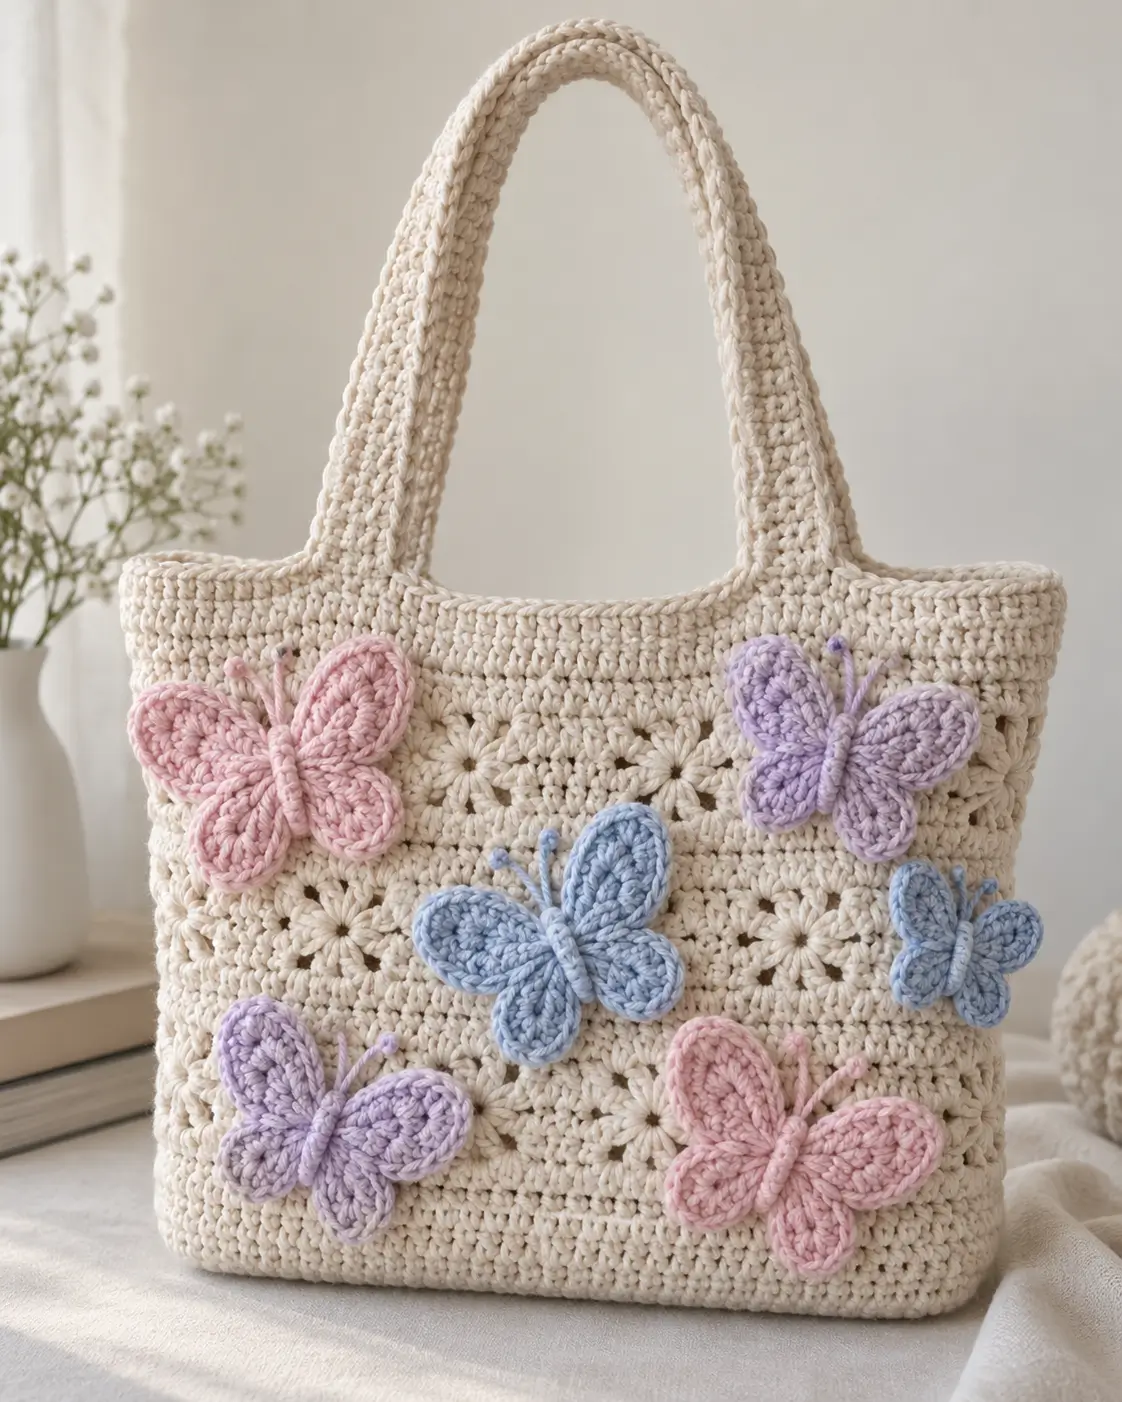
Butterfly Crochet Tote Bag Pattern with 3D Appliqués
Butterfly wings need four distinct lobes before a flat crochet motif reads clearly as a butterfly rather than a bow. This butterfly crochet tote bag pattern builds that silhouette over a cream floral body with six raised appliqués. Use DK/light-worsted cotton, a 4 mm hook, and approximately 250–290 g of yarn for a medium intermediate-level tote. The dense borders make it practical for books, yarn, and everyday lightweight items.
The Design: What Makes This Butterfly Tote Different
Three structural decisions control this design. First, the floral center uses open clusters while the bottom, rim, and handles use denser stitches. That contrast keeps the floral crochet tote bag visually close to the reference while placing firmer fabric where stretching is most likely.
Second, each 3D crochet butterfly is made separately and sewn on only through its central body. The wings remain slightly raised instead of being flattened by stitching around every edge. Third, the handles extend well below the rim so carrying force is distributed across the bag wall.
A frequent mistake with decorative crochet totes is attaching heavy appliqués before the bag has been blocked. The fabric can distort afterward, moving carefully arranged butterflies out of alignment. Block the body first, pin every motif, then sew.
Project Info at a Glance
| Skill Level | Time | Finished Size | Hook | Best For |
|---|---|---|---|---|
| Intermediate | 10–14 hours | Approx. 34 × 30 cm | 4.0 mm | Everyday lightweight tote |
The target width is approximately 34 cm. Finished measurements can vary depending on yarn, gauge, blocking, and individual crochet tension.
Materials and Tools
Yarn
- Warm ivory — DK/light-worsted cotton — approximately 250 g
- Dusty pink — DK/light-worsted cotton — approximately 12 g
- Lavender — DK/light-worsted cotton — approximately 12 g
- Powder blue — DK/light-worsted cotton — approximately 12 g
Tools
- 4.0 mm crochet hook
- Yarn needle
- Locking stitch markers
- Scissors
- Measuring tape
- Blocking pins and mat
- Optional cotton lining
- Optional plastic canvas for the base
Abbreviations
- MR — magic ring
- ch — chain
- sl st — slip stitch
- sc — single crochet
- hdc — half double crochet
- dc — double crochet
- tr — treble crochet
- inc — 2 stitches in one stitch
- sp — space
- st/sts — stitch/stitches
- RS — right side
- WS — wrong side
Invisible decreases are unnecessary in the flat bag construction. When used in three-dimensional crochet, they are normally worked through the front loops of the next two stitches to reduce the visible gap.
Butterfly Crochet Tote Bag Pattern — Step by Step
Pattern note: This is an original photo-inspired construction. The bag is assembled from floral panels, dense structural bands, narrow side and base pieces, long crochet handles, and six butterfly appliqués.
Front Floral Panel
Yarn: warm ivory.
Make 12 floral motifs and arrange them four motifs across and three motifs high.
R1: Make an MR, ch 1, work 12 sc into MR, sl st to first sc. (12)
R2: Ch 3, 2 dc in same st, ch 1, skip 1 st; *3 dc in next st, ch 1, skip 1 st* ×5, sl st to top of beginning ch. Six petal clusters.
R3: Sl st to first ch-1 sp. Ch 3, 2 dc, ch 2, 3 dc in same sp. Continue around, placing clusters and ch spaces so four defined corners are formed.
R4: Work 3 dc in each ch-1 sp. In every corner ch-2 sp work (3 dc, ch 2, 3 dc). Join with sl st.
Fasten off and weave in the ends. Block each motif to approximately 8–8.5 cm square.
Join four motifs horizontally and three vertically using mattress stitch or a flat slip-stitch join. The completed floral field should measure approximately 32–34 cm across.
Back Floral Panel
Make another 12 floral motifs following the instructions for the front panel.
Arrange and join the motifs in the same 4 × 3 configuration.
Block both panels to matching measurements before continuing. Keep the difference between the two finished panel widths below approximately 5 mm.
Lower Solid Band
Yarn: warm ivory.
With the right side facing, join yarn at the lower-right corner of the front floral panel.
Row 1: Ch 1. Work sc evenly across the complete lower edge. Turn.
Rows 2–6: Ch 1, sc in each st across. Turn.
The completed band should measure approximately 4–5 cm deep.
Fasten off and repeat the same instructions for the back panel.
Upper Solid Band
Yarn: warm ivory.
Join the ivory yarn at one upper corner.
Row 1: Ch 1, sc evenly across. Turn.
Row 2: Ch 1, sc across. Turn.
Row 3: Ch 1, hdc across. Turn.
Row 4: Ch 1, sc across. Turn.
Rows 5–7: Repeat Rows 2–4.
Fasten off and repeat for the back panel. Aim for an upper band approximately 5 cm deep.
Side Panels — Make 2
Yarn: warm ivory.
Row 1: Ch 9. Sc in second ch from hook and across. (8)
Rows 2–60: Ch 1, sc across. (8)
Continue until each side strip matches the total height of the lower band, floral panel, and upper band.
Fasten off, leaving approximately 50 cm of yarn for sewing.
An 8-stitch strip should produce approximately 4–5 cm of bag depth depending on gauge. For a deeper tote, begin with enough chains to produce 10 or 12 sc instead.
Base Panel
Yarn: warm ivory.
Row 1: Ch 9. Sc in second ch from hook and across. (8)
Row 2 onward: Ch 1, sc across. (8)
Continue until the strip measures the same as the finished width of the front panel, approximately 32–34 cm.
Fasten off with a 50 cm sewing tail.
For additional base support, cut a piece of plastic canvas approximately 5 mm smaller on every edge than the finished crochet base. Place it between the crochet fabric and optional lining.
Handles — Make 2
Yarn: warm ivory.
Row 1: Ch 7. Sc in second ch from hook and across. (6)
Row 2: Ch 1, sc across. (6)
Repeat Row 2 until the handle measures approximately 58–62 cm.
Fold the strip lengthwise and slip stitch the long edges together to produce a thicker, rounded handle. Alternatively, keep the handle flat and work one round of sc around its entire perimeter.
Fasten off with approximately 35 cm of yarn for attachment.
Make the second handle in the same way.
Large Butterfly Appliqués — Make 4
Make 2 dusty pink and 2 lavender butterflies.
R1: 6 sc in MR. (6)
R2: Inc ×6. (12)
The small circle forms the central anchor for the four wing lobes.
Upper Wing 1: Ch 4, work 4 tr into next st, ch 4, sl st into following st.
Lower Wing 1: Ch 3, work 4 dc into next st, ch 3, sl st into following st.
Lower Wing 2: Ch 3, work 4 dc into next st, ch 3, sl st into following st.
Upper Wing 2: Ch 4, work 4 tr into next st, ch 4, sl st into following st.
Fasten off.
For a stronger wing outline, join the matching yarn at the base of an upper wing and work sc evenly around each lobe. Place 2 sc at the widest point of each wing where necessary to prevent pulling.
Leave approximately 25 cm of yarn for sewing.
Medium Blue Butterfly — Make 1
Yarn: powder blue.
R1: 6 sc in MR. (6)
R2: Inc ×6. (12)
Follow the large butterfly wing construction, but replace each group of 4 tr with 3 tr and each group of 4 dc with 3 dc.
Fasten off with a long sewing tail.
This butterfly is positioned close to the center of the front panel.
Small Blue Butterfly — Make 1
Yarn: powder blue.
R1: 6 sc in MR. (6)
Do not work an increase round.
Upper Wing 1: Ch 3, 3 dc in next st, ch 3, sl st in next st.
Lower Wing 1: Ch 2, 3 hdc in next st, ch 2, sl st in next st.
Lower Wing 2: Repeat the lower-wing sequence.
Upper Wing 2: Repeat the upper-wing sequence.
Fasten off with a long sewing tail.
Butterfly Bodies — Make 6
Use yarn matching each butterfly.
For each large butterfly, ch 10.
For the medium butterfly, ch 8.
For the small butterfly, ch 6.
Starting in the second chain from the hook, sl st along the chain.
Fasten off with two long tails.
Position the narrow strip vertically across the center of the corresponding butterfly. Stitch through the central section while keeping the four wings free so they retain the raised appearance.
Butterfly Antennae — Make 6 Pairs
Cut two approximately 6 cm yarn strands for each large butterfly. Cut two 4–5 cm strands for the medium and small butterflies.
Attach the strands at the top of the butterfly body.
Tie a small overhand knot close to the end of each strand to reproduce the rounded antenna-tip appearance. Trim approximately 3 mm above each knot.
For a bag intended for a young child, avoid bead-ended antennae or other small detachable components.
Optional Cotton Lining
Cut two cotton rectangles approximately 1.5 cm larger than the finished front and back panels on every edge.
Sew the side and bottom seams with a 1 cm seam allowance. Fold and press the upper raw edge inward.
Place the lining inside the finished crochet shell and hand-sew it beneath the upper solid band.
The lining prevents keys, pens, cosmetics, and other narrow objects from passing through the floral openings.
Assembly
- Block the front and back floral panels to matching measurements. Keep all corners square and allow both pieces to dry completely before sewing.
- Sew one long edge of the base panel to the bottom edge of the front panel. Attach the opposite base edge to the back panel.
- Position one narrow side panel between the front and back. Mattress-stitch both vertical edges, then attach its bottom edge to the base. Repeat on the opposite side.
- Turn the tote right side out. Check that all four base corners sit close to 90 degrees and correct twisted seams before adding decoration.
- Position each handle approximately 7–8 cm inward from the corresponding side edge. Sew at least 5 cm of every handle end down the inside of the upper band.
- Pin one large pink butterfly toward the upper-left section and one lavender butterfly toward the upper-right. Keep the outer wing edges at least 2 cm from structural seams.
- Position the medium blue butterfly near the center. Arrange the remaining pink and lavender butterflies lower on the front to create an irregular diagonal distribution.
- Place the smallest blue butterfly near the right side. Stitch each appliqué primarily through its central body so the wings remain raised.
- Add the antennae and trim them evenly. Install the optional lining and base reinforcement after the decorative sewing has been completed.
- Weave each yarn tail through at least 4 cm of dense crochet fabric, reverse direction, weave another 2 cm, then trim.
The finished tote should have a rectangular cream body, long crochet handles, a floral openwork center, and six raised pastel butterfly appliqués.
7 Technical Tips for a Better Crochet Butterfly Bag
- Prevent a stretched upper rim: Measure the opening before and after the first solid edging row. If the opening grows by more than 1 cm, reduce stitches evenly across the following row.
- Avoid handle elongation: Cotton handles can lengthen when the tote is loaded. Reinforce at least 5 cm of each handle end against the inside of the bag instead of sewing only across the bottom edge.
- Control openwork distortion: Block every floral motif to within approximately 3 mm of the same dimensions. Significant differences between neighboring squares can create waves across the completed panel.
- Stop butterfly wings curling: Block the appliqués separately before attachment. Pin all four wing tips flat while keeping the center body at its natural width.
- Prevent base sagging: Cut optional plastic canvas approximately 5 mm smaller on every side than the crochet base. Oversized reinforcement can push against the seams and distort the lower corners.
- Avoid crooked butterfly placement: Pin all six appliqués before sewing any of them permanently. Maintain at least 2 cm between wing tips and structural side seams so the butterflies remain on the flat front surface.
- Stop yarn tails escaping: Do not finish appliqué tails inside open chain spaces. Weave each tail through approximately 4 cm of dense stitches, reverse direction once, and then trim.
Finishing the Butterfly Crochet Tote Bag
A successful butterfly crochet tote bag pattern depends on structural contrast: firm lower and upper bands carry the load, open floral motifs create the central field, and lightly attached butterflies preserve the raised wing effect.
Block the panels before assembly, reinforce at least 5 cm of every handle end, and attach the butterflies only after the tote has reached its final dimensions. For the first practical step, crochet one floral motif and block it to the target measurement before making the remaining motifs. This test establishes the actual finished width before substantial yarn is committed to the project.
Save the finished butterfly tote to Pinterest or share your completed version on Instagram with #ButterflyGardenTote. Which detail would you change on your version: the central blue butterfly, the pastel color arrangement, or the number of butterfly appliqués?









