Introduction
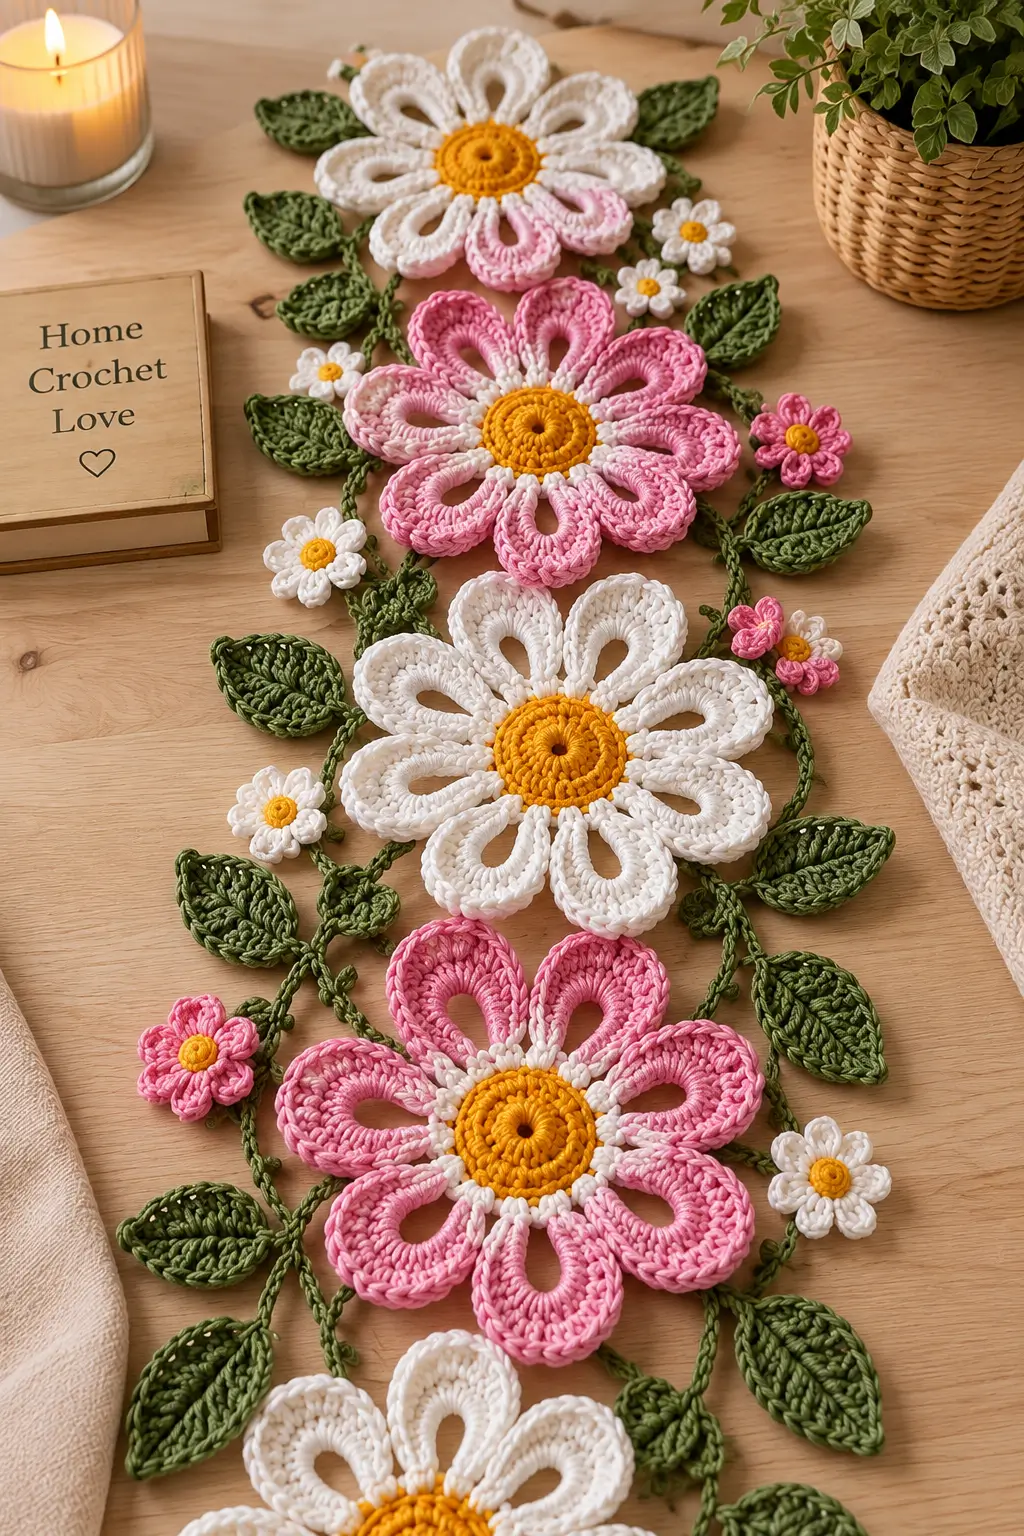
Eight open-loop petals around a mustard center give each large daisy enough negative space to keep this runner from becoming a solid strip of crochet. This crochet daisy table runner pattern combines pink and white flowers, olive-green leaves, small blossoms and narrow vine stems. Worked mainly in cotton yarn with a 4 mm hook, the intermediate project creates an adjustable botanical runner for dining tables, consoles and coffee tables.
The Design: What Makes This Daisy Runner Different
The photographed runner is constructed more like a botanical garland than a conventional rectangular table runner. Large daisies establish the central line, while narrow green stems branch outward to support individual leaves and smaller flowers. Empty tabletop remains visible between the motifs.
The second structural feature is the large looped petal. Each petal has an open center rather than being filled completely with stitches. This reduces weight and creates the distinctive elongated daisy shape visible in both the pink and white flowers.
Alternating pink and white motifs also prevents the crochet flower table runner from reading as one continuous block of color. A common construction mistake is attaching every leaf before the large flowers are positioned. That can produce uneven spacing and force the central flower line to curve.
Project Info at a Glance
| Skill Level | Time | Finished Size | Hook | Best For |
|---|---|---|---|---|
| Intermediate | 12–16 hours estimated | Approx. 30 × 150 cm, adjustable | 4 mm | Dining tables, coffee tables and consoles |
The finished dimensions are a reconstruction target rather than a measurement of the photographed runner. Published floral table-runner patterns vary considerably according to motif count; comparable designs range from approximately 28 × 94 cm to 46 × 114 cm.
Materials and Tools
Yarn
- Soft pink — worsted cotton — approximately 100–120 g for large and small flowers.
- Ivory white — worsted cotton — approximately 100–120 g for large daisies and small flowers.
- Mustard yellow — worsted cotton — approximately 40–50 g for flower centers.
- Olive green — worsted cotton — approximately 100–120 g for leaves, vines and joining stems.
Yarn quantities are working estimates for this photo-inspired construction. Cotton is particularly suitable because the finished motifs need enough body to remain flat on a tabletop.
Tools
- 4 mm crochet hook
- Tapestry needle
- Scissors
- Stitch markers
- Measuring tape
- Blocking mat
- Rust-resistant blocking pins
Abbreviations
- MR — Magic ring
- sc — Single crochet
- inc — 2 single crochet in one stitch
- dec — Single crochet decrease
- sl st — Slip stitch
- ch — Chain
- hdc — Half double crochet
- dc — Double crochet
- tr — Treble crochet
- BLO — Back loop only
- FLO — Front loop only
- st/sts — Stitch/stitches
- sp — Space
An invisible decrease is needed only if a small flower or bud is shaped as a closed element; insert the hook through the front loops of the next two stitches before completing one single crochet.
Crochet Daisy Table Runner Pattern – Step by Step
Pattern note: This is a new photo-inspired construction based on the visible structure of the supplied image. Exact yarn, gauge, hidden joins and the original designer’s stitch sequence cannot be determined from a photograph.
Large Daisy Center – Make 5
Yarn: mustard yellow.
R1: 6 sc in MR (6)
R2: inc ×6 (12)
R3: (sc 1, inc) ×6 (18)
R4: (sc 2, inc) ×6 (24)
R5: (sc 3, inc) ×6 (30)
Fasten off. Leave approximately 20 cm of yarn if the center will be sewn to the completed petal layer.
The center should remain flat. If it begins forming a shallow bowl, loosen the working tension before continuing with additional centers.
White Inner Petal Foundation
Yarn: ivory white.
Join white yarn to any stitch of the mustard center.
R1: Ch 1 and work 1 sc in each stitch around (30).
R2: Work a sequence of short ch-3 loops evenly around the center, anchoring each loop with a sl st or sc. These loops form the narrow white transition visible between the yellow center and the large colored petals.
Fasten off if the main petals will be worked in pink. Continue in white for an all-white daisy.
Large Pink Open Petals – Make 8 Per Pink Daisy
Yarn: soft pink.
Join pink to the outer white foundation.
Petal foundation: Ch 12.
Working back along the chain, sc in the second ch from hook, hdc in next ch, dc in next 6 ch, hdc in next ch, sc in next ch.
Work 3 sc into the final chain at the rounded end.
Continue along the opposite side of the foundation chain: sc in next ch, hdc in next ch, dc in next 6 ch, hdc in next ch, sc in next ch.
Join the petal back to the flower center with a sl st.
To create the open center visible in the photograph, do not fill the middle of the foundation loop. Work only around the outside chain structure.
Repeat until 8 petals are distributed evenly around the flower.
Fasten off and leave a 20 cm tail for reinforcement if needed.
Large White Open Petals – Make 8 Per White Daisy
Yarn: ivory white.
Use the same petal construction as the pink version.
Petal foundation: Ch 12.
Work sc, hdc and dc stitches along one side of the chain, round the tip with 3 sc, then mirror the sequence down the opposite side.
Anchor the petal to the mustard-and-white center with a sl st.
Repeat until the daisy has 8 open petals.
The petals should lie in one radial plane. Correct twisting before weaving in the tails.
Optional Two-Tone Daisy
The upper flower in the photograph includes a small section of pink among predominantly white petals. Reproduce this by working six or seven petals in ivory and changing to pink for the remaining one or two petals.
Keep the petal dimensions identical. Only the yarn color changes.
Small White Daisies – Make 6–8
Yarn: mustard yellow and ivory white.
R1: With yellow, 6 sc in MR (6).
R2: inc ×6 (12).
Change to white.
R3: *sl st in next st, ch 4, 2 dc in same st, ch 4, sl st in next st* ×6.
Fasten off. Leave a 15 cm tail for attachment.
Keep these flowers substantially smaller than the five dominant daisies. Their purpose is to fill gaps along the vines without competing with the central motifs.
Small Pink Flowers – Make 5–7
Yarn: mustard yellow and soft pink.
R1: With mustard yellow, 6 sc in MR (6).
R2: inc ×6 (12).
Change to pink.
R3: *sl st, ch 3, 2 dc, ch 3, sl st* distributed evenly to form six petals.
Fasten off with a 15 cm sewing tail.
For a slightly larger flower, replace each ch 3 with ch 4 and each pair of dc stitches with three dc stitches.
Large Green Leaves – Make 16–20
Yarn: olive green.
Foundation: Ch 12.
Side 1: Sl st in second ch from hook, sc in next ch, hdc in next 2 ch, dc in next 5 ch, hdc in next ch, sc in next ch.
Work 3 sc in the final chain to turn around the tip.
Side 2: sc in next ch, hdc in next ch, dc in next 5 ch, hdc in next 2 ch, sc, sl st at the base.
Fasten off with a 15–20 cm tail.
Published crochet leaf patterns commonly use a foundation chain followed by graduated sc, hdc and dc stitches on both sides. This produces the pointed oval profile required for the runner.
Leaf Veins
Yarn: olive green.
Insert the hook at the base of a completed leaf and surface-slip-stitch along the original foundation chain toward the tip.
For the raised vein effect visible in the photograph, keep these surface stitches slightly loose. Do not pull them tightly enough to fold the leaf along its center.
Fasten off at the tip and weave the yarn back through the wrong side.
Small Green Leaves – Make 8–12
Yarn: olive green.
Foundation: Ch 8.
Sl st in second ch from hook, sc in next ch, hdc in next ch, dc in next 2 ch, hdc, sc.
Work 3 sc into the final chain.
Continue along the opposite side by mirroring the stitch sequence.
Fasten off with a 15 cm tail.
Main Green Vine
Yarn: olive green.
The vine is worked to measurement because the final length depends on the number and size of flowers.
Foundation: Ch until the cord measures approximately 140–150 cm.
Row 1: Sl st into every chain back to the beginning.
Do not pull the slip stitches tightly. The finished cord needs enough flexibility to curve around the flowers without lifting them from the tabletop.
Fasten off.
Branching Vines
Yarn: olive green.
Make approximately 12–16 branch cords.
For a short branch, ch 12–18 and sl st back through every chain.
For a longer branch carrying two leaves, ch 20–28 and sl st back through every chain.
Leave a 15 cm sewing tail at the base of every branch.
Small Crochet Buds
Yarn: soft pink.
R1: 6 sc in MR (6).
R2: inc ×6 (12).
R3: sc around (12).
R4: dec ×6 (6).
Fasten off. Do not stuff the bud. Flatten it gently and attach it near a vine junction.
Planning the Runner Layout
Do not sew the motifs together immediately after crocheting them. First place the complete collection on a flat surface approximately the size of the intended table.
Arrange the five large daisies in a loose vertical line. Alternate pink and white flowers so that two motifs of the same dominant color do not create one large uninterrupted block.
The reference image uses flowers at slightly different angles rather than aligning every petal vertically. Rotate each daisy by approximately 10–25 degrees until the spaces between neighboring motifs appear balanced.
Place large leaves beside the spaces between flowers rather than directly underneath the petals. Add smaller flowers only after the dominant flower-and-leaf arrangement is stable.
Assembly
- Block every large daisy separately. Pin the eight petals into an even radial arrangement and allow each motif to dry completely before joining.
- Arrange the five large flowers along a line approximately 140–150 cm long. Leave enough space between motifs for green vine sections and leaves to remain visible.
- Lay the main green vine between and around the flowers. Curve it gently rather than pulling it into a rigid straight line.
- Secure each large flower to the vine at two or three points near the underside of the yellow center. Avoid sewing across the open sections of the petals.
- Add the branching green cords between the large flowers. Position branches at different angles to reproduce the irregular botanical structure visible in the reference image.
- Pin the large leaves to the outer branches. Alternate their directions so neighboring leaves do not all point toward the same side of the runner.
- Add the smaller leaves near branch junctions and around spaces that remain visually empty after the large foliage is positioned.
- Distribute the small white and pink flowers along the vines. Keep most small flowers outside the central line so they do not obscure the dominant daisies.
- Attach any small buds near the ends of branches. Weave structural yarn tails through at least 3–4 cm of matching crochet fabric before trimming.
- Lay the completed runner on a blocking surface, correct the vine curves and leaf angles, then pin the entire composition into its final dimensions before allowing it to dry completely.
The completed runner should remain open between motifs, with the five large flowers forming the visual center and the leaves extending the design irregularly toward both sides.
7 Technical Tips for a Better Crochet Flower Table Runner
- Prevent petal twisting. Check the foundation chain before crocheting down its second side. One half-turn in a 12-chain petal can make the finished loop permanently cross over itself.
- Keep the yellow centers flat. Place each center on the table after Round 5. If the 30-stitch circle forms a bowl, loosen the tension or move up 0.5 mm in hook size for the center.
- Control flower diameter. Block all large daisies to the same target measurement before assembly. A difference of more than approximately 1 cm becomes noticeable when adjacent motifs are positioned along the central line.
- Avoid rigid vines. Slip stitches worked too tightly shorten the foundation chain and cause the runner to curl. The finished green cord should bend around a flower without pulling its yellow center sideways.
- Pin leaves before sewing. A leaf positioned only 2–3 cm too close to a large petal can disappear underneath it. Complete the entire foliage layout before making permanent joins.
- Reinforce flower attachments. Join every large flower to the vine at a minimum of two points near its center. Attaching only one point allows a heavy cotton motif to rotate whenever the runner is moved.
- Block without flattening the texture. Pin the outer edge of each leaf and the tips of the petals rather than pressing directly on their raised stitches. Heavy pressure removes the dimensional ridges visible in the flower and foliage motifs.
Adjusting the Table Runner Size
The motif-based construction makes the length easier to modify than a solid rectangular runner. For a shorter coffee-table version, use three large daisies and reduce the main vine proportionally. A long dining-table runner can use six or seven large flowers.
Measure the table before deciding on the final arrangement. If the runner is intended to remain entirely on the tabletop, make it shorter than the table. For a design intended to extend over both ends, calculate the required drop before making the main vine.
Width can also be changed without altering the flowers. Shorter branch cords produce a narrow runner, while longer branches with additional leaves expand the botanical design toward the sides.
Color Placement
The reference design uses mustard yellow as the repeating anchor color. Keeping every large center the same color creates continuity even though the petals alternate between pink and white.
Olive green works as the structural color because the vines, branches and leaves visually connect otherwise separate motifs. Use one consistent green for the complete framework unless a more varied botanical effect is intended.
For the closest interpretation of the photograph, alternate the dominant large flowers between white and pink while scattering small flowers in both colors. Avoid placing every pink accessory beside a pink large flower. Mixed placement creates clearer separation between motif sizes.
Blocking and Finishing
Weave in loose ends before the final blocking stage, but retain any tails still required for structural attachment. Place the runner on a blocking mat and establish the central flower line first.
Next, pin each leaf by its base and pointed tip. Keep the sides slightly rounded rather than stretching the leaf into a narrow spear shape.
Shape the open petals individually. Their inner openings should remain visible and reasonably consistent from one petal to the next.
Allow the runner to dry completely in its pinned position. Remove the pins and place the piece on a flat surface for several hours before storage or use. If one branch lifts from the tabletop, damp-block that section again rather than pressing the complete runner.
Conclusion
Finish the runner by checking every flower-to-vine attachment from the wrong side and trimming only after the structural joins are secure. This crochet daisy table runner pattern can then be resized by changing the number of large flowers instead of rebuilding individual motifs. Record the final flower diameter, runner length and branch measurements before storing your notes; those figures make a second version easier to reproduce. Photograph the finished runner from directly above for Pinterest or Instagram so the full vine structure remains visible, and use #CrochetDaisyTableRunner. For another version, would you keep the alternating pink-and-white daisies or make all five large flowers the same color? “`0









