Introduction
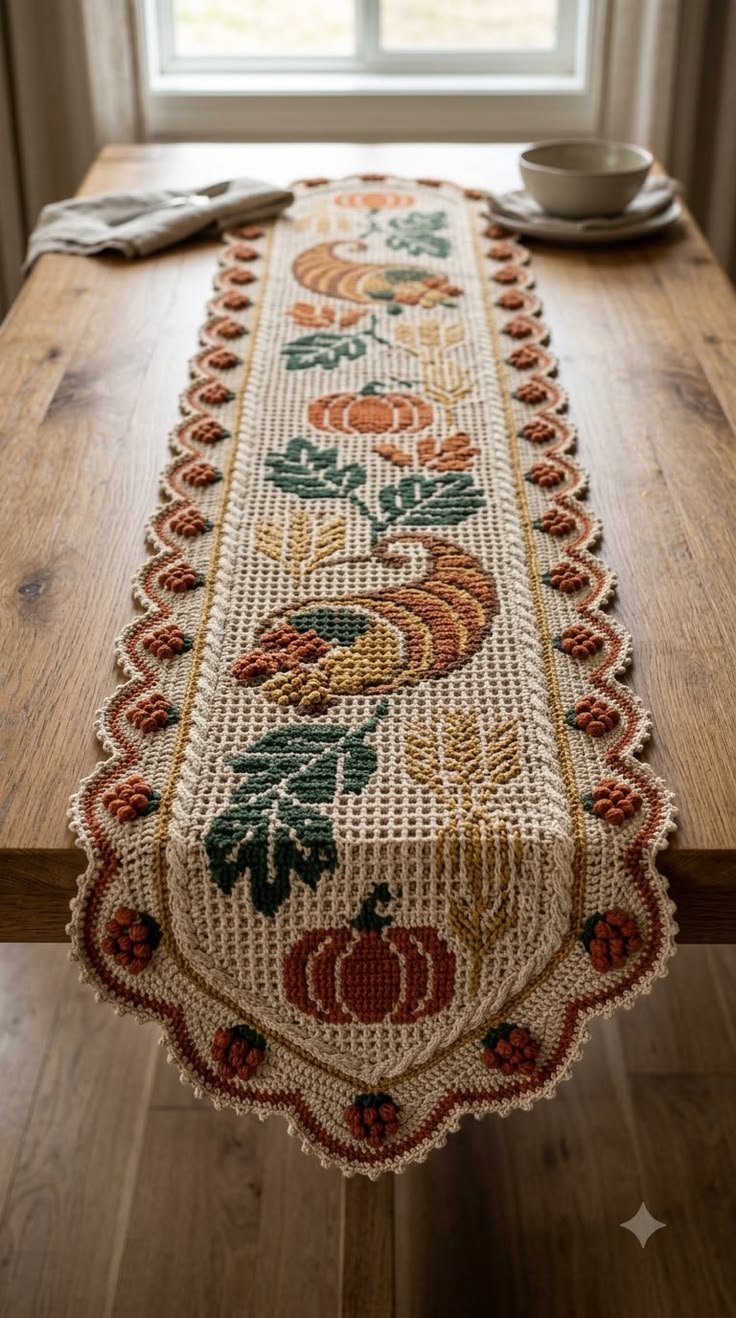
A cornucopia needs a widening spiral, pumpkins need visible ribs, and wheat must stay narrow enough to read as stalks rather than leaves. This fall harvest crochet table runner pattern combines those shapes on a long cream openwork base with rust, mustard and forest-green details. Use worsted-weight yarn and a 5 mm hook for a substantial table runner. The elongated construction can also be adjusted to suit different dining-table lengths.
The Design: What Makes This Harvest Table Runner Different
The runner uses a long central field rather than repeating identical square motifs. Pumpkins, leaves, wheat and cornucopia-inspired harvest shapes are distributed vertically so the design can be viewed from either side of a dining table. Cream yarn separates the stronger autumn colors and prevents the motifs from merging visually.
The second structural feature is the border. Instead of stopping with a narrow edging, the reference design uses pronounced scallops containing small raised rust-colored details. This creates a frame around the central crochet Thanksgiving table runner while repeating the pumpkin colors used inside it.
A common construction problem is excessive colorwork tension. Pulling the unused yarn too tightly contracts the openwork base, so the cream field should be checked against its original width after every major motif section.
Project Info at a Glance
| Skill Level | Estimated Time | Target Size | Hook | Yarn |
|---|---|---|---|---|
| Intermediate | 12–18 hours | Approx. 35 × 120 cm | 5.0 mm | Worsted weight |
The finished dimensions are adjustable. Add or remove central motif sections before working the outer border to change the overall length.
Materials and Tools
Yarn
- Cream / natural — worsted weight — approximately 250–300 g for the main runner and border.
- Rust orange — worsted weight — approximately 70–90 g for pumpkins, cornucopia details and raised border motifs.
- Forest green — worsted weight — approximately 50–70 g for leaves, stems and harvest foliage.
- Mustard / wheat gold — worsted weight — approximately 40–60 g for wheat, corn and accent sections.
- Medium brown — worsted weight — approximately 20–30 g for stems and cornucopia outlines.
These quantities are working estimates for the pictured multicolor construction. Yarn use changes with the final runner length, stitch tension and number of decorative motifs.
Tools
- 5.0 mm crochet hook
- Yarn needle
- Scissors
- Locking stitch markers
- Tape measure
- Blocking mats
- Rust-resistant blocking pins
Abbreviations
- ch — chain
- sc — single crochet
- hdc — half double crochet
- dc — double crochet
- tr — treble crochet
- sl st — slip stitch
- st/sts — stitch/stitches
- sp — space
- ch-sp — chain space
- dc3tog — double crochet three together
- bobble — grouped stitches closed together to form a raised motif
Fall Harvest Crochet Table Runner Pattern
The photographed runner combines openwork crochet with detailed autumn motifs. The instructions below recreate that construction as a modular design: make the cream foundation first, add the larger harvest appliqués, then finish with the framed scalloped border.
Main Cream Runner Foundation
Yarn: cream / natural.
Foundation: Ch 66.
Row 1: Dc in 4th ch from hook and in each chain across. Turn.
Row 2: Ch 3, dc in next 3 sts, *ch 1, skip 1 st, dc in next st*. Repeat across until 4 sts remain. Dc in final 4 sts. Turn.
Row 3: Ch 3, dc in each dc and each ch-1 space across. Turn.
Row 4: Ch 3, dc in next 3 sts, *ch 1, skip 1, dc in next st*. Repeat across, ending with solid dc stitches along the opposite edge.
Rows 5–12: Alternate Rows 3 and 4.
This establishes the open cream grid used behind the harvest motifs.
Measure the width after Row 12. The fabric should remain rectangular without either edge drawing inward.
Lower Pumpkin Appliqué
Yarn: rust orange with brown and green details.
Foundation: Ch 17.
Row 1: Sc in second ch from hook and across. Turn. (16)
Row 2: Ch 1, sc in first 2 sts, hdc in next 2, dc in next 8, hdc in next 2, sc in final 2. Turn. (16)
Row 3: Ch 1, sc across. (16)
Row 4: Repeat Row 2.
Row 5: Sc across.
Fasten off rust yarn.
With brown yarn, embroider or surface-crochet four vertical curved lines from the upper edge toward the lower center. These lines divide the pumpkin into five visible ribs.
Attach green yarn at the upper center and work 4 sc upward for the stem. Fasten off.
Pin the pumpkin near one end of the runner and sew around its outside edge.
Large Green Harvest Leaf — Make 4 or More
Yarn: forest green.
Foundation: Ch 18.
Side 1: Sc in second ch, hdc in next 2, dc in next 4, tr in next 4, dc in next 3, hdc in next 2, 3 sc in final ch.
Continue along the unused side of the foundation chain.
Side 2: Hdc in next 2, dc in next 3, tr in next 4, dc in next 4, hdc in next 2, sc in final ch.
Sl st to first stitch.
Fasten off, leaving a sewing tail.
Use cream or green yarn to surface-crochet a center vein from the base toward the tip. Add two or three short diagonal veins on either side.
Wheat Stalk — Make 4 to 6
Yarn: mustard / wheat gold.
Ch 25.
Sl st in second ch and in each chain back toward the foundation. This forms the central stalk.
Working upward along the stalk, create a grain branch by chaining 4, sl st in second chain, sc in next, hdc in next, then sl st back into the stalk.
Repeat on the opposite side approximately 2 stitches higher.
Continue alternating these short branches until 5–7 grain shapes have been formed on each side.
Fasten off and leave a long sewing tail.
When attaching the wheat, sew down the central stalk first. Tack the grain branches individually so they do not curl away from the runner.
Small Rust Pumpkin — Make 3
Yarn: rust orange.
R1: Ch 2, work 8 hdc into second ch from hook. Join. (8)
R2: Work 2 hdc in every stitch. Join. (16)
R3: *Hdc in next st, 2 hdc in next.* Repeat around. Join. (24)
Fasten off.
Use brown yarn to create three surface lines from the upper center toward the bottom. Pull these lines only enough to define the ribs; excessive tension will cup the appliqué.
Add a short green or brown stem at the upper center.
Cornucopia Appliqué — Make 2
Yarn: medium brown, rust and mustard.
Ch 5.
Row 1: Sc in second ch and across. Turn. (4)
Row 2: Ch 1, 2 sc in first st, sc across, 2 sc in final st. Turn. (6)
Row 3: Sc across. (6)
Row 4: 2 sc in first st, sc across, 2 sc in final st. (8)
Row 5: Sc across. (8)
Row 6: 2 sc in first st, sc across, 2 sc in final st. (10)
Rows 7–10: Continue increasing at both ends of every second row until the upper opening is broad enough for the fruit cluster.
Fasten off brown.
Curve the narrow end sideways while pinning the piece to the runner. Stitch the curved edge first, then secure the wider opening.
Use rust, mustard and green yarn to add small circular fruit motifs at the open end.
Small Harvest Berry or Fruit Cluster
Use rust, mustard or brown.
R1: MR, 6 sc in ring. (6)
R2: 2 sc in each stitch. (12)
Fasten off.
Make several circles in different harvest colors. Overlap them at the cornucopia opening rather than arranging them in a straight row.
Raised Border Pumpkin Motif — Make as Needed
Yarn: rust orange.
R1: MR, 6 sc. Join. (6)
R2: Work a 4-dc bobble in each stitch around, separating each bobble with ch 1.
Fasten off.
Pull the magic ring firmly closed. The grouped stitches form the small raised pumpkin or berry-like detail visible around the border.
Add one or two tiny green surface stitches at the top when a clearer pumpkin shape is preferred.
Positioning the Harvest Motifs
Lay the cream foundation flat before sewing anything permanently.
Place a pumpkin close to each end. Position the larger cornucopia motifs through the central third of the runner, rotating one so the composition does not read in only one direction.
Distribute the green leaves between the larger orange and brown elements. Insert gold wheat stalks into open spaces where a broad leaf would make the design too dense.
Leave visible cream mesh between motifs. The negative space is part of the design and prevents the center panel from becoming visually congested.
Pin every component before sewing. Check the runner from both ends of the table.
Sewing the Appliqués
Thread a yarn needle with a matching yarn color.
Whipstitch around each pumpkin and cornucopia approximately 3–5 mm inside the outer edge. Catch only enough of the cream foundation to hold the appliqué securely.
Leaves should be secured along the central vein first. Add small stitches around the outer points afterward.
For wheat motifs, sew the main stem completely and tack each grain branch separately.
Do not carry dark sewing yarn across exposed cream sections on the reverse side.
Cream Foundation Border
Join cream yarn at one corner.
R1: Ch 1 and sc evenly around all four sides. Work 3 sc in each corner.
R2: Ch 2, hdc in each stitch around. Work (hdc, ch 1, hdc) in every corner.
R3: Ch 1, sc in each stitch. Work 3 sc in every corner.
Do not continue until the runner lies flat. A waving border means too many stitches were added along the long sides; inward curling indicates too few.
Rust Accent Round
Join rust yarn in a corner.
R4: Ch 1, sc in each stitch around, working 3 sc at each corner.
R5: Ch 1, sc around again. At regular intervals, mark the positions where the raised pumpkin motifs will be attached.
Fasten off rust yarn.
Scalloped Cream Border
Rejoin cream yarn.
R6: Ch 1, sc in first stitch. *Skip 2 sts, 5 dc in next st, skip 2 sts, sc in next st.* Repeat along each side.
Adjust the spacing before each corner so a full shell sits symmetrically around the turn.
R7: Sl st to the center dc of the first shell. *Ch 3, sc in center dc of next shell.* Repeat around.
For the deeper border shown in the photograph, work another cream sc round followed by a second shell round.
Adding the Raised Border Pumpkins
Position one small rust bobble motif inside every second scallop, or inside every scallop for a denser border.
Sew each motif through its center and lower edge. Leave the outer bobbles free so the motif remains dimensional.
Keep the spacing identical along both long sides. At the short ends, begin at the center and work outward so the final arrangement remains symmetrical.
Assembly
- Crochet the complete cream openwork foundation to the required table length.
- Make the large rust pumpkins and smaller pumpkin motifs.
- Crochet the forest-green leaves and mustard wheat stalks.
- Make two cornucopia motifs and the small fruit circles used at their openings.
- Block the foundation and arrange all harvest motifs before sewing.
- Attach pumpkins and cornucopias first because they determine the main composition.
- Add leaves and wheat to fill the remaining spaces without covering the cream mesh completely.
- Work the cream foundation edging followed by the rust accent round.
- Add the scalloped cream border and attach the raised rust border motifs at consistent intervals.
- Weave in all yarn tails, block the runner to final measurements and allow it to dry completely while lying flat.
The finished runner should have a long cream central field framed by autumn-colored harvest motifs and a symmetrical scalloped border.
7 Technical Tips for a Better Crochet Table Runner
- Prevent narrowing in the mesh. Measure the runner every 10–12 rows. A width loss greater than approximately 1 cm indicates that the openwork chains or colorwork floats are being worked too tightly.
- Control appliqué distortion. Block the cream base before attaching the pumpkins and leaves. Sewing motifs onto an unblocked foundation can permanently pull the runner toward one side.
- Keep pumpkin ribs visible. Surface lines should indent the orange fabric without folding it. If a rib causes the outer edge to curl upward, loosen that line before tying off.
- Stabilize long leaves. Sew each large leaf along its center vein before securing the outside points. Starting around the perimeter can twist the leaf and move its tip by 1–2 cm.
- Check border stitch density. Lay the runner flat after the first complete sc round. Ripples indicate excess stitches; an edge that lifts from the table indicates insufficient stitches.
- Center the end motifs. Mark the midpoint of each short edge before attaching the end pumpkin. A displacement of even 2 cm is noticeable because the runner’s long centerline emphasizes asymmetry.
- Secure color tails individually. Weave each rust, green, gold and brown tail through matching-colored stitches for at least 5 cm. Avoid carrying dark tails underneath exposed cream mesh where they can remain visible from the front.
Adjusting the Table Runner Length
Measure the table before deciding on the final number of motif sections. For a runner that stays completely on the tabletop, subtract approximately 20–30 cm from the table length. For an overhanging runner similar to the reference image, add enough length for the fabric to drop over both ends.
Length changes should be made in the cream center before the decorative border is started. Add complete openwork repeats rather than isolated rows so the mesh remains consistent.
When extending the runner substantially, add another pumpkin, leaf-and-wheat group or cornucopia section instead of leaving a large empty area in the center.
Color Placement
Cream should remain the dominant color. Rust orange forms the strongest secondary color through the pumpkins and border accents, while forest green separates neighboring warm-colored motifs. Mustard should be used more selectively for wheat and small harvest details.
A practical distribution is approximately 65–70% cream, 15% rust, 8–10% green and the remaining area divided between mustard and brown.
Do not place every green leaf at the same angle. Alternating the direction of the foliage makes the long runner readable from both sides of a dining table.
Blocking and Finishing
Weave in all yarn ends before final blocking. Wash or dampen the runner according to the yarn manufacturer’s care instructions, then remove excess water without twisting the fabric.
Lay the runner on blocking mats. Pin the centerline first, followed by the four corners. Measure the width at several points along the length and adjust the side pins until those measurements match.
Shape every scallop separately. The outer points should follow a consistent line rather than pulling individual scallops farther outward to compensate for uneven stitch counts.
Keep the raised border motifs uncompressed during drying. If necessary, reposition them after the cream edging has been pinned.
Finishing the Fall Harvest Crochet Table Runner
Place the dry runner on the intended table and check both overhanging ends before trimming any remaining tails. The pumpkins and cornucopias should remain centered on the long axis, while the leaves and wheat provide asymmetrical detail around them.
For the first sample, crochet a 15–20 cm section of the cream mesh and one pumpkin appliqué before committing to the full length. That test establishes the actual width produced by your yarn, hook and tension and shows whether the 5 mm hook creates enough definition for the openwork background.
Photograph the completed fall harvest crochet table runner pattern from directly above for Pinterest, then take a lower side photograph to show the raised border motifs and layered appliqués for Instagram. Use #FallHarvestCrochetRunner when sharing the finished project.
For this specific runner, would you place the two cornucopias facing opposite directions or orient both toward the center pumpkin? “`1









