Introduction
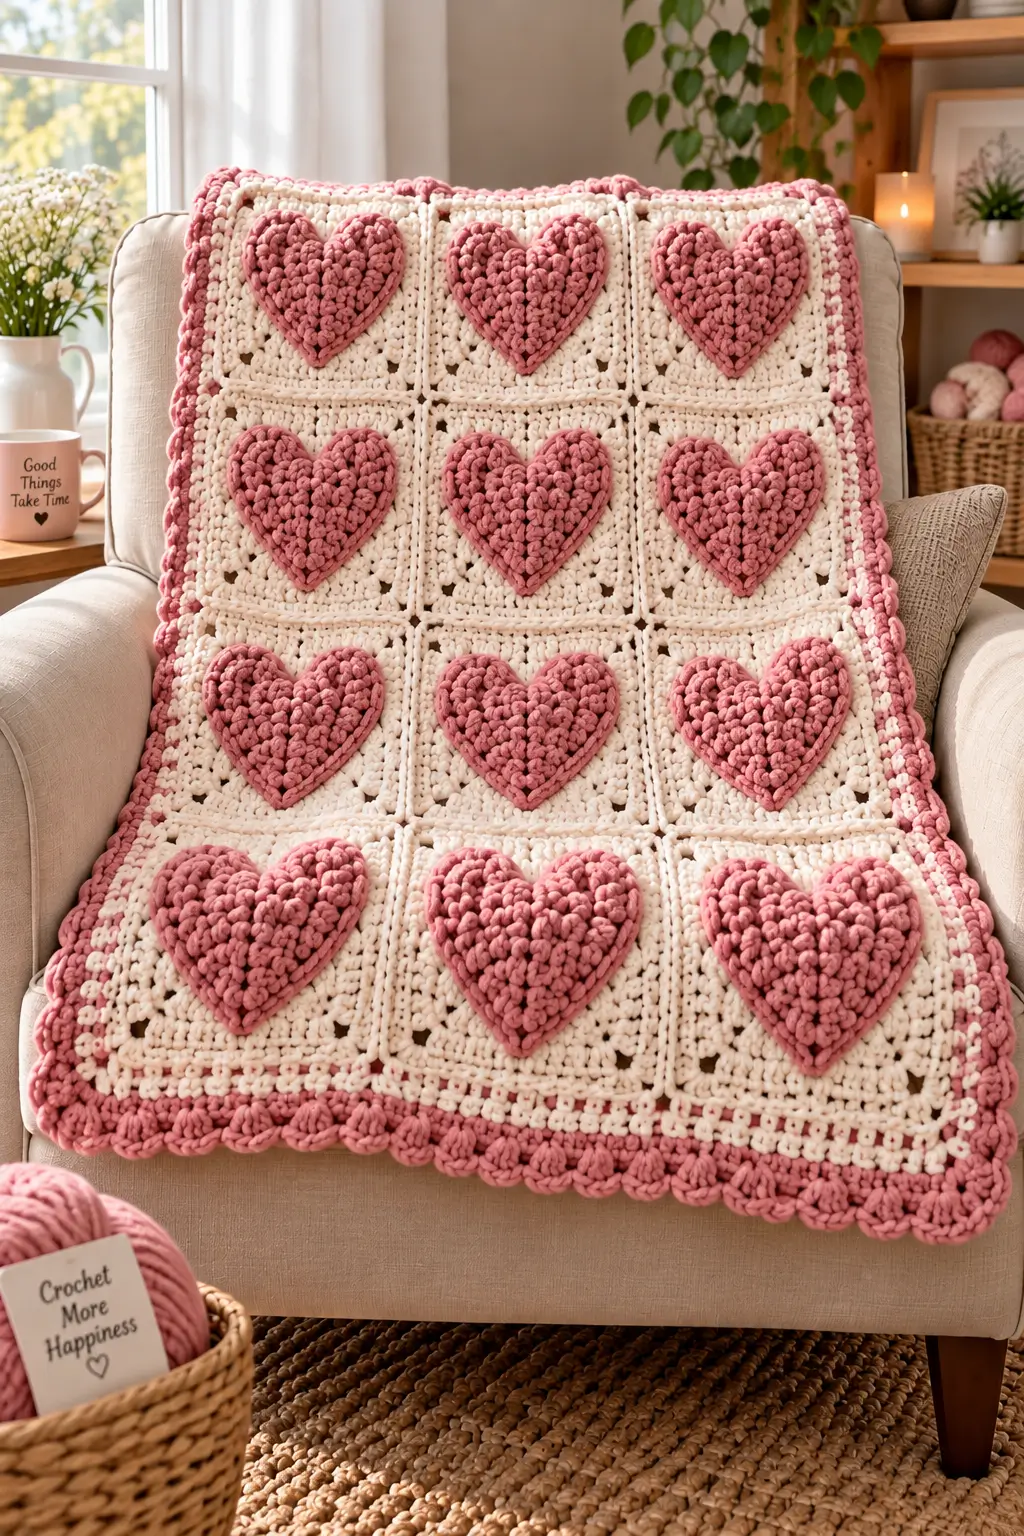
Twelve raised pink hearts turn this blanket into something structurally different from a standard heart granny square. This heart granny square blanket crochet pattern uses cream modular blocks, dimensional heart appliqués, a 5 mm hook and light-to-medium yarn. Target an intermediate skill level and roughly 86 × 107 cm for a baby-blanket or compact throw format. Modular construction also makes damaged squares easier to repair individually.
The Design: What Makes the Raised Heart Blanket Different
The photograph uses three structural choices that matter. First, the hearts sit above the cream background rather than relying only on color changes. That extra layer creates the pronounced relief visible across all 12 blocks. Second, each heart occupies roughly two-thirds of its square, leaving enough cream around the motif for the joining seams to remain visible. Third, the pink border is substantially deeper than a basic finishing round, which balances the visual weight of the raised motifs.
A common mistake with a raised heart crochet square is sewing the heart down too tightly. That flattens the lobes and can pull the square inward. The heart should be pinned at its cleft, side curves and point before sewing. This approach also gives the pink heart crochet blanket a more consistent grid.
Project Info at a Glance
| Skill Level | Time | Finished Size | Hook | Best For |
|---|---|---|---|---|
| Intermediate | 14–20 hours | Approx. 86 × 107 cm | 5.0 mm | Baby blanket / compact throw |
The 86 × 107 cm target is based on a published 34 × 42-inch heart-granny blanket benchmark. Finished measurements will vary with yarn weight, hook size, tension and the number of rounds added to each square.
Materials and Tools
Yarn
- Cream / warm white — size 3 light or comparable DK — approximately 400–450 g for the 12 squares, joining and inner border.
- Dusty rose pink — size 3 light or comparable DK — approximately 200–250 g for 12 raised hearts and the decorative outer border.
Yarn consumption is an estimate for the pictured 3 × 4 construction. Dimensional appliqués and a deep decorative border require more yarn than a flat heart motif.
Tools
- 5.0 mm crochet hook
- Yarn needle
- Scissors
- Locking stitch markers
- Tape measure
- Blocking mats and rust-resistant pins
No safety eyes or stuffing are required.
Abbreviations
- MR — magic ring
- ch — chain
- sc — single crochet
- hdc — half double crochet
- dc — double crochet
- tr — treble crochet
- sl st — slip stitch
- st/sts — stitch/stitches
- sp — space
- BLO — back loop only
- inc — two stitches in the same stitch
Invisible decreases are primarily used for three-dimensional amigurumi shaping and are not required for this modular blanket.
Heart Granny Square Blanket Pattern — Step by Step
This blanket is built from 12 separate cream squares and 12 dusty-pink raised hearts. The blocks are assembled in three columns and four rows before the cream inner edging and pink scalloped border are added.
Cream Background Square — Make 12
Yarn: cream / warm white.
R1: MR, ch 3, 2 dc, ch 2, 3 dc, ch 2 ×3, sl st to beginning ch. You now have four 3-dc groups.
R2: Sl st to corner. Ch 3, 2 dc, ch 2, 3 dc in same corner. Ch 1, (3 dc, ch 2, 3 dc) in next corner ×3. Ch 1 and join.
R3: Sl st to corner. Work (3 dc, ch 2, 3 dc) in corner, ch 1, 3 dc in side space, ch 1. Repeat around, working (3 dc, ch 2, 3 dc) in every corner.
R4: Repeat the established granny-square sequence, adding one additional 3-dc group along each side.
R5: Repeat the established sequence again. Each side now contains the corner groups plus three intermediate granny groups.
R6: Ch 1. Sc evenly around the entire square, working 3 sc into each corner space. Join with sl st.
Fasten off. Leave a 15 cm tail if you intend to use the tail during joining.
Block all 12 squares to identical dimensions before attaching the hearts. For a larger blanket, continue the granny-square sequence for additional rounds. Add the same number of rounds to every square.
Raised Heart Appliqué — Make 12
Yarn: dusty rose pink.
R1: MR, ch 2, work 12 dc into ring, sl st to first dc. (12)
R2: Ch 1, 2 sc in each stitch around, sl st. (24)
The circular foundation provides enough fabric for the two upper lobes while maintaining a defined lower point.
R3: Ch 1, sc in first st, hdc in next, 2 dc in each of next 3 sts, hdc in next 2 sts, sc in next 3 sts, (sc, ch 1, sc) in next st to establish the lower point. Mirror the shaping across the second half: sc in next 3 sts, hdc in next 2 sts, 2 dc in each of next 3 sts, hdc in next, sc in final st. Join.
R4: Sl st toward the first upper curve. Ch 2. Work hdc and dc stitches evenly around the first lobe, using occasional 2-dc increases where the fabric needs additional curvature. Work sl st into the center cleft. Mirror the stitch sequence around the second lobe.
At the lower point, work (dc, ch 1, dc) into the point space.
R5: Sc around the heart. Work 2 sc into selected stitches along each outer lobe where additional curvature is required. Place 3 sc into the lower point.
Fasten off. Leave approximately 40 cm of yarn for sewing the heart to its square.
The finished heart should lie mostly flat before assembly while retaining enough thickness to stand above the cream background after attachment.
Optional Second Heart Layer — Make 12 for Extra Relief
The reference blanket has strongly raised motifs. A smaller second layer can be attached to each large heart when additional depth is wanted.
R1: MR, work 12 dc into the ring. (12)
R2: Shape the heart directly: sc, hdc, 2 dc in each of next 3 sts, hdc, sc, (sc, ch 1, sc) for the point, then mirror the stitch sequence across the opposite side.
Fasten off.
Place the smaller heart centrally over the larger pink heart and sew around its inner edge. Do not attach it to the cream square at this stage. The doubled fabric creates additional relief without requiring stuffing.
Attaching the Raised Hearts
Place one completed pink heart in the center of each blocked cream square. Align the lower point with the vertical centerline of the block.
Pin each heart at five locations: the center cleft, left lobe, right lobe, lower-left curve and bottom point. Add another pin to the lower-right curve if the yarn shifts while sewing.
Thread a yarn needle with the long pink tail. Whipstitch or mattress-stitch around the outer edge of the heart, catching only the surface loops of the cream square where possible.
Do not stitch through the center section of the heart. Leaving the central fabric unattached helps maintain the raised profile.
Repeat until all 12 squares have a pink heart.
Joining the Granny Squares
Arrange the completed squares in three columns and four rows. Check the direction of every heart before beginning the joins.
Start with the horizontal seams. Hold two adjacent squares with the wrong sides together and attach cream yarn at the corner.
Ch 1, then sc through corresponding edge stitches of both squares. Continue evenly to the opposite corner.
Fasten off.
Repeat until each row is complete. Join the four rows with three long seams, checking each intersection so that all four square corners meet cleanly.
A slip-stitch join can be substituted for a flatter finish. A single-crochet join produces a more visible division between the blocks and more closely matches the structure shown in the reference image.
Inner Cream Border
Join cream yarn in any outer corner.
R1: Ch 1, sc evenly around the entire blanket. Work 3 sc into each corner. Keep stitch spacing consistent where the square seams meet the outer edge.
R2: Ch 2, hdc in every stitch around. Work (hdc, ch 1, hdc) in each corner.
R3: Ch 1, sc around. Work 3 sc into each corner.
Fasten off.
Measure the two long sides against each other, then compare the two short sides. Correct uneven stitch distribution before beginning the decorative border.
Pink Foundation Border
Join dusty rose pink yarn in one corner.
R1: Ch 1, sc in each stitch around. Work 3 sc in every corner.
R2: Ch 3, dc in each stitch around. At every corner, work (2 dc, ch 2, 2 dc).
R3: Ch 1, sc around, placing 3 sc into each corner space.
Keep the corner stitches relaxed. A foundation border that is worked too tightly can cause the finished blanket to curl inward.
Scalloped Pink Border
The outer edge uses large rounded shells to repeat the curves of the heart motifs.
R4: Skip 2 sts, 5 dc in next st, skip 2 sts, sl st in next st. Repeat across each side.
Adjust the spacing near each corner so that one shell is centered over the corner. Work 7 dc instead of 5 dc in a corner shell when extra width is needed to keep the corner flat.
R5: Sl st to the center dc of the first shell. Ch 3, sc in the center dc of the next shell. Repeat around.
For a wider and heavier border closer to the reference photograph, work another shell round into the spaces between the previous shells.
Fasten off. Weave the final yarn tail through at least 5 cm of border stitches, reverse direction, pass through another section and trim.
Assembly
- Block all 12 cream squares to the same dimensions.
- Crochet 12 dusty rose heart appliqués.
- Add the optional smaller heart layer when stronger relief is required.
- Center and pin one heart onto every cream square.
- Sew around each heart while leaving the center unattached.
- Arrange the blocks in three columns and four rows.
- Join the short seams to construct four complete rows.
- Join the four rows along their long seams.
- Crochet the cream inner border, followed by the pink foundation rounds and scalloped edging.
- Block the completed blanket to the planned measurements and weave in all remaining yarn tails.
The finished blanket contains 12 dimensional heart motifs arranged in a 3 × 4 modular grid.
7 Technical Tips for a Cleaner Heart Blanket
- Control marker drift. Place a locking stitch marker into the first stitch of every border round. Losing that first stitch can shift the shell placement and leave the final corner out of alignment.
- Prevent heart flattening. Keep the attachment seam within approximately 5 mm of the heart’s outer edge. Sewing across the center removes much of the dimensional effect.
- Correct uneven square size before joining. Block the 12 squares to within approximately 5 mm of one another. Larger differences can produce ripples at the intersections.
- Set the heart cleft first. Pin the upper center indentation before positioning either lobe. Pinning the lobes first can spread the cleft into a shallow V.
- Watch for join puckering. Match corresponding edge stitches instead of forcing additional stitches into the shorter square. A seam that contracts by more than about 1 cm can distort the complete grid.
- Correct border ruffling immediately. Too many stitches along the foundation edge cause waves. Reduce the stitch count before adding the shell round rather than attempting to remove the ruffle during blocking.
- Secure every yarn tail. Weave each joining and border tail through at least 5 cm of stitches, reverse direction once, then pass through another section before trimming. A tail woven in only one direction can work loose during repeated washing.
Finishing the Heart Granny Square Blanket
Lay the blanket flat after the final border round and compare opposite edges before blocking. Pin the square intersections first, followed by the four corners and then the border between those points. The hearts should remain raised rather than being compressed under blocking pins.
For the next practical step, crochet one cream test square and one raised heart before producing all 12 motifs. Pin the sample together and check that the heart occupies roughly two-thirds of the square. Adjust the heart or square size at this stage rather than after assembly.
Photograph the completed blanket directly from above for Pinterest, then use a lower side angle for Instagram to show the relief that distinguishes this heart granny square blanket crochet pattern from a flat colorwork design. Use #RaisedHeartGrannyBlanket when sharing the finished project.
Would you keep all 12 raised hearts dusty rose, or alternate two pink shades across the 3 × 4 grid?









