Introduction
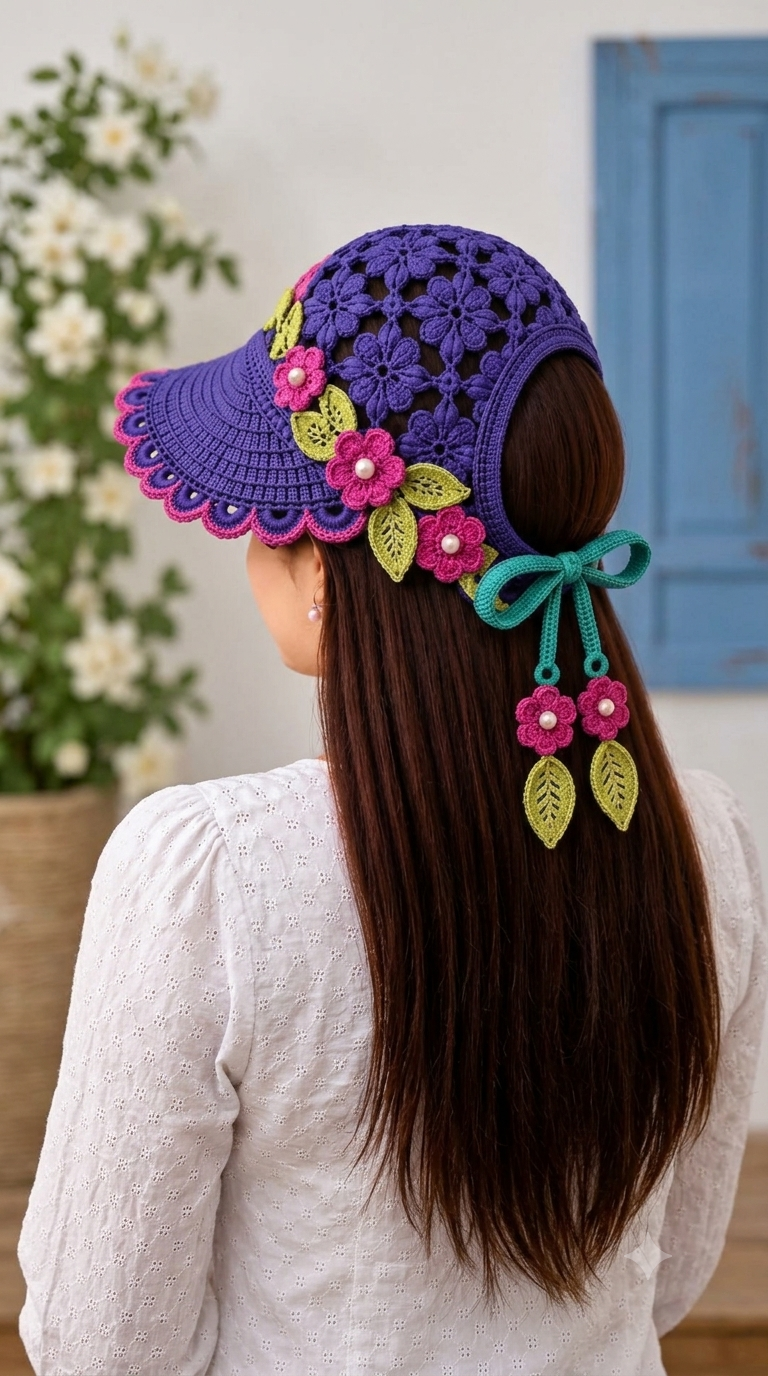
A flower-lace crown changes the engineering of this purple visor before the first brim increase is made. This floral crochet sun hat pattern uses DK cotton, a 3.5 mm hook, layered flowers, leaves and adjustable back ties to produce an adult-size photo-inspired design for intermediate crocheters. The open back leaves long hair unrestricted while the solid front visor provides a structured base for the decorative crown.
The Design: What Makes This Floral Visor Different
The photograph combines three structures that normally appear separately: a dense visor, an open flower-lace crown and an open back secured by ties. The visor therefore needs more firmness than the decorative upper section. A smaller hook and cotton-rich DK yarn help limit unwanted brim collapse.
The crown uses joined floral motifs rather than imitating the appearance with surface embroidery. That choice preserves the visible openings between purple flowers. The crochet flower sun hat also places the heavier pink-and-green appliqués close to the lower crown, where their weight is less likely to distort the top.
A common mistake in a crochet visor pattern is adding too many increases too quickly across the front. The result is a ruffled visor rather than a projecting brim. Work increases symmetrically and check the width while the piece lies flat.
Project Info at a Glance
| Skill Level | Time | Finished Size | Hook | Best For |
|---|---|---|---|---|
| Intermediate | 8–12 hours estimated | Adjustable adult; target 54–58 cm | 3.5 mm | Summer visor, long-hair/open-back hat |
Published adult sun-hat references commonly place adult circumference around 54–58.5 cm. The exact size of the photographed hat cannot be measured from the image alone.
Materials and Tools
Yarn
- Deep violet — DK cotton or cotton blend — approximately 100–120 g.
- Fuchsia pink — DK cotton — approximately 20 g for flowers and scalloped edging.
- Leaf green — DK cotton — approximately 15 g for leaves.
- Teal — DK cotton — approximately 15 g for the adjustable bow and hanging cords.
The accent quantities are working estimates for this photo-inspired construction rather than measured quantities from the pictured object.
Tools
- 3.5 mm crochet hook
- Tapestry needle
- Locking stitch markers
- Scissors
- Measuring tape
- 6–7 mm pearl-style beads for the flower centers
- Optional millinery wire or nylon line for additional visor stiffness
Small detachable beads should not be used on items intended for babies or young children.
Abbreviations
- MR — Magic ring
- sc — Single crochet
- inc — 2 single crochet in one stitch
- dec — Single crochet decrease
- sl st — Slip stitch
- ch — Chain
- hdc — Half double crochet
- dc — Double crochet
- tr — Treble crochet
- BLO — Back loop only
- st/sts — Stitch/stitches
For an invisible decrease, insert the hook through the front loops of the next two stitches, yarn over, draw through both front loops, then complete the single crochet.
Floral Crochet Sun Hat Pattern – Step by Step
Pattern note: This is a new photo-inspired construction based on the visible features of the reference image. It is not presented as the original designer’s pattern.
Purple Crown Flower Motifs – Make 10–12
Yarn: deep violet.
R1: 6 sc in MR (6)
R2: inc ×6 (12)
R3: *sl st in next st, ch 5, 3 tr in same st, ch 5, sl st in next st* ×6, forming six petals.
Fasten off. Leave a 15 cm tail on motifs that will be sewn to neighboring flowers.
Arrange the flowers across the crown so the petals touch while small openings remain visible. The photographed hat uses a denser floral field at the top and a more structured lower edge.
Lower Crown Band
Yarn: deep violet.
This section is sized by measurement because an open-back visor must fit the wearer rather than close into a complete circular hat.
Row 1: Ch enough stitches to span approximately 45–48 cm across the forehead and around the sides, leaving the center back open.
Row 2: Ch 1, sc across.
Rows 3–6: Ch 1, sc across.
Row 7: Ch 1, BLO sc across.
Rows 8–10: Ch 1, sc across.
Fasten off only after checking that the ends finish behind the ears rather than meeting at the center back.
Sew the lower flower motifs to the upper edge of this band. Add subsequent motifs upward, overlapping petal tips enough to stabilize the lace while retaining the visible openings between flowers.
Front Visor
Yarn: deep violet.
Mark approximately the central 30–34 cm of the lower crown band. Work the visor only between those markers.
Row 1: Join purple at the first marker and sc evenly to the second marker.
Row 2: Ch 1, turn, inc, sc across to final st, inc.
Row 3: Ch 1, turn, sc across.
Row 4: Ch 1, turn, inc, sc across to final st, inc.
Row 5: Ch 1, turn, sc across.
Row 6: Repeat Row 4.
Row 7: Ch 1, turn, sc across.
Row 8: Repeat Row 4.
Rows 9–15: Ch 1, turn, sc across without further increases.
Measure from the crown edge. Aim for a visor depth of approximately 8–10 cm before adding the decorative edging.
If the visor begins to ripple strongly while lying flat, stop increasing. The exact number of stitches depends on the starting width and individual gauge.
Do not fasten off.
Scalloped Visor Edge
Yarn: deep violet followed by fuchsia pink.
Work one round of purple sc evenly around the exposed outer visor edge.
Change to pink.
Scallop repeat: *sl st, skip 1 st, 5 dc in next st, skip 1 st, sl st in next st.*
Repeat across the curved outer edge. Adjust the final repeat by one stitch when necessary rather than forcing a complete scallop into insufficient stitches.
Fasten off and weave in the tail.
Pink Layered Flowers – Make 5
Yarn: fuchsia pink.
R1: 6 sc in MR (6)
R2: inc ×6 (12)
R3: Work six petal sections using *sl st, ch 3, 3 dc in next st, ch 3, sl st* distributed evenly around the circle.
For additional depth, attach the yarn around the posts behind the first petal layer. Form six ch-4 loops and work a slightly larger petal into each loop.
Fasten off. Leave a 15 cm sewing tail.
Green Leaves – Make 6–8
Yarn: leaf green.
Foundation: Ch 11.
Side 1: Sl st in second ch from hook, sc, hdc, dc in next 4 ch, hdc, sc, 3 sc in final ch.
Rotate the work to crochet down the unused side of the foundation chain.
Side 2: sc, hdc, dc in next 4 ch, hdc, sc, sl st.
Fasten off with a 15 cm tail.
For the visible vein effect, surface-slip-stitch along the center foundation chain in green. Add short diagonal embroidered stitches from the central vein toward the outside edges.
Teal Back Ties – Make 2
Yarn: teal.
Row 1: Ch until the cord measures approximately 38–42 cm.
Row 2: Sl st into each chain back to the beginning.
Fasten off with a long sewing tail.
Attach one cord securely to each back end of the lower crown band. The two cords should form a bow without pulling the front band backward.
Hanging Decorative Cords – Make 2
Yarn: teal.
Row 1: Ch 35.
Row 2: Sl st into each chain.
At the free end, ch 6 and sl st into the first of those six chains to create a small terminal loop.
Fasten off.
Attach one pink flower below each terminal loop when reproducing the long ornaments visible at the back of the reference hat.
Dangling Pink Flowers – Make 2
Yarn: fuchsia pink.
R1: 6 sc in MR (6)
R2: inc ×6 (12)
R3: Form six petals using *sl st, ch 3, 3 dc, ch 3, sl st* distributed evenly around the circle.
Fasten off with a sewing tail.
Dangling Leaves – Make 2
Yarn: leaf green.
Foundation: Ch 12.
Use the same construction as the smaller green leaves, adding one additional dc through the long central section to create the elongated leaf shape visible below the bow.
Fasten off. Leave a 15 cm tail.
Pearl-Style Flower Centers
Sew one pearl-style bead into the center of each prominent pink flower. Pass the thread or matching yarn through the center several times and secure the knot on the wrong side, where the attachment can be covered by the crown band or appliqué.
For a bead-free alternative, crochet a small cream center.
R1: 6 sc in MR (6)
R2: inc ×6 (12)
Fasten off and sew the circle securely over the center of the flower.
Assembly
- Lay the lower purple band flat and mark the exact center front.
- Center the visor beneath that marker. Check that both outside corners finish at equal distances from the open back.
- Arrange the purple crown flowers above the band. Join neighboring petals with small purple stitches while preserving the open spaces between motifs.
- Secure the lowest crown motifs firmly to the band so the flower-lace section cannot rotate independently of the visor.
- Pin three pink flowers along one side of the lower crown, following the diagonal floral arrangement visible in the reference image.
- Position the green leaves between the pink flowers. Direct the leaf points away from the flower centers rather than placing every leaf at the same angle.
- Attach the remaining pink flowers around the side of the crown while retaining the deliberately asymmetric arrangement.
- Sew the teal ties firmly to the two back corners. Test the bow at normal wearing tension before weaving in the yarn tails.
- Add one hanging flower and one elongated green leaf to each decorative teal cord, then attach the cords close to the bow.
- Weave every structural yarn tail through at least 3–4 cm of matching crochet fabric. Trim the ends and reshape the visor by hand.
The finished construction has a firm front visor, an open floral crown, an adjustable rear bow and layered flower-and-leaf decorations.
7 Technical Tips for a Better Crochet Sun Hat
- Control stitch-marker drift. Mark both visor corners before working Row 1. A one-stitch shift on one side becomes increasingly visible after several increase rows.
- Watch for brim ruffling. Stop adding increases if the visor forms waves when placed on a flat surface. Excess circumference is the main failure mode; aim for an approximately 8–10 cm flat projection.
- Leave enough yarn for flower attachment. Keep at least a 15 cm tail on appliqués carrying pearl-style centers. Very short tails provide insufficient material for repeated anchoring passes.
- Pin the flower crown before sewing. Position all purple motifs first and check the crown from the front, side and back. Sewing motifs individually without checking the full arrangement can pull the crown off center.
- Add beads after attaching the flowers. Sew the pink appliqués to the hat before installing their pearl-style centers. A bead already attached to the flower can obstruct the stitches required to secure the motif.
- Correct a collapsing visor at the fabric stage. If the brim folds immediately below the band, try a hook approximately 0.5 mm smaller for the visor or add suitable brim support. Tightening only the final edging can cause the perimeter to cup.
- Reinforce structural yarn tails. Weave the visor corners and bow-anchor tails through at least 3–4 cm of fabric, reverse direction and then trim. These areas receive more repeated tension than the decorative petals.
Finishing the Floral Crochet Sun Hat
Check the finished hat against the wearer’s head measurement before cutting any remaining structural yarn tails. The open back provides adjustment through the teal bow, but the purple front band still determines where the visor sits.
Block the flower motifs individually rather than flattening the entire crown under heavy pressure. Shape the visor into a smooth curve and check that the pink scallops follow the outer edge without pulling it inward.
Inspect the flower and leaf attachments from the wrong side. Decorative pieces near the band should have several anchoring points because these sections move whenever the hat is tied or removed.
Conclusion
Measure the wearer’s head before cutting the final structural yarn tails; the open back provides adjustment, but the front band still determines visor position. After completing this floral crochet sun hat pattern, photograph the hat from the side and back so the flower-lace crown, asymmetric appliqués and teal closure remain visible. Save the finished measurements for the next size adjustment. Share the completed version on Pinterest or Instagram with #FloralCrochetSunHat. For the next sample, compare the pictured long dangling leaves with a shorter version: which length keeps the floral back detail visible without interfering with long hair?









