Introduction
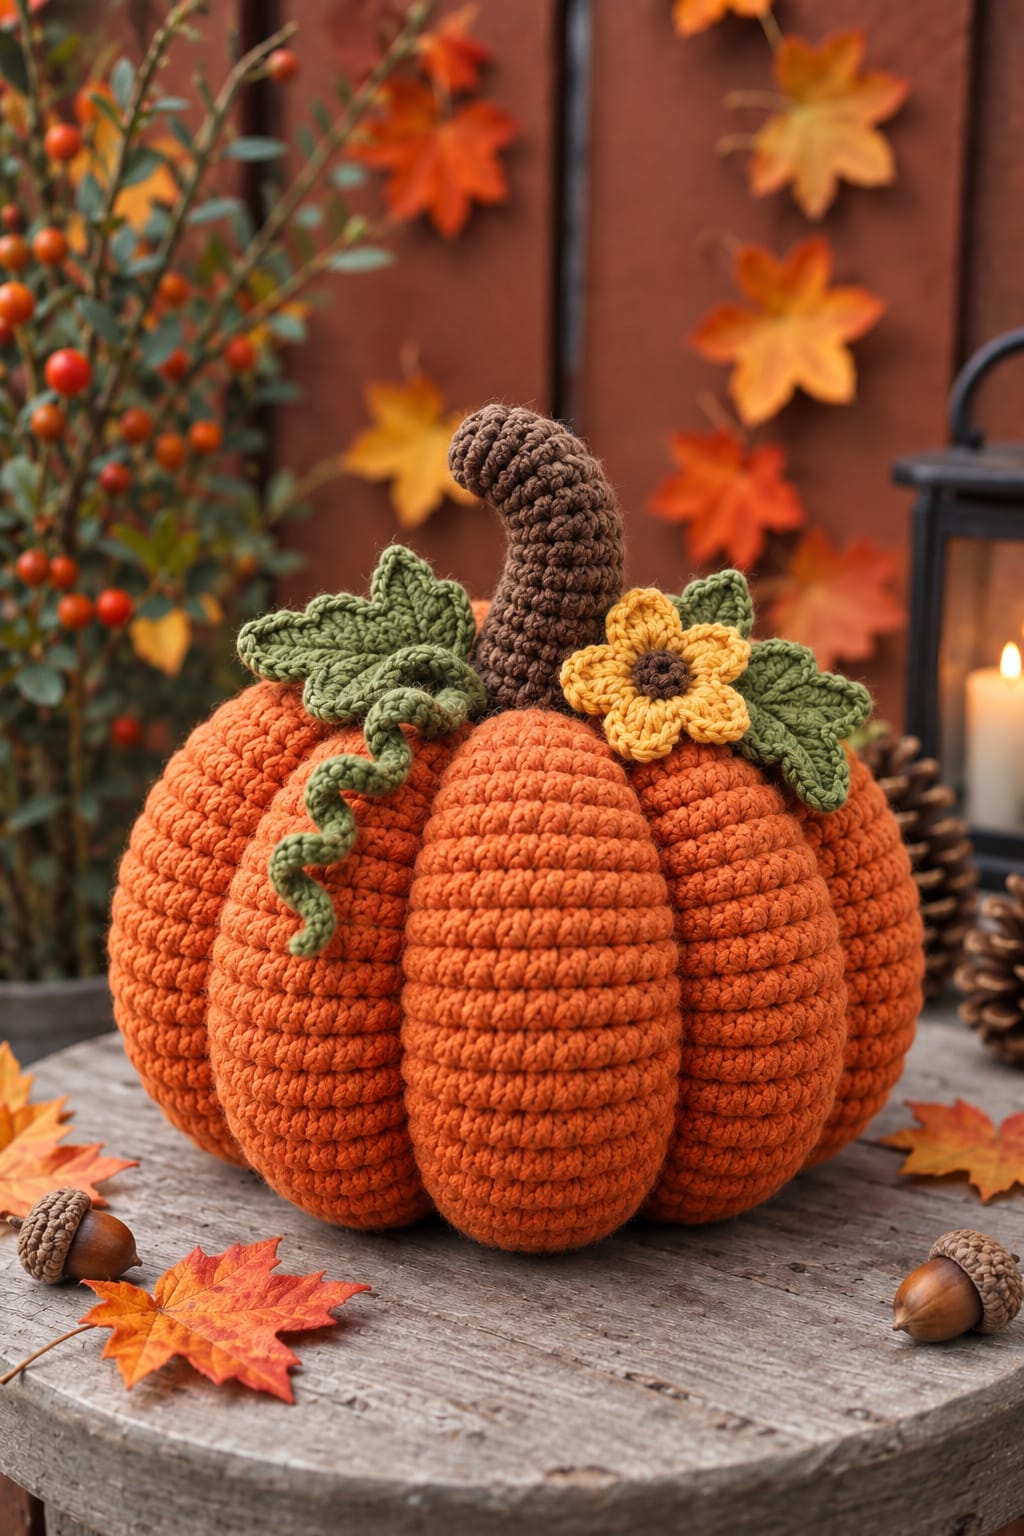
Seven orange ribs have to converge beneath one oversized crooked stem without pulling this pumpkin into a flat wheel. This large orange crochet pumpkin pattern uses worsted-weight yarn, a 5 mm hook, fiberfill, sage leaves, a spiral vine, and a yellow flower. The intermediate project targets approximately 25 × 22 cm overall and makes a substantial freestanding centerpiece for a fall display.
The instructions below are an original photo-inspired reconstruction based on visible structure; published patterns cited later are used only for sizing, gauge, and material benchmarks.
The Design: What Makes This Large Crochet Pumpkin Different
The reference relies on seven strongly projected orange sections rather than shallow embroidered grooves. Each lobe is built as a separate stuffed wedge, which creates the unusually deep channels and tall oval ribs visible from crown to base. A long brown stem curves forward from the center instead of standing vertically, so its lower section needs a broad attachment zone to resist tipping. Two layered sage leaves, a narrow spiral tendril, and a five-petal flower form an asymmetric crown. This crochet pumpkin with leaves and vine is also larger than many published worsted pumpkins, which commonly finish around 13–17 cm across. Current patterns support medium #4 yarn with 4.5–5 mm hooks. The main construction error is overstuffing every lobe; excessive firmness eliminates the deep valleys that make the separate-section construction recognizable.
Project Info at a Glance
| Skill Level | Time | Finished Size | Hook | Best For |
|---|---|---|---|---|
| Intermediate | Approx. 9–12 hours | Target approx. 25 cm wide × 22 cm overall | 5 mm | Fall centerpieces, mantels, shelf displays |
The photographed size cannot be measured directly, so 25 × 22 cm is a reconstruction target rather than a published specification. For comparison, Laura Brian’s current worsted Fall Pumpkins pattern uses a 5 mm hook and finishes its large version at approximately 5 inches / 12.7 cm across. A current Etsy three-size worsted pumpkin reaches approximately 6.5 inches high and 26 inches around for its largest size, while Nicki’s Homemade Crafts publishes a dedicated large linked-crochet pumpkin construction.
Materials and Tools
Yarn
- Burnt pumpkin orange — worsted #4 — approximately 220–260 g
- Chocolate brown — worsted #4 — approximately 35–45 g
- Sage green — worsted #4 — approximately 35–45 g
- Golden yellow — worsted #4 — approximately 12–15 g
- Dark brown flower center — worsted #4 — approximately 3–5 g
The orange quantity is an estimate for the seven individually stuffed sections in this reconstruction. A current commercial large worsted pumpkin pattern specifies about 175 yards of orange for a less segmented 6.5-inch-high version, while smaller textured worsted pumpkins can use approximately 25–90 yards. Separate lobes and the larger target size increase consumption here.
Tools
- 5 mm crochet hook
- 4.5 mm crochet hook — optional for leaves and flower
- Polyester fiberfill — approximately 300–400 g
- Extra-long tapestry needle
- Standard tapestry needle
- Scissors
- Locking stitch markers
- Blocking pins
Abbreviations
- MR — magic ring
- ch — chain
- sc — single crochet
- hdc — half double crochet
- dc — double crochet
- tr — treble crochet
- inc — 2 sc in one stitch
- dec — single crochet decrease
- sl st — slip stitch
- BLO — back loop only
- st/sts — stitch/stitches
For an invisible decrease, insert the hook through the front loops of the next two stitches, yarn over, pull through both front loops, then yarn over and complete the sc.
Construction Overview
The pumpkin body is reconstructed as seven individually crocheted lobes. The center-front section is slightly broader than the side sections, while the two rear lobes can be marginally narrower. Each piece reaches a 36-stitch plateau, is lightly stuffed, and is closed before assembly.
This differs from common one-piece pumpkins that use a crocheted rectangle or round body followed by exterior sculpting strands. The separate-lobe method is selected specifically because the photograph shows unusually deep, persistent valleys between the orange sections.
Pattern — Step by Step
Work all stuffed pieces in continuous spirals unless stated otherwise. Mark the first stitch of every round.
Front Center Pumpkin Lobe — Make 1
Yarn: burnt pumpkin orange — original photo-inspired stitch reconstruction.
R1: 6 sc in MR. (6)
R2: inc ×6. (12)
R3: (sc, inc) ×6. (18)
R4: (2 sc, inc) ×6. (24)
R5: (3 sc, inc) ×6. (30)
R6: (4 sc, inc) ×6. (36)
R7: sc around. (36)
R8: sc around. (36)
R9: sc around. (36)
R10: sc around. (36)
R11: sc around. (36)
R12: sc around. (36)
R13: sc around. (36)
R14: sc around. (36)
R15: sc around. (36)
R16: sc around. (36)
R17: sc around. (36)
R18: (4 sc, dec) ×6. (30)
R19: (3 sc, dec) ×6. (24)
Begin stuffing. Keep the center firm but allow the side walls to compress.
R20: (2 sc, dec) ×6. (18)
R21: (sc, dec) ×6. (12)
Add the final stuffing in small pieces.
R22: dec ×6. (6)
Fasten off. Leave a 50 cm tail and close the opening through the front loops.
Side Pumpkin Lobes — Make 4
Yarn: burnt pumpkin orange.
R1: 6 sc in MR. (6)
R2: inc ×6. (12)
R3: (sc, inc) ×6. (18)
R4: (2 sc, inc) ×6. (24)
R5: (3 sc, inc) ×6. (30)
R6: (4 sc, inc) ×6. (36)
R7: sc around. (36)
R8: sc around. (36)
R9: sc around. (36)
R10: sc around. (36)
R11: sc around. (36)
R12: sc around. (36)
R13: sc around. (36)
R14: sc around. (36)
R15: sc around. (36)
R16: (4 sc, dec) ×6. (30)
R17: (3 sc, dec) ×6. (24)
Stuff to approximately 75–80 percent firmness.
R18: (2 sc, dec) ×6. (18)
R19: (sc, dec) ×6. (12)
R20: dec ×6. (6)
Fasten off with a 45 cm tail.
Rear Pumpkin Lobes — Make 2
Yarn: burnt pumpkin orange.
R1: 6 sc in MR. (6)
R2: inc ×6. (12)
R3: (sc, inc) ×6. (18)
R4: (2 sc, inc) ×6. (24)
R5: (3 sc, inc) ×6. (30)
R6: (4 sc, inc) ×6. (36)
R7: sc around. (36)
R8: sc around. (36)
R9: sc around. (36)
R10: sc around. (36)
R11: sc around. (36)
R12: sc around. (36)
R13: sc around. (36)
R14: sc around. (36)
R15: (4 sc, dec) ×6. (30)
R16: (3 sc, dec) ×6. (24)
Stuff lightly. These pieces should compress more than the front lobe.
R17: (2 sc, dec) ×6. (18)
R18: (sc, dec) ×6. (12)
R19: dec ×6. (6)
Fasten off with a 45 cm tail.
Shaping Each Pumpkin Lobe
Before joining, roll every stuffed piece between both hands to distribute the filling. The front center lobe should remain the tallest. Compress the rear lobes slightly from front to back.
Each section should resemble a long rounded oval rather than a ball.
If a lobe becomes spherical, remove some stuffing through the final opening before closing it completely.
Joining the Seven Pumpkin Lobes
Place the center lobe vertically.
Position one side lobe on its left and one on its right.
Add the remaining two side pieces beside those.
Place the two rear lobes behind the arrangement.
Viewed from above, the seven pieces should form a roughly circular crown.
Use orange yarn and an extra-long needle to stitch adjacent pieces together along their inner contact lines.
Do not close the visible valleys completely. Keep approximately 1–1.5 cm of separation at the outer surface.
Bottom Stabilizing Pass
Thread approximately 100 cm of doubled orange yarn.
Pass the needle through the lower center of all seven lobes in sequence.
Pull until the bases angle slightly toward the middle.
Knot securely.
This prevents the sections from spreading when the pumpkin is placed on a table.
Crown Stabilizing Pass
Repeat the same process through the upper ends of all seven sections.
Pull firmly enough to create a central depression approximately 2–3 cm deep.
Do not pull until the lobes collapse sideways.
The depression becomes the mounting point for the stem, leaves, vine, and flower.
Curved Brown Stem
Yarn: chocolate brown. ChristaCoDesign’s published pumpkin topper uses worsted yarn and a 5 mm hook with a 6-stitch stem core; this reconstruction extends that principle for the oversized curved stem.
R1: 6 sc in MR. (6)
R2: sc around. (6)
R3: sc around. (6)
R4: sc around. (6)
R5: sc around. (6)
R6: inc ×6. (12)
R7: sc around. (12)
R8: sc around. (12)
R9: sc around. (12)
R10: sc around. (12)
R11: sc around. (12)
R12: sc around. (12)
R13: sc around. (12)
R14: sc around. (12)
R15: sc around. (12)
R16: (sc, inc) ×6. (18)
R17: sc around. (18)
R18: sc around. (18)
R19: sc around. (18)
R20: sc around. (18)
R21: (2 sc, inc) ×6. (24)
R22: sc around. (24)
Fasten off with a 60 cm tail.
Shaping the Stem Curve
Stuff only the lower half firmly.
Add a very small amount of fiberfill to the upper section.
Thread brown yarn through the inside curve from approximately R6 to R17.
Pull gently until the stem bends forward.
Secure the shaping strand inside the lower opening.
The finished stem should remain curved without requiring wire.
Large Sage Leaf — Make 2
Yarn: sage green. Published pumpkin leaves from Doily Designs use worsted yarn and a 5 mm hook and measure approximately 2.25 inches with the stem.
Ch 15.
Starting in second chain from hook:
sl st, sc, hdc, dc, dc, tr, tr, dc, dc, hdc, sc, sc, sl st, sl st.
Work 3 sc in the final foundation chain.
Rotate and mirror the stitch sequence along the opposite side.
Join at the base.
Leaf Pointed Edge
Ch 1.
*Sc in next 2 stitches, ch 2, sl st in second ch from hook.*
Repeat toward the leaf tip.
At the primary point work:
sc, ch 3, sl st in first ch, sc.
Repeat the edging down the opposite side.
Fasten off with a 30 cm tail.
Leaf Center Vein
Join sage yarn at the base.
Surface sl st along the original foundation chain toward the point.
Fasten off.
Add two short diagonal surface-slip-stitch veins on each side.
Small Sage Leaf — Make 1
Ch 11.
Starting in second chain:
sl st, sc, hdc, dc, tr, tr, dc, hdc, sc, sl st.
Work 3 sc in the final chain.
Mirror the sequence along the second side.
Add the pointed sc edging and center surface-crochet vein.
Fasten off with a 25 cm tail.
Curly Sage Vine
Yarn: sage green. ChristaCoDesign describes the standard pumpkin-vine method as a long chain with multiple stitches worked into each chain so the strip curls naturally.
Ch 28.
Starting in the second chain from hook, work 3 sc in each of the first 22 chains.
Work one sc in each of the final 5 chains.
Fasten off with a 30 cm tail.
Twist the spiral gently in one direction after crocheting so the coils align.
Golden Five-Petal Flower
Yarn: dark brown and golden yellow.
With brown:
R1: 6 sc in MR. (6)
R2: inc ×6. (12)
Fasten off brown.
Join golden yellow in any stitch.
Petal 1: Ch 2, 2 dc in same stitch, 2 tr in next stitch, 2 dc in next stitch, ch 2, sl st in same stitch.
Sl st into next stitch.
Repeat the petal construction four more times, spacing the five petals evenly around the brown center.
Fasten off with a 35 cm tail.
Flower Edging
For a more defined petal profile, join yellow at the base of one petal.
Work sc around the outer edge.
At each petal tip work sc, ch 2, sc.
Continue around all five petals.
Fasten off.
Positioning the Crown Components
Insert the broad lower stem approximately 2 cm into the crown depression.
Place one large leaf to the left and one to the right.
Position the small leaf behind the right side.
Let the spiral vine emerge from the left side and descend across one orange lobe.
Place the golden flower on the front-right side of the stem.
Pin everything before sewing.
Attaching the Curved Stem
Use the long brown tail.
Sew around the complete 24-stitch lower opening.
Pass the needle through the crown and into several neighboring orange lobes.
Add four crossing reinforcement stitches beneath the stem.
The stem should remain stable when the pumpkin is moved by its body, but the pumpkin should never be carried by the stem.
Attaching the Leaves
Sew only the lower 2–3 cm of each large leaf to the pumpkin.
Leave the outer points free.
Attach the small rear leaf through its lower half.
Do not stitch every leaf edge to the orange body because the crown needs layered depth.
Attaching the Vine
Sew the five straight sc stitches at the vine base beneath the left leaf.
Add one hidden tack approximately halfway down the first coil.
Leave the remaining spiral free.
The lowest curl should rest against the pumpkin without being stretched.
Attaching the Flower
Position the flower partly over the right leaf and partly against the pumpkin crown.
Sew around the brown center only.
Add one small hidden stitch beneath the lowest petal if it flips upward excessively.
Leave the remaining petal edges free.
Assembly
- Crochet the center, four side, and two rear orange lobes, keeping the center section two to three rounds taller than the rear pieces.
- Stuff each lobe separately, maintaining approximately 75–80 percent firmness so neighboring sections can compress into deep pumpkin valleys.
- Arrange all seven lobes in a circular formation and stitch their inner contact areas together without closing the visible outer channels.
- Pass doubled orange yarn through the lower ends of all seven sections and pull them toward one center point to create a stable pumpkin base.
- Repeat the stabilizing pass through the crown and create a central depression approximately 2–3 cm deep for the topper components.
- Crochet the brown stem, stuff its lower half, shape the upper section into a forward curve, and sew its 24-stitch base securely into the crown.
- Make two large sage leaves and one smaller leaf, add surface-crochet veins, and attach only their lower sections around the stem.
- Crochet the sage spiral vine and secure its straight base beneath the left leaf, leaving most of the coils unattached.
- Make the golden five-petal flower with its brown center and sew the center to the front-right crown without flattening the petals.
- Weave every remaining tail into matching dense stitches, redistribute any uneven stuffing by hand, and set the pumpkin on a flat surface to confirm all seven lobes support the base.
The completed pumpkin should show seven substantial orange ribs, a deep central crown, one forward-curving brown stem, layered sage foliage, a hanging spiral vine, and one golden flower.
7 Technical Tips
- The lobe valleys disappear: stop stuffing each section at approximately 75–80 percent firmness instead of packing it solid. Overfilled 36-stitch lobes cannot compress against neighboring pieces and create the 1–1.5 cm channels visible in the reference.
- The pumpkin rocks on the table: pull the lower stabilizing strand









