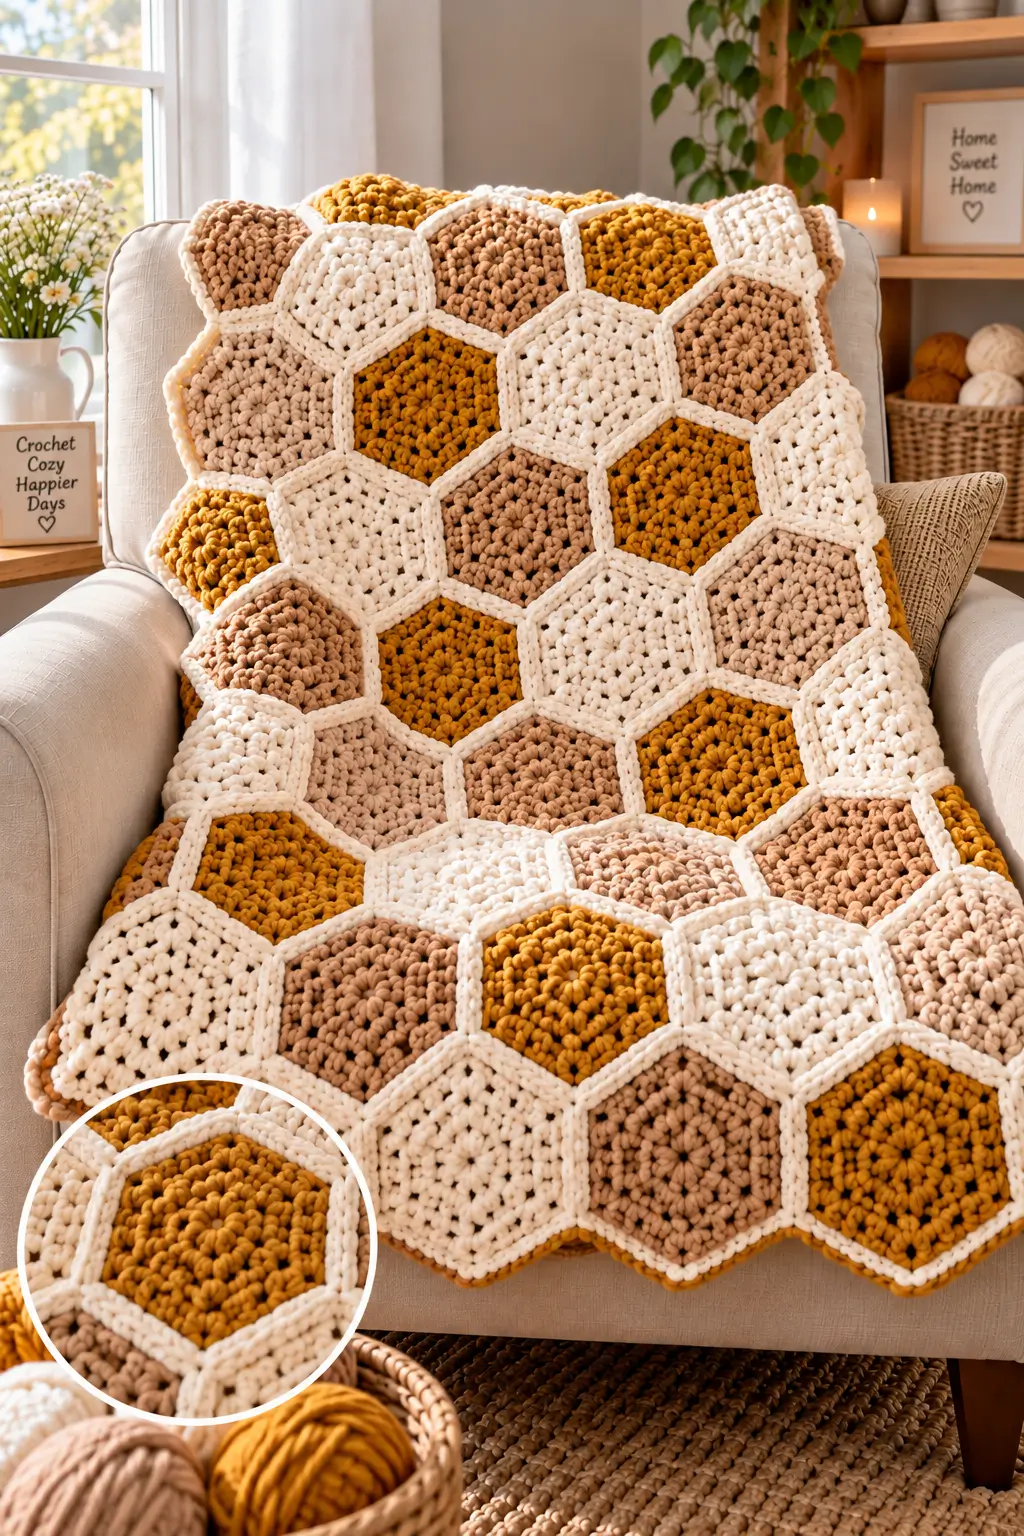
Six-sided motifs create the honeycomb geometry that separates this blanket from an ordinary granny-square throw. This hexagon crochet blanket pattern uses chunky yarn, an 8 mm hook, and three neutral-to-mustard colors to reproduce the dense visual structure of the reference. Plan on an intermediate skill level and adjust the final dimensions through motif count. Modular construction also makes damaged sections individually repairable.
The Design: What Makes This Honeycomb Blanket Different
The photographed blanket depends on three structural decisions. First, full hexagons create uninterrupted six-way intersections rather than a square grid. Second, cream joining lines remain visually prominent, separating mustard, tan, and ivory motifs like grout between tiles. Third, the crochet hexagon motifs are dense enough that their centers read as solid blocks of color instead of open lace.
That density matters with chunky yarn. Excess corner stitches can produce ruffling; too few can turn a motif into a shallow bowl. The maker therefore has to maintain six clearly defined corners while adding the same amount of fabric to every side.
A common error in a honeycomb crochet blanket is changing tension during assembly. The individual motifs may lie flat, yet tight joining stitches can contract the finished panel. Keep joining tension consistent and check the blanket on a flat surface after completing each group of seams.
Project Info at a Glance
| Skill Level | Time | Finished Size | Hook | Best For |
|---|---|---|---|---|
| Intermediate | Variable by motif count | Custom; reference throw approximately 117 × 134.5 cm | 8 mm for this chunky adaptation | Throw, sofa blanket, modular afghan |
The final dimensions are adjustable. Make one complete motif first, block it, and calculate the required number of hexagons from its actual finished measurement.
Materials and Tools
Yarn
- Mustard/gold — chunky/bulky — approximately 450–600 g for a medium throw.
- Camel/tan — chunky/bulky — approximately 450–600 g.
- Cream/ivory — chunky/bulky — approximately 650–850 g including joining seams and edging.
Choose all three colors from the same yarn range when possible. Matching fiber content, thickness, and meterage helps every hexagon finish at the same dimensions.
The quantities above are planning estimates for this chunky adaptation rather than measurements taken from the photograph. Make one motif, weigh it, and multiply that weight by the number of motifs required. Add approximately 15–20% to the cream allowance for joining and finishing.
Tools
- 8 mm crochet hook
- Large-eye yarn needle
- Locking stitch markers
- Sharp scissors
- Digital kitchen scale
- Tape measure
- Blocking mats and rust-resistant pins
Abbreviations
- MR — magic ring
- sc — single crochet
- hdc — half double crochet
- dc — double crochet
- inc — increase
- sl st — slip stitch
- ch — chain
- st/sts — stitch/stitches
- sp — space
- BLO — back loop only
- RS — right side
- WS — wrong side
An invisible decrease is not required in these flat motifs. It is an amigurumi shaping technique and should not replace the corner spacing used to construct a flat hexagon.
Hexagon Crochet Blanket Pattern — Step by Step
The reference photograph provides the visual direction rather than an exact stitch chart. The following construction produces comparable six-sided geometry using chunky yarn.
Full Chunky Hexagon Motif
Yarn: mustard, camel, or cream.
R1: MR, ch 3, dc in ring, ch 2; *2 dc in ring, ch 2* five times. Join with sl st to top of beginning ch. (12 dc, 6 corner spaces)
R2: Sl st to first corner space. Ch 3, dc, ch 2, 2 dc in same corner; *dc in each stitch to next corner, (2 dc, ch 2, 2 dc) in corner* around. Join. (24 dc, 6 corner spaces)
R3: Sl st to corner. Ch 3, dc, ch 2, 2 dc in corner; *dc across side, (2 dc, ch 2, 2 dc) in next corner* around. Join. (36 dc, 6 corner spaces)
R4: Repeat the established corner sequence, placing one dc in each side stitch and (2 dc, ch 2, 2 dc) into each corner. (48 dc, 6 corner spaces)
Measure the motif after Round 4. Very thick yarn may already produce a hexagon large enough for the required blanket scale.
R5: Repeat the established corner sequence once more. (60 dc, 6 corner spaces)
Fasten off. Leave approximately 15 cm of yarn for weaving in.
Cream Seam Round
Yarn: cream/ivory.
Attach cream yarn to any corner with the right side facing.
R1: Ch 1, sc in each dc across the first side; place (sc, ch 1, sc) in the corner space. Repeat around all six sides. Join with sl st.
Fasten off unless using a continuous or join-as-you-go assembly method. Keep this round slightly relaxed because excessive tension can pull the hexagon inward.
The contrasting cream perimeter produces the outlined honeycomb appearance. Keep its width consistent on every motif.
Mustard Hexagons
Make approximately one third of the required full motifs in mustard/gold.
Work the complete Full Chunky Hexagon Motif through R5, then add the cream seam round.
Distribute mustard motifs across the blanket rather than placing all of them into one large block. Mustard carries the strongest contrast in this palette, so its position controls much of the finished pattern.
Camel Hexagons
Make approximately one third of the motifs in camel/tan.
Work R1–R5 of the full hexagon and finish each motif with the cream seam round.
Camel functions as the middle-value color between mustard and ivory. Use it to break up high-contrast transitions and prevent the layout from becoming a predictable checkerboard.
Ivory Hexagons
Make the remaining motifs in ivory/cream.
Work the same R1–R5 construction. Finish with the cream seam round.
You can use exactly the same cream for both the motif and seam or select a slightly brighter cream for the final round. A subtle tonal difference keeps the six-sided outline visible on the light motifs.
Optional Half Hexagons
The reference blanket keeps a pointed, stepped hexagon edge. Half motifs are therefore unnecessary when reproducing that appearance.
If a straighter rectangular side is preferred, half hexagons can fill the gaps between alternating motif rows. Make and measure the full motif first because the half-hexagon dimensions must correspond precisely with the chosen yarn, hook, and full motif.
Joining the Hexagons
Arrange every completed motif on a large flat surface before starting the permanent seams. Alternate mustard, camel, and ivory while checking for accidental vertical or diagonal stripes.
Place two motifs with right sides together. Using cream yarn, insert the hook through the corresponding back loops of both motif edges.
Join 1: Sl st through the matching corner stitches.
Join 2 onward: Sl st through the corresponding BLO of each stitch across the side.
Final join: Work through the matching corner and fasten off, or continue directly into the next seam when the layout permits.
Do not pull the slip stitches tight. The joining seam needs enough flexibility for the adjacent hexagons to lie flat.
A mattress-stitch seam worked with a yarn needle can be substituted when a flatter connection is preferred.
Outer Edge
Keep the stepped points formed by the outer hexagons for the closest match to the reference design.
Attach cream yarn at any exposed outer corner.
Edge R1: Sc evenly along every exposed motif edge. Work (sc, ch 1, sc) at projecting corners.
At inward valleys, monitor the fabric carefully. If stitches begin accumulating and producing a ripple, work the last stitch of one edge and the first stitch of the next edge together.
Edge R2: Work one loose round of sc or sl st around the entire blanket for a thicker cream outline.
Fasten off. Weave the final tail at least 8–10 cm through the reverse side, change direction, then weave through a second path.
Assembly
- Block every full motif to the same point-to-point measurement before joining.
- Lay out the complete blanket with all right sides facing upward.
- Distribute mustard motifs so they do not form an unintended solid stripe.
- Position camel motifs between high-contrast mustard and ivory areas.
- Take a photograph of the complete arrangement before moving any pieces.
- Join motifs into horizontal or diagonal strips using cream yarn.
- Connect the completed strips while matching every corner intersection.
- Check the blanket on a flat surface after each major seam for puckering or cupping.
- Work the cream outer edge around every exposed motif side.
- Weave in the remaining tails and block the complete blanket to its final dimensions.
The completed fabric should lie flat with every six-sided motif clearly separated by the cream joining lines.
7 Technical Tips for a Flat Hexagon Blanket
- Stitch-marker drift: Mark the first stitch and all six corners when chunky yarn makes stitch tops difficult to distinguish. Missing one corner increase will pull that section inward on the following round.
- Excessive stitch density: Place a finished motif on a flat table before continuing. If the edges ripple noticeably, check the previous round’s stitch count instead of attempting to hide the extra fabric during blocking.
- Incorrect decreases: Do not add invisible decreases to correct a hexagon that has become too wide. Return to the round where the incorrect stitch count first appeared.
- Corner-placement error: Count exactly six corner spaces after every round. Five corners produce an irregular pentagon, while seven introduce an additional wedge.
- Chunky-yarn tension: If the center rises by more than approximately 1 cm when the motif is placed flat, test a larger hook or loosen the corner stitches.
- Pinning distortion: Block every motif to one recorded point-to-point measurement. A difference of only 1 cm per motif can become several centimeters across a completed row.
- Tail failure: Leave at least 10–15 cm for yarn tails and weave them in through more than one direction. Very short tails can work free from the raised joining seams during repeated use.
How to Size the Hexagon Crochet Blanket
A modular blanket can be resized without rewriting the motif. The dimensions are controlled mainly by the finished motif measurement and the number of pieces in each row.
Do not decide the final motif quantity before making a gauge sample.
For example, suppose one blocked chunky hexagon measures approximately 18 cm from point to point. Make three motifs and temporarily join them using the actual seam method. Measure that assembled section rather than multiplying 18 cm by three.
This matters because joined hexagons overlap geometrically. Seam width and stitch tension also affect the actual measurement.
For a sofa throw, add motif rows until the blanket covers the required seating width and length. For a bed blanket, measure the mattress first and add the desired side and foot drop.
Keep a written record of the number of mustard, camel, and ivory pieces as the dimensions increase. Maintaining approximately equal quantities gives the blanket the balanced three-color appearance visible in the reference.
How to Calculate the Yarn Quantity
Motif weighing is more reliable than estimating yarn by skein count because chunky yarns can have very different meterage.
Complete one representative hexagon, including its cream seam round. Weigh the colored portion and cream portion separately on a digital kitchen scale.
Multiply the colored motif weight by the number of motifs planned for that color. Repeat the calculation for mustard, camel, and ivory.
Next, calculate the cream joining requirement. Add approximately 15–20% to the estimated cream quantity to cover seams, the outside edging, gauge differences, and yarn tails.
Buy all yarn for one color from the same dye lot when the manufacturer supplies dye-lot information. Slight color changes become much more visible when identical motifs sit directly beside one another.
Planning the Honeycomb Color Layout
The three colors should not carry equal visual weight even when their motif counts are similar. Mustard is the strongest color and becomes the primary focal point. Camel provides intermediate contrast, while ivory creates lighter areas and connects visually with the cream seams.
Random placement can accidentally create obvious columns. Lay every motif on the floor before joining and inspect the arrangement from several steps away.
Place the mustard hexagons first. Keep their spacing irregular while avoiding large concentrations in one corner.
Add camel motifs next. They can separate mustard from ivory and break up repeated patterns.
Fill the remaining positions with ivory motifs.
Pay particular attention to six-way intersections. Several identical colors converging around the same junction can create an unintended flower or star shape. Moving a single hexagon is often enough to correct the visual concentration.
Take a clear photograph after finalizing the arrangement. Refer to that image during assembly so motifs do not change position as rows are moved to the work area.
Choosing Yarn for the Chunky Texture
The reference uses a substantially thicker visual texture than many traditional hexagon blankets. A smooth chunky or bulky yarn provides a useful starting point for reproducing the pronounced stitch definition.
Do not rely only on the yarn-weight name printed on the label. One manufacturer’s chunky yarn can differ considerably from another manufacturer’s product.
Compare meterage per 100 g. Three colors with similar meterage and fiber composition are more likely to produce motifs of equal dimensions.
Acrylic provides dimensional stability and practical washing characteristics for a frequently used throw. Acrylic-wool blends can also work, but test the blocked dimensions because natural fibers may respond differently to washing.
Avoid combining a rigid cotton yarn with a highly elastic acrylic yarn in the same blanket unless a gauge test confirms that the motifs behave similarly.
Use the same yarn thickness for the cream joining lines. A substantially thinner joining yarn can disappear between the motifs and reduce the raised honeycomb effect.
Blocking the Finished Blanket
Block individual motifs before permanent assembly whenever possible. This exposes size differences while individual pieces can still be corrected or remade.
Measure from one outer point directly across the center to the opposite point. Record that measurement and use it for every motif.
After assembly, lay the entire blanket flat and align the rows without stretching the seams. Pin the outer points only as much as required to establish the final geometry.
Follow the washing and blocking instructions supplied by the yarn manufacturer. Acrylic yarn generally needs different handling from wool, so the fiber label takes priority over a universal blocking method.
Allow the complete blanket to return to its stable dimensions before taking the final measurement.
Conclusion
Before buying yarn for the complete blanket, crochet one mustard hexagon, add its cream seam round, block it, and record both its dimensions and weight. Those measurements provide a more reliable basis for calculating the final throw than the photograph alone. Keep the three-color distribution irregular and inspect every six-way intersection before permanent joining. The finished hexagon crochet blanket pattern can then be scaled by adding or removing motif rows without changing the core construction. Save your finished layout to Pinterest and share the completed blanket on Instagram with #HoneycombHexagonThrow. Which layout will you use: isolated mustard hexagons or small two-motif mustard clusters?









