Introduction
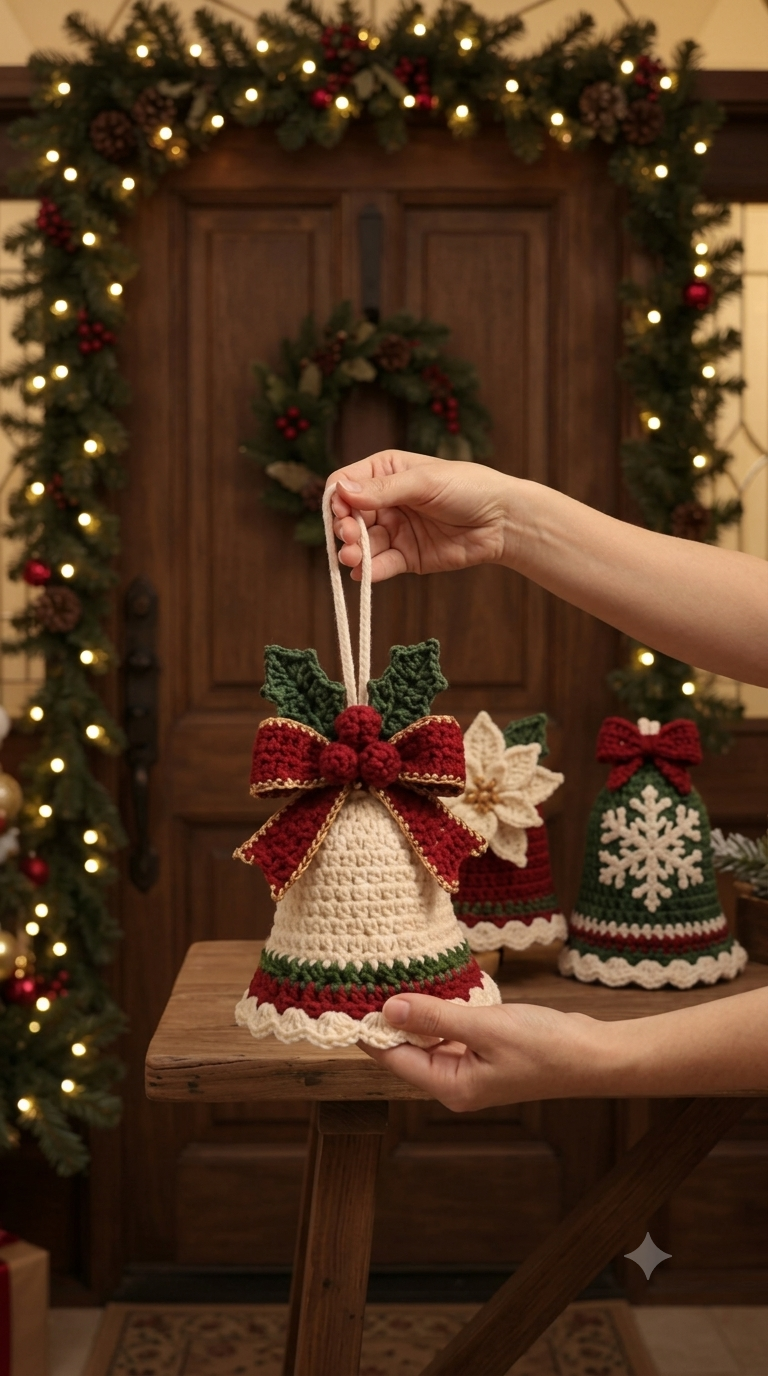
A Christmas bell needs its flare to begin below the crown, not at the first round, or the silhouette turns into a cone. This Christmas bell amigurumi crochet pattern uses DK yarn, 4.0 and 3.5 mm hooks, and a 22–24 cm decorated format. Rated intermediate, it combines a structured bell with a gold-edged bow and holly. The hanging format makes it practical for doors, mantels, wreaths, or oversized tree displays.
The Design: What Makes This Christmas Bell Different
The bell begins with six-stitch amigurumi geometry but delays the full flare through plateau rounds. That choice keeps the crown narrow enough for the hanging cord while allowing the lower section to reach a stable 42-stitch circumference. Red and green bands are positioned near the rim because color concentrated at the base visually anchors the cream body.
The crochet Christmas bell ornament also uses a separate scalloped edge rather than forcing shells into the structural rounds. This keeps the lower circumference predictable. A broad red bow then covers the transition near the crown, while pointed holly leaves add height without making the bell itself longer.
A common mistake in a Christmas bell crochet pattern is increasing too quickly. The result becomes a flat skirt instead of a bell. The controlled flare used here avoids that proportion problem.
Project Info at a Glance
| Skill Level | Time | Finished Size | Hook | Best For |
|---|---|---|---|---|
| Intermediate | 4–6 hours | 22–24 cm overall | 4.0 mm / 3.5 mm | Hanging Christmas decoration |
The finished bell body measures approximately 13 cm high and 15–16 cm across, reaching approximately 22–24 cm overall with its decorative top and hanging loop.
Materials and Tools
Yarn
- Cream — DK weight — approximately 50 g — Paintbox Cotton DK or similar smooth cotton/acrylic yarn.
- Christmas red — DK weight — approximately 20 g.
- Forest green — DK weight — approximately 15 g.
- Metallic gold — crochet thread or fine decorative yarn — up to 10 g.
Tools
- 4.0 mm crochet hook for the bell and main bow pieces
- 3.5 mm crochet hook for leaves, berries, and decorative edging
- Tapestry needle
- Locking stitch marker
- Scissors
- Rustproof pins
- Small amount of stuffing for the berries
Safety eyes are not required because this Christmas bell has no face.
Abbreviations
- MR — magic ring
- sc — single crochet
- inc — 2 sc in one stitch
- dec — single crochet decrease
- sl st — slip stitch
- ch — chain
- hdc — half double crochet
- dc — double crochet
- BLO — back loop only
- st/sts — stitch/stitches
For an invisible decrease, insert the hook through the front loops of the next two stitches, yarn over, pull through, then complete one sc through the gathered loops.
Christmas Bell Amigurumi Pattern — Step by Step
Work the bell body in a continuous spiral until the decorative bands. Place a stitch marker in the first stitch and move it after every completed round.
Bell Body — Make 1
Yarn: cream. Use the 4.0 mm crochet hook.
R1: 6 sc in MR (6)
R2: inc ×6 (12)
R3: (sc, inc) ×6 (18)
R4: sc around (18)
R5: (2 sc, inc) ×6 (24)
R6: sc around (24)
R7: (3 sc, inc) ×6 (30)
R8: sc around (30)
R9: (4 sc, inc) ×6 (36)
R10: sc around (36)
R11: sc around (36)
R12: (5 sc, inc) ×6 (42)
R13: sc around (42)
R14: sc around (42)
R15: sc around (42)
The 42-stitch lower plateau forms the main bell flare. Do not stuff the bell body.
Change to forest green.
R16: sc around (42)
R17: sc around (42)
Change to Christmas red.
R18: sc around (42)
R19: sc around (42)
R20: sc around (42)
Change to cream.
R21: BLO sc around (42)
Do not close the lower opening. Fasten off with a 15 cm yarn tail.
Scalloped Hem — Make 1
Yarn: cream. Use the 3.5 mm or 4.0 mm hook depending on your tension.
Join cream yarn to an unused front loop from R21.
R1: Ch 1, then repeat (sl st in next front loop, skip 1 loop, 5 dc in next loop, skip 1 loop) around.
Distribute the final shells evenly around the 42-stitch circumference. The scallops should sit below the red band without pulling the bell opening inward.
Fasten off and weave the yarn tail toward the inside.
Bow Loops — Make 2
Yarn: Christmas red. Use the 4.0 mm hook.
Ch 18.
Row 1: sc in second ch from hook and across (17)
Rows 2–6: ch 1, turn, sc across (17)
Fasten off with a 20 cm sewing tail.
Bring the two short edges of each rectangle together and stitch them securely to create a flattened loop. Pinch the joined edge before sewing the two loops together at the center.
Gold Bow Edging
Yarn: metallic gold. Use the 3.5 mm hook.
Join gold yarn along the visible outer perimeter of each red bow loop.
R1: Work loose sl sts around the exposed edge. Add an extra stitch at a corner if the red fabric begins to cup.
Fasten off with an 8 cm yarn tail. Keep the metallic stitches relaxed so they do not distort the bow.
Bow Tails — Make 2
Yarn: Christmas red.
Ch 9.
Row 1: sc in second ch from hook and across (8)
Row 2: ch 1, turn, sc across (8)
Row 3: ch 1, turn, sc across (8)
Row 4: ch 1, turn, dec, 4 sc, dec (6)
Row 5: ch 1, turn, sc across (6)
Row 6: ch 1, turn, dec, 2 sc, dec (4)
Fasten off and leave a 20 cm yarn tail for assembly.
Using metallic gold yarn, work sl sts around both long sides and the lower edge. Leave the upper edge without gold trim because this section will be hidden behind the bow center.
Bow Center — Make 1
Yarn: Christmas red.
Ch 7.
Row 1: sc in second ch from hook and across (6)
Rows 2–4: ch 1, turn, sc across (6)
Fasten off with a 20 cm yarn tail.
Wrap the rectangle around the pinched center of the bow. Stitch its short ends together securely at the back.
Holly Leaves — Make 3
Yarn: forest green. Use the 3.5 mm crochet hook.
Ch 9.
Working along one side of the foundation chain:
Sl st in second ch from hook, sc, hdc, dc, dc, hdc, sc, then work 3 sc in the final chain.
Rotate the work and crochet along the opposite side:
sc, hdc, dc, dc, hdc, sc, sl st.
For the characteristic pointed holly edge, make surface picots at three evenly spaced positions along each long side. At each point, ch 2 and sl st into the first chain.
Fasten off and leave a 20 cm yarn tail for sewing.
Shape each finished leaf to approximately 6–7 cm long. Position the central leaf vertically and angle the two side leaves outward.
Holly Berries — Make 3
Yarn: Christmas red. Use the 3.5 mm hook.
R1: 6 sc in MR (6)
R2: inc ×6 (12)
R3: sc around (12)
R4: dec ×6 (6)
Add a pea-sized amount of stuffing before completing R4 if you want firm, rounded berries.
Fasten off and leave a 15 cm sewing tail.
Hanging Loop — Make 1
Yarn: cream.
Ch 45.
Row 1: sl st in second chain from hook and along the remaining chains (44).
Fasten off while leaving approximately 20 cm at both attachment points.
Fold the cord in half and sew both ends securely to the inside of the bell crown. For a shorter hanging loop, reduce the starting chain instead of tying a knot above the finished ornament.
How to Assemble the Christmas Bell
- Place the bell on a flat surface and check that the 42-stitch lower section forms an even circular opening rather than folding toward one side.
- Attach the hanging loop through the crown. Distribute its ends across opposite stitches so the ornament’s weight is not carried by a single strand.
- Position the red bow approximately 2–3 cm below the crown. Pin the center before making permanent stitches.
- Place both bow tails behind the loops at downward angles of approximately 25–35 degrees. Compare their visible lengths before sewing.
- Stitch the bow center firmly to the bell. Pass the needle through complete crochet stitches instead of catching only surface fibers.
- Arrange the three holly leaves behind the bow. Keep the center leaf vertical and angle the two outer leaves away from it.
- Sew only the lower 15–20 mm of each holly leaf to the bell. Leaving the upper section unattached preserves the pointed shape.
- Cluster the three red berries over the bases of the leaves. Pass the sewing yarn through every berry at least twice before securing it inside the bell.
- Shape the cream scalloped hem by hand. Space the shells consistently and correct any sections that twist toward the inside.
- Hang the finished ornament for approximately five minutes. If the heavy bow causes the bell to rotate, reposition the hanger or bow slightly before weaving in the final tails.
The completed Christmas bell should hang vertically with an open lower rim, centered bow, visible color bands, and balanced holly decoration.
7 Technical Tips for a Better Crochet Bell
- Control marker drift. Move the stitch marker after every completed round. Losing the first stitch by even one position during the increase section can shift the flare diagonally.
- Keep the bell hollow. Do not stuff the main bell body. Filling the 42-stitch lower section pushes the opening outward and changes the intended hanging-bell silhouette.
- Use invisible decreases on the berries. Conventional decreases can leave horizontal bars across the red surface. Work through the front loops when completing R4 so the decrease remains less visible.
- Measure the bow position. Pin its center approximately 2–3 cm below the crown. Placing the bow too low covers the cream body and shifts the visual weight toward the middle.
- Correct a collapsing rim. If the 42-stitch opening folds when the bell is held upright, switch to a hook approximately 0.5 mm smaller for the final colored and cream rounds. Excessively loose stitches are a common cause of a weak rim.
- Set the leaf angles before sewing. Pin the center holly leaf vertically and position the side leaves approximately 35–45 degrees outward. Parallel leaves produce a narrow cluster that can disappear behind the bow.
- Weave attachment tails in multiple directions. Run each structural tail through at least three different stitch directions inside the bell. A single straight weaving path can loosen when the decoration swings repeatedly from its hanger.
Christmas Bell Size and Customization
The finished dimensions depend on yarn thickness, hook size, and individual tension. With DK yarn and the hook sizes listed above, target a bell body of approximately 13 cm high, a maximum width of approximately 15–16 cm, and an overall decorated height of approximately 22–24 cm.
For a smaller crochet bell ornament, changing to a lighter yarn and proportionally smaller hook is preferable to deleting random rounds. Removing increase rounds changes the flare geometry. A larger version can be produced with thicker yarn, but the bow, berries, and holly leaves should be scaled at the same time so the decoration does not look undersized.
The red and green lower bands can also be changed without modifying stitch counts. Keep both bands at 42 stitches so the colorwork does not pull the rim inward.
Conclusion
Check the finished bell against three measurements before storing the pattern: roughly 13 cm for the body, 15–16 cm across the broadest section, and 22–24 cm overall with the upper decoration and hanger included. The next step is to hang the piece and correct any rotation caused by the bow before trimming the remaining sewing tails. Save this Christmas bell amigurumi crochet pattern to a Pinterest Christmas crochet board, or share the finished version on Instagram with #HollyBowChristmasBell. For your next bell, would you use two prominent holly leaves like the photographed ornament or keep the three-leaf arrangement for extra height?









