Introduction
More than forty individual leaves have to hang from this runner without turning its narrow branching vines into a tangled cord. This crochet leaf table runner pattern uses DK cotton, a 3.5 mm hook, raised leaf veins, and cream, rust, mustard, brown, and plum yarn. The intermediate runner finishes at approximately 35 × 150 cm and can be lengthened one branch section at a time.
The Design: What Makes This Autumn Leaf Runner Different
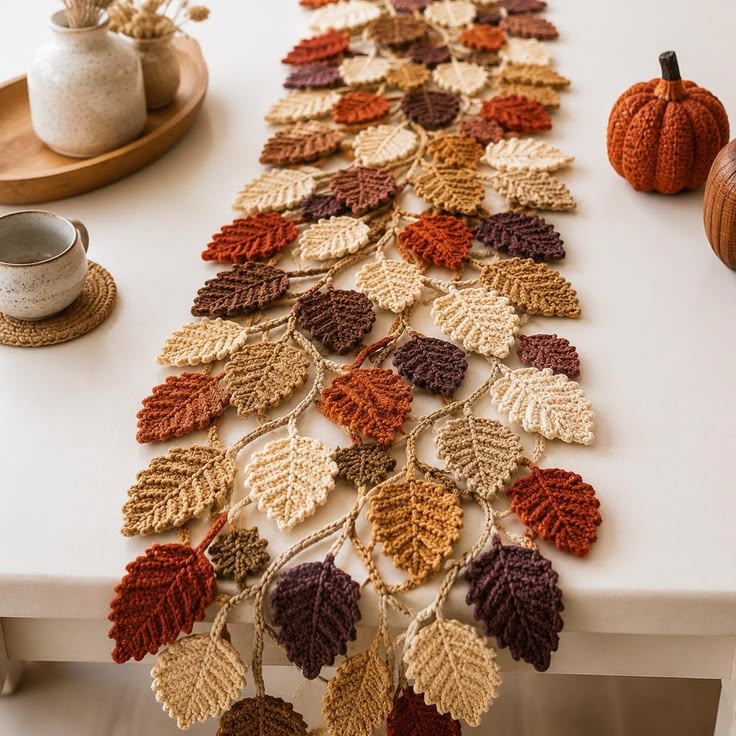
The photographed runner has no conventional rectangular fabric beneath the motifs. Instead, crocheted stems form an open branching network, and separate leaves attach at irregular intervals so the tabletop remains visible between them. Each leaf has a pronounced center vein and smaller diagonal ridges, which give the motifs enough structure to lie flat without looking like simple ovals. Five autumn colors are deliberately mixed rather than arranged in stripes, producing a scattered-leaf layout. This autumn crochet table runner therefore uses far less background yarn than a filet or solid runner of comparable length. Published autumn runners range from approximately 20 × 100 cm to 28 × 140 cm and beyond. The main construction error is attaching leaves before the vine network has been measured; excess branches then bunch together instead of forming open spaces.
Project Info at a Glance
| Skill Level | Time | Finished Size | Hook | Best For |
|---|---|---|---|---|
| Intermediate | Approx. 14–20 hours | Approx. 35 × 150 cm | 3.5 mm | Dining tables, consoles, Thanksgiving displays |
The instructions below are an original photo-inspired reconstruction based on visible structure; published patterns cited later are used only for sizing, gauge, and material benchmarks. Raine Eimre’s published Fall Leaves Table Runner measures approximately 19 × 56 cm using size-10 thread and a 1.75 mm hook, while Karin Burkart’s Autumn Leaf Table Runner measures approximately 20 × 100 cm. A current worsted Fall Leaves Table Runner is offered in lengths from 69 cm to more than 270 cm, confirming that autumn runners are commonly designed for adjustable length.
Materials and Tools
Yarn
- Natural cream — DK #3 cotton or cotton blend — approximately 70–90 g
- Burnt orange / rust — DK #3 — approximately 55–70 g
- Mustard / camel — DK #3 — approximately 45–60 g
- Chocolate brown — DK #3 — approximately 45–60 g
- Dark plum / burgundy — DK #3 — approximately 45–60 g
- Tan for branching vines — DK #3 — approximately 60–80 g
Plan approximately 320–420 g total yarn for a 150 cm runner. These amounts are reconstruction estimates rather than quantities from a published version of the photographed runner. Smooth cotton or a cotton-acrylic blend is particularly useful because the leaves need enough structure for their pointed ends and raised veins to remain readable.
Tools
- 3.5 mm crochet hook
- 3 mm hook — optional for firmer vines
- Tapestry needle
- Scissors
- Blocking mats and pins
- Tape measure
- Locking stitch markers
Abbreviations
- ch — chain
- sc — single crochet
- hdc — half double crochet
- dc — double crochet
- tr — treble crochet
- sl st — slip stitch
- picot — ch 3, sl st in first chain
- BLO — back loop only
- st/sts — stitch/stitches
An invisible decrease is not needed because the runner consists of flat leaves and narrow crocheted vines rather than closed three-dimensional pieces.
Finished Component Measurements
- Complete runner: approximately 35 × 150 cm
- Large leaf: approximately 9 × 6 cm
- Medium leaf: approximately 7.5 × 5 cm
- Small leaf: approximately 5.5 × 4 cm
- Main vine: approximately 145–150 cm before side branches
- Side branches: approximately 8–18 cm each
Leaf Quantity
The reference shows a dense but still open arrangement. For a 150 cm runner, make approximately 42 leaves:
- 18 large leaves
- 16 medium leaves
- 8 small leaves
Distribute the colors irregularly. Avoid making exactly the same quantity in each shade because the photographed layout looks naturally scattered rather than mathematically repeated.
Pattern — Step by Step
Large Autumn Leaf — Make 18
Yarn: alternate cream, rust, mustard, brown, and plum.
Ch 17.
Starting in second chain from hook work:
sl st, sc, hdc, dc, dc, tr, tr, tr, tr, dc, dc, hdc, hdc, sc, sc, sl st.
Work 3 sc into the final chain.
Rotate the foundation and work along its opposite side:
sl st, sc, sc, hdc, hdc, dc, dc, tr, tr, tr, tr, dc, dc, hdc, sc, sl st.
Join at the base.
Large Leaf Serrated Edging
Ch 1.
*Sc in next 2 stitches, ch 2, sl st in second ch from hook.*
Repeat along the first side.
At the leaf tip work:
sc, ch 3, sl st in third ch from hook, sc.
Continue the two-stitch serration repeat down the opposite side.
Fasten off, leaving a 25 cm attachment tail.
Large Leaf Center Vein
Join matching yarn at the base.
Surface sl st directly over the original foundation chain toward the leaf point.
Keep every surface stitch relaxed.
Fasten off at the tip.
Large Leaf Side Veins
Join yarn approximately one-third of the way up the center vein.
Surface sl st diagonally toward the outer edge for 3–4 stitches.
Fasten off.
Repeat on the opposite side.
Add another pair of diagonal veins higher on the leaf.
The resulting structure should resemble the raised branching veins visible in the reference.
Medium Autumn Leaf — Make 16
Ch 14.
Starting in second chain work:
sl st, sc, hdc, dc, dc, tr, tr, tr, dc, dc, hdc, sc, sl st.
Work 3 sc in the final chain.
Mirror the stitch sequence down the opposite side.
Join.
Work the same serrated edging as the large leaf.
Add one raised center vein and two pairs of short diagonal veins.
Fasten off with a 25 cm tail.
Small Autumn Leaf — Make 8
Ch 11.
Starting in second chain work:
sl st, sc, hdc, dc, tr, tr, dc, hdc, sc, sl st.
Work 3 sc in the final chain.
Mirror the sequence down the second side.
Join.
Work a simplified serrated edge with a picot after every 2–3 sc.
Surface sl st from base to tip for the center vein.
Fasten off.
Optional Rounded Birch-Style Leaf
The photograph contains subtle variation in leaf width. To create a rounder motif, use the medium-leaf foundation but replace the three central treble stitches with five tr.
Keep the pointed tip unchanged.
This increases the center width without lengthening the leaf and prevents all 42 motifs from looking mechanically identical.
Optional Narrow Beech-Style Leaf
Begin with ch 15.
Use only two treble stitches at the widest point and increase the number of dc stitches on either side.
The result is narrower and longer than the standard medium leaf.
Make four to six of these for the upper and lower edges of the runner.
Main Tan Vine
Yarn: tan or light camel.
Ch approximately 420, or continue chaining until the relaxed foundation measures approximately 145 cm.
Starting in second chain from hook, sl st in every chain.
Do not tighten the slip stitches.
Fasten off.
The slip-stitch return creates a narrow cord that is substantially more stable than an uncovered chain.
Second Main Vine
Make a second cord approximately 120–130 cm long.
This secondary line crosses the main vine several times and produces the irregular branching network visible in the reference.
Do not join the two cords together continuously. They should intersect only at selected attachment points.
Long Side Branch — Make 8
Ch until the foundation measures approximately 16–18 cm.
Sl st back through every chain.
Fasten off with a 20 cm tail at both ends.
Medium Side Branch — Make 12
Ch until the strand measures approximately 11–14 cm.
Sl st back across.
Fasten off.
Short Side Branch — Make 10
Ch until the strand measures approximately 7–9 cm.
Sl st back across.
Fasten off.
Curved Branch Sections
For several curved connectors, work 2 sc in every fourth chain instead of using only slip stitches on the return pass.
The occasional increase makes the cord bend slightly.
Use curved branches sparingly. If every connector curls, the runner loses its long directional structure.
Building the Vine Network
Lay the 145 cm main vine on a flat surface.
Position the second main vine so it crosses the first approximately every 20–30 cm.
Pin both cords in place.
Add long, medium, and short side branches at irregular intervals.
Maintain an overall width of approximately 30–35 cm.
Leave open spaces between branches rather than filling the complete rectangle.
Joining Branch Intersections
Thread a tan tail onto the tapestry needle.
At each crossing, make two or three small stitches through both cords.
Knot on the wrong side.
Do not wrap yarn visibly around the entire intersection.
The finished join should look like one vine naturally branching into another.
Planning the Leaf Layout
Place all 42 leaves on top of the completed vine network before sewing any of them down.
Begin with the largest motifs.
Distribute cream leaves throughout the full runner rather than grouping them in the center.
Then place rust and plum leaves, followed by mustard and brown.
Use small leaves to fill narrow gaps.
Color Distribution
A useful starting distribution is:
- Cream: 10 leaves
- Rust: 10 leaves
- Chocolate: 8 leaves
- Mustard/camel: 8 leaves
- Plum/burgundy: 6 leaves
This is intentionally asymmetrical. Rotate several leaves before attachment so neighboring motifs do not all point in the same direction.
Attaching a Leaf to a Branch
Thread the leaf’s 25 cm tail.
Place the base over the vine.
Make four to six small stitches through the lower 1–1.5 cm of the leaf and the vine beneath it.
Leave the upper leaf surface unattached.
This allows the motif to retain a small amount of dimension while keeping the runner stable on the table.
Attaching Leaves at Intersections
Use larger leaves to conceal selected branch joins.
Position the leaf base directly over the crossing.
Stitch through both vines and the lower leaf section.
This reinforces the runner while hiding construction points.
Creating the Trailing End
The reference allows several leaves to extend beyond the end of the table.
For this effect, continue the main vine approximately 15–20 cm beyond the last dense cluster.
Attach three to five leaves along the trailing section.
Place the final leaves at different heights rather than forming one straight line.
Creating a Flat-End Version
If the runner must remain entirely on the tabletop, stop all vine cords approximately 5 cm before the target finished length.
Place the final leaf tips near the 150 cm boundary.
Do not attach dangling branches.
This produces a cleaner runner for smaller dining tables.
Assembly
- Crochet one large, one medium, and one small test leaf, block them, and confirm finished lengths near 9 cm, 7.5 cm, and 5.5 cm before making the full set.
- Make approximately 42 leaves in cream, rust, mustard, brown, and plum, varying the three sizes rather than repeating one identical motif throughout the runner.
- Add a surface-slip-stitch center vein to every leaf and place two to four shorter diagonal veins on the large and medium motifs.
- Crochet the 145 cm main tan vine and the shorter secondary vine, keeping both cords relaxed enough to lie flat without twisting.
- Make the long, medium, and short branch cords, then pin the entire vine network to a 35 × 150 cm working area before joining any intersections.
- Sew branch intersections with small hidden tan stitches while retaining irregular open spaces between the vine sections.
- Arrange all leaves over the completed framework, positioning large leaves first and using small motifs only after the main color distribution is balanced.
- Attach each leaf through only its lower 1–1.5 cm, using selected large leaves to conceal and reinforce major vine intersections.
- Add the trailing end leaves last, checking that no unsupported branch extends more than approximately 10 cm beyond an attachment point.
- Weave all tails into matching stitches, wet-block the complete runner to approximately 35 × 150 cm, and shape every leaf point and branch while drying.
The completed runner should form an open network of tan branches supporting layered autumn leaves rather than a continuous rectangular crochet fabric.
7 Technical Tips
- The leaf curls into a bowl: compare the serrated edging with the unedged leaf before continuing. If the perimeter shortens by more than approximately 5 mm, work the edging with a hook 0.5 mm larger.
- The raised center vein puckers the leaf: make each surface slip stitch slightly longer than the stitch beneath it. A tight 7–9 cm center vein contracts the motif length and forces the leaf sides upward.
- The runner tangles when lifted: keep unsupported vine sections below approximately 10 cm between leaf or branch attachments. Long loose cords can loop around neighboring leaves during storage or laundering.
- The runner narrows through the center: pin the vine network inside a 35 cm-wide guide before sewing intersections. Building branches by eye can gradually reduce the center width even when both ends remain broad.
- Leaves rotate around the vine: sew through at least 1–1.5 cm of the leaf base rather than using one stitch at the stem. A single attachment point acts as a pivot whenever the runner is moved.
- The tabletop disappears beneath the motifs: maintain open areas approximately 5–10 cm across between selected branches. Filling every gap converts the airy runner into a dense pile of overlapping leaves.
- The trailing end stretches out of shape: support each dangling branch with a leaf attachment within approximately 8 cm of the table edge. Heavy DK leaves placed at the end of a long unsupported cord pull the vine downward.
Why Separate Leaves Work for This Runner
A conventional crochet table runner is normally made as one rectangular piece. Current fall patterns commonly use filet crochet, solid fabric, or joined maple motifs. The reference takes a different approach: the table itself becomes the negative space between the leaves.
Separate motifs make that structure practical. Each leaf can be blocked independently, its color can be repositioned during layout, and damaged motifs can be replaced without remaking the runner.
This construction also provides the defining irregular outer edge. A solid rectangular foundation would remain visible beneath the open branches and substantially change the design.
Verified Table Runner Benchmarks
Raine Eimre’s Fall Leaves Table Runner measures approximately 7.5 × 22 inches / 19 × 56 cm. It uses size-10 cotton thread, a 1.75 mm hook, approximately 320 m of yarn, 87 filet rows, and three edging rounds.
Karin Burkart’s Autumn Leaf Table Runner measures approximately 20 × 100 cm and is specifically designed so the length can be adjusted.
A current Sweet Potato 3 Fall Leaves Table Runner uses worsted yarn with 5.5 and 6.5 mm hooks. Published sizes include approximately 28 × 69 cm, 28 × 140 cm, 28 × 206 cm, and 28 × 274 cm, providing useful evidence for treating runner length as customizable.
Those published projects use different construction methods from this photo-inspired version, so their stitch counts are not presented as counts for the runner shown here.
Why the Leaf Point Needs a Picot
A rounded crochet oval does not read clearly as an autumn leaf once dozens of motifs overlap. The pointed end needs a structural change.
A Threads tutorial for crocheted autumn leaves uses a chain-and-slip-stitch picot to produce a defined leaf point. The same principle is applied here at the leaf tip and repeated more subtly along the serrated sides.
Keep the top picot longer than the side picots. That difference preserves one obvious primary point.
Choosing the Cream Yarn
The lightest leaves in the photograph are warm natural cream rather than stark white.
Look for shade names such as ecru, natural, oatmeal, ivory, or unbleached cotton.
Cream motifs provide visual breaks between the darker rust, brown, and plum leaves. Distribute them from one end to the other rather than concentrating them in a single section.
Choosing the Rust Yarn
Rust supplies the strongest fall color in the runner.
Useful shade names include burnt orange, copper, terracotta, brick, and cinnamon.
Use rust on several large leaves near the outer edges. Their higher contrast makes the irregular silhouette easier to read against a light tabletop.
Choosing the Brown and Plum
Chocolate brown creates the darkest neutral, while deep plum adds a cooler dark value.
The two colors should remain distinguishable when placed side by side.
If the plum is nearly black, use fewer plum motifs and place cream or mustard nearby. This prevents the darkest leaves from merging into one continuous patch.
Choosing the Mustard Yarn
Use a muted ochre or camel rather than bright primary yellow.
Mustard bridges the value difference between cream and rust and works particularly well on medium leaves.
The same shade can be mixed into several tan vine sections if a completely uniform branch color looks too controlled.
Cotton Versus Acrylic
Cotton gives the leaf points, picots, and raised veins stronger definition. It also blocks accurately, an important property when more than 40 independent motifs must lie on one table.
Acrylic makes the runner lighter and reduces the weight on hanging branches. A cotton-acrylic blend is a practical middle option.
Use the same yarn family for every color. Different fibers can make identically counted leaves finish at noticeably different sizes.
Making a 100 cm Runner
Reduce the main vine to approximately 95 cm.
Make about 28–30 leaves rather than 42.
Use six long branches, eight medium branches, and six short branches.
Maintain the same 30–35 cm maximum width.
This size is close to the 100 cm length of Karin Burkart’s published Autumn Leaf Table Runner benchmark.
Making a 200 cm Runner
Extend the main vine to approximately 195 cm.
Plan about 55–60 leaves.
Add branch sections in 25–30 cm modules instead of simply stretching the existing cords farther apart.
Maintain leaf density throughout the center. Increasing only the length of the bare vines produces a visibly sparse middle section.
Making the Runner Wider
Add longer side branches rather than enlarging every leaf.
For a 45 cm-wide version, increase several side branches from 16–18 cm to approximately 22 cm.
Add one large leaf near each extended end.
Keep the main vines near the centerline so the runner still reads as one connected botanical structure.
Making a Narrow Console Runner
Target approximately 22–25 cm wide.
Use mostly medium and small leaves.
Reduce side branches to 5–12 cm.
Keep the long central vine unchanged if the furniture requires the full length.
A narrow version works particularly well when the runner needs to share the surface with lamps or decorative objects.
Using Only Three Colors
For a simpler palette, use cream, rust, and brown.
Allocate approximately 40 percent of the leaves to cream, 35 percent to rust, and 25 percent to brown.
Maintain the same three leaf sizes.
Size variation becomes more important when fewer colors are available to separate neighboring motifs.
Adding Olive Green
Replace several mustard leaves with muted olive.
Use green sparingly if the objective is a late-autumn palette.
Five or six olive motifs among 42 leaves are enough to introduce another color without making the runner read as spring foliage.
Adding Maple Leaves
Replace six standard leaves with five-point maple motifs for stronger shape variation.
Current maple-leaf table-runner patterns use individually crocheted motifs and adjustable joining arrangements, making modular leaf substitution practical.
Keep the maple leaves approximately 8–9 cm across so they do not dominate the narrower oval leaves.
Using the Motifs as a Garland
Omit the side branches.
Make one main vine to the required length and attach leaves approximately every 6–9 cm.
Alternate their direction along the cord.
The resulting construction can be used along a mantel or shelf rather than lying flat as a table runner.
Using the Runner on a Round Table
Reduce the finished length and increase branching around the center.
A 90–110 cm runner works better on many round dining tables than the full 150 cm version.
Keep the ends visually lighter by using fewer large leaves.
Measure the actual tabletop before constructing the main vine.
Blocking the Leaves
Wet each finished leaf according to the yarn label.
Pin the base first, followed by the primary point.
Set the widest points symmetrically.
Pin the side picots only after the basic outline is established.
Do not stretch the raised center vein separately from the surrounding fabric.
Blocking the Vine Network
Block the assembled vine framework before attaching the leaves.
Pin the main cord to approximately 145–150 cm.
Spread side branches to the intended 35 cm maximum width.
Allow the network to dry completely.
This intermediate blocking stage makes final leaf placement much easier because the branches no longer twist.
Blocking the Finished Runner
After all leaves are attached, dampen the runner lightly rather than fully soaking it if the yarn permits.
Pin the main vine first.
Position the largest leaves next, followed by medium and small motifs.
Shape each point individually.
Allow the runner to dry completely before removing the pins.
Care and Storage
Follow the yarn manufacturer’s washing instructions.
For a runner with many open branches, hand washing or a mesh laundry bag reduces tangling.
Support the wet runner rather than lifting it by one vine.
Dry flat and reshape the leaf points while damp.
For storage, roll the runner loosely around a cardboard tube or folded towel instead of compressing the raised veins under a heavy stack.
Sources
Published runner-size and yarn benchmarks were checked against HandmadebyRaine’s Fall Leaves Table Runner, which specifies size-10 crochet thread, a 1.75 mm hook, 87 filet rows, three edging rounds, and a finished size of approximately 22 × 7.5 inches.
The same project specifications were cross-checked with Fall Leaves Table Runner on Ravelry, which lists approximately 320 m of size-10 cotton thread and a 1.75 mm hook, and the Ribblr edition, which reports a finished size of approximately 7.5 × 22 inches.
Longer runner dimensions were compared with Karin Burkart’s Autumn Leaf Table Runner, published at approximately 20 × 100 cm, and Sweet Potato 3’s Fall Leaves Table Runner, which uses worsted yarn, 5.5 and 6.5 mm hooks, and provides several adjustable lengths from 27 to 108 inches.
Leaf-point construction was compared with Threads’ How to Crochet Autumn Leaves tutorial, which uses picot construction to create a defined pointed leaf tip. A current motif-based market comparison was checked against StitchRunnerStore’s Crochet Maple Leaf Table Runner Pattern, which uses separately crocheted leaf motifs and an adjustable joining method.
Conclusion
The branching framework controls this runner more than any single leaf does. Build and block the tan vine network to roughly 35 × 150 cm first, then distribute the 42 motifs so cream, rust, mustard, brown, and plum remain mixed from end to end. Attach only the lower 1–1.5 cm of each leaf, leaving the pointed upper sections free while reinforcing major vine intersections beneath larger motifs. Your next step is to make one leaf in each size and compare their blocked proportions. Save this crochet leaf table runner pattern to Pinterest or share the finished runner on Instagram with #AutumnLeafVineRunner. Which color would you place on the leaves hanging over the table edge? “`0









