Introduction
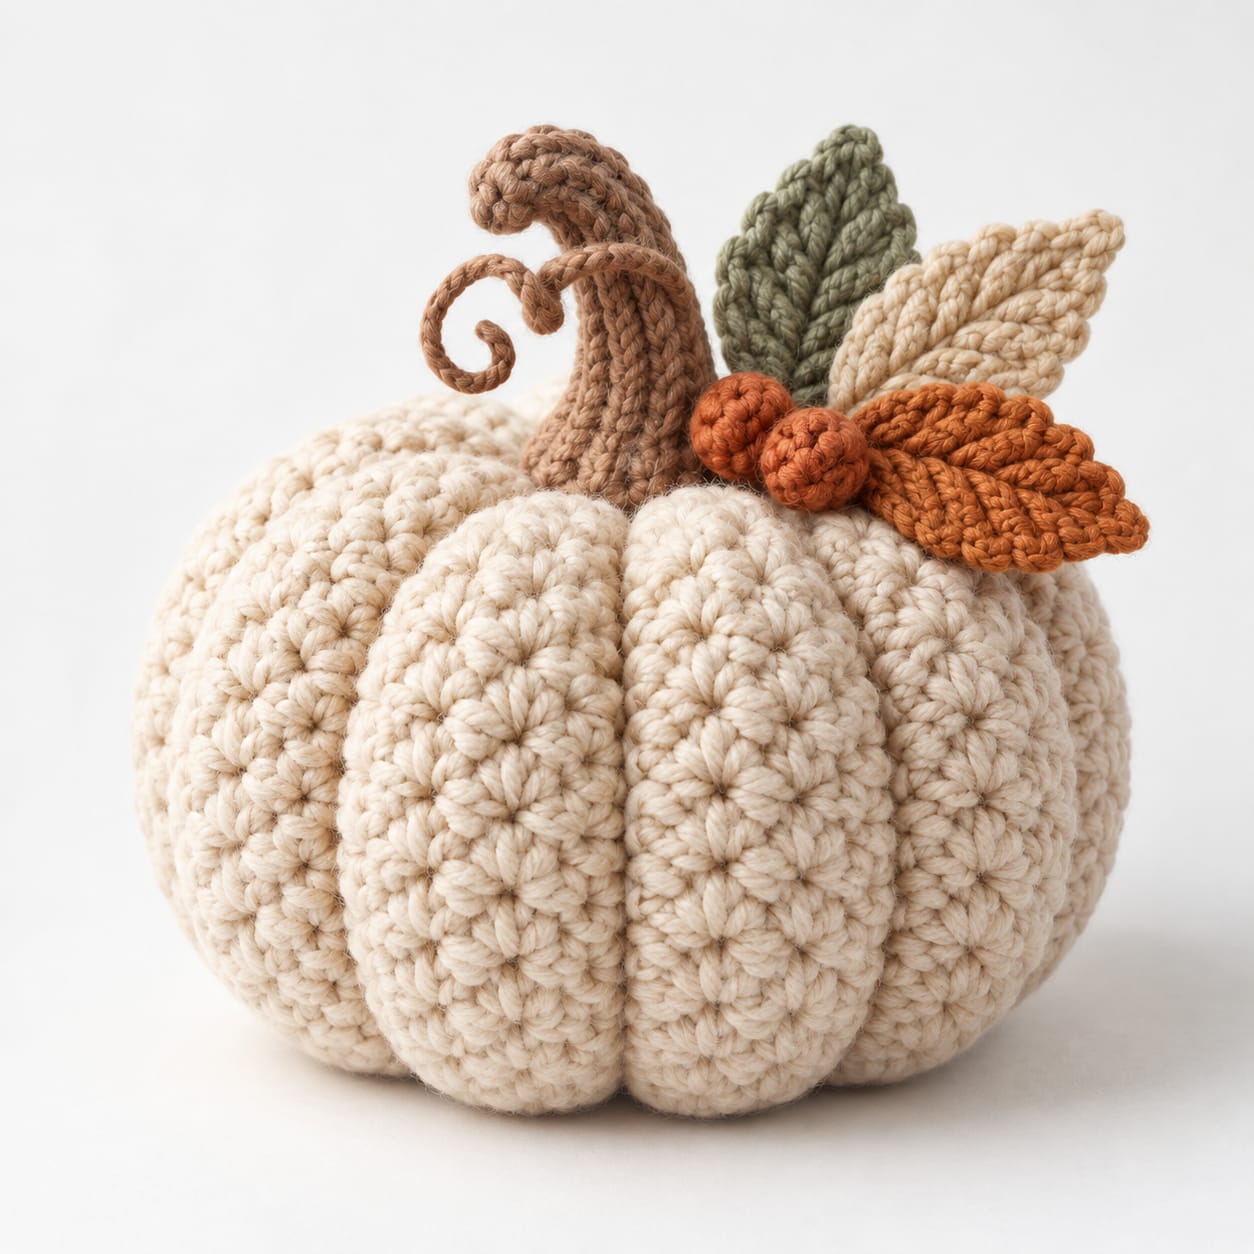
Eight deep cream lobes have to meet beneath one crooked brown stem without turning the pumpkin into a flattened cushion. This cream crochet pumpkin pattern uses worsted-weight yarn, a 5 mm hook, fiberfill, a sculpted stem, three autumn leaves, berries, and a curled vine. The intermediate pumpkin finishes at approximately 18 × 14 cm and works as a freestanding fall centerpiece or shelf decoration.
The Design: What Makes This Crochet Pumpkin Different
The photographed pumpkin relies on pronounced vertical segmentation rather than subtle ribbing. A stuffed round body provides the volume, then separate sculpting passes pull from the top opening to the bottom center to form eight substantial lobes. That method preserves a rounded profile while creating deeper channels than ordinary textured stitches alone. The topper is deliberately asymmetric: a tall curved brown stem rises behind overlapping sage, cream, and burnt-orange leaves, while two small orange berries and a narrow spiral vine fill the lower gap. This crochet pumpkin with leaves therefore needs a firmer crown than a plain pumpkin. Published worsted-weight pumpkins commonly use 5 mm hooks and range from about 9 cm to 16.5 cm wide. A common maker error is over-tightening the sculpting yarn, which produces a compressed center and pointed underside.
Project Info at a Glance
| Skill Level | Time | Finished Size | Hook | Best For |
|---|---|---|---|---|
| Intermediate | Approx. 4–6 hours | Approx. 18 cm wide × 14 cm high | 5 mm | Fall centerpieces, shelves, mantels |
The 5 mm hook is supported by several published worsted-weight pumpkin patterns. Laura Brian’s Easy Alpine Pumpkin uses worsted yarn with a 5 mm hook and finishes around 14 cm wide × 7.6 cm high, while Crafty Crochet Castle reports worsted pumpkins from approximately 9 × 7.6 cm through 16.5 × 12.7 cm using the same hook size. The larger dimensions here account for the fuller eight-lobe silhouette in the reference.
Materials and Tools
Yarn
- Warm cream — worsted #4 — approximately 130–160 g
- Medium brown — worsted #4 — approximately 25–30 g
- Sage green — worsted #4 — approximately 15–20 g
- Burnt orange — worsted #4 — approximately 15–20 g
- Light beige — worsted #4 — approximately 10–15 g
Veronika Cromwell’s Pumpkins From The Patch uses one 100 g ball of worsted cotton for its smaller 23.5 cm-circumference pumpkin. The larger reconstructed pumpkin shown here requires more cream yarn because its stuffed body is approximately 18 cm across and the sculpting channels consume additional strand length.
Tools
- 5 mm crochet hook
- 4.5 mm hook for a firmer stem and berries
- Polyester fiberfill — approximately 100–140 g
- Long tapestry needle
- Stitch markers
- Scissors
- Optional straight pins for arranging leaves
Abbreviations
- MR — magic ring
- sc — single crochet
- inc — increase
- dec — invisible decrease
- hdc — half double crochet
- dc — double crochet
- tr — treble crochet
- ch — chain
- sl st — slip stitch
- BLO — back loop only
- st/sts — stitch/stitches
For an invisible decrease, insert the hook through the front loops of the next two stitches, yarn over, draw through both front loops, then complete one single crochet.
Gauge and Finished Measurements
Exact gauge is less important than producing a dense fabric that does not expose the stuffing.
- Main pumpkin: approximately 18 cm wide × 11–12 cm high before topper
- Total height: approximately 14–16 cm depending on stem curve
- Stem: approximately 8–9 cm tall
- Large leaves: approximately 8–10 cm long
- Berries: approximately 2.5–3 cm diameter
If the stitches expose visible gaps when the body is firmly stuffed, reduce the hook to 4.5 mm rather than decreasing the stuffing quantity.
Pattern — Step by Step
Work the pumpkin body in a continuous spiral. Mark the first stitch of every round. The stitch counts below create a 42-stitch plateau, then extend the middle with additional even rounds to build the large rounded body visible in the reference.
Cream Pumpkin Body
Yarn: warm cream.
R1: 6 sc in MR. (6)
R2: inc ×6. (12)
R3: (1 sc, inc) ×6. (18)
R4: (2 sc, inc) ×6. (24)
R5: (3 sc, inc) ×6. (30)
R6: (4 sc, inc) ×6. (36)
R7: (5 sc, inc) ×6. (42)
R8: sc around. (42)
R9: sc around. (42)
R10: sc around. (42)
R11: sc around. (42)
R12: sc around. (42)
R13: sc around. (42)
R14: sc around. (42)
R15: sc around. (42)
R16: sc around. (42)
R17: sc around. (42)
R18: (5 sc, dec) ×6. (36)
R19: (4 sc, dec) ×6. (30)
R20: (3 sc, dec) ×6. (24)
Begin stuffing firmly.
Push stuffing toward the outer circumference while keeping the exact top and bottom centers slightly softer. This makes the later sculpting passes easier to tighten.
R21: (2 sc, dec) ×6. (18)
Add the remaining stuffing.
R22: (1 sc, dec) ×6. (12)
R23: dec ×6. (6)
Fasten off, leaving a 150–180 cm cream tail.
Thread the tail through the remaining six front loops and pull the opening closed.
Creating the Eight Pumpkin Lobes
Thread approximately 250 cm of doubled cream yarn onto a long tapestry needle.
Insert the needle through the bottom center and bring it out through the top center.
Wrap the strand down the outside of the pumpkin.
Insert through the bottom center again and exit at the top.
Pull until a visible groove forms.
Rotate the pumpkin approximately 45 degrees.
Repeat until eight evenly spaced channels surround the body.
After the eighth pass, inspect the pumpkin from above before knotting the yarn.
The lobes should remain rounded rather than compressed into narrow wedges.
Controlling the Lobe Depth
The reference uses pronounced grooves, but the center remains broad.
Tighten every sculpting pass gradually.
Work once around the entire pumpkin before applying final tension.
If one lobe is narrower than its neighbors, loosen that channel and reposition the yarn slightly.
Knot the sculpting yarn beneath the future stem attachment.
Curved Brown Stem
Yarn: medium brown. Use the 4.5 mm hook.
R1: 6 sc in MR. (6)
R2: sc around. (6)
R3: sc around. (6)
R4: sc around. (6)
R5: sc around. (6)
R6: sc around. (6)
R7: sc around. (6)
R8: sc around. (6)
R9: sc around. (6)
R10: sc around. (6)
R11: sc around. (6)
R12: sc around. (6)
Begin shaping the curve.
R13: sl st in next 2 sts, sc in next 4 sts. (6)
R14: sl st in next 2 sts, sc in next 4 sts. (6)
R15: sc around. (6)
R16: sl st in next 2 sts, sc in next 4 sts. (6)
R17: sc around. (6)
Fasten off, leaving a 50 cm attachment tail.
Stem Base
Join brown yarn around the lower stem opening.
R1: inc ×6. (12)
R2: (1 sc, inc) ×6. (18)
R3: sc around. (18)
Fasten off with a long tail.
The wider base distributes the stem load across the gathered pumpkin crown.
Firming the Stem
Insert short brown yarn scraps into the lower two-thirds of the stem.
Keep the upper curved section relatively soft.
Do not use rigid wire in a decorative piece that may be handled frequently.
The short slip-stitch sections create the bend without requiring an internal armature.
Sage Leaf — Make 1
Yarn: sage green.
Ch 15.
Starting in second chain from hook work:
sl st, sc, hdc, dc, dc, tr, tr, tr, dc, dc, hdc, hdc, sc, sl st.
Work 3 sc into the final chain.
Continue along the opposite side:
sl st, sc, hdc, hdc, dc, dc, tr, tr, tr, dc, dc, hdc, sc, sl st.
Join at the base.
Sage Leaf Edging
Ch 1.
Sc around the leaf.
At the point work:
sc, ch 2, sl st into first ch, sc.
Continue around.
Join.
Do not fasten off.
Sage Leaf Vein
Surface sl st along the foundation chain from base to tip.
Fasten off with a 35 cm tail.
Cream Leaf — Make 1
Yarn: light beige or warm cream.
Repeat the Sage Leaf instructions.
For the slightly longer profile shown in the reference, begin with ch 17 and add one additional dc on each side of the center.
Fasten off with a 35 cm tail.
Burnt-Orange Leaf — Make 1
Yarn: burnt orange.
Ch 14.
Starting in second chain work:
sl st, sc, hdc, dc, dc, tr, tr, dc, dc, hdc, sc, sc, sl st.
Work 3 sc in the final chain.
Mirror the stitch sequence along the opposite side.
Join.
Scalloped Orange Leaf Edge
Ch 1.
*Sc in









