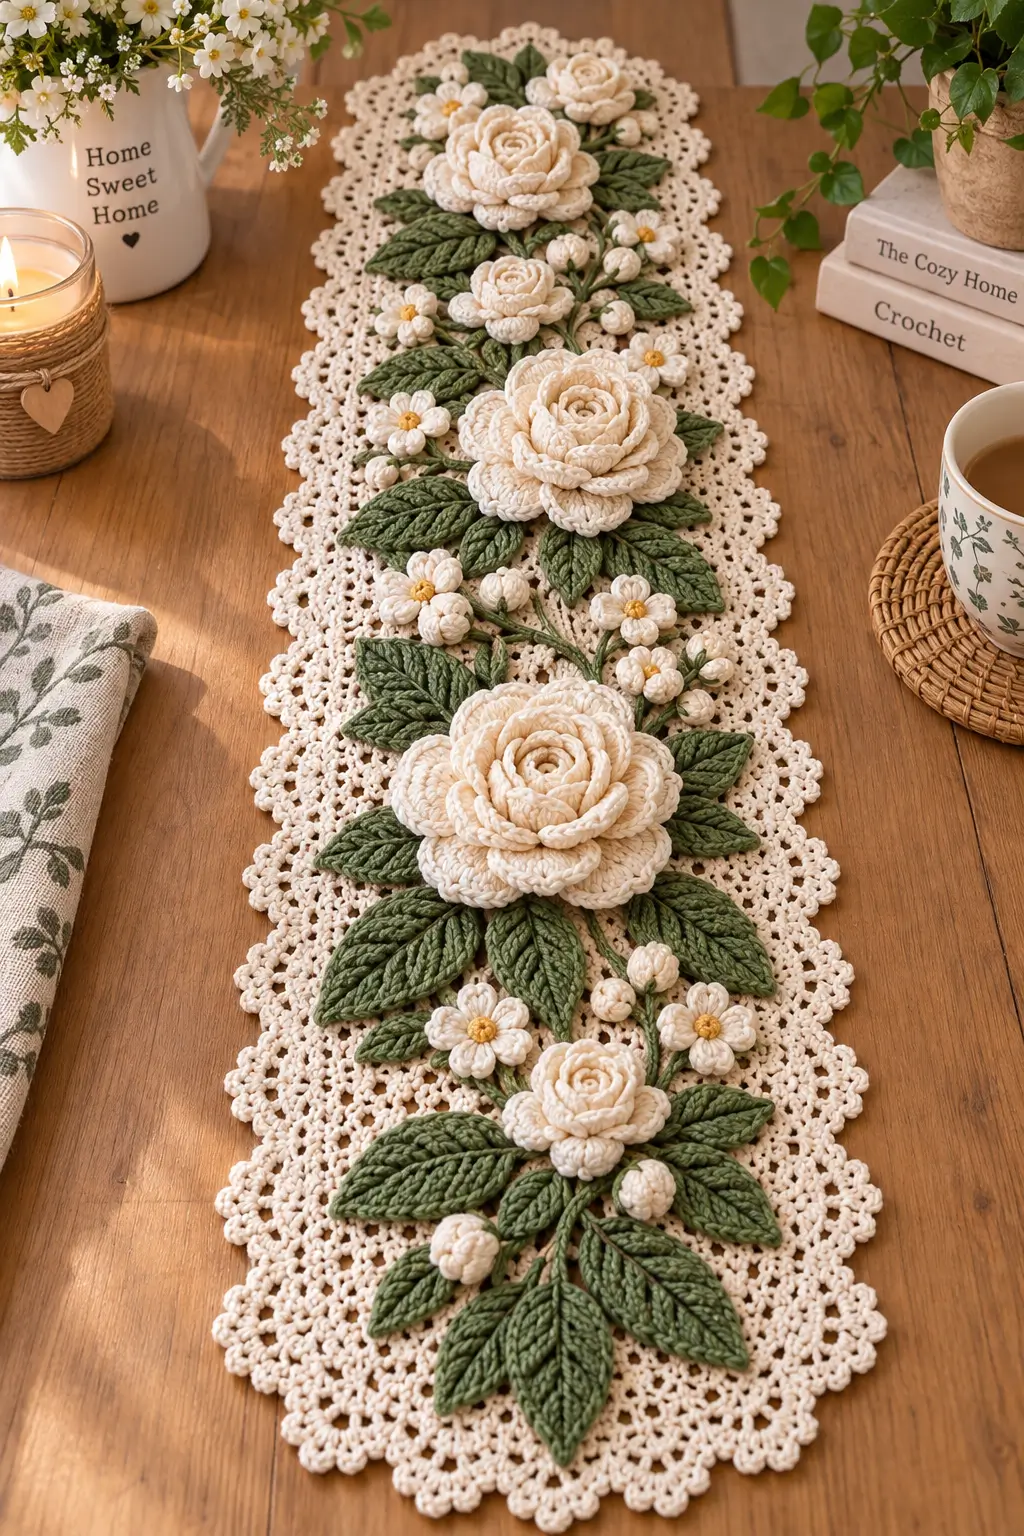
A rose needs progressively larger petals around a tight center or it reads as a flat rosette instead of a flower. This crochet rose table runner pattern uses that structure across five dimensional ivory roses, smaller blossoms, closed buds, textured green leaves, branching stems, and a cream lace foundation. Medium-weight yarn gives the botanical motifs enough structure, while a lighter foundation keeps the finished runner manageable on a dining table.
The Design: What Makes This Rose Table Runner Different
The photographed runner is built around five dimensional roses rather than a continuous floral stitch pattern. Three large roses establish the main visual rhythm, while two smaller roses bridge the spaces between them. Each flower uses concentric petal layers, with small upright petals at the center and progressively broader petals toward the outside.
Dense green leaves create the second structural layer. Their raised center veins make the foliage substantial enough to sit beside the thick 3D crochet roses. Small five-petal flowers and closed buds then fill narrow spaces along branching stems.
The main construction risk is excessive attachment. Sewing every petal and leaf edge to the foundation removes most of the dimensional effect. Secure large roses through their bases, leaves primarily through their central veins, and small flowers through their centers. The surrounding edges should remain raised.
Project Info at a Glance
| Skill Level | Estimated Time | Comparable Size | Hook | Construction |
|---|---|---|---|---|
| Intermediate | 22–30 hours | Approx. 132 × 28 cm | 4–5 mm motifs; 3–3.5 mm lace | Separate flowers, leaves and stems attached to lace foundation |
A published Rose Garden Table Runner measures approximately 132 cm long by 28 cm wide after blocking and uses medium-weight yarn with a 5 mm hook. The supplied photograph appears wider because the foliage and lace border extend substantially beyond the central floral line. Treat the published dimensions as a practical reference rather than an exact measurement of the photographed piece.
Materials and Tools
Yarn
- Warm ivory or natural white medium-weight cotton — approximately 250–320 g for roses, small flowers and buds
- Sage or olive green medium-weight cotton — approximately 180–250 g for leaves and stems
- Mustard or golden yellow DK cotton — approximately 10–20 g for small flower centers
- Cream DK cotton — approximately 250–350 g for the openwork foundation and scalloped border
- Light olive cotton — approximately 30–50 g if contrasting stems are wanted
The quantities above are working estimates for this photo-inspired construction. Actual consumption depends on rose diameter, yarn thickness, runner length, leaf count, and the density of the lace foundation.
Tools
- 4 mm crochet hook for dimensional roses and leaves
- 3–3.5 mm crochet hook for the cream lace foundation
- Tapestry needle
- Stitch markers
- Sharp scissors
- Blocking mat
- Rustproof blocking pins
- Flexible measuring tape
- Small amount of fiberfill for closed buds if required
Abbreviations
- MR = magic ring
- sc = single crochet
- hdc = half double crochet
- dc = double crochet
- tr = treble crochet
- inc = increase
- dec = decrease
- sl st = slip stitch
- ch = chain
- BLO = back loop only
- FLO = front loop only
- sp = space
- st/sts = stitch/stitches
For an invisible decrease in a closed bud, insert the hook through the front loops of the next two stitches and complete one single crochet through both loops.
Crochet Rose Table Runner Pattern — Step by Step
Pattern note: This is an original photo-inspired interpretation of the visible runner. A photograph cannot reveal its original yarn, gauge, hidden stitches, exact motif counts, or concealed attachment points. Crochet and block one test rose and one leaf before producing the full set.
Large Rose Base — Make 3
Yarn: warm ivory
R1: 6 sc in MR (6).
R2: Inc ×6 (12).
R3: (Sc 1, inc) ×6 (18).
R4: (Sc 2, inc) ×6 (24).
R5: (Sc 3, inc) ×6 (30).
R6: (Sc 4, inc) ×6 (36).
Do not fasten off. The 36-stitch circle provides the attachment base for the concentric petal layers.
Large Rose — Inner Petals
Continue with ivory yarn.
R7: Working in FLO, *sl st in next st, ch 4, work 1 sc, 1 hdc and 1 dc back down the chain, sl st in next base st* ×18.
The first petal ring should curve upward. Do not block these petals flat.
R8: Work behind R7 into the unused loops. *Sl st in next loop, ch 5, starting in second ch work sc, hdc, dc, dc; sl st into next available loop* ×12.
Arrange the twelve petals so they overlap the gaps between the inner petals.
Large Rose — Middle Petals
R9: Working behind the previous petals, *ch 5, skip approximately 2 base sts, sl st around the next anchor* ×12.
R10: Into each ch-5 loop work (sc, hdc, 3 dc, hdc, sc) (12 petals).
R11: Working behind R10, *ch 6, sl st around next petal anchor* ×12.
R12: Into each ch-6 loop work (sc, hdc, 4 dc, hdc, sc) (12 petals).
Pull the center petals slightly upward with your fingers while the outer petals remain progressively flatter.
Large Rose — Outer Petals
R13: Work behind the existing petals: *ch 7, sl st around next anchor* ×12.
R14: Into each ch-7 loop work (sc, hdc, 2 dc, 3 tr, 2 dc, hdc, sc) (12 petals).
R15: Sl st around the rear base of the flower to stabilize the final petal ring.
Fasten off with a 35 cm tail. The completed large rose should measure approximately 15–19 cm across with medium-weight yarn, depending on hook and tension.
Medium Rose — Make 2
Yarn: warm ivory
R1: 6 sc in MR (6).
R2: Inc ×6 (12).
R3: (Sc 1, inc) ×6 (18).
R4: (Sc 2, inc) ×6 (24).
R5: (Sc 3, inc) ×6 (30).
R6: In FLO, *sl st, ch 4, work sc, hdc, dc down chain, sl st in next base st* ×15.
R7: Behind the first petals, create 10 ch-5 loops evenly around.
R8: Into each loop work (sc, hdc, 3 dc, hdc, sc) (10 petals).
R9: Behind R8, create 10 ch-6 loops.
R10: Into each loop work (sc, hdc, 4 dc, hdc, sc) (10 petals).
Fasten off with a 30 cm tail. Shape the center upward before assembly.
Small Five-Petal Flowers — Make 12–16
Yarn: ivory and mustard yellow
With mustard:
R1: 6 sc in MR (6).
R2: Inc ×6 (12).
Change to ivory.
R3: *Sl st in next st, ch 5, starting in second ch work sc, hdc, dc, hdc down chain, sl st in next base st* ×6.
Fasten off with a 20 cm sewing tail.
The photograph includes several small open blossoms around the rose clusters. Keep these flowers considerably smaller than the medium roses so they function as connecting motifs rather than additional focal points.
Closed Rose Bud — Make 10–14
Yarn: ivory and sage green
With ivory:
R1: 6 sc in MR (6).
R2: Inc ×6 (12).
R3: (Sc 1, inc) ×6 (18).
R4: Sc around (18).
R5: (Sc 1, dec) ×6 (12).
Add a small pinch of fiberfill if the yarn does not hold its rounded shape.
R6: Dec ×6 (6).
Change to sage green.
R7: *Sl st in next st, ch 4, work sl st, sc, hdc down chain, sl st in next base st* ×3.
Fasten off with a 20 cm tail. The three short green points form the sepal beneath the closed flower.
Large Textured Leaf — Make 28–34
Yarn: sage or olive green
Ch 18.
Row 1: Starting in second ch, sc in next 2, hdc in next 3, dc in next 4, tr in next 5, dc in next 2, work 5 hdc in final ch.
Rotate the work and continue down the opposite side of the foundation chain.
Work dc in next 2, tr in next 5, dc in next 4, hdc in next 3 and sc in next 2.
Row 2: Ch 1. Sc around the entire leaf, working (sc, ch 2, sc) into the pointed tip.
Row 3: Surface sl st along the central foundation chain from the base to the tip.
Row 4: Add four short diagonal surface-slip-stitch veins on each side of the center line.
Fasten off with a 20 cm tail. Block each large leaf to approximately 9–12 cm long.
Small Leaf — Make 14–18
Yarn: sage green
Ch 11.
Row 1: Starting in second ch, sc, hdc in next 2, dc in next 4, hdc in next 2, work 3 sc in final ch.
Continue along the opposite side with hdc in next 2, dc in next 4, hdc in next 2 and sc.
Row 2: Sl st evenly around, placing (sl st, ch 2, sl st) at the tip.
Fasten off with a 15 cm tail.
Branching Stems
Yarn: sage or light olive green
For a long central branch, ch 60–75.
Row 1: Starting in second ch, sc across.
Row 2: Ch 1, turn, BLO sc across.
For smaller branches, repeat the same construction over foundation chains of 20–40 stitches.
Fasten off with a long tail. Curve each branch during assembly instead of blocking it perfectly straight.
Openwork Lace Foundation
Yarn: cream DK cotton
Ch 65.
Row 1: Dc in fourth ch from hook and across.
Row 2: Ch 4, turn, skip 1 st, dc in next, *ch 1, skip 1, dc in next* across.
Row 3: Ch 3, turn, dc into each dc and ch-1 sp across.
Row 4: Ch 5, turn, skip 2 sts, sc in next, *ch 5, skip 2 sts, sc in next* across.
Row 5: Ch 5, sc in first ch-5 sp, *ch 5, sc in next ch-5 sp* across.
Row 6: Ch 3, work 3 dc into each ch-5 sp across.
Repeat Rows 2–6 until the foundation measures approximately 115–125 cm before adding the outer border. Add or remove repeats according to the intended table.
Scalloped Lace Border
Yarn: cream DK cotton
Round 1: Work sc evenly around all four edges. Place 3 sc at each corner.
Round 2: *Ch 5, skip approximately 2–3 sts, sc in next* around.
Round 3: Into every ch-5 loop work (2 sc, 5 dc, 2 sc).
Round 4: Sl st to the center dc of the first shell. *Ch 6, sc in the center dc of the next shell* around.
Round 5: Into each ch-6 loop work (2 sc, hdc, 3 dc, picot, 3 dc, hdc, 2 sc).
Round 6: Sl st around the edge, placing one picot above each previous-round point if a more pronounced scallop is required.
Fasten off and weave the tail into the reverse side.
Block the entire foundation before attaching any dimensional motifs. Pin every repeated scallop separately so both long edges finish at the same measurement.
Assembly
- Block the cream lace foundation completely and mark its longitudinal centerline with removable contrasting yarn.
- Position the three large roses first. Place one close to the upper third, one around the middle, and one in the lower half while leaving open lace between their outer petals.
- Add the two medium roses between the larger flowers. Attach each rose through its circular base rather than sewing around the outer petals.
- Arrange the branching green stems between the five roses. Curve them gently and hide major intersections beneath flower bases or large leaves.
- Place large leaves around every focal rose. Sew through the base and central vein while leaving most of the outer leaf edge unattached.
- Add the small ivory flowers beside branches and in open spaces between rose-and-leaf clusters. Keep several centimeters between neighboring flower centers to prevent crowding.
- Position the closed buds primarily at branch ends and beside small flowers. Angle some buds toward the runner edge rather than pointing every bud toward the centerline.
- Add the remaining small leaves around buds and secondary stems. Maintain visible areas of cream lace between dense botanical groups.
- View the complete runner from at least one meter away before finishing the sewing. Correct uneven foliage distribution now rather than moving the large roses after they have been attached.
- Weave each structural tail through at least 4–5 cm of matching stitches. Block exposed lace and leaves locally without pressing the dimensional rose petals flat.
The completed runner should remain flat along its lace foundation and scalloped border while the roses, buds, flowers, stems, and leaves project above the surface.
7 Technical Tips for Dimensional Crochet Roses
- A wide rose center produces a flat flower instead of a layered bloom. Keep the innermost petals upright and within approximately 3–4 cm of the flower center before positioning the middle tier.
- Identical petal alignment creates visible radial lines. Offset each new petal layer so its petals cover the gaps in the preceding tier rather than sitting directly behind them.
- A heavy rose can distort open lace. Spread the attachment stitches across approximately 5–7 cm of foundation underneath each large flower instead of pulling everything into one central anchor.
- Leaves curl sideways when the central vein is blocked off-axis. Pin the base, center, and pointed tip in one line and keep blocked leaves within approximately 5 mm of the target length.
- Branches look rigid when sewn continuously along both edges. Attach each stem at intervals of approximately 2 cm, allowing the unstitched sections to retain a slightly raised profile.
- Closed buds collapse when filled too firmly or not at all. Add only enough fiberfill to maintain the approximately 2–3 cm rounded bud shape without stretching the stitches apart.
- Exposed tails are especially visible through cream openwork. Weave every structural end through at least 4–5 cm of same-color stitches and reverse direction once before trimming.
How to Shape the Crochet Rose Petals
The rose depends more on petal orientation than sheer stitch count. Inner petals need a tighter curve, middle petals should overlap one another, and the outer tier should open almost horizontally over the surrounding leaves.
Start by holding the innermost petals upright while attaching the next ring behind them. Each middle petal should cover part of the gap between two inner petals. Repeat that offset arrangement for the outer rounds.
If the yarn is soft, dampen the completed flower lightly and support the center with a small rolled cloth while it dries. Position the outer petals around the support rather than pinning every layer flat against a blocking mat.
Do not steam-press the rose. Compressing the center removes the height that distinguishes this construction from a flat flower appliqué.
How to Arrange the Roses and Leaves
Place the largest motifs before working with filler flowers. Five focal roses establish the overall composition, and moving them later requires repositioning almost every nearby leaf and stem.
Start with the central large rose. Position the other large flowers above and below it, then use the two medium roses to interrupt the spacing. The result should look irregular at close range but balanced across the full runner.
Large leaves belong closest to large flowers. Place several underneath petal edges so the transition from ivory flower to cream foundation passes through a band of green foliage. Smaller leaves belong along secondary stems and beside buds.
Avoid covering the entire foundation. Open cream lace between botanical groups is part of the design and keeps the dimensional motifs visually separate.
Adjusting the Table Runner Length
The modular structure makes this crochet flower table runner easier to resize than a design where every flower is built directly into the lace.
For a shorter runner, use three large roses and one medium rose. Reduce the foundation length before working the scalloped border, then arrange the leaves and smaller flowers around the reduced number of focal motifs.
For a longer dining table, extend the lace foundation by complete pattern repeats and add another medium or large rose. Do not simply increase the empty distance between the existing flowers; large gaps can make the central stem look disconnected.
Measure one blocked large rose before finalizing the foundation. If the flower measures 18 cm across, account for that full diameter plus surrounding foliage when calculating each botanical section.
Blocking the Lace Without Flattening the Roses
Complete the main blocking before assembly. The lace foundation should be measured, squared, and pinned along every scalloped repeat while it is still free of heavy floral motifs.
After assembly, correct individual areas instead of blocking the entire runner aggressively. Dampen a curling leaf, pin it through the central vein, and allow it to dry while the adjacent rose remains untouched.
If the outer border contracts after sewing, dampen only the cream lace and repin the scallops. Keep pins away from the raised rose centers.
For storage, roll the runner loosely with the floral surface facing outward. A hard fold through the center of a large rose can distort several petal layers simultaneously.
Conclusion
Make one large rose, one closed bud, and two leaf sizes before committing yarn to the complete runner. Block those samples and measure their actual dimensions; those figures determine flower spacing, foundation width, and final yarn requirements more accurately than the unblocked stitch counts. Build and block the cream foundation next, then position all five roses before attaching stems or foliage. This crochet rose table runner pattern can be resized by changing complete botanical sections rather than stretching the spaces between flowers. Save the finished layout to Pinterest and share your runner on Instagram with #IvoryRoseTableRunner. For your version, would you keep all five roses ivory or make the two smaller roses a contrasting color?









