Introduction
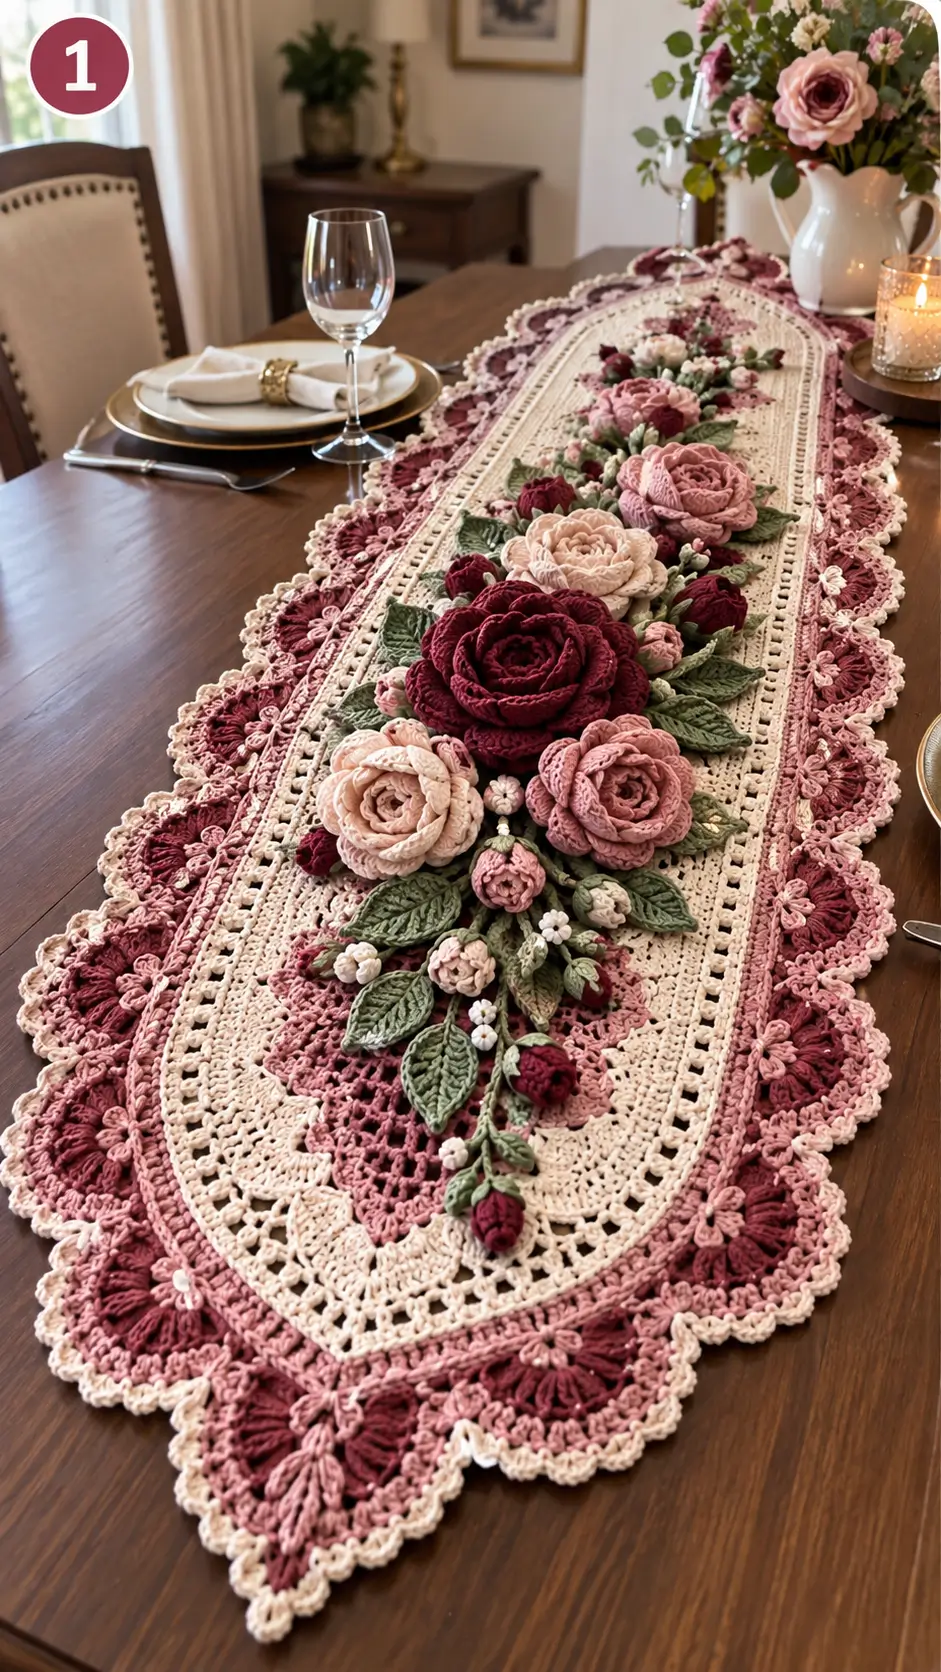
A rose needs progressively wider outer petals or the finished flower reads as a flat spiral rather than a layered bloom. This crochet rose table runner pattern combines burgundy, dusty rose, blush and ivory flowers with sage leaves, an ivory lace foundation and a wide scalloped border. The project is intermediate to advanced and works as a long dining-table centerpiece with the raised floral arrangement concentrated along its centerline.
The Design: What Makes This Rose Table Runner Different
The runner uses three separate structural layers. An elongated ivory lace foundation carries the weight of the decoration, while a dusty-pink and burgundy border supplies width without making the center visually heavy. Dimensional roses are then sewn over the foundation rather than crocheted directly into it.
That separation matters. Large roses need enough freedom for their outer petals to curve away from the center, while the lace beneath them must remain flat.
The floral arrangement also changes scale along the runner. Large open roses establish the main focal points, medium blooms bridge the spaces between them, and narrow buds extend the arrangement lengthwise. Sage-green leaves break up adjacent pink and burgundy flowers. A common failure is making every rose identical; repeated diameter, color and petal placement produce a rigid row rather than the irregular botanical arrangement visible in the reference.
Project Info at a Glance
| Skill Level | Construction | Reference Runner Size | Hook | Best For |
|---|---|---|---|---|
| Intermediate–Advanced | Modular lace with sewn 3D flowers | Approx. 48 × 18 cm for a published rose-runner reference; extend as required | 1.75–3.5 mm depending on component | Dining tables, sideboards and floral centerpieces |
The finished dimensions are adjustable. Add foundation repeats before completing the rounded ends when a longer dining-table runner is required.
Materials and Tools
Yarn
- Ivory — crochet cotton or fine fingering yarn — main lace foundation and final edging
- Dusty rose — fingering or sport cotton — border, roses and buds
- Burgundy — fingering or sport cotton — large focal roses and border accents
- Blush pink — fingering or sport cotton — medium and large roses
- Pale peach — fingering or sport cotton — light roses
- Sage green — fingering or sport cotton — leaves, stems and sepals
- Dark sage — fingering or sport cotton — selected leaves for additional contrast
- White or cream — fine cotton — miniature filler flowers
Yarn consumption depends heavily on runner length and the number of dimensional roses. Make and weigh one large rose, one leaf and a 10 cm section of the foundation before purchasing additional yarn for an extended runner.
Tools
- 1.75–2 mm crochet hook for fine lace
- 2.5–3.5 mm crochet hook for dimensional flowers, depending on yarn weight
- Tapestry needle
- Sharp scissors
- Locking stitch markers
- Blocking mat
- Rust-resistant blocking pins
- Optional 0.5 mm floral wire for structured leaves
Abbreviations
- MR — magic ring
- ch — chain
- sc — single crochet
- hdc — half double crochet
- dc — double crochet
- tr — treble crochet
- inc — 2 stitches in one stitch
- dec — decrease
- sl st — slip stitch
- sp — space
- st/sts — stitch/stitches
- RS — right side
When a decrease is required in a dimensional component, work through the front loops of the next two stitches before completing the sc to reduce the visible horizontal bar.
Pattern — Step by Step
This runner is assembled as a modular floral textile. Complete and block the lace foundation first. Crochet the roses, buds and leaves separately, arrange them while the foundation lies flat, then sew each component in position.
Large Layered Rose — Make 3–5
Yarn: burgundy, blush, dusty rose or pale peach.
Foundation: Ch 51.
Row 1: Starting in second ch from hook, sc across (50).
Row 2: Ch 4, dc in same st, skip 2 sts, (dc, ch 2, dc) in next st. Repeat across, adjusting the final repeat if necessary so the row finishes evenly.
The ch-2 spaces form the foundations for the petals.
Row 3 — Inner petals: In each of the first 4 ch-2 spaces work (sc, 4 dc, sc).
Row 3 — Middle petals: In each of the next 6 spaces work (sc, 6 dc, sc).
Row 3 — Outer petals: In each remaining space work (hdc, 7 dc, hdc).
Fasten off, leaving a 35 cm sewing tail.
Starting at the end containing the smaller petals, roll the strip tightly for approximately two turns. Continue rolling with progressively less tension so the larger petals spread outward.
Use the long tail to stitch repeatedly across the underside of the rolled strip. Catch several layers with every pass.
Shape the outer petals individually after the base has been secured.
Extra-Large Burgundy Rose — Make 1–2
Yarn: deep burgundy.
Foundation: Ch 61.
Row 1: Sc in second ch from hook and across (60).
Row 2: Ch 4, dc in same st, then create repeated (dc, ch 2, dc) groups with two foundation stitches between groups.
Row 3: Work approximately one-third of the petals with 4 dc, the middle third with 6 dc, and the final third with 8 dc inside their respective ch-2 spaces.
Fasten off with a 40 cm tail.
Roll from the smaller-petal end. Keep the center compact but allow the final three to five petals to sit farther from the core.
Sew across the complete underside in several directions. A large rose attached only through its center can rotate after the runner is moved.
Medium Rose — Make 4–7
Yarn: dusty rose, blush or ivory.
Foundation: Ch 34.
Row 1: Sc in second ch from hook and across (33).
Row 2: Form repeated (dc, ch 2, dc) petal foundations across the strip.
Row 3: Work smaller petals at one end and progressively taller groups toward the opposite end.
Fasten off with a 25 cm tail.
Roll tightly for the first two petals and more loosely for the outer layers. Stitch through the base several times before attaching the flower to the runner.
Small Rosebud — Make 8–14
Yarn: burgundy, dusty pink or blush.
Foundation: Ch 16.
Row 1: Sc in second ch from hook and across (15).
Row 2: Ch 3, 4 dc in next st, sl st in next st. Repeat across to create small petal groups.
Fasten off, leaving a 20 cm tail.
Roll the strip firmly so the petals remain mostly upright. Sew across the bottom to stop the bud from opening.
Rosebud Sepal
Yarn: sage green.
R1: 6 sc in MR (6)
R2: (sc, ch 4, sl st in second ch from hook, sc in next 2 ch, sc in next foundation st) ×6.
Fasten off. Leave a 15 cm tail.
Position the sepal beneath the rosebud so its pointed green sections remain visible around the lower edge.
Large Rose Leaf — Make 12–20
Yarn: sage or dark sage green.
Foundation: Ch 13.
R1: Starting in second ch from hook: sc, hdc, 2 dc, 5 tr, 2 dc, hdc, 3 sc in final ch.
Continue along the opposite side of the foundation chain:
hdc, 2 dc, 5 tr, 2 dc, hdc, sc.
Sl st to join.
R2: Ch 1. Work sc around the leaf edge, adding a picot near the tip and small regularly spaced picots if a serrated outline is wanted.
Fasten off. Leave a 15 cm sewing tail.
Embroider or surface-crochet a central vein from the base to the tip. Add short diagonal veins on both sides.
Small Rose Leaf — Make 10–18
Yarn: sage green.
Foundation: Ch 9.
R1: Starting in second ch from hook: sc, hdc, 4 dc, hdc, 3 sc in final ch.
Continue down the opposite side:
hdc, 4 dc, hdc, sc.
R2: Sc around, placing 3 sc at the pointed tip.
Fasten off. Leave a 12 cm sewing tail.
Five-Petal Filler Flower — Make 10–20
Yarn: ivory, cream or pale pink.
R1: 6 sc in MR (6).
R2: Work five petals using (sl st, ch 2, 2 hdc, ch 2, sl st), distributing the groups around the ring.
Fasten off. Leave a 10 cm tail.
Add a tiny contrasting knot to the center after the flower is sewn in position.
Floral Vine
Yarn: sage green.
Ch to the required length. For the long tapered sections visible near both ends of the runner, begin with approximately 35–50 chains.
Sl st back along the complete chain to make a firmer cord.
At irregular intervals, create short side branches by chaining 5–10 stitches, slip stitching back along each branch, then continuing along the main vine.
Fasten off with a 15 cm tail.
Small buds, filler flowers and leaves are sewn to these branches after the vine is attached to the runner.
Ivory Central Lace Foundation
Yarn: ivory crochet cotton.
The foundation is worked as a long oval so both ends remain rounded.
Foundation: Ch a length approximately 15–20 cm shorter than the desired finished runner.
R1: Dc in fourth ch from hook and dc across. Work 6 dc into the final chain. Continue down the unused side of the foundation chain. Work 5 dc into the starting end and join.
R2: Ch 3, dc around, increasing evenly around each curved end.
R3: Ch 4, skip 1 st, dc in next st. Repeat around to create an open mesh.
R4: Work dc into each dc and 2 dc into each ch-space.
R5: Repeat an open mesh round.
R6: Work a solid dc round while distributing increases around the two rounded ends.
Continue alternating solid and openwork rounds until the ivory center reaches the required width.
The fabric must remain flat. If either rounded end begins to cup, increase more frequently around that curve. If it ripples, reduce the number of increases.
Dusty Rose Inner Border
Yarn: dusty rose.
Join yarn anywhere along the outer edge of the blocked ivory foundation.
R1: Sc evenly around.
R2: Ch 3, skip 1 st, dc in next st; repeat around.
R3: Work 3 dc into each ch-space, placing additional groups around the curved ends when required.
R4: Sc around.
Fasten off.
Burgundy Fan Border
Yarn: burgundy.
Join yarn to the dusty rose border.
R1: Ch 1, sc around.
R2: *Skip 2 sts, 7 dc in next st, skip 2 sts, sc in next st.* Repeat around.
Adjust spacing by one stitch at the curved ends whenever necessary. Do not force an extra fan into a space that causes the runner to ripple.
Fasten off.
Dusty Rose Overlay Border
Yarn: dusty rose.
Join between two burgundy fans.
R1: Ch 5, sc into the center dc of the next burgundy fan. Repeat around.
R2: Work (sc, hdc, 3 dc, hdc, sc) into each ch-5 space.
Fasten off.
Ivory Scalloped Outer Edge
Yarn: ivory.
Join to the outside border.
R1: Sc evenly around.
R2: *Sl st in next st, skip 1 st, 5 dc in next st, skip 1 st.* Repeat around.
At the two rounded ends, check the border after every few scallops. Add or remove one skipped stitch when required to maintain a flat edge.
Fasten off and weave the tail through at least 4 cm of dense stitches.
Arranging the Roses
Do not sew the flowers down as soon as each one is completed. Finish the major roses first and arrange the entire composition on the blocked runner.
Place the largest burgundy rose slightly below the visual midpoint rather than exactly at the geometric center. Position one large blush or dusty-pink rose above it and another medium-to-large rose below or beside it.
Add pale peach and ivory roses between the darker flowers. Their lighter values separate neighboring burgundy and dusty-pink blooms.
Turn neighboring flowers in different directions. Although every rose has the same basic construction, changing its orientation prevents repeated petal seams from becoming obvious.
Finish both ends with narrowing floral vines containing leaves, small buds and filler flowers. This creates the tapered arrangement visible in the reference rather than ending the decoration abruptly with another full-size rose.
Assembly
- Block the complete ivory, dusty rose and burgundy runner foundation before attaching any dimensional component.
- Place the largest burgundy rose near the central focal area and pin it through its underside without flattening the outer petals.
- Position the remaining large roses around the focal bloom, leaving enough space for green leaves to remain visible between neighboring flowers.
- Add medium roses to bridge the larger flowers and reduce obvious empty sections along the centerline.
- Slide pairs of large sage leaves beneath the major roses. Allow approximately one-half to two-thirds of each leaf to remain visible.
- Position the floral vines above and below the main rose group. Curve them slightly rather than running them as rigid straight lines.
- Add small rosebuds along the vines, pointing some toward the center and others toward the ends of the runner.
- Fill small gaps with miniature ivory or pale-pink flowers. Do not cover the complete ivory lace center; sections of openwork should remain visible.
- Sew each large rose through several points on its underside. Anchor long leaves at the base and again approximately one-third of the way toward the tip.
- Turn the runner over, weave every tail through dense stitches, block only the flat foundation if required, and reshape the dimensional petals by hand.
The finished piece should remain flat at the lace foundation while the roses, buds and veined leaves project above the surface.
7 Technical Tips for Dimensional Crochet Roses
- Prevent a flat rose center. Roll the first two or three petals more tightly than the outer section. If the entire strip is rolled with equal tension, the finished rose develops a cylindrical profile instead of a recessed center.
- Control oversized outer petals. Increase petal height progressively rather than switching immediately from four to eight double crochets. A sudden size change creates an obvious ring around the flower.
- Stop large roses from rotating. Attach every major flower at three or more points across its underside. One central attachment allows a heavy dimensional rose to turn when the runner is moved.
- Keep the oval foundation flat. Inspect each rounded end after every border round. Cupping means more increases are required; visible waves mean too many increases were added.
- Pin leaves at two points. Secure long leaves at their base and approximately one-third of the distance toward the tip. This keeps the central vein aligned after the runner is handled.
- Protect the lace openings. Weave yarn tails through at least 4 cm of solid crochet rather than carrying them across mesh spaces. Burgundy tails are particularly visible behind an ivory foundation.
- Check border expansion before finishing. Lay the runner flat after every two border rounds. A difference of one extra fan or scallop at each curved end can be enough to produce permanent rippling.
Adjusting the Runner Length
Measure the usable flat section of the dining table before beginning the foundation chain. Decide whether the runner should stop inside the table ends or extend beyond them.
The central foundation chain controls most of the finished length. Increase it for a longer runner while keeping the same rounded-end construction.
Do not calculate the finished measurement from the foundation chain alone. Several border rounds add length at both curved ends, and the exact increase depends on yarn thickness, hook size and tension.
Make a gauge sample using the selected ivory yarn. Measure 20 foundation stitches after blocking, then use that measurement to estimate the chain required for the target length.
Choosing the Rose Colors
The photographed palette depends on value contrast rather than using several unrelated colors. Burgundy provides the darkest flowers, dusty rose creates the main mid-tone, and blush or pale peach supplies the lightest large blooms.
Keep the lace foundation ivory. Using pink for the entire center reduces the separation between the flowers and their background.
Sage green works as a quieter bridge between burgundy and blush. Use a darker sage for selected leaves beneath pale roses and a lighter sage around burgundy flowers.
For a more uniform version, make all large roses dusty pink and reserve burgundy for buds and the outer border. For stronger contrast, place one burgundy focal rose near the center and repeat the same color in smaller buds toward both ends.
Blocking the Lace Runner
Complete the full flat foundation and border before blocking. Measure the runner at several points so both long edges have the same width.
Pin the two rounded ends first. Next, establish a straight centerline and pin the long sides at regular intervals.
Do not stretch individual burgundy fans farther than their neighbors. Unequal scallop tension creates a visibly irregular perimeter even when the underlying ivory foundation is correctly shaped.
Allow the foundation to dry completely before removing the pins and beginning floral assembly.
Finishing the 3D Flowers
Shape each rose only after it has been sewn securely to the runner. Pull the smallest central petals inward and allow the middle layer to overlap them.
Outer petals should sit at different angles. Some can remain almost upright while others curve outward over the leaves.
Check the runner from directly above after every major flower is attached. This view exposes large gaps, repeated color blocks and leaves hidden too deeply beneath the roses.
Then inspect it from table height. A flower that appears correctly positioned from above may lean noticeably when viewed horizontally.
Care and Storage
Support the complete runner with both hands when moving it rather than lifting it by a rose or leaf. Dimensional flowers place more strain on their attachment stitches than flat crochet motifs.
For storage, roll the runner loosely around a clean fabric-covered tube with the flowers facing outward. Folding directly through the central roses can compress their outer petals and create permanent creases.
If the lace foundation requires reshaping later, block only the flat areas around the floral arrangement. Keep heavy pressure away from the raised roses and buds.
Conclusion
Make one large rose, one leaf and a small section of the lace border before committing to the complete runner. Those samples establish flower diameter, border expansion and the hook combination required for your yarn. Build the ivory foundation next, block it flat, then arrange every major flower before sewing. This sequence keeps the crochet rose table runner pattern balanced while allowing its burgundy, blush and dusty-pink roses to remain dimensional. Photograph the completed runner from above for Pinterest and share the finished floral arrangement on Instagram with #CrochetRoseTableRunner. Which focal flower should dominate your version: deep burgundy, dusty rose or pale blush? “`1









