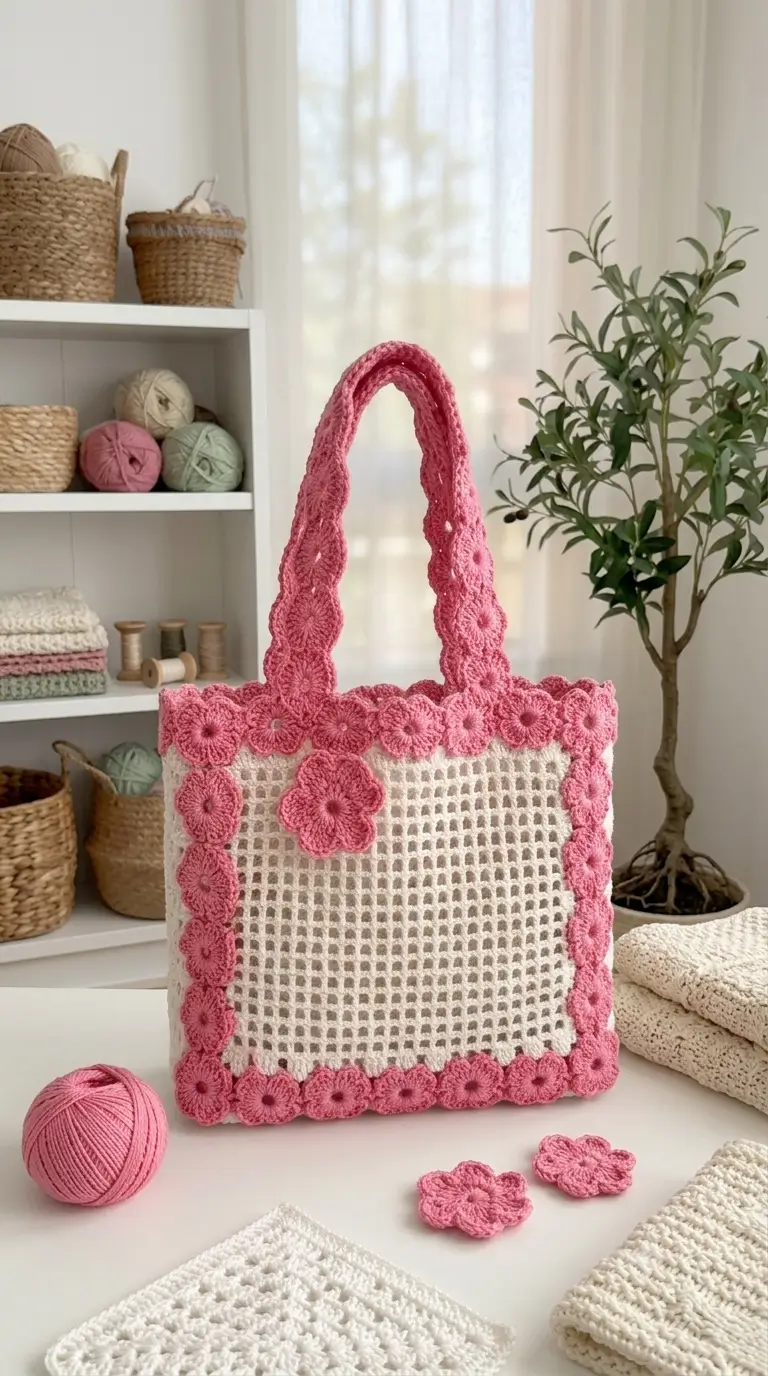
A flower border this dense changes how a mesh tote has to carry its weight. This crochet flower tote bag pattern combines a cream open-grid body, dusty-pink crochet flowers, a large front appliqué and two long decorated handles. Worked with medium-weight cotton yarn and a 4 mm hook, the finished bag measures approximately 32–34 cm wide and 33–35 cm high, excluding the handles. The open mesh keeps the structure light while the reinforced edges control stretching.
The Design: What Makes This Flower Tote Different
The central section uses an open square mesh rather than dense single crochet. This reduces yarn consumption and creates the regular cream grid visible across the front and back. A solid crochet border surrounds each panel because flowers sewn directly onto unsupported chain spaces can pull the mesh out of shape.
The second structural feature is the continuous pink flower frame. Instead of spacing a few appliqués across the surface, small flowers run along the sides, bottom and upper edge. The same floral treatment continues onto the handles. This makes the handles visually connected to the body while a separate foundation strip underneath carries the actual load.
One common problem with a crochet mesh tote bag is attaching handles directly to a few chain spaces. Those openings can stretch rapidly. Here, the handles are anchored across reinforced sections of the upper edge instead.
Project Info at a Glance
| Skill Level | Time | Finished Size | Hook | Best For |
|---|---|---|---|---|
| Intermediate | 8–12 hours | Approx. 32–34 × 33–35 cm | 4 mm | Project bag, light market tote, everyday carry |
Materials and Tools
Yarn
- Cream/off-white yarn — medium/worsted #4 cotton — approximately 200 g.
- Dusty rose pink yarn — medium/worsted #4 cotton — approximately 80–100 g.
Choose a cotton yarn with a firm twist. Very elastic fibres allow the mesh and handles to lengthen considerably after the bag is loaded.
Tools
- 4 mm crochet hook
- Tapestry needle
- Scissors
- Locking stitch markers
- Measuring tape
- Rust-resistant pins
- Optional fabric lining
Abbreviations
- MR — magic ring
- ch — chain
- sc — single crochet
- dc — double crochet
- inc — increase
- sl st — slip stitch
- sp — space
- st/sts — stitch/stitches
- BLO — back loop only
- rep — repeat
An invisible decrease is unnecessary in the main bag construction because the body consists of flat rectangular panels rather than shaped three-dimensional pieces.
Crochet Flower Tote Bag Pattern — Step by Step
The bag consists of two cream mesh panels, reinforced outer edges, a joined bottom and sides, approximately 26–32 small flowers, one large front flower and two reinforced shoulder handles. Check the dimensions while working because yarn thickness and individual tension can change the final measurements.
Front Mesh Panel
Yarn: cream/off-white.
Foundation: Ch 63.
Row 1: Dc in 6th ch from hook, *ch 2, skip 2 ch, dc in next ch* across. Turn.
Row 2: Ch 5, dc in next dc, *ch 2, dc in next dc* across. Turn.
Rows 3–30: Repeat Row 2.
Lay the panel flat without stretching it. The target is approximately 32–34 cm wide and about 33 cm high before the final decorative treatment. Add repeat rows when additional height is required or stop earlier if your row gauge is larger.
Do not fasten off yet.
Front Panel Reinforcement
Continue with cream yarn.
Border Round 1: Ch 1. Work sc evenly down the first side. A practical starting ratio is approximately 3 sc for every 2 dc row edges. Work 3 sc at the corner. Sc across the foundation edge, work 3 sc in the next corner, sc evenly up the opposite side, then work across the upper edge. Place 3 sc in each remaining corner. Join with sl st.
Border Round 2: Ch 1, sc in every st around. Work 3 sc in each corner st. Join with sl st.
Fasten off and weave in the end.
The border should lie flat. Rippling means too many stitches have been inserted along the sides; a border that pulls inward indicates too few.
Back Mesh Panel
Yarn: cream/off-white.
Repeat the complete instructions for the Front Mesh Panel and both reinforcement rounds.
Compare the two panels before assembly. Their width, height and perimeter should match. Block them to identical dimensions if one panel has contracted slightly during crochet.
Joining the Bag
Yarn: cream/off-white.
Place the front and back panels together with corresponding corners aligned. Insert locking stitch markers at both upper corners, both lower corners and several points along the sides.
Attach cream yarn at the upper-right corner.
Seam: Work sc through both layers down the first side. Place 2 sc at the lower corner, continue in sc across the bottom, place 2 sc at the second lower corner, then sc through both layers up the opposite side.
Fasten off.
Leave the entire upper edge open. For a bag intended to carry heavier objects, work a second line of slip stitches across the bottom seam only. Avoid tightening this second line or the base will contract.
Small Pink Border Flowers
Make approximately 26–32. Yarn: dusty rose pink.
The exact number depends on the finished size of each motif and the blocked dimensions of the bag. Crochet several flowers first, measure their diameter, then calculate how many are required to frame the front without large gaps.
R1: 6 sc in MR. Join with sl st. (6)
R2: Inc ×6. Join with sl st. (12)
Petal Round: *Sl st in next st, ch 2, 3 dc in next st, ch 2, sl st in next st*; repeat around to create six evenly distributed petal sections.
Fasten off. Leave approximately 20 cm of yarn for sewing each flower to the tote.
Do not attach each flower immediately after making it. Complete enough motifs to arrange an entire side first. This makes it possible to correct spacing before permanent assembly.
Large Front Flower
Make 1. Yarn: dusty rose pink.
R1: 6 sc in MR. Join. (6)
R2: Inc ×6. Join. (12)
R3: (Sc, inc) ×6. Join. (18)
The 18-stitch circle forms a firm center for the larger appliqué.
Petals: Distribute five large petals around the center. For each petal, work sl st into the starting point, ch 3, 2 dc, then work 4 dc through the central portion of the petal and 2 dc toward the opposite edge. Ch 3 and sl st back into the center.
Repeat until five broad petals have been formed.
Fasten off, leaving a 30 cm sewing tail.
Block the flower before attaching it. The finished motif should remain noticeably larger than the perimeter flowers. Position it in the upper portion of the front panel rather than exactly in the geometric center, following the asymmetrical placement visible in the design.
First Handle
Yarn: dusty rose pink.
Ch until the foundation measures approximately 55–60 cm without stretching.
Row 1: Sc in second ch from hook and in every ch across. Turn.
Row 2: Ch 1, sc in every st across. Turn.
Row 3: Ch 1, sc in every st across.
Fasten off, leaving approximately 25 cm for attachment.
The finished foundation should measure approximately 2–2.5 cm wide. It forms the structural core of the decorative handle.
Second Handle
Repeat the first handle exactly. Place both straps side by side before installation and check that their relaxed lengths match.
If one handle is longer by more than 5 mm, correct it before attaching the floral decorations. Unequal handles cause the upper edge of the tote to tilt when carried.
Flowers for the Handles
Yarn: dusty rose pink.
Use the same instructions given for the small border flowers. Make enough motifs to cover the visible outer surface of both handles.
Arrange the flowers with the petals touching or overlapping slightly. Sew every flower through the structural strap at its center and at two opposing points near the petal bases.
Do not rely on the flowers themselves to create the handle. The plain strip underneath carries the load; the flowers provide the decorative surface.
Attaching the Floral Border
Lay the bag flat with the front facing upward. Arrange the small flowers along the bottom edge first, then continue up both sides and across the top.
Use pins or locking stitch markers to hold every motif temporarily.
Check the corners carefully. A flower positioned directly at each corner can conceal the transition between horizontal and vertical borders and produce a cleaner frame.
Sew through the reinforced cream border rather than through isolated chain spaces. Secure each flower through its center and at least two petal bases.
The mesh should remain square after the flowers are attached. If the outermost openings become diamond-shaped, the floral border has been sewn too tightly.
Attaching the Large Front Flower
Place the large flower against the upper section of the front mesh panel.
Thread its long tail onto a tapestry needle. Sew around the center first, passing through stable dc posts where possible. Add small anchoring stitches behind each petal base.
Keep the outer portion of each petal free. Sewing completely around every petal produces a flat patch rather than the raised appliqué effect visible on the finished bag.
Attaching the Handles
Mark four attachment points across the upper edge. Position both handles symmetrically, keeping the opening between their ends consistent.
Each handle end should overlap the reinforced upper border by approximately 4–5 cm.
Sew a rectangle around each overlapping section. Add a diagonal line from one corner to the opposite corner, then sew the second diagonal. This boxed-X attachment distributes force across a wider section of crochet.
Repeat for all four handle ends.
Check that neither handle is twisted before completing the final attachment stitches.
Assembly
- Block the front and back mesh panels to matching dimensions.
- Align both panels and join the two sides and bottom with cream yarn.
- Turn and shape the bag, checking that both upper corners remain level.
- Arrange the small pink flowers around the front perimeter before sewing them down.
- Sew each border flower into the reinforced edge rather than unsupported mesh spaces.
- Position and attach the large five-petal flower to the upper portion of the front panel.
- Measure both handle foundations and correct any difference greater than approximately 5 mm.
- Sew the small decorative flowers along the outer surfaces of both handles.
- Attach each handle with 4–5 cm of overlap and reinforce every connection with a boxed-X seam.
- Weave yarn tails through dense stitches, trim them, then block the completed bag without stretching the mesh.
The completed tote should have a square open-grid body, a continuous pink floral frame and two structurally reinforced decorative handles.
7 Technical Tips for a Cleaner Crochet Flower Tote
- Mark the corners before joining. A one-row offset between the front and back panels creates a twisted side seam. Place a locking marker through both layers at every corner before starting the seam.
- Check the mesh every five rows. Accidentally skipping one dc creates a missing vertical grid line that becomes much harder to correct later. Count the vertical posts rather than judging the panel only by its width.
- Keep the border flat. Rippling along a reinforced edge indicates excess stitches, while inward curling indicates too few. Correct the border before attaching any flowers because appliqués will make the distortion harder to repair.
- Limit flower overlap. Keep overlapping petals to approximately 3–5 mm along the perimeter. Greater overlap adds unnecessary bulk and can shorten the usable width of the bag opening.
- Reinforce each handle over 4–5 cm. Attaching a strap at only one row concentrates the load and can distort the upper mesh. A longer overlap spreads tension through the solid border.
- Measure both handles without stretching them. A difference greater than about 5 mm can make the bag hang unevenly. Cotton straps can lengthen in use, so pulling them during measurement produces a misleading result.
- Weave tails through solid crochet. A yarn tail passed only through open chain spaces can work loose because there is little friction around it. Change direction at least once while weaving through the flower centers, seams or reinforced border.
Optional Fabric Lining
The open mesh is a defining part of this crochet flower bag, but small objects can pass through the grid. A fabric lining changes the bag from a light project tote into a more practical everyday carrier.
Cut two fabric rectangles slightly larger than the internal dimensions of the finished crochet body. Add seam allowance, sew the sides and bottom, then press the upper raw edge toward the wrong side.
Insert the lining into the crochet shell with wrong sides together. Hand-sew its upper edge to the dense cream border. Keep the needle out of the decorative pink flowers so the lining can later be removed or replaced without dismantling the appliqués.
A lining should match the finished crochet dimensions rather than the unblocked panel measurements. If it is significantly smaller, it will carry all of the load; if it is too large, fabric will bunch behind the open grid.
Adjusting the Bag Size
The mesh construction makes width and height adjustments practical. To increase width, add complete mesh repeats to the foundation chain while preserving the same skip-two structure. To increase height, repeat Row 2 until the required measurement is reached.
Changing the body dimensions also changes the number of flowers required. Do not calculate the floral border from the original motif count alone. Make one flower, block it, measure its usable width and divide the finished perimeter sections by that measurement.
Handle length can also be modified. A short hand-held tote may use approximately 35–40 cm handles, while a shoulder version generally needs more length. Test a paper strip or measuring tape over the shoulder before committing yarn to the final strap dimensions.
Controlling Stretch in the Mesh
Open crochet behaves differently from a dense tote body. Chain spaces can expand under weight even when the yarn itself has little elasticity. The problem becomes more visible near the upper corners because that is where the handles transfer force into the body.
Three structural elements counter that movement in this pattern: the solid perimeter rounds, the foundation strips inside the floral handles and the 4–5 cm handle overlaps.
For heavier use, add a narrow cotton webbing strip behind each crochet handle or install a full fabric lining with reinforced attachment points. Do not depend on decorative flower petals to carry weight.
Flower Placement and Finishing
Complete all the small flowers before final placement whenever possible. Lay the pink crochet tote flat and arrange the motifs without sewing. Begin at the four corners, fill the bottom, then work upward along both sides. Finish with the upper row.
This sequence prevents a common spacing problem: reaching the last corner with a gap too small for a complete flower but too large to leave empty.
The large front appliqué should remain separate from the perimeter border. Leave visible cream mesh around it so its five-petal outline remains readable.
After assembly, damp-block the bag rather than stretching it aggressively. Square the mesh openings by hand, align the side seams and arrange the flower petals while the work dries flat.
Conclusion
This crochet flower tote bag pattern depends on structure as much as decoration: square mesh forms the lightweight body, dense edging supports the perimeter, foundation strips carry the handles, and pink flowers create the visible frame. Before making all the appliqués, crochet one mesh panel and one test flower, block both, and confirm their dimensions. Save the finished version to Pinterest or share it on Instagram with #FlowerMeshTote. When changing the design, decide where the large front flower should sit before attaching the border motifs. Would you keep that single oversized five-petal flower, or replace it with a cluster of the smaller border flowers?









