Introduction
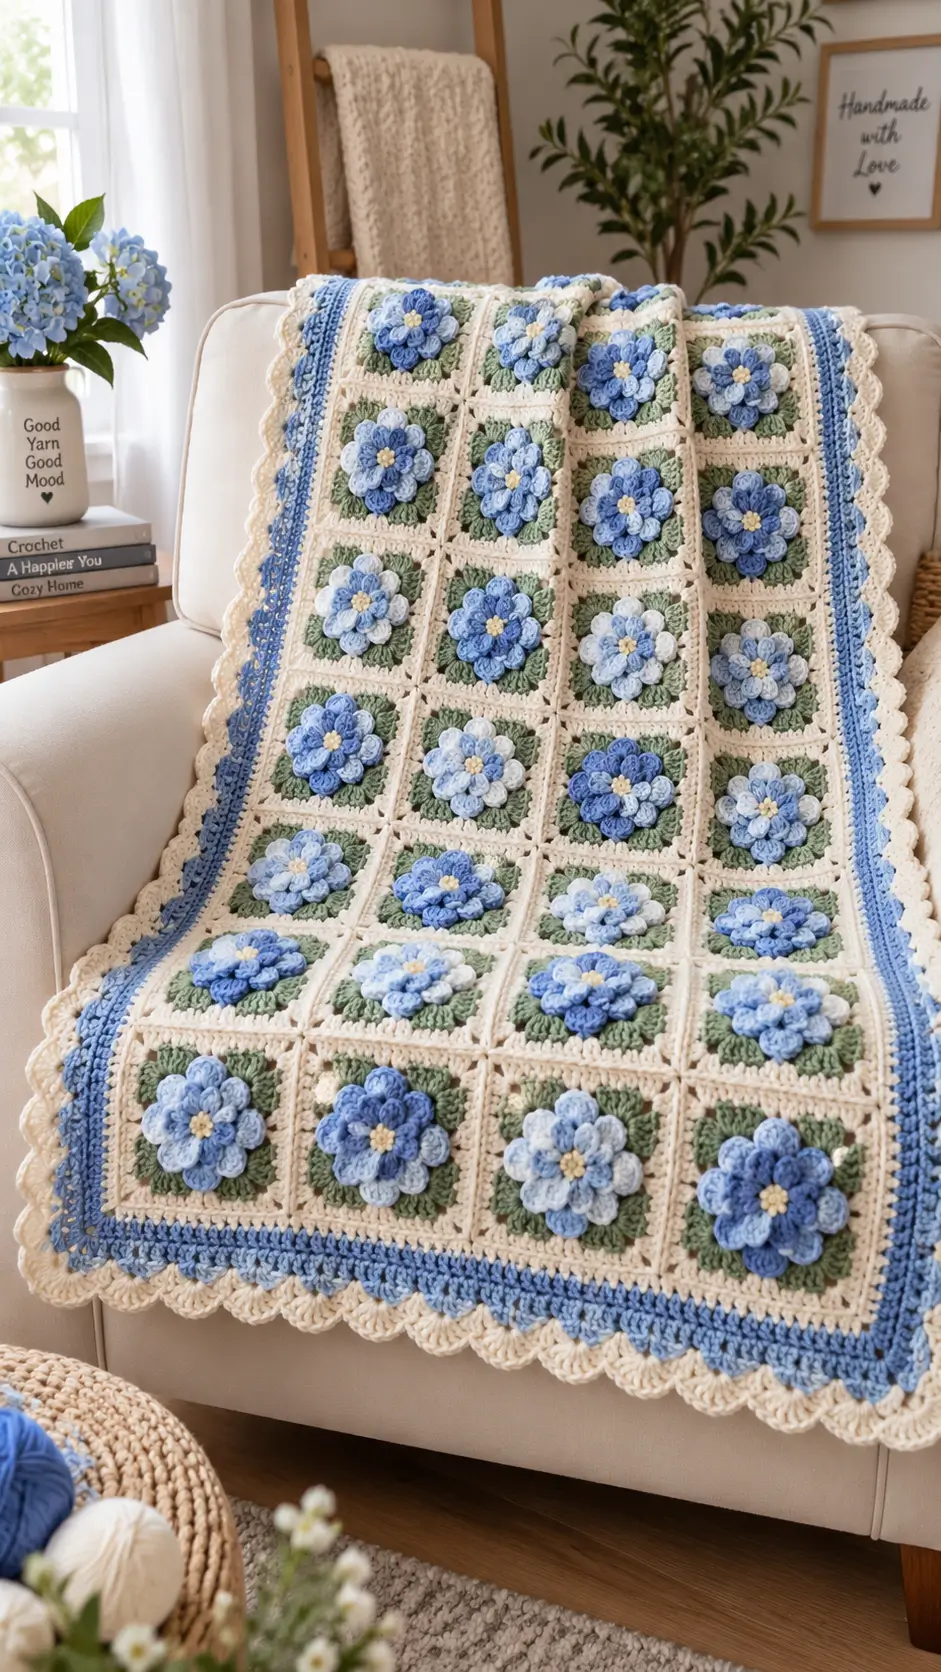
A flat blue flower cannot produce the stacked petal profile visible across this blanket. This 3D flower granny square blanket instead builds each blossom in raised layers before surrounding it with sage green and cream. Use DK yarn with a 4 mm hook. The finished throw is an intermediate modular project whose repeated squares make individual motifs easier to construct, block, join, and replace when necessary.
The Design: What Makes This Flower Blanket Different
The flower sits above its square rather than being represented only by color changes. Two petal levels create the depth visible in the reference design, while a small yellow center prevents the blue layers from merging visually.
A sage section behind the petals performs a second job: it separates each blossom from the cream framing and introduces the leaf color without requiring separately sewn leaves. The cream outer round then gives every motif the same joining color, which makes small tension differences less conspicuous after assembly.
The most common error in a layered flower granny square is allowing the petal rounds to dictate the square’s final geometry. They should remain decorative. The structural green and cream rounds control the corners.
That distinction matters across a full crochet flower granny square blanket, where a 3 mm discrepancy repeated across five squares becomes visible.
Project Info at a Glance
| Skill Level | Time | Finished Size | Hook | Best For |
|---|---|---|---|---|
| Intermediate | Multi-session | Adjustable throw size | 4.0 mm | Throw, chair blanket, decorative bed layer |
Finished dimensions remain adjustable because motif count, individual gauge, yarn choice, and border width determine the final blanket size.
Materials and Tools
Yarn
Use one DK yarn line for all colors where possible. Keeping the fiber content and yarn construction consistent makes the individual squares easier to block to identical measurements.
- Warm cream — DK — largest quantity — smooth acrylic, wool/acrylic, cotton, or cotton-blend DK.
- Sage green — DK — background quantity — preferably the same yarn line as the cream.
- Medium blue — DK — flower and border quantity.
- Pale blue — DK — flower quantity.
- Pale yellow — DK — small quantity for flower centers.
For a photo-matched palette, distribute medium and pale blue differently from square to square. Some flowers can have dark outer petals and pale inner petals; reverse that sequence on neighboring blocks.
Tools
- 4.0 mm crochet hook
- Yarn needle
- Sharp scissors
- Locking stitch markers
- Blocking mats
- Rust-resistant blocking pins
- Tape measure
- Digital kitchen scale — optional for calculating yarn consumption
Abbreviations
- MR — magic ring
- sc — single crochet
- hdc — half double crochet
- dc — double crochet
- tr — treble crochet
- sl st — slip stitch
- ch — chain
- sp — space
- BLO — back loop only
- FLO — front loop only
- RS — right side
Invisible decrease is not required because this blanket is constructed from flat structural rounds with raised decorative petals rather than closed stuffed forms.
3D Flower Granny Square Blanket Pattern
The reference blanket appears to contain approximately 35 motifs arranged five squares across and seven squares long. Treat this as a visual reconstruction rather than an exact measurement of the original blanket.
Make one complete test square first. Block it, measure it, and calculate the final blanket dimensions before producing the remaining motifs.
Yellow Flower Center — Make 35
Yarn: pale yellow.
R1: 6 sc in MR (6).
R2: inc ×6 (12).
Join with sl st.
Fasten off, leaving approximately a 10 cm tail. Pull the magic ring completely closed before weaving the beginning tail through several stitches on the wrong side.
Inner Petal Layer — Make 35 Sets
Yarn: pale blue or medium blue.
Join the first flower color in any stitch of R2.
R3: *sl st in next st, ch 3, 2 dc in same st, ch 3, sl st in same st*; repeat around to form 6 small petals.
Do not stretch the chains while working. Each petal should curve slightly upward instead of being forced completely flat.
Fasten off. Leave approximately a 10 cm tail.
Rear Petal Anchors
Yarn: color selected for the outer petal layer.
Turn the flower so the spaces behind R3 can be reached without piercing the visible face of the petals.
R4: Attach behind the first petal. *Ch 4, anchor with sl st behind next petal* around to create 6 ch-4 spaces.
Join with sl st.
The anchor chains must remain behind the first petals. If they are visible from the front, move the insertion point closer to the base of each petal.
Outer Petal Layer
Yarn: alternate blue shade.
R5: In each ch-4 space work *(sl st, ch 2, 2 dc, 2 tr, 2 dc, ch 2, sl st)*. Repeat around for 6 large petals.
The taller treble stitches create the raised outer portion of the flower.
Fasten off. Leave approximately a 12 cm tail.
For stronger color variation, use pale blue inside and medium blue outside on approximately half the motifs. Reverse the sequence on selected neighboring motifs.
Sage Foundation Round
Yarn: sage green.
The circular flower now needs to transition into the structural portion of the square. Work behind the petal layers rather than through their decorative outer edges.
R6: Attach sage behind an outer petal. Ch 3, then distribute 24 dc evenly around the rear flower base (24).
Join with sl st.
Turning the Flower into a Square
Yarn: sage green.
R7: Position four evenly spaced corner points around the motif. Work dc stitches between the corners and *(2 dc, ch 2, 2 dc)* into each designated corner stitch or space.
Join with sl st.
Check the motif before continuing. Four distinct corners should now be visible while the blue petals remain free above the sage foundation.
Sage Square Expansion
Yarn: sage green.
R8: Ch 3. Dc across to the first corner space. Work *(2 dc, ch 2, 2 dc)* in the corner space. Dc across the next side.
Repeat the same sequence around all four sides, placing *(2 dc, ch 2, 2 dc)* into every corner space.
Join with sl st.
All four sides should contain matching stitch counts. Count each side before fastening off. Correcting one motif at this stage is considerably easier than correcting an assembled row.
Fasten off.
Cream Frame — Work on Every Square
Yarn: warm cream.
R9: Join cream in any corner. Ch 3, dc in the same corner, ch 2, 2 dc in the same corner. Dc once in every stitch across the side.
At each following corner work *(2 dc, ch 2, 2 dc)*.
Join with sl st.
R10: Ch 1, sc in each dc across. Work *(sc, ch 2, sc)* in each corner space.
Join with sl st.
Fasten off. Leave approximately a 15 cm tail.
Block and measure the completed test square now. Use that measurement as the target for every remaining motif rather than relying on an assumed granny-square size.
Optional Raised Leaf Corners — Make Four per Motif
Yarn: sage green.
Small surface leaves can be added if stronger botanical definition is required.
Attach green at the flower base.
Leaf: ch 5. Starting in the second ch from hook, sc, hdc, dc, hdc. Sl st back into the flower base.
Repeat at four diagonal positions.
Fasten off after each pair or carry the yarn discreetly behind the flower where it cannot be seen from the front.
Joining the Granny Squares
Yarn: warm cream.
Block every square to the same dimensions before beginning assembly.
Arrange the motifs in approximately five columns and seven rows. Rotate the pale-blue and medium-blue flower combinations so matching color sequences do not accidentally create a stripe through the blanket.
Place two squares with wrong sides together.
Join cream at one corner and work sl st through corresponding outer loops along both square edges. Fasten off at the opposite corner.
Join the individual squares into complete horizontal rows first. Join those rows together afterward.
A whip-stitch seam through corresponding outer loops can be substituted when a flatter join is preferred. Do not switch between joining methods after assembly has started because the seams can have different widths.
Cream Preparation Border
Yarn: warm cream.
With RS facing, attach cream at any outer blanket corner.
Border R1: Ch 1, sc evenly around the entire blanket. At each blanket corner work *(sc, ch 2, sc)*.
Across the raw motif edges, place approximately one sc per available stitch. At joined intersections, avoid adding an extra stitch simply because several seams meet at one point.
Join with sl st.
Border R2: Ch 3, dc in each sc around. Work *(2 dc, ch 2, 2 dc)* in each corner.
Join with sl st.
Fasten off.
Blue Border
Yarn: medium blue.
Border R3: Attach blue in a corner. Ch 1, sc in every stitch around. Work *(sc, ch 2, sc)* in each corner.
Join with sl st.
Border R4: Ch 3, dc in each stitch around. Work *(2 dc, ch 2, 2 dc)* at each corner.
Join with sl st.
Border R5: Ch 1, *sc in next 3 sts, ch 1, skip 1 st*. Repeat around. Adjust the repeat by one stitch near a corner when required to maintain an even edge.
Work *(sc, ch 2, sc)* in each corner.
Join with sl st.
Border R6: Ch 3, dc in every sc and ch-1 space around. Work *(2 dc, ch 2, 2 dc)* at each corner.
Join with sl st.
Fasten off.
The blue section should be wide enough to read as a separate frame around the cream and green motifs. One narrow blue round will produce a substantially different appearance.
Cream Scalloped Edge
Yarn: warm cream.
Attach cream to any suitable stitch after a corner.
Border R7: Ch 1, sc evenly around. Work 3 sc in each corner space.
Join with sl st.
Border R8: *Skip 2 sts, 6 dc in next st, skip 2 sts, sl st in next st.* Repeat around to create the cream scallops.
At each corner, position one complete shell as close to the center of the corner as the stitch count permits. Distribute small spacing corrections over several repeats rather than concentrating extra stitches into a single shell.
Fasten off.
Weave the final tail through the cream stitches on the wrong side.
Assembly
- Make one complete test motif, block it, and record its finished width and height.
- Crochet approximately 35 yellow flower centers using consistent tension.
- Add the inner and outer petal layers, rotating pale blue and medium blue between motifs.
- Work the sage foundations and check that every motif develops four matching corners.
- Add the cream frame to every square and block all motifs to one target measurement.
- Arrange approximately five squares across and seven down. Photograph the arrangement before moving the pieces.
- Join individual squares into horizontal rows using cream yarn.
- Join the completed rows while keeping the cream intersection seams aligned.
- Crochet the cream preparation rounds, blue border, and final cream scalloped edging.
- Weave tails through stitches of matching color and block the entire blanket so the outer corners and edges sit square.
The completed blanket consists of raised blue floral motifs surrounded by sage backgrounds, cream joining lines, a substantial blue frame, and cream scalloped edging.
7 Technical Tips for Cleaner Flower Granny Squares
- Control square-size drift. Measure every fifth motif against the blocked test square. A 3 mm difference per square becomes 15 mm across a five-square row.
- Close the flower center completely. A partially closed magic ring can widen after washing and expose a hole behind the yellow center. Thread the beginning tail around the center once more before weaving it into the wrong side.
- Keep the petals free. Joining through a blue petal instead of the rear foundation traps the raised layer against the green square. All structural stitches should be anchored behind the decorative petals.
- Control outer-petal height. Too many tall stitches produce petals that lean or twist. Keep the same two treble stitches at the peak of every large petal.
- Avoid wavy joins. Extra stitches at square intersections introduce surplus fabric into the cream grid. Match corresponding stitches and do not treat every seam intersection as an increase point.
- Check the border before adding scallops. Excess perimeter stitches make the blue border flare. Lay the blanket flat after the first blue round and correct visible rippling before continuing.
- Hide tails inside matching colors. A medium-blue tail woven through cream stitches can remain visible. Weave each tail through at least 4–5 cm of its own color, reverse direction once, and trim after blocking.
Finishing the Blanket
The blocked motif is the measurement that controls this project, not an assumed granny-square width. Make one complete square with DK yarn and a 4 mm hook, record its dimensions, then multiply that measurement by the planned five-by-seven arrangement while allowing additional width and length for the outer borders.
After joining, lay the blanket flat and inspect the cream grid before beginning the border. Correct twisted seams or inconsistent intersections at this stage. Add the cream preparation rounds, build the blue frame, and finish with the cream scalloped edge.
For the next version of this 3D flower granny square blanket, test the blue placement before making the full batch. Photograph one motif with pale-blue outer petals and another with medium-blue outer petals, then select the version with the clearest contrast against the sage background.
Share the finished blanket on Pinterest and Instagram with #Blue3DFlowerBlanket. Which arrangement works better for this specific flower design: dark-blue outer petals with pale centers, or pale outer petals with dark-blue centers?









