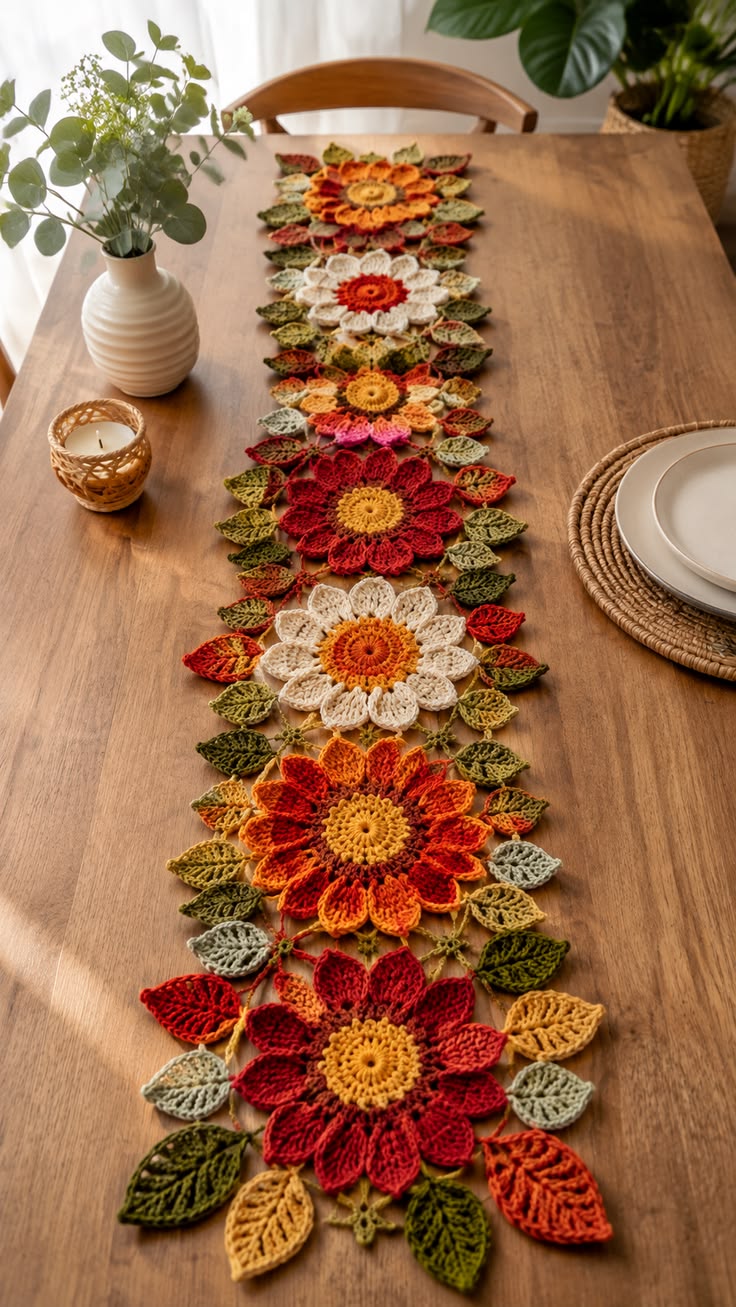
Seven oversized flowers turn this runner into a chain of botanical motifs rather than a conventional strip of crochet fabric. This crochet flower table runner combines burgundy, rust, orange, mustard and cream flowers with individually crocheted leaves and connecting stems. DK cotton with a 3.5 mm hook is a practical starting combination. The modular construction also makes the finished length easy to change before final assembly.
The Design: What Makes This Floral Runner Different
The photographed runner has almost no conventional background fabric. Instead, the flowers, leaves and narrow connecting stems form the structure. That distinction affects construction because every connection between motifs contributes to the stability of the finished piece.
Large flowers create the central line. Their petals alternate between rounded and pointed profiles, preventing the crochet floral table runner from looking like a sequence of identical motifs. Smaller leaves occupy the spaces along both sides and provide much of the runner’s width.
Color distribution is equally important. Burgundy and orange dominate, while cream flowers interrupt the darker sequence. Olive, sage, mustard and rust leaves repeat those colors without following a strict pattern. A common mistake is joining the flowers first and adding leaves afterward without planning their positions. That can produce uneven gaps and a runner that bends to one side.
Project Info at a Glance
| Skill Level | Construction | Suggested Hook | Suggested Yarn | Finished Size |
|---|---|---|---|---|
| Intermediate | Separate motifs joined with stems | 3.5 mm | DK cotton or cotton blend | Adjustable |
The photographed piece is long enough to run through the center of a dining table. Exact measurements cannot be calculated reliably from the photograph, so this pattern uses modular sizing rather than claiming a fixed dimension.
A useful reference measurement for planning is approximately 20 cm across for a large DK crochet flower. Make one flower with the chosen yarn and hook, block it, and use its actual diameter to calculate the final runner length.
Materials and Tools
Yarn
Use the same yarn family for the flowers and leaves so the motifs maintain similar thickness and drape.
- Burgundy — DK cotton — approximately 50–70 g
- Burnt orange — DK cotton — approximately 40–60 g
- Rust red — DK cotton — approximately 30–50 g
- Mustard yellow — DK cotton — approximately 30–50 g
- Cream — DK cotton — approximately 30–50 g
- Olive green — DK cotton — approximately 40–60 g
- Sage green — DK cotton — approximately 20–40 g
- Muted green — DK cotton — approximately 20–40 g
The quantities above are estimates for a photo-inspired runner. Yarn consumption changes with the number of flowers, leaf density, yarn construction and individual tension.
Tools
- 3.5 mm crochet hook
- Yarn needle
- Stitch markers
- Sharp scissors
- Blocking mats
- Rust-resistant pins
- Measuring tape
Abbreviations
- MR — magic ring
- ch — chain
- sc — single crochet
- hdc — half double crochet
- dc — double crochet
- tr — treble crochet
- sl st — slip stitch
- st/sts — stitch/stitches
- sp — space
- rep — repeat
- FO — fasten off
Crochet Autumn Flower Table Runner Pattern
This is an original photo-inspired construction. It is not a transcription of a published commercial pattern. Make and block one complete flower and one leaf before producing the full set.
Large 12-Petal Flower
Make 4–5 in burgundy, rust, orange and mixed autumn colors.
Round 1: With mustard or contrasting center yarn, make 6 sc in MR. (6)
Round 2: Inc in each stitch around. (12)
Round 3: (1 sc, inc) ×6. (18)
Round 4: (2 sc, inc) ×6. (24)
Round 5: (3 sc, inc) ×6. (30)
Join the petal color.
Round 6: Ch 1, sc in same st, ch 5, skip 1 st, sc in next st. Continue around to create evenly distributed petal foundations.
The exact final spacing can be adjusted so the round contains 12 petal loops.
Round 7: Into each ch-5 loop work:
sc, hdc, 3 dc, tr, 3 dc, hdc, sc
Repeat in every loop.
Round 8: Sl st toward the back of the first petal. Ch 6 and anchor behind the neighboring petal with sc. Repeat around if a second petal layer is required.
Round 9: Work into each ch-6 loop:
sc, hdc, 2 dc, 3 tr, 2 dc, hdc, sc
Fasten off and weave in the ends.
The second layer should remain visible between the front petals. Do not pull the back loops tightly enough to make the flower cup.
Large Pointed-Petal Flower
Make 2–3 using burgundy, red and orange combinations.
Round 1: 6 sc in MR. (6)
Round 2: Inc ×6. (12)
Round 3: (1 sc, inc) ×6. (18)
Round 4: (2 sc, inc) ×6. (24)
Round 5: (3 sc, inc) ×6. (30)
Change to the petal color.
Create 10–12 evenly spaced chain loops around the center.
Into each loop work:
sc, hdc, dc, tr, ch 2, sl st in second ch from hook, tr, dc, hdc, sc
The ch-2 point forms the sharper tip seen on several flowers in the photographed runner.
Repeat for every petal.
Fasten off.
Cream Daisy-Style Flower
Make 2.
Use burnt orange or rust for the center and cream for the petals.
Round 1: 6 sc in MR. (6)
Round 2: Inc ×6. (12)
Round 3: (1 sc, inc) ×6. (18)
Round 4: (2 sc, inc) ×6. (24)
Round 5: (3 sc, inc) ×6. (30)
Change to cream.
Petal foundation: Work evenly spaced ch-6 loops around the flower center.
Into each loop work:
sc, hdc, 4 dc, tr, 4 dc, hdc, sc
Repeat around until the center is surrounded by approximately 10–12 full petals.
Fasten off.
The cream flowers serve as visual breaks between the darker autumn motifs, so avoid adding additional dark edging to every cream petal.
Two-Tone Orange Flower
Make 1–2.
Begin with mustard.
Round 1: 6 sc in MR. (6)
Round 2: Inc ×6. (12)
Round 3: (1 sc, inc) ×6. (18)
Round 4: (2 sc, inc) ×6. (24)
Round 5: (3 sc, inc) ×6. (30)
Change to burnt orange.
Build 12 evenly distributed petal loops.
Work each petal with:
sc, hdc, 3 dc, tr, 3 dc, hdc, sc
On alternating petals, change to rust or red for the final stitches or outer edging.
Fasten off.
Large Crochet Leaf
Make approximately 24–30 in mixed autumn colors.
Leaves are essential structural components in this design rather than small decorative additions.
Foundation: Ch 12.
Beginning in the second chain from the hook, work:
sc, hdc, dc, dc, tr, tr, dc, dc, hdc, sc
Work 3 sc into the final chain to turn around the tip.
Continue down the opposite side of the foundation chain:
sc, hdc, dc, dc, tr, tr, dc, dc, hdc, sc
Join with sl st.
Edging round: Sc around the leaf. At the tip work:
sc, ch 2, sl st in second ch from hook, sc
This produces a defined pointed end.
Fasten off, leaving approximately 20 cm for assembly.
Openwork Veined Leaf
Make approximately 12–20.
Ch 11.
Sl st in second chain from hook, then work sc, hdc, dc, tr, tr, dc, hdc and sc along the foundation.
At the tip, ch 3 and sl st back into the tip stitch.
Work down the opposite side while introducing ch-1 spaces between selected tall stitches.
Those spaces create the open veining visible through the leaf.
Finish with sl st at the base.
Leave a long tail for joining.
Small Autumn Leaf
Make 10–16.
Foundation: Ch 8.
Starting in the second chain:
sc, hdc, dc, tr, dc, hdc, sc
Work 3 sc at the tip.
Repeat the stitch sequence in reverse down the opposite side.
Fasten off.
Use these smaller leaves near narrow gaps where two large leaves would overlap.
Connecting Stem
Use olive, mustard, rust or another color already present in the surrounding motifs.
Ch the required distance between two motifs.
For a stronger cord, sl st back through every chain.
For a slightly thicker connection, work one sc into each chain instead.
Fasten off with a sewing tail at both ends.
Most connectors should remain short. Long unsupported chains can stretch and allow the runner to distort during handling.
Small Joining Ring
Some spaces between flowers and leaves need a small junction rather than another large motif.
Round 1: 6 sc in MR. (6)
Round 2: (sc, ch 3, sc in same st) ×6.
Fasten off.
These small junction motifs can connect three or four stems while adding very little bulk.
Planning the Flower Layout
Do not begin permanent assembly until every large flower is finished.
Place the flowers in a single line down the center of a table or blocking surface. Leave approximately 2–5 cm between neighboring motifs, depending on their diameter.
The reference image alternates flower colors rather than repeating a fixed sequence. A practical arrangement is:
- Burgundy flower with mustard center
- Orange and red flower
- Cream flower with orange center
- Dark red flower with mustard center
- Orange or multicolor flower
- Cream flower with rust center
- Orange flower with mustard center
For a longer runner, continue the sequence while changing the precise petal colors.
Place large leaves diagonally beside the gaps between flowers. Add smaller leaves closer to the central stems.
Creating the Autumn Color Distribution
The runner should contain repetition without becoming symmetrical.
Use dark olive beside burgundy flowers, then place sage or muted green near cream motifs. Mustard leaves can sit beside orange flowers, but avoid placing every matching color immediately beside itself.
Rust and red leaves can be inserted periodically among the greens. This creates the autumn effect without removing the botanical contrast supplied by olive and sage.
Before joining, photograph the entire arrangement from directly above. The photograph makes clusters of repeated colors easier to identify than viewing the runner at table height.
Assembly
- Block every large flower individually and allow all motifs to dry completely.
- Arrange the flowers in one central line with approximately 2–5 cm between neighboring motifs.
- Position large leaves along both sides, alternating their angles toward and away from the center line.
- Add small and openwork leaves to fill excessive gaps without creating a continuous solid edge.
- Join neighboring flowers with short crocheted stems, attaching each stem securely to the reverse of the flower center or petal base.
- Attach the largest leaves near flower-to-flower junctions so they support the outer width of the runner.
- Add smaller leaves and joining rings between the main structural connections.
- Turn the runner over and reinforce weak junctions with matching yarn, keeping those stitches hidden on the reverse.
- Lay the complete runner flat and correct any section that curves away from the central axis.
- Wet-block the assembled runner to its final length and width, pinning flowers and individual leaf tips before drying.
The finished structure should form a continuous floral chain while retaining open areas of visible tabletop between the stems and leaves.
How to Adjust the Runner Length
The easiest sizing method is to change the number of large flowers.
A short console-table version can use three or four main flowers. Five flowers produce a medium centerpiece, while seven or more create the long dining-table proportions shown in the reference image.
Measure one blocked flower before deciding how many to make. If a motif measures 18 cm across and the gap between flowers averages 3 cm, seven flowers will occupy roughly 144 cm before accounting for leaf tips extending beyond the first and last motifs.
That calculation is only a planning measurement. Final dimensions depend on flower diameter, connecting distance and the orientation of the end leaves.
How to Make the Pointed Crochet Leaves
The shape of the leaves contributes heavily to this pattern because there is no solid background.
Begin each leaf with a foundation chain that acts as the central vein. Short stitches belong near the base, taller stitches occupy the widest middle section, and the stitch height then decreases toward the tip.
Working along both sides of the same foundation chain creates a symmetrical leaf without sewing two halves together.
For a sharper point, add a small chain picot at the end. For a rounder autumn leaf, replace that point with three single crochet stitches.
Mixing both shapes makes the foliage look less mechanically repeated.
Joining Flowers Without a Fabric Background
This runner depends on its connections. Treat every stem as part of the construction rather than surface decoration.
Attach connecting cords close to the base of the petals instead of their outer tips. Petal tips move easily and can stretch under the weight of neighboring motifs.
Where three elements meet, reinforce the junction with several sewing passes or a small joining ring.
Do not connect every leaf to only one narrow chain. A large outer leaf is more stable when its base attaches near a flower and another point connects to an adjacent stem.
Test the structure by lifting the runner gently from several different sections before blocking. Any junction that opens noticeably should be reinforced.
7 Technical Tips
- Mark the first stitch of every flower-center round. Accidentally adding or losing one increase can shift the petal spacing and make one side of the flower visibly wider.
- Block large flowers to the same diameter. Keep equivalent motifs within approximately 5–10 mm of one another before assembly so the central line does not change width unpredictably.
- Do not attach stems to petal tips. The narrow end of a petal can stretch or twist when it carries the weight of the next flower.
- Keep most flower gaps between 2 and 5 cm. Excessively long connections create unsupported sections that can sag when the runner is lifted.
- Pin every leaf before sewing. Moving a large leaf by only 2 cm can change the apparent width of one side enough to make the runner look off-center.
- Check color repetition from above. Three burgundy or orange motifs clustered on the same side create an unintended dark patch even when each individual motif looks balanced.
- Weave joining tails through at least 4–5 cm of dense stitches. Openwork leaves have fewer stitches to trap a short tail, increasing the risk that an attachment point loosens during washing.
Blocking the Finished Table Runner
Blocking establishes the final shape because the design has no continuous background fabric to hold the motifs in alignment.
Place the wet runner on blocking mats and establish the central flower line first. Run a measuring tape from the center of the first flower to the center of the last. The flower centers should follow one straight axis.
Next, arrange the leaves along both sides. Do not force them into identical positions. Instead, maintain approximately equal overall width while allowing individual leaves to point at different angles.
Pin pointed leaf tips separately. Shape each large flower so the petals remain open and clearly separated.
Check the connecting stems last. They should be extended enough to remove twists but should not be pulled under heavy tension.
Allow the entire runner to dry completely before removing any pins.
Estimating Yarn for a Longer Runner
Make one representative large flower, two large leaves, two small leaves and the connecting stems required for one section. Weigh those components together on a digital kitchen scale.
Multiply that weight by the planned number of floral sections. Add approximately 10–15 percent for color variation, joining, tails and tension differences.
This method is more accurate than estimating yarn from the photograph because yarn weight, hook size and motif diameter substantially change consumption.
When using leftover yarn, weigh every color before starting. Reserve enough of the dominant burgundy, orange and green shades to repeat them along the full length rather than exhausting one color halfway through assembly.
Finishing the Crochet Flower Table Runner
Inspect the reverse before the final blocking. Remove loose fibers and reinforce any joining point where a flower can rotate independently from the central line.
The leaves should remain relatively flat. Flowers can retain more relief, particularly around the petal edges, but their centers need to sit securely against the table.
No separate border is required. The alternating leaf tips already form an irregular botanical edge, which is one of the defining structural features of this design.
For washing, follow the care requirements of the chosen yarn. Reshape the runner while damp rather than allowing the flowers and stems to dry in a folded position.
Conclusion
The defining feature of this crochet flower table runner is its absence of a conventional background: flowers, leaves and connecting stems become the fabric itself. Complete and block every large flower before deciding the final length, then arrange all foliage before making permanent joins. That sequence gives direct control over width, color distribution and the spacing between motifs. Save the pattern to Pinterest and share the completed autumn version on Instagram with #AutumnFlowerTableRunner. Before sewing the leaves permanently, take one overhead photograph and check the silhouette. For this specific runner, would you keep both cream flowers or replace one with another deep burgundy bloom?









