Introduction
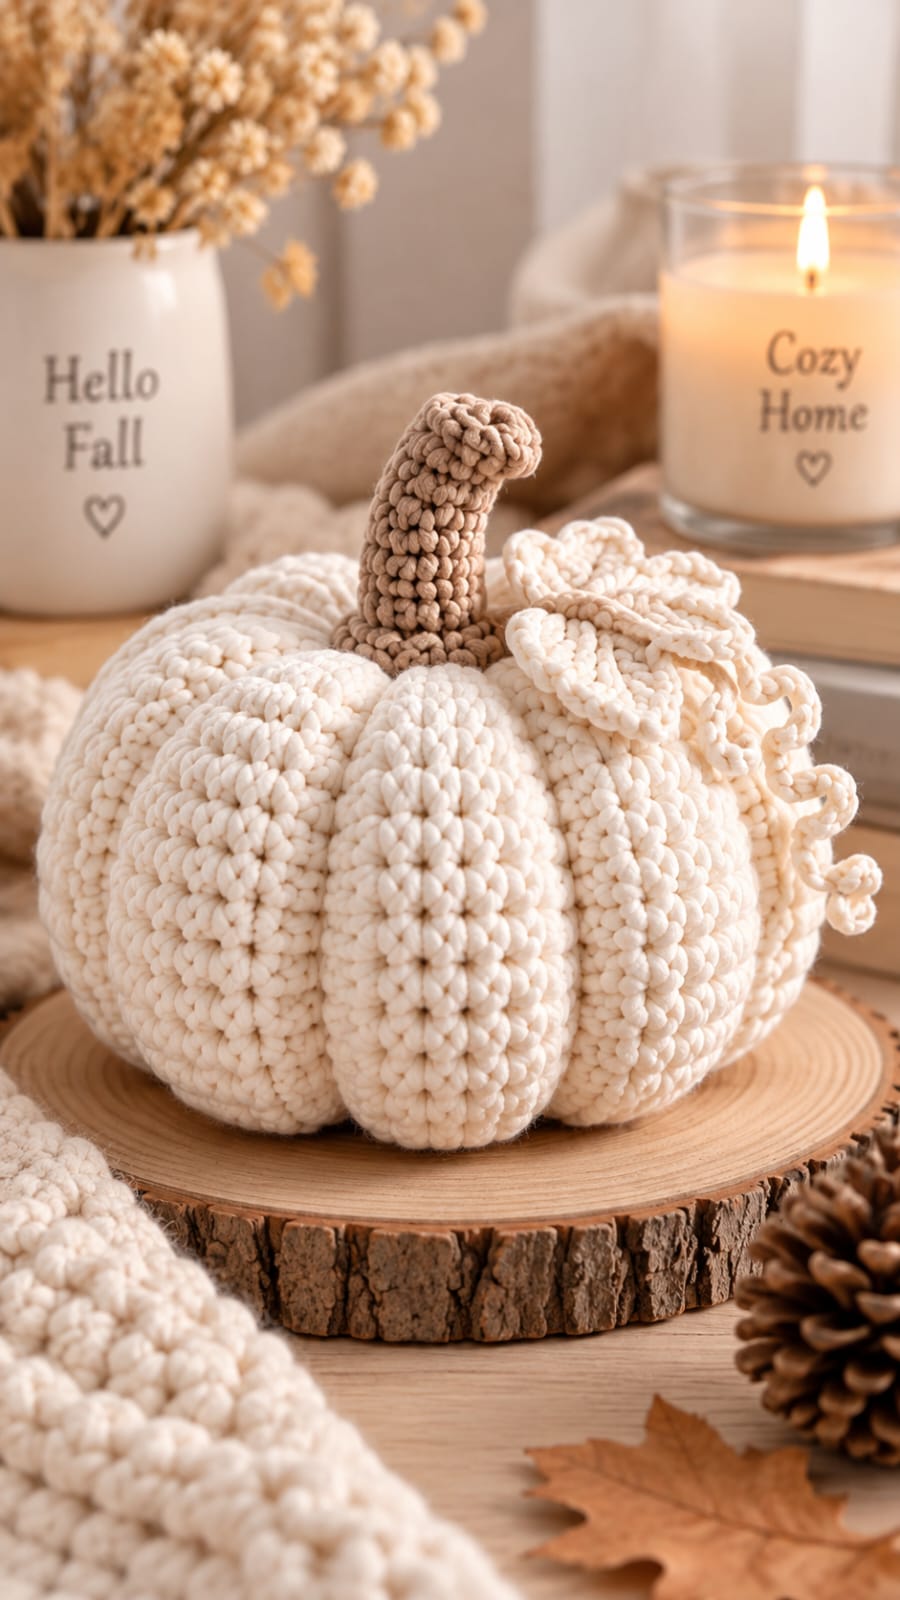
Eight ivory lobes have to remain distinct even where the cream yarn removes almost all color contrast between them. This white crochet pumpkin pattern uses worsted or Aran yarn, a 5 mm hook, post-stuffing sculpting, a tall taupe stem, layered leaves, and curled tendrils. The finished decoration measures approximately 22–25 cm wide. Its structured botanical crown makes it suitable for fall tables, shelves, and neutral seasonal displays.
The Design: What Makes This White Pumpkin Different
The photographed pumpkin has a broad body divided into eight unusually deep sections. A smooth stuffed form is therefore more useful than a lightly ribbed sphere: after stuffing, separate shaping strands can compress the body exactly where each groove belongs. The second structural decision is the tall curved stem. Its narrow diameter keeps the crown visible while the bend prevents the topper from looking mechanically vertical.
The third feature is the asymmetric cluster beside the stem. Layered ivory leaves and two crochet pumpkin vines interrupt the otherwise symmetrical body. Published pumpkin patterns also commonly use post-stuffing yarn passes to create eight sections, while separate stem, leaf, and curlicue pieces are established topper techniques. A frequent mistake with a farmhouse crochet pumpkin is excessive stuffing. If the center becomes rigid, the shaping yarn cannot sink far enough to reproduce these deep channels.
Project Info at a Glance
| Skill Level | Estimated Time | Finished Size | Hooks | Best For |
|---|---|---|---|---|
| Intermediate | 6–8 hours | Approx. 22–25 cm wide | 5 mm body / 4 mm details | Fall tables, shelves, neutral seasonal decor |
The finished dimensions are a target based on the photographed proportions. Comparable published decorative pumpkin patterns use worsted yarn with hooks around 5 mm, and topper patterns commonly use a six-stitch stem tube followed by a wider attachment base.
Materials and Tools
Yarn
- Warm ivory / natural white — worsted or Aran #4 — approximately 160–190 g for the pumpkin body and sculpting
- Warm taupe / mushroom brown — worsted or Aran #4 — approximately 15–20 g for the curved stem
- Ivory — approximately 20–30 g additional for leaves and curled vines
Use a smooth, firmly plied yarn for the body. Deep sculpting places considerable pressure on the fabric, and loosely spun yarn can spread enough for white stuffing to appear inside the channels.
Tools
- 5 mm crochet hook
- 4 mm crochet hook for stem, leaves, and vines
- Polyester fiberfill — approximately 200–250 g
- Long tapestry or doll needle
- Standard yarn needle
- Eight removable stitch markers
- Dressmaking pins
- Scissors
- Tape measure
Abbreviations
- MR — magic ring
- ch — chain
- sc — single crochet
- hdc — half double crochet
- dc — double crochet
- inc — two single crochets in one stitch
- dec — invisible decrease
- sl st — slip stitch
- BLO — back loop only
- st/sts — stitch/stitches
An invisible decrease catches the front loops of the next two stitches before completing one single crochet, reducing the visible bump along the decreasing rounds.
Pattern — Step by Step
Use US crochet terminology. Work the pumpkin body in a continuous spiral unless a section specifically states otherwise. Move the stitch marker at the beginning of every round.
White Pumpkin Body
Yarn: warm ivory.
R1: 6 sc in MR (6)
R2: inc ×6 (12)
R3: (1 sc, inc) ×6 (18)
R4: (2 sc, inc) ×6 (24)
R5: (3 sc, inc) ×6 (30)
R6: (4 sc, inc) ×6 (36)
R7: (5 sc, inc) ×6 (42)
The 42-stitch plateau produces a large body appropriate for the broad pumpkin shown in the reference.
R8: sc around (42)
R9: sc around (42)
R10: sc around (42)
R11: sc around (42)
R12: sc around (42)
R13: sc around (42)
R14: sc around (42)
R15: sc around (42)
R16: sc around (42)
R17: (5 sc, dec) ×6 (36)
R18: (4 sc, dec) ×6 (30)
R19: (3 sc, dec) ×6 (24)
Begin stuffing with small pieces. Push fiberfill toward the circumference while leaving the vertical center slightly more compressible.
R20: (2 sc, dec) ×6 (18)
Add additional stuffing around the outer wall.
R21: (1 sc, dec) ×6 (12)
Complete the stuffing. The pumpkin should hold a round form without becoming rigid.
R22: dec ×6 (6)
Fasten off, leaving a 30 cm tail. Thread through the front loops of the final six stitches, pull the opening closed, and secure.
Sculpting the Eight Pumpkin Lobes
The large vertical sections in the photograph are produced after stuffing. Crochet increases alone will not create channels of comparable depth.
Cut approximately 150–180 cm of ivory yarn and thread the long needle.
Insert the needle through the bottom center and bring it out through the top center.
Carry the yarn down the outside of the pumpkin. Reinsert at the bottom center and return through the top.
Pull until the strand sinks approximately 8–12 mm into the body.
That creates the first channel.
Rotate the pumpkin 180 degrees and create the opposite channel.
Add another pair at 90 degrees to the first pair. The body now has four sections.
Divide each of those four sections in half with another shaping pass.
The finished body now has eight lobes.
Do not tighten the first groove completely before positioning the others. Establish all eight at moderate tension, compare the lobe widths, then tighten opposite grooves in pairs.
Flattening the Pumpkin Profile
The reference is wider than it is tall. Create that proportion after the eight channels are positioned.
Pass a strong ivory strand directly from the top center through the body to the bottom center.
Return through the center.
Pull the two poles toward each other by approximately 1–2 cm.
Secure the strand inside a sculpted groove.
The top should develop a recessed crown while the bottom becomes stable enough to sit on a flat surface.
Tall Curved Stem
Yarn: warm taupe or mushroom brown.
R1: 6 sc in MR (6)
R2: sc around in BLO (6)
R3: sc around (6)
R4: sc around (6)
R5: sc around (6)
R6: sc around (6)
R7: sc around (6)
R8: sc around (6)
R9: 2 sl st, 4 sc (6)
R10: 2 sl st, 4 sc (6)
R11: sc around (6)
R12: 2 sl st, 4 sc (6)
R13: sc around (6)
R14: sc around (6)
The repeated slip stitches shorten one side and create the gradual curve visible in the photograph.
R15: inc ×6 (12)
R16: (1 sc, inc) ×6 (18)
Fasten off, leaving approximately 40 cm for attachment.
Add only a narrow amount of stuffing to the stem. Overfilling removes the curve.
Large Pumpkin Leaf
Yarn: ivory — make 2.
Use the 4 mm hook so the leaves remain firmer than the body.
Ch 12.
Starting in the second chain from the hook:
Row 1: sl st, sc, hdc, dc, dc, 2 dc, dc, dc, hdc, sc, 3 sc in final chain.
Continue along the opposite side of the foundation chain:
Row 1 continued: sc, hdc, dc, dc, 2 dc, dc, dc, hdc, sc, sl st.
Fasten off, leaving a 25 cm tail.
The increases around the tip produce a broad leaf rather than a narrow oval.
Small Crown Leaf
Yarn: ivory — make 1.
Ch 9.
Starting in the second chain:
Row 1: sl st, sc, hdc, dc, dc, hdc, sc, 3 sc in final chain.
Continue along the opposite side:
Row 1 continued: sc, hdc, dc, dc, hdc, sc, sl st.
Fasten off, leaving a 20 cm tail.
Optional Raised Leaf Vein
Join ivory yarn at the base of a completed leaf.
Work surface slip stitches along the central foundation chain toward the tip.
Fasten off at the leaf point.
This creates a visible central vein and gives the monochromatic leaf additional relief.
Long Curly Vine
Yarn: ivory — make 1.
Ch 28.
Beginning in the second chain from the hook, work 2 sc in every chain.
The increases force the chain into a spiral.
Fasten off, leaving approximately 20 cm for attachment.
Short Curly Vine
Yarn: ivory — make 1.
Ch 18.
Starting in the second chain, work 2 sc in each chain.
Fasten off, leaving a sewing tail.
For a tighter tendril, work 3 sc into each chain instead. The photographed vines have compact coils near their free ends, so this variation can be used for the final six chains.
Building the Botanical Crown
Do not arrange the leaves symmetrically around the stem. The reference concentrates most of the foliage on one side.
Place the tall taupe stem slightly behind the exact center of the crown.
Overlap the two large leaves at its front-right side. Position the smaller leaf above them so its point remains visible.
Allow the long vine to fall beyond the pumpkin circumference and curl downward.
Keep the short tendril closer to the stem.
Pin all pieces before sewing. Rotate the pumpkin and inspect it from the front, both sides, and directly above.
Assembly
- Close and stuff the ivory body, keeping the outer circumference firm while leaving the central axis slightly compressible.
- Mark eight approximately equal positions around the pumpkin before tightening any sculpting strand completely.
- Create four opposite shaping channels first, then divide those four sections to form eight deep lobes.
- Compress the top and bottom centers by approximately 1–2 cm and secure the shaping yarn inside a groove.
- Place the flared 18-stitch stem base inside the recessed crown and pin it before sewing.
- Sew around the complete stem base, catching several body stitches with every attachment pass.
- Position the two large ivory leaves on one side of the stem and attach only their lower sections so the tips remain dimensional.
- Add the smaller leaf above the first pair, overlapping the bases without covering the stem completely.
- Sew the long and short curly vines beneath the leaf cluster, leaving most of each spiral unattached.
- Set the pumpkin on a flat surface, redistribute any uneven stuffing, then weave every remaining tail through at least 5 cm of matching fabric.
The completed piece should show eight rounded ivory lobes, a recessed center, one tall curved taupe stem, layered crown leaves, and free-hanging spiral tendrils.
7 Technical Tips
- The pumpkin becomes spherical: Compress the top and bottom by approximately 1–2 cm after closing the body. Deep side grooves without vertical compression still leave a ball-shaped profile.
- One lobe becomes narrower than the others: Mark all eight groove positions before applying full tension. Tightening sequentially around the circumference pushes stuffing toward the unfinished sections and changes their width.
- White stuffing appears through a groove: Limit each channel to roughly 8–12 mm of indentation. Pulling beyond the fabric’s available stretch can open the single-crochet stitches.
- The crown collapses under the stem: Keep the 18-stitch stem base flat against several body rounds. Sewing only through the six-stitch tube concentrates the stem’s weight on too small an area.
- The curved stem straightens: Place the two slip stitches on the same side during each shaping round. Alternating their position cancels the directional shortening that produces the bend.
- The leaves lie completely flat: Attach only the lowest 15–20 mm of each leaf. Sewing around the complete perimeter removes the layered raised effect visible at the crown.
- The vine does not curl: Work at least two single crochets into every foundation chain. One stitch per chain produces a mostly straight cord rather than the compact spiral required here.
How to Make the Eight Lobes More Pronounced
The reference has unusually deep channels, particularly near the crown. Stuffing distribution matters as much as shaping tension.
Push most fiberfill outward while the body opening is still large. The perimeter should feel firm, but the vertical center should compress when pressed between a finger and thumb.
After closing, establish the grooves in opposite pairs. Start at 12 and 6 o’clock when viewing the pumpkin from above, then add the 3 and 9 o’clock positions.
Divide those quarters again.
Once all eight channels exist, tighten them gradually. A useful target is an indentation of approximately 8–12 mm at the widest point and slightly deeper compression near the crown.
Massage the stuffing toward any lobe that appears narrower than its neighbors before securing the sculpting strand.
Why a 42-Stitch Body Works
The body increases from six stitches to a 42-stitch plateau in regular six-stitch increments. That creates a broad form while keeping the increase geometry predictable.
Thirty stitches would produce a considerably smaller pumpkin in the same yarn. Thirty-six works for a medium decoration, while 42 gives enough circumference for eight substantial lobes.
The sculpting process reduces the final apparent width because yarn is pulled into the body at eight points. For that reason, measure the finished pumpkin after sculpting rather than judging size from the unsculpted sphere.
If your 42-stitch body already exceeds 25 cm before shaping, switch to a smaller hook or stop at 36 stitches for the next version.
How to Make a Smaller White Pumpkin
For a medium version, use a 36-stitch plateau.
R1: 6 sc in MR (6)
R2: inc ×6 (12)
R3: (1 sc, inc) ×6 (18)
R4: (2 sc, inc) ×6 (24)
R5: (3 sc, inc) ×6 (30)
R6: (4 sc, inc) ×6 (36)
R7–R14: sc around (36)
R15: (4 sc, dec) ×6 (30)
R16: (3 sc, dec) ×6 (24)
R17: (2 sc, dec) ×6 (18)
R18: (1 sc, dec) ×6 (12)
R19: dec ×6 (6)
Use the same eight-section shaping method. Shorten the stem by two or three straight rounds and reduce the large leaf foundation from 12 chains to approximately 9–10 chains.
How to Make a Small Pumpkin
For a compact shelf decoration, stop at the 30-stitch plateau.
R1: 6 sc in MR (6)
R2: inc ×6 (12)
R3: (1 sc, inc) ×6 (18)
R4: (2 sc, inc) ×6 (24)
R5: (3 sc, inc) ×6 (30)
R6–R11: sc around (30)
R12: (3 sc, dec) ×6 (24)
R13: (2 sc, dec) ×6 (18)
R14: (1 sc, dec) ×6 (12)
R15: dec ×6 (6)
Six sculpted lobes can be used at this size if eight sections become too narrow. Keep the botanical topper smaller so the stem and leaves do not obscure the body.
Making a Larger Centerpiece Pumpkin
Increase beyond 42 stitches while maintaining six-stitch increments.
R8: (6 sc, inc) ×6 (48)
R9: (7 sc, inc) ×6 (54)
Work the required number of straight rounds, then reverse the shaping sequence: 54 to 48, 42, 36, 30, 24, 18, 12, and 6.
A 54-stitch body requires considerably more fiberfill and longer sculpting strands. Cut at least 2 m of shaping yarn before starting the channels.
Eight lobes still work at this scale, but ten sections can be used if a finer pumpkin structure is preferred.
Making the Curly Crochet Vines
The curl is produced by putting more stitch width into the chain than the chain can hold in a straight line.
Two sc in every chain create a moderate spiral. Three sc in each chain make a tighter corkscrew.
A useful compromise for the photographed topper is to work two sc per chain through most of the vine, then three sc per chain across the final six chains.
That construction leaves the attachment end relatively relaxed while producing compact loops at the free end.
Published pumpkin topper patterns use the same basic principle: an increased stitch count along a foundation chain forces the vine to curl naturally.
Leaf Placement
The leaves should not cover equal portions of the pumpkin crown.
Position the largest leaf so it crosses one sculpted channel and rests partly on the neighboring lobe. Place the second leaf at a different angle rather than stacking its point directly over the first.
The small leaf can sit closer to the stem.
Leave the outer halves free from sewing. That allows their edges to lift and keeps the crown dimensional.
If the leaves curl excessively, lightly block them before attachment. Do not flatten them completely; a slight bend helps reproduce the layered structure in the reference.
Choosing the Right White Yarn
Natural white, ivory, and warm cream work better for this specific appearance than a blue-toned optical white. The photographed pumpkin has a warm neutral body against a similarly warm fall setting.
Cotton provides strong stitch definition and firm lobes but increases finished weight. Acrylic is lighter and generally easier to sculpt. A cotton-acrylic blend provides a useful middle point.
Avoid highly fuzzy yarn when the horizontal crochet rows are part of the intended appearance. Halo softens both stitch definition and the boundaries of the sculpted grooves.
Use the same ivory yarn for the leaves if you want the monochromatic botanical crown shown in the image. Changing the leaves to green creates a more conventional pumpkin but alters the neutral design significantly.
Stuffing the Pumpkin Correctly
Add stuffing in small pieces instead of inserting one large mass.
Build a firm ring around the outer circumference first. Continue filling toward the center while keeping the vertical axis slightly softer.
Before the final decrease round, press the top and bottom simultaneously. They should move toward each other without causing the side walls to collapse.
If the pumpkin feels rigid, remove a small amount of central stuffing before closing.
If the sides collapse after sculpting, more perimeter stuffing is required. Open the final closure before the sculpting strands are permanently secured and add fiberfill to the affected lobe.
Keeping the Pumpkin Stable
The tall stem raises the visual and physical center of the decoration. A rounded bottom can therefore make the finished piece lean.
Leave slightly less stuffing directly at the bottom center and more around the lower circumference.
After completing the eight channels, press the pumpkin onto a flat surface with both hands.
Rotate it 90 degrees and repeat.
The base should develop a small flattened contact area without destroying the rounded lower lobes.
Attach the stem only after the pumpkin stands without support. Correcting the base becomes harder after the crown pieces have been sewn in place.
Care and Storage
Follow the washing instructions supplied with the chosen yarn. A heavily stuffed decorative pumpkin is usually easier to spot-clean than to machine wash.
Do not store the pumpkin beneath heavy objects. Long-term compression can flatten the lobes and change the curved stem.
Before seasonal storage, allow the piece to dry completely and place it in a container large enough for the vines to remain loose.
If a tendril becomes flattened, twist it gently around a crochet hook or pencil for several minutes to restore the spiral.
Keep the finished yarn decoration away from open flames and hot surfaces. The candle shown in the styled reference is photographic decor rather than a recommended placement distance for a fiber object.
Conclusion
The eight channels determine whether this white pumpkin reads as a sculpted fall decoration rather than a stuffed sphere. Build the body to 42 stitches, distribute the filling around its perimeter, and position every groove before applying full tension. Next, test the pumpkin on a flat surface before attaching the tall taupe stem and asymmetric ivory foliage. Keep most of each leaf and tendril free so the crown retains its layered shape. Save this white crochet pumpkin pattern to Pinterest or share the finished version on Instagram with #WhiteCrochetPumpkin. For this specific crown, would you keep the leaves ivory or use muted olive green for stronger contrast?









