Introduction
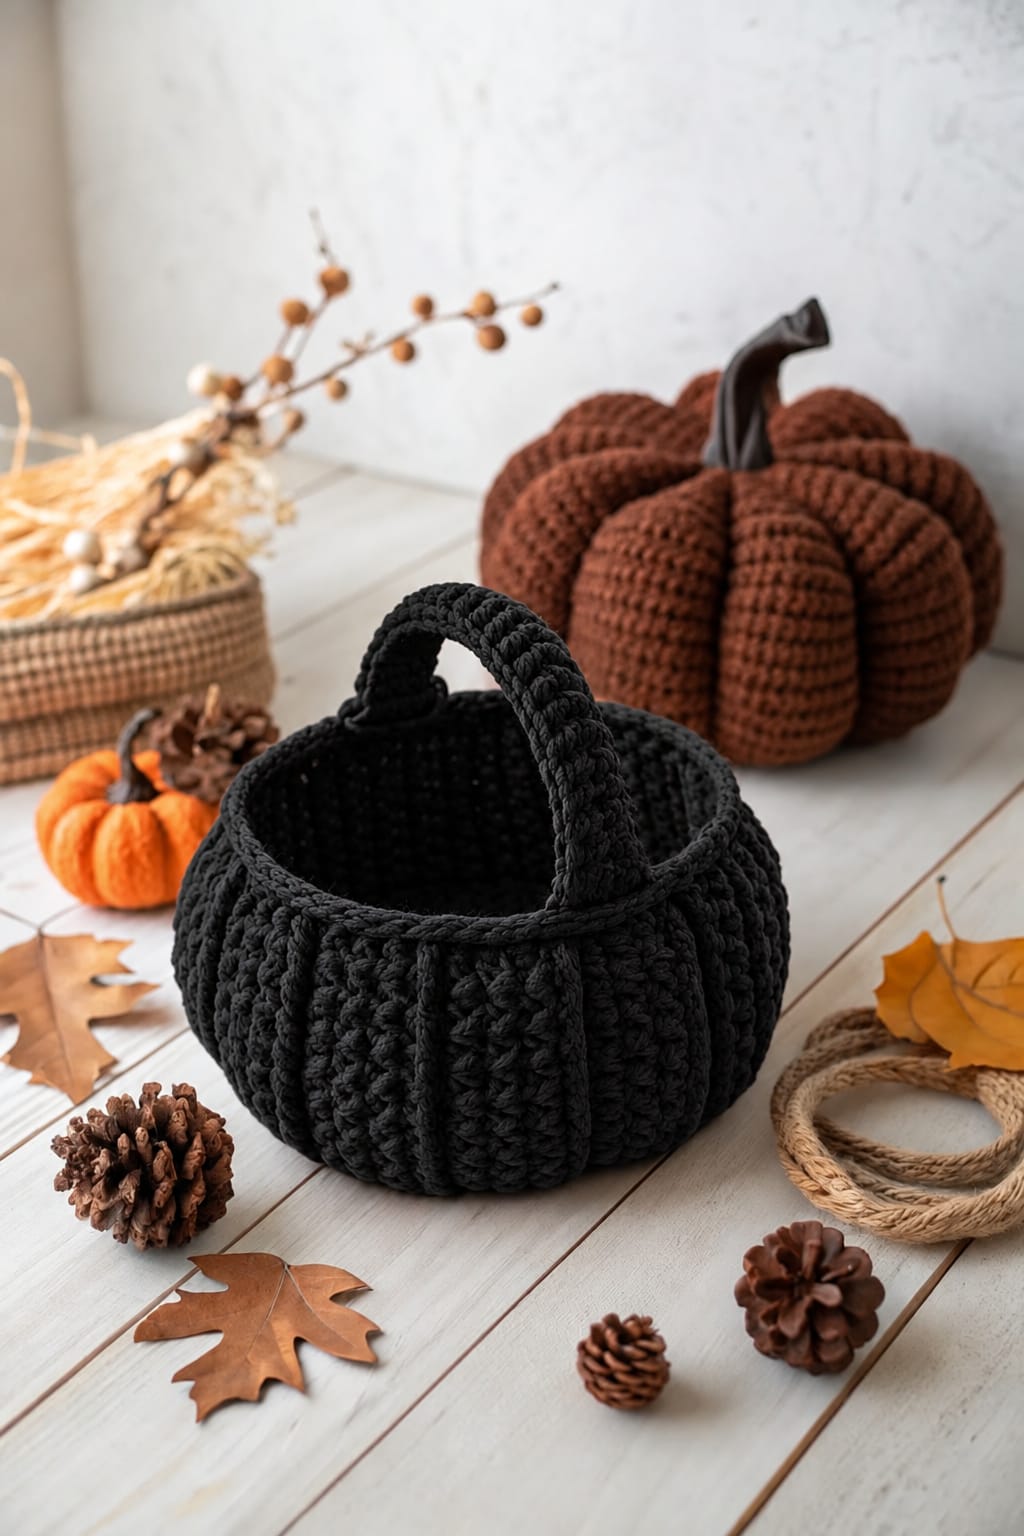
A pumpkin cannot carry pinecones until its hollow center is engineered to resist the same shaping that creates its ribs. This black crochet pumpkin basket pattern combines a firm circular base, eight raised pumpkin sections, an open top, and one reinforced arched handle. Worked in chunky yarn with a 5 mm hook, the target basket measures approximately 20–22 cm across. The finished container works for wrapped treats, yarn, or lightweight October decorations.
The Design: What Makes This Pumpkin Basket Different
The photographed basket is neither a stuffed pumpkin nor a conventional straight-sided container. Its lower wall expands into a rounded pumpkin profile before returning toward an open rim. Eight strong vertical ribs exaggerate that shaping while leaving the interior usable.
The second structural feature is the handle. Instead of two small side grips, this crochet pumpkin basket uses one tall arch attached at opposite sides of the rim. Multiple rows of tight crochet limit stretching.
Black yarn makes shallow texture difficult to see, so the ribs need more depth than they would on an orange basket. Raised post stitches create the primary channels without pulling strands across the interior. The common mistake is reducing too aggressively near the opening. That creates a narrow neck and prevents the ribbed pumpkin basket from functioning as practical storage.
Project Info at a Glance
| Skill Level | Estimated Time | Finished Size | Hook | Best For |
|---|---|---|---|---|
| Intermediate | 5–7 hours | Approx. 20–22 cm diameter × 13–15 cm high | 5 mm | Wrapped treats, yarn, fall decorations |
Published pumpkin baskets vary considerably by construction. Comparable designs include a 20 cm wide × 12 cm high sport-yarn basket, a 21 cm diameter cotton-rope basket, and pumpkin baskets around 20 cm diameter made from super-bulky T-shirt yarn. Those measurements provide a practical benchmark for the photographed proportions.
Materials and Tools
Yarn
- Black — chunky/category 5 yarn — approximately 180–230 g
- Additional black yarn — reserve approximately 30–40 g for the reinforced handle and rim
A firm cotton or cotton-blend yarn gives the basket stronger walls than a highly draping acrylic. Another option is to hold two strands of worsted-weight yarn together. Published pumpkin basket designs use both doubled worsted yarn and single-strand chunky yarn to create structured containers.
Tools
- 5 mm crochet hook
- 4.5 mm crochet hook — optional for a firmer handle
- Large tapestry needle
- Scissors
- Locking stitch markers
- Eight contrasting markers for rib placement
- Optional plastic canvas circle — approximately 15–17 cm diameter
No stuffing or safety eyes are required. The reference is an open functional basket without a face, stem, leaf, or separate decorative accessory.
Abbreviations
- MR — magic ring
- ch — chain
- sc — single crochet
- inc — two single crochets in one stitch
- dec — invisible decrease
- sl st — slip stitch
- hdc — half double crochet
- dc — double crochet
- FPdc — front post double crochet
- BPdc — back post double crochet
- BLO — back loop only
- st/sts — stitch/stitches
For an invisible decrease, insert through the front loops of the next two stitches, pull up a loop, then complete one single crochet through both positions.
Pattern — Step by Step
Use US crochet terminology. The basket begins at the center of the base and is worked upward in rounds. The stitch count expands in six-stitch increments before the pumpkin wall is established.
Black Circular Base
Yarn: black.
R1: 6 sc in MR (6)
R2: inc ×6 (12)
R3: (1 sc, inc) ×6 (18)
R4: (2 sc, inc) ×6 (24)
R5: (3 sc, inc) ×6 (30)
R6: (4 sc, inc) ×6 (36)
R7: (5 sc, inc) ×6 (42)
Lay the base flat before continuing. The 42-stitch round is the target plateau for this medium-size construction.
If your yarn produces a base substantially wider than 17 cm at this point, move down one hook size rather than adding more circumference.
Base-to-Wall Transition
Continue with black.
R8: sc BLO around (42)
R9: sc around (42)
The unused front loops from R8 create a defined lower edge. This transition helps the base remain flatter while the sides begin moving upward.
If extra base stiffness is required, cut a plastic canvas circle slightly smaller than the completed base and place it inside after several wall rounds have been completed.
Expanding the Pumpkin Wall
The photographed basket bulges beyond its base before narrowing slightly toward the opening.
R10: (6 sc, inc) ×6 (48)
R11: sc around (48)
R12: sc around (48)
R13: sc around (48)
R14: sc around (48)
R15: sc around (48)
The 48-stitch section forms the widest circumference.
Place eight temporary markers approximately evenly around the wall. These positions indicate the future raised ribs.
Raised Pumpkin Rib Texture
The photograph shows strong vertical channels rather than a smooth bowl. The following surface structure produces the pumpkin appearance without adding external shaping yarn across the interior.
Establishing Eight Ribs
Divide the 48 stitches into eight groups of six stitches.
Each six-stitch section contains one raised rib position and the surrounding recessed fabric.
R16: *2 sc, FPdc around the corresponding stitch/post below, 3 sc.* Repeat eight times around. (48 stitch positions)
R17: Work sc into ordinary stitches and FPdc around each established raised post. Maintain eight raised columns. (48)
R18: Repeat R17. (48)
R19: Repeat R17. (48)
R20: Repeat R17. (48)
R21: Repeat R17. (48)
R22: Repeat R17. (48)
The eight front-post columns should now run vertically around the outside of the basket.
Keep each FPdc slightly loose. Tight post stitches shorten the rib and can pull the upper wall downward.
Deepening the Pumpkin Channels
For stronger relief similar to the photograph, add a recessed stitch immediately beside each raised column.
R23: At each established rib, work BPdc around the stitch immediately before the FPdc, FPdc around the rib, then BPdc around the stitch immediately after it. Work sc across the remaining stitches of each six-stitch section. (48 positions)
R24: Repeat the established BPdc–FPdc–BPdc structure around all eight ribs. (48)
R25: Repeat R24. (48)
This three-column treatment pushes the central rib forward while drawing the neighboring fabric backward.
Shaping the Upper Pumpkin
The basket now needs to narrow moderately toward the opening without closing like a stuffed pumpkin.
R26: (6 sc-equivalent stitches, dec) ×6 around, maintaining the rib positions as evenly as possible. (42)
R27: Work around in established texture. (42)
R28: Work around in established texture. (42)
Stop reducing at 42 stitches.
The opening needs to remain large enough for a hand to enter comfortably. Continuing standard amigurumi decreases would turn the upper section into a closed pumpkin rather than a basket.
Firm Upper Rim
Continue with black.
R29: sc around (42)
R30: sc around (42)
R31: sl st loosely around (42)
Do not fasten off until the handle positions have been marked.
Flatten the basket gently and identify two directly opposite points on the rim.
Place one locking marker at each point.
Single Arched Handle
The reference uses one thick handle crossing over the center of the opening. It should stand high enough to leave the basket usable while remaining short enough to resist stretching.
Handle Foundation
Yarn: black. Use a 4.5 mm hook if the fabric feels loose.
Join yarn at the first marked position.
Ch 40.
Bring the chain across the opening without twisting it.
Slip stitch securely into the opposite marked position.
Check the arch before continuing. The handle should rise approximately 14–17 cm above the rim.
If the arch is too low, add chains. If it collapses toward one side, remove chains.
Handle Row 1
Turn and work back across the chain.
Row 1: sc into each chain across. (40)
Anchor the row into the rim with a slip stitch.
Handle Row 2
Row 2: Turn, ch 1, sc in each stitch across. (40)
Secure to the opposite rim.
Handle Row 3
Row 3: Turn, ch 1, sc BLO across. (40)
Secure to the rim.
Handle Row 4
Row 4: Turn, ch 1, sc across. (40)
Fasten off with a 35 cm tail.
Use the tail to reinforce the handle attachment through at least four neighboring rim stitches.
Optional Rounded Handle Edge
The photographed handle has a thick corded appearance rather than a flat strap.
Join black yarn at one end of the completed handle.
Work slip stitches or tight single crochet evenly along the first long edge.
Continue around the top attachment point and down the opposite edge.
Fasten off.
This edging slightly rounds the strap and reduces lateral stretching.
Do not add so many stitches that the handle edge becomes longer than the center rows. Excess edge stitches create waves along the arch.
Strengthening the Handle Attachments
A basket handle experiences more concentrated force than the side wall. The attachment must therefore spread the load across several rim stitches.
Thread a long black yarn tail through the tapestry needle.
At the first attachment, sew through the handle base and approximately four rim stitches.
Repeat the same path at least three times.
Move the needle one stitch outward and repeat.
Reinforce the opposite attachment in the same manner.
Do not rely on a single slip stitch to carry the basket. The slip stitch positions the handle during construction; the reinforcement stitches provide the long-term connection.
Optional Firm Base Insert
A functional basket benefits from a flat internal base, particularly when the exterior wall contains heavy raised stitches.
Measure the inside diameter at the bottom.
Cut a plastic canvas circle approximately 5–10 mm smaller than that measurement.
Round any sharp edges with scissors.
Place the insert inside the basket.
For a removable insert, cover it with a crocheted circle or fabric before use.
Do not force an oversized insert into the bottom. Excess pressure can stretch the transition round and make the basket flare outward.
How to Make the Black Ribs More Visible
Black yarn absorbs much of the shadow that normally defines crochet texture. The ribs therefore need actual physical depth.
The FPdc column creates the raised center. The BPdc stitches beside it push the neighboring fabric backward.
Keep the post stitches consistent from one round to the next. If one FPdc is placed around a different post, the rib will move sideways.
Run a finger along each column after every two rounds. Touch often reveals a misplaced black stitch before it becomes easy to see.
If stronger channels are required, work surface slip stitches along the eight FPdc columns after completing the basket. Keep those stitches moderately loose so they reinforce the rib without shortening the wall.
Assembly and Finishing
- Place the empty basket on a flat surface and check that the circular base remains level.
- Identify all eight raised ribs and correct any column that has shifted more than one stitch from its intended vertical path.
- Shape the lower wall outward with your hands so the 48-stitch section forms the widest part of the pumpkin.
- Shape the 42-stitch upper rounds slightly inward while keeping the opening circular.
- Position the two handle attachment points exactly opposite one another before completing reinforcement stitches.
- Hold the handle at its highest point and check that neither attachment pulls the rim downward by more than approximately 5 mm.
- Reinforce each handle end across at least four rim stitches and make three passes through the attachment area.
- Insert the optional plastic canvas base and check that it lies flat without forcing the lower wall outward.
- Weave all black tails through at least 5 cm of matching stitches and reverse direction once before trimming.
- Set the completed basket upright, adjust the eight ribs, and test the handle with lightweight contents before regular use.
The finished piece should have a flat base, rounded pumpkin wall, eight raised black ribs, open circular top, and one stable arched handle.
7 Technical Tips
- Base becomes wavy: Check the circle after every increase round. If the outer edge rises and falls by more than approximately 5 mm, adjust hook tension before beginning the vertical wall.
- Basket resembles a cylinder: The 48-stitch middle section must project beyond the 42-stitch base and upper opening. Removing that difference eliminates much of the pumpkin silhouette.
- Black rib changes direction: Mark all eight FPdc columns and verify them every round. Moving a post stitch one position sideways produces a diagonal channel that becomes increasingly visible higher on the wall.
- Opening puckers: Stop the upper reduction at 42 stitches. Additional decreases may improve a stuffed pumpkin but make a functional basket opening unnecessarily narrow.
- Handle stretches: Work four dense rows and reinforce each attachment across at least four rim stitches. A single chain or one-row strap can lengthen significantly under repeated lifting.
- Rim collapses under the handle: Use a 4.5 mm hook for the final rim or add another tight single-crochet round. A soft rim transfers the handle load into two distorted side sections.
- Basket tips when carried: Position the handle attachments directly opposite one another and compare their height before reinforcement. Even a two-stitch offset can move the load away from the center of the base.
Choosing Yarn for a Structured Pumpkin Basket
Published pumpkin baskets demonstrate several workable yarn strategies. One Ravelry design uses worsted yarn held double or a single strand of chunky yarn with a 5 mm hook. Another uses super-bulky cotton rope and measures approximately 21 cm in diameter.
A different pumpkin basket pattern uses 3 mm braided cotton cord with a 6 mm hook for a small 14 × 14 × 11 cm basket and 5 mm cord with an 8 mm hook for a larger 20 × 20 × 13 cm version.
For the reference design, category 5 chunky cotton or doubled worsted cotton provides a useful balance. The fabric needs enough flexibility to form rounded pumpkin sides but enough resistance to keep the opening and handle upright.
Highly elastic yarn is less suitable because both the rim and handle can stretch during use.
Making the Basket Smaller
For a compact candy basket, stop the circular base at 36 stitches.
R1: 6 sc in MR (6)
R2: inc ×6 (12)
R3: (1 sc, inc) ×6 (18)
R4: (2 sc, inc) ×6 (24)
R5: (3 sc, inc) ×6 (30)
R6: (4 sc, inc) ×6 (36)
Work the turning round in BLO.
Increase the middle wall to 42 stitches, maintain the circumference through the textured section, then reduce back to 36 stitches for the opening.
Shorten the handle foundation to approximately 30–34 chains after checking the physical width of the basket.
Use six or seven ribs if eight sections become too narrow at the smaller circumference.
Making a Larger Pumpkin Basket
For a larger storage basket, continue the base increase sequence beyond 42 stitches.
Next Round: (6 sc, inc) ×6 (48)
Next Round: (7 sc, inc) ×6 (54)
Work the base-to-wall transition after the final required increase.
Increase the widest pumpkin section another six stitches beyond the base circumference. A 54-stitch base can therefore expand to approximately 60 stitches through the middle wall.
Reduce back toward the original base count near the rim rather than closing the top.
Larger baskets require stronger handles. Add two extra handle rows or crochet around a suitable internal cord if the basket will carry more than lightweight contents.
Why This Pumpkin Is Not Shaped Like Amigurumi
A stuffed crochet pumpkin can be reduced all the way from its widest circumference to six stitches because no opening is required.
A basket has a different structural problem. It needs a recognizable pumpkin profile while retaining enough upper circumference for access.
That is why the reduction stops at 42 stitches in this construction. The middle wall reaches 48 stitches, producing a modest inward curve without creating a closed crown.
The raised ribs add the remaining visual shaping. They allow the object to read as a pumpkin even though the top stays open.
This approach also avoids external sculpting strands passing across the inside, where they could catch on stored objects.
How to Keep the Handle Upright
Handle stability begins with dense crochet. Use the smaller 4.5 mm hook if the four-row strap feels soft with the main 5 mm hook.
The arch also needs an appropriate length. A very long strap falls toward one side, while an excessively short strap pulls the two sides of the rim together.
Pin or temporarily slip stitch the chain into place before crocheting the remaining handle rows. Lift the empty basket several centimeters from the table and inspect the opening.
If the rim becomes oval immediately, increase the handle length or strengthen the upper edge.
After reinforcement, the handle should support the empty basket without folding sharply at either attachment.
Using the Basket for Halloween and Fall Storage
The black color shifts the design toward Halloween while the pumpkin silhouette remains usable through the broader autumn season. No jack-o’-lantern face is required.
Use the basket for wrapped candy, lightweight yarn, artificial foliage, fabric decorations, or other dry items.
Do not treat the crocheted handle as a substitute for a rigid shopping-basket handle. The pattern is intended for lightweight household storage and decorative use.
If filling the basket with heavier craft supplies, add a plastic canvas base and reinforce the handle attachments with additional yarn passes.
For a coordinated display, make a second basket in rust, chocolate brown, cream, or olive while keeping the same rib and handle construction.
Care and Shape Maintenance
Follow the washing instructions for the selected yarn. Cotton, acrylic, polyester, and blended chunky yarns respond differently to water and heat.
Reshape the basket while damp rather than allowing it to dry collapsed.
Place an appropriately sized bowl or container inside temporarily if the walls need support during drying. Do not use a form that stretches the 42-stitch opening.
Shape the handle into an even arch and allow it to dry without heavy objects pulling on it.
Store the basket upright when possible. Folding the handle flat for extended periods can create a persistent bend near one attachment.
Conclusion
The open rim changes the mathematics of this pumpkin: its upper section must suggest a recessed crown without closing like stuffed amigurumi. Keep the 48-stitch middle wider than the 42-stitch opening, maintain all eight raised columns, and reinforce the handle across several rim stitches before carrying anything. Test the completed basket first with lightweight contents and record its diameter if you plan to make a matching set. Save this black crochet pumpkin basket pattern to Pinterest or share the finished version on Instagram with #BlackPumpkinBasket. For this specific basket, would you keep the single black handle or add two shorter side handles?









