Introduction
An oversized bow changes the engineering of a baby shoe because its weight can pull a soft crochet toe out of shape. These crochet baby booties with bow use DK yarn, a 3 mm hook and a structured 9–10 cm sole sized around newborn proportions. The project suits an intermediate beginner familiar with decreases. A low Mary Jane opening also makes the finished pair practical for newborn photographs and non-walking wear.
The Design: What Makes These Bow Booties Different
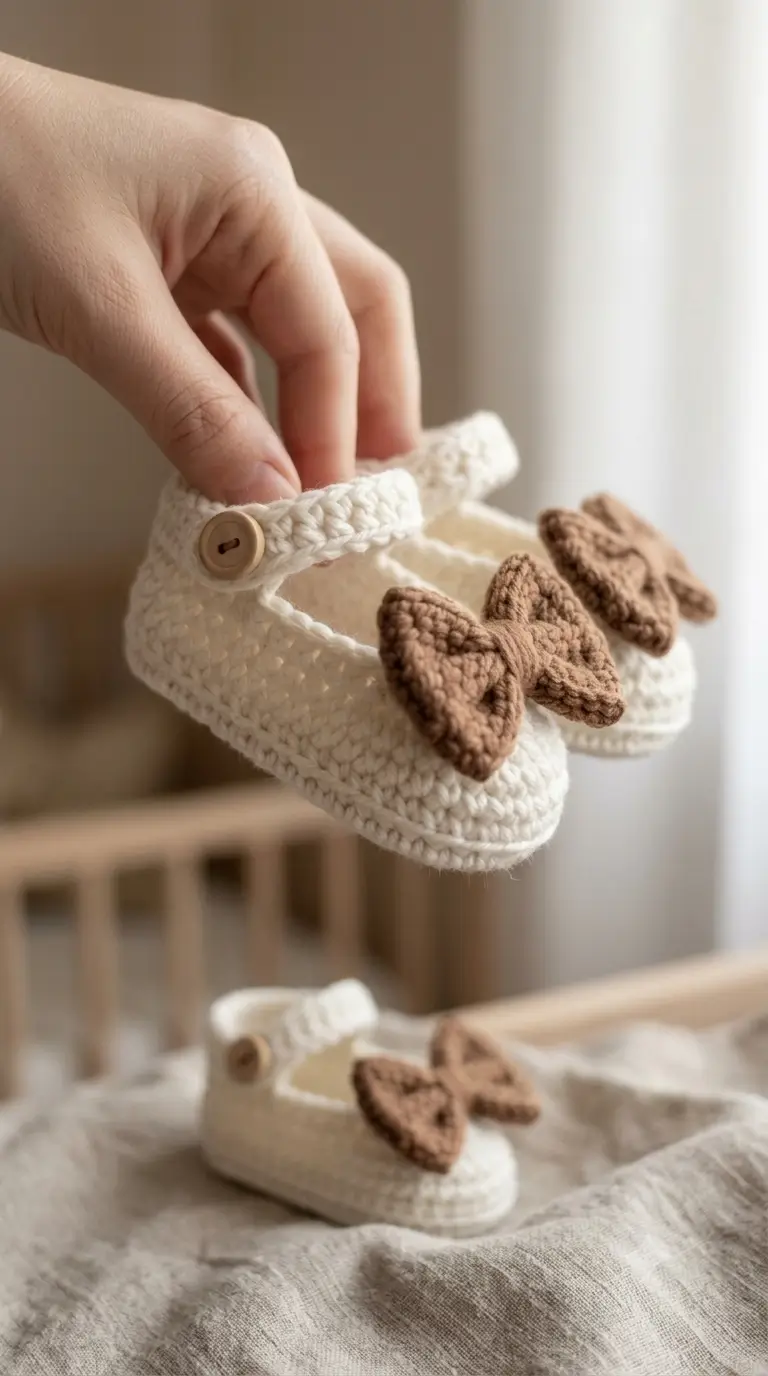
Three proportions define this design. First, the toe stays broad and rounded instead of tapering into a conventional boot shape; that gives the large bow enough surface area to sit flat. Second, the upper remains low across the instep. This converts ordinary newborn crochet booties into a Mary Jane silhouette while preventing the bow and ankle edge from competing visually.
The strap is the third structural element. It crosses a relatively open heel section and needs enough firmness to retain its shape without becoming bulky.
A common mistake with crochet bow baby booties is attaching the bow only through its center wrap. The outer edges can then rotate upward. A few concealed securing stitches behind each bow loop distribute the load across the toe. The photographed design also uses a very large bow, so controlled placement matters more than decorative complexity.
Project Info at a Glance
| Skill Level | Time | Finished Size | Hook | Best For |
|---|---|---|---|---|
| Intermediate beginner | Approx. 2–3 hours/pair | Approx. 9–10 cm sole | 3.0 mm | Newborn, non-walking wear |
The 9–10 cm measurement is the target sole length for this newborn version. Measure the completed sole before continuing because yarn choice, hook size and individual tension can alter the final dimensions.
Materials and Tools
Yarn
- Cream/ivory: category 3 DK/light worsted, approximately 30–35 g.
- Camel brown: category 3 DK/light worsted, approximately 5–10 g.
A smooth, washable baby DK works well for the shoe body. Use the same yarn weight for the contrasting bow so the bow remains proportional to the toe.
Tools
- 3.0 mm crochet hook
- Yarn needle
- Locking stitch markers
- Small scissors
- Flexible measuring tape
Polyester stuffing is not required because these are crochet shoes rather than stuffed amigurumi.
The reference design includes a wooden-style button. For an infant item, a detachable button can become a small-part hazard. The construction below therefore allows the strap to be sewn permanently into position. A crocheted decorative disc can reproduce the button appearance without requiring a hard component.
Abbreviations
- ch — chain
- sc — single crochet
- hdc — half double crochet
- dc — double crochet
- inc — 2 stitches in one stitch
- dec — decrease
- sl st — slip stitch
- BLO — back loop only
- st(s) — stitch(es)
An invisible decrease works through the front loops of the next two stitches before completing one single crochet; this reduces visible bulk on shaped sections.
Crochet Baby Booties With Bow Pattern
The booties are constructed from the sole upward. Joined rounds provide a defined sole edge and make it easier to keep the toe decreases centered.
Sole — Make 2
Use cream yarn.
Ch 11.
Round 1: Starting in the second chain from the hook, work 2 hdc in the first chain. Hdc in the next 8 chains. Work 5 hdc in the final chain. Rotate the foundation chain and work along the unused loops. Hdc in the next 8 chains. Work 3 hdc in the final space. Join with sl st. (26 sts)
Round 2: Ch 1. Work 2 hdc in each of the next 2 stitches, hdc in the next 8 stitches, 2 hdc in each of the next 5 stitches, hdc in the next 8 stitches, then 2 hdc in each of the final 3 stitches. Join. (36 sts)
Round 3: Ch 1. Work controlled increases around the heel and toe while keeping the center sections even. Continue until the sole forms a flat oval measuring approximately 9–10 cm long. Target approximately 44 stitches.
The finished measurement is more important than the nominal stitch target. Differences in DK yarn and crochet tension can change the number required to reach the target length.
Lower Upper — Make 2
Continue with cream yarn.
If the sole was fastened off, join cream yarn at the center back.
Round 1: Ch 1. Sc BLO around. Join with sl st. (44 sts)
Round 2: Ch 1. Sc around. Join. (44 sts)
Round 3: Ch 1. Sc around. Join. (44 sts)
The BLO round creates a defined turn between the sole and side wall. Do not add increases at this stage. Extra stitches will make the shoe wall flare outward.
Toe Shaping — Make 2
Continue with cream yarn.
Place a stitch marker at the exact center front before beginning the decreases.
Round 4: Sc around while working 4 evenly distributed decreases across the front 16 stitches. (40 sts)
Round 5: Sc around while working another 4 evenly distributed decreases across the centered toe section. (36 sts)
Round 6: Sc around while working 3 decreases across the toe. (33 sts)
Check the toe after each decrease round. The decreases should remain symmetrical around the center-front marker while the heel retains its width.
Fasten off.
Mary Jane Opening and Heel Wall
Use cream yarn.
Lay the shoe flat and locate the center of the toe. Leave approximately 12–14 stitches across the front instep unworked to form the low Mary Jane opening.
Join the cream yarn at one side of the opening.
Row 1: Ch 1. Sc around the side and heel until reaching the opposite side of the opening. Turn.
Row 2: Ch 1. Sc across. Turn.
Row 3: Ch 1. Sc across.
Fasten off, leaving approximately 15 cm of yarn for finishing.
The two sides of the opening should terminate the same distance from the center toe. Count the stitches on each side before fastening off.
Ankle Strap — Make 2
Use cream yarn.
Ch 13.
Row 1: Starting in the second chain from the hook, sc in every chain. (12 sts)
Row 2: Ch 1, turn and sc in every stitch. (12 sts)
Fasten off, leaving approximately 20 cm of yarn for sewing.
Pin one end of the strap to the outer side of the shoe. Bring the strap across the ankle opening and check its position before sewing. It should lie flat without pulling the side walls inward.
Crocheted Button Disc — Optional, Make 2
Use camel brown or cream yarn.
Round 1: 6 sc in MR. (6 sts)
Round 2: Inc ×6. (12 sts)
Fasten off, leaving approximately 15 cm of yarn for attachment.
This component is decorative. Sew the disc completely flat against the strap area through several stitches.
Large Brown Bow — Make 2
Use camel brown DK yarn.
The bow should cover most of the rounded toe while remaining above the sole edge.
Ch 15.
Row 1: Starting in the second chain from the hook, sc across. (14 sts)
Row 2: Ch 1, turn, sc across. (14 sts)
Row 3: Ch 1, turn, sc across. (14 sts)
Row 4: Ch 1, turn, sc across. (14 sts)
Row 5: Ch 1, turn, sc across. (14 sts)
Row 6: Ch 1, turn, sc across. (14 sts)
Fasten off and weave in the ends.
Bring the two short ends of the rectangle toward the center back and sew them together. Turn the seam toward the back. Flatten the piece, then pinch the exact center to create two matching bow loops.
Bow Center Wrap — Make 2
Use camel brown yarn.
Ch 5.
Row 1: Starting in the second chain from the hook, sc across. (4 sts)
Rows 2–7: Ch 1, turn and sc across. (4 sts)
Fasten off, leaving approximately 25 cm of yarn.
Wrap the strip around the pinched center of the bow. Sew the short ends together at the back. Keep the remaining yarn tail for attaching the bow to the shoe.
Toe Reinforcement Patch — Make 2
Use cream yarn.
The large bow places additional tension on the toe fabric. A small flat circle hidden inside the shoe distributes the attachment stitches across a wider area.
Round 1: 6 sc in MR. (6 sts)
Round 2: Inc ×6. (12 sts)
Round 3: (1 sc, inc) ×6. (18 sts)
Fasten off.
Place the circle against the inside of the toe directly behind the bow. Attachment stitches can then pass through the bow, shoe fabric and reinforcement patch.
Assembly
- Place both completed soles side by side. Confirm that their finished lengths differ by no more than 2 mm.
- Shape each upper and check that the center-front decrease line points directly toward the middle of the toe.
- Compare the Mary Jane openings. Both side edges should terminate at matching positions.
- Pin the first strap to the outer wall approximately 10–15 mm below the upper edge. Bring it across the opening without stretching it.
- Sew the opposite end of the strap permanently in position for a decorative newborn or photography-prop construction.
- Center each camel brown bow horizontally across the toe. Keep the lower bow edge above the sole-to-upper transition.
- Position the reinforcement patch inside the toe directly behind the bow.
- Sew through the bow center, shoe fabric and reinforcement patch several times. Add one concealed securing stitch near the inner edge of each bow loop.
- Weave each yarn tail through at least 3 cm of adjacent stitches, reverse direction once, then trim.
- Measure both completed shoes and compare the bow height, strap position, toe shape and sole length before removing the final stitch markers.
The completed pair should have matching 9–10 cm soles, centered oversized bows and symmetrical low Mary Jane openings.
7 Technical Tips for Better Crochet Baby Booties
- Mark the center toe before decreasing. Moving the marker even two stitches sideways can make the finished toe and bow appear rotated when the shoe is viewed from above.
- Keep the two soles within a 2 mm tolerance. A 9.0 cm first sole and a 9.6 cm second sole can produce noticeably different shoes even though both may fall inside a general newborn range.
- Watch the BLO transition tension. Pulling this round too tightly causes the edge of the sole to curl upward instead of remaining flat.
- Check bow width before sewing. The outer bow tips should remain above the sole edge; excessive width makes the loops wrap around the sides of the shoe.
- Pin each bow at three points. Sewing only through the center wrap allows the loops to rotate forward or upward after handling.
- Keep the ankle strap at neutral tension. Stretching the 12-stitch strap during attachment makes the opening smaller after the yarn relaxes.
- Reverse direction when weaving yarn tails. Run the tail through approximately 3 cm of stitches, reverse once and continue through neighboring stitches to reduce the chance of the tail working loose.
Sizing and Gauge
This version targets a newborn-size sole measuring approximately 9–10 cm. Finished measurement should control the sizing rather than the number printed on a yarn label or the baby’s age alone.
Changing hook size can alter the finished dimensions. A 3.0 mm hook provides the target starting point with DK yarn. If your first sole is considerably longer than 10 cm, moving to a smaller hook or adjusting the foundation chain may be necessary. If it is shorter than 9 cm, check your yarn weight and tension before increasing the pattern.
Measure the sole after the final increase round. Do not wait until both shoes are assembled to compare their dimensions.
These are soft crochet baby shoes intended for newborn and non-walking use. They are not protective footwear for standing or walking.
Why DK Yarn Works for This Design
DK yarn gives the oversized bow clear stitch definition without creating an excessively thick center wrap. It also keeps the low shoe wall relatively thin, which is important for maintaining the Mary Jane profile.
Using heavier yarn changes more than the sole length. The side walls become thicker, the ankle strap becomes wider and the bow gains additional mass. Those changes can alter the proportions of the complete shoe even when the sole still appears correctly shaped.
Use the same yarn weight for both cream and camel sections. A substantially heavier brown yarn can make the bow pull the toe upward, while a much finer accent yarn may produce a bow that looks undersized against the shoe.
How to Match the Bow Booties in the Reference Design
Color placement carries much of the visual structure. Keep the sole, upper, heel wall and ankle strap in cream or warm ivory. Reserve the camel brown yarn for the oversized bow and optional decorative button detail.
Bow position is equally important. Place it horizontally across the upper toe, close to the front edge of the Mary Jane opening. The bow should cover a substantial portion of the toe without hanging below the sole.
Moving the bow too far toward the ankle makes the shoe appear shorter. Positioning it too far forward allows the loops to extend beyond the rounded toe.
The ankle strap should remain narrow. Increasing its depth changes the silhouette from a low Mary Jane shoe toward a conventional crochet bootie.
Do not stuff the toe. The finished shape should come from the oval sole, controlled decreases and consistent stitch tension rather than polyester filling.
Finishing the Pair
Place both shoes on a flat surface after weaving in the final yarn tails. Compare the toe curves from above first, then examine the shoes from the side. The heel walls should be approximately equal in height and the straps should cross at matching angles.
Check the bows last. Measure from the center wrap to each outer tip if visual comparison is difficult. A small adjustment at this stage can correct a bow that sits several millimeters higher on one shoe.
For infant use, inspect every attached component before the booties are worn. Permanently sewn crochet details are preferable to loose decorative components, and the shoes should remain intended for supervised, non-walking use.
Conclusion
Measure the first finished sole before making the second; 9–10 cm is the target for this newborn version, and matching the pair matters more than relying on an age label. Next, pin the camel bow across the completed toe and check its width from above before placing permanent stitches. That check prevents the main proportion problem in these crochet baby booties with bow. Save the finished pattern to Pinterest or share the completed pair on Instagram with #MaryJaneBowBooties, including your yarn and hook substitutions so the sizing can be compared. Which proportion would you change on this specific design: the width of the camel bow or the length of the cream ankle strap?









