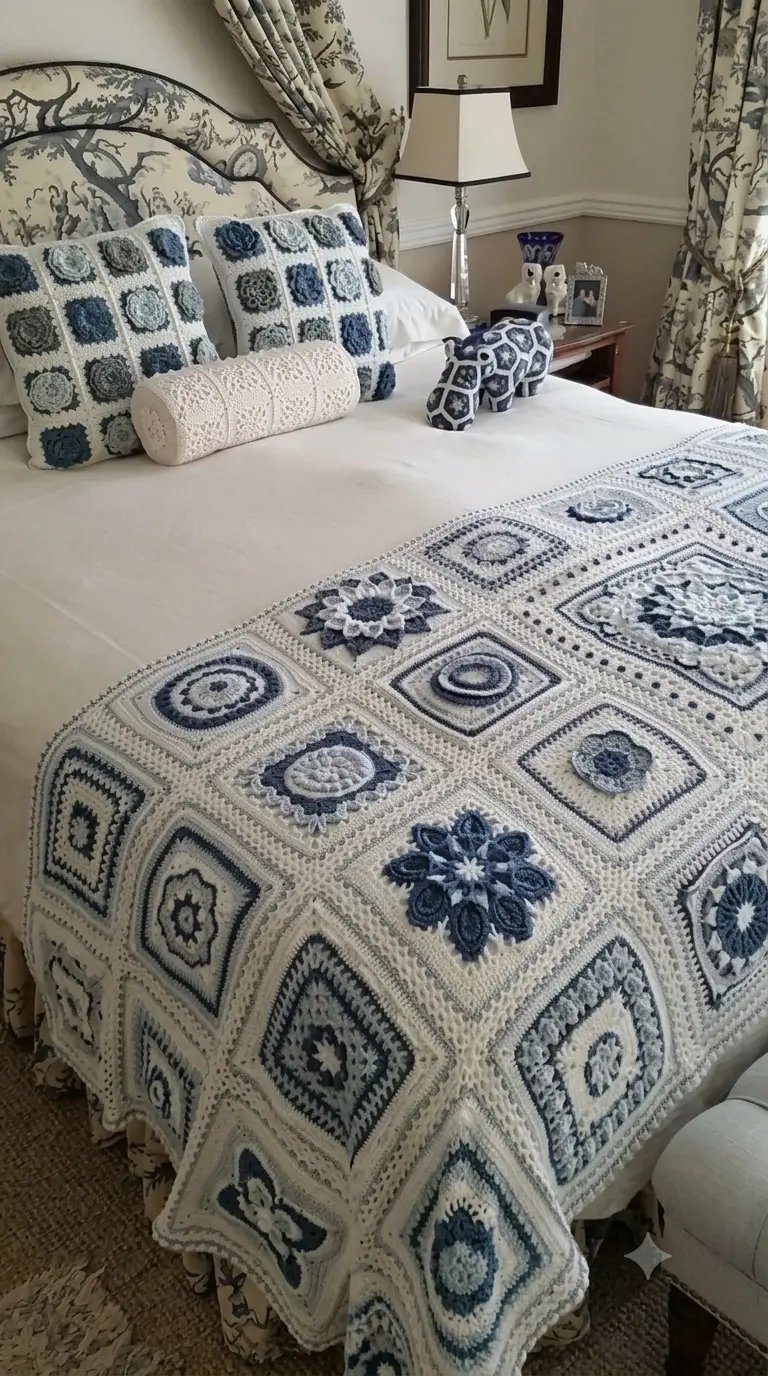
An elephant’s trunk has to project from the face without dragging the entire head forward. This elephant amigurumi crochet pattern solves that problem with a compact 36-stitch head, lightweight curved trunk and four-point leg support. Use worsted yarn, a 3.5 mm hook and 8 mm eyes for a roughly 15 cm project. The skill level is intermediate. Its low profile also makes the finished elephant practical for shelf or bed-display arrangements.
The Design: What Makes the Blue Elephant Different
The photographed elephant is long rather than upright, so the crochet body needs horizontal volume without turning into a sphere. A 36-stitch body plateau supplies that width while four short legs distribute the stuffing load. The trunk begins narrow and gains only limited circumference; a heavy trunk would rotate the head downward after assembly.
Broad ears provide the second important proportion. They are worked as flat pieces instead of stuffed forms, keeping weight away from the head. Navy, white and pale blue color changes create the blue elephant crochet pattern effect without copying the photograph square by square.
A frequent mistake in a crochet elephant step by step project is sewing the trunk too low. That compresses the lower face and leaves too little visual separation between the trunk and front legs.
Project Info at a Glance
| Skill Level | Time | Finished Size | Hook | Best For |
|---|---|---|---|---|
| Intermediate | 6–8 hours | Approx. 15 cm tall | 3.5 mm | Decorative amigurumi, animal collections, colorwork practice |
The 15 cm size is a working target. Final measurements can change according to yarn thickness, hook size, stuffing density and individual crochet tension.
Materials and Tools
Yarn
- Deep navy — worsted/Aran — approximately 100 g available
- White — worsted/Aran — approximately 15 g
- Pale blue — worsted/Aran — approximately 10 g
- Black — scrap quantity for facial embroidery if safety eyes are omitted
Tools
- 3.5 mm crochet hook
- 8 mm safety eyes — 2
- Polyester stuffing
- Tapestry needle
- Stitch markers
- Pins
- Scissors
For an item intended for a child under three, embroidered eyes remove detachable plastic eye components.
Abbreviations
- MR — magic ring
- sc — single crochet
- inc — two sc in one stitch
- dec — single-crochet decrease
- sl st — slip stitch
- ch — chain
- BLO — back loop only
- FLO — front loop only
- st/sts — stitch/stitches
For an invisible decrease, insert the hook through the front loops of the next two stitches, yarn over, pull through, then complete the single crochet through the remaining loops.
Elephant Amigurumi Pattern — Step by Step
Work in a continuous spiral unless a section states otherwise. Place a stitch marker in the first stitch of every round. The head and body use a medium 36-stitch maximum circumference.
Head
Yarn: deep navy
R1: 6 sc in MR (6)
R2: inc ×6 (12)
R3: (1 sc, inc) ×6 (18)
R4: (2 sc, inc) ×6 (24)
R5: (3 sc, inc) ×6 (30)
R6: (4 sc, inc) ×6 (36)
R7: sc around (36)
R8: sc around (36)
R9: sc around (36)
R10: sc around (36)
R11: sc around (36)
R12: sc around (36)
Place the 8 mm eyes between R9 and R10, approximately 8 stitches apart. Check the future trunk position before locking the safety-eye washers.
R13: (4 sc, dec) ×6 (30)
R14: (3 sc, dec) ×6 (24)
R15: (2 sc, dec) ×6 (18)
Stuff firmly while keeping the face rounded.
R16: (1 sc, dec) ×6 (12)
R17: dec ×6 (6)
Fasten off. Leave a 20 cm tail and close the six-stitch opening.
Body
Yarn: deep navy with white and pale-blue accents
R1: 6 sc in MR (6)
R2: inc ×6 (12)
R3: (1 sc, inc) ×6 (18)
R4: (2 sc, inc) ×6 (24)
R5: (3 sc, inc) ×6 (30)
R6: (4 sc, inc) ×6 (36)
R7: sc around in navy (36)
R8: 12 navy, 6 pale blue, 18 navy (36)
R9: 10 navy, 8 white, 18 navy (36)
R10: sc around in navy (36)
R11: 20 navy, 6 pale blue, 10 navy (36)
R12: sc around in navy (36)
R13: sc around (36)
R14: (4 sc, dec) ×6 (30)
R15: (3 sc, dec) ×6 (24)
R16: (2 sc, dec) ×6 (18)
Stuff the center firmly while keeping the sides evenly rounded. The underside needs enough firmness to support all four legs.
R17: (1 sc, dec) ×6 (12)
R18: dec ×6 (6)
Fasten off. Leave a 20 cm tail and close the opening.
Front Legs — Make 2
Yarn: deep navy with white foot band
R1: 6 sc in MR (6)
R2: inc ×6 (12)
R3: (1 sc, inc) ×6 (18)
R4: sc around in white (18)
R5: sc around in navy (18)
R6: sc around (18)
R7: (1 sc, dec) ×6 (12)
R8: sc around (12)
R9: sc around (12)
Stuff the lower two-thirds only. Leaving the upper section softer makes the leg easier to sew flush against the body.
Fasten off. Leave a 25 cm sewing tail.
Back Legs — Make 2
Yarn: deep navy
R1: 6 sc in MR (6)
R2: inc ×6 (12)
R3: (1 sc, inc) ×6 (18)
R4: sc around (18)
R5: sc around (18)
R6: sc around (18)
R7: (1 sc, dec) ×6 (12)
R8: sc around (12)
R9: sc around (12)
Stuff firmly at the foot and more lightly near the open edge.
Fasten off. Leave a 25 cm sewing tail.
Ears — Make 2
Yarn: deep navy and pale blue
R1: 6 sc in MR (6)
R2: inc ×6 (12)
R3: (1 sc, inc) ×6 (18)
R4: (2 sc, inc) ×6 (24)
R5: (3 sc, inc) ×6 (30)
Fold approximately one-quarter of each circle inward at the front edge. Do not stuff the ears.
Fasten off. Leave a 25 cm sewing tail.
Elephant Trunk
Yarn: deep navy
R1: 6 sc in MR (6)
R2: sc around (6)
R3: sc around (6)
R4: (1 sc, inc) ×3 (9)
R5: sc around (9)
R6: sc around (9)
R7: 3 sc, inc ×3, 3 sc (12)
R8: sc around (12)
R9: sc around (12)
R10: sc around (12)
R11: sc around (12)
R12: sc around (12)
Add only a small amount of stuffing to R7–R12. Keep the narrow end almost empty so the tip can be curved downward.
Fasten off. Leave a 30 cm sewing tail.
Tail
Yarn: deep navy
R1: 6 sc in MR (6)
R2: sc around (6)
R3: sc around (6)
R4: sc around (6)
R5: sc around (6)
R6: sc around (6)
Do not stuff. Fasten off with a 20 cm sewing tail. Add three short pale-blue yarn strands to the tip and trim them to approximately 1.5 cm.
Cheek Patches — Make 2
Yarn: pale blue
R1: 6 sc in MR (6)
R2: inc ×6 (12)
Slip stitch to the first stitch. Fasten off with a 15 cm sewing tail.
Keep both circles flat. Positioning them below the eyes adds light-colored facial detailing without increasing the weight of the head.
Patchwork Body Appliqués — Make 3
Yarn: white and pale blue
R1: 6 sc in MR (6)
R2: inc ×6 (12)
R3: (1 sc, inc) ×6 (18)
Fasten off and flatten each circle before assembly. Make one in white and two in pale blue, or reverse the color ratio.
The appliqués reproduce the visual idea of the photographed elephant’s blue-and-white ornamental surface without covering the entire body with bulky motifs.
Assembly
- Pin the head to the narrow front end of the body. Position the center of the head slightly above the body’s horizontal centerline, then sew through complete stitches on both pieces.
- Check the head-to-body seam before closing it completely. Add a small quantity of stuffing behind the neck seam if the head begins to rotate downward.
- Complete the face by positioning the cheek patches below and slightly outside the eyes. Keep both patches level when viewed from the front.
- Pin the two front legs beneath the front third of the body. Space their centers approximately 4–5 cm apart.
- Position the back legs beneath the rear third. Place the elephant on a flat surface before sewing the legs permanently.
- Center the trunk below the eyes and sew its open R12 edge to the face. Shape the lightly stuffed tip downward after attachment.
- Place each ear behind the eye line with its folded section facing forward. Sew mainly along the inner portion so the outer edge remains free.
- Sew the tail to the rear center approximately two rounds above the underside of the body.
- Pin the patchwork appliqués asymmetrically across the sides and upper body. Sew around their edges using matching yarn.
- Weave all remaining yarn tails through at least four internal stitch columns before trimming them inside the stuffed pieces.
The completed elephant should rest on all four legs with the trunk clear of the supporting surface.
7 Technical Tips for a Better Elephant Amigurumi
- Control stitch-marker drift. A missing marker can move the apparent beginning of the round several stitches across the body. Move the marker immediately after completing the first stitch of every new round.
- Do not overstuff the trunk. Packing fiber into the first four trunk rounds creates a rigid tip that cannot hold the required downward curve. Keep approximately the final 2–3 cm of the narrow tip almost empty.
- Watch for visible decrease ridges. Standard sc2tog decreases can produce raised bars across the head. Work decreases through the front loops when you need a cleaner exterior surface.
- Install the eyes before the head becomes too narrow. After the decrease rounds begin, there is progressively less room for fitting safety-eye washers. Place and secure the 8 mm eyes after R12.
- Check the fabric for stuffing gaps. Open spaces wider than approximately 1 mm can expose pale stuffing beneath navy yarn. Change from a 3.5 mm to a 3.25 mm hook if your personal tension produces an open fabric.
- Pin all four legs before sewing. A difference of only 5–8 mm between corresponding leg positions can make the horizontal body rock diagonally. Test the pinned elephant on a flat surface before completing any leg seam.
- Do not cut assembly tails too close. A yarn end carried through only one or two stitches can return to the surface under pressure. Pass each tail through at least four internal stitch columns before trimming it inside the body.
Finishing the Blue Patchwork Elephant
The finished structure depends on three measurements: a 36-stitch head, four evenly positioned legs and a trunk light enough to maintain its curve. Before making another elephant, record the actual height, body length and eye spacing from the first sample. Those measurements make yarn substitutions easier to predict.
For a closer match to the photographed design, add more white and pale-blue appliqués rather than increasing the size of the ears or trunk. Keep the additional motifs flat so they do not distort the body.
Save this elephant amigurumi crochet pattern to Pinterest and share the completed color arrangement on Instagram with #BluePatchworkElephant. For a second version, decide one construction detail before changing the colors: should the trunk curve downward like the photographed elephant, or turn upward across its final three rounds?









