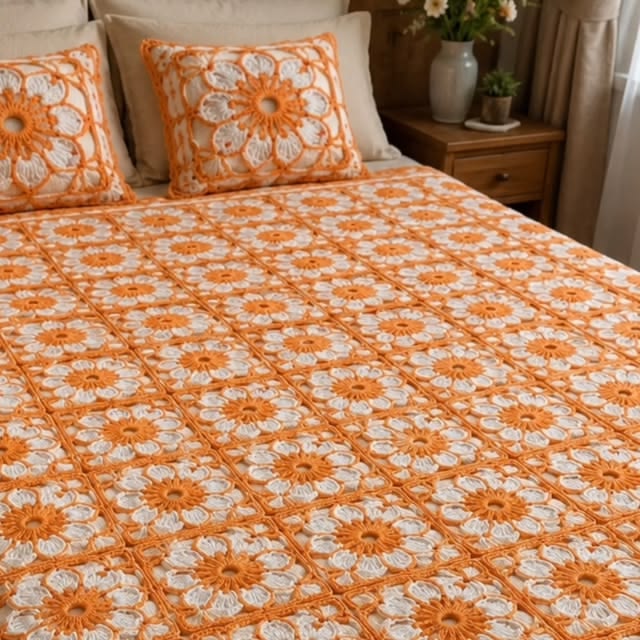
Eight white petals have to divide cleanly around four orange corners or this flower bedspread loses its repeating grid. This orange and white flower granny square blanket pattern uses worsted-weight yarn, a 5.0 mm hook, broad raised petals, orange openwork framing, and matching joins. The image-inspired bedspread targets approximately 180 × 210 cm, with individual squares blocked to about 12 cm.
What Makes This Flower Granny Square Blanket Different
The motif is built around eight petals rather than a conventional twelve-petal daisy. Two petals visually occupy each side of the square, which gives the flower a broad radial shape while leaving enough room for orange corner construction. White petals dominate the center, but orange remains visible through the open spaces and forms the entire geometric framework.
Scale is the second structural choice. At approximately 12 cm, each 8 petal flower granny square is small enough to repeat densely across a bedspread but large enough for the petal texture to remain readable. Orange joining stitches continue the square outlines instead of interrupting them with a third color.
A common mistake with a floral granny square blanket is adding too many stitches behind the petals. Excess fabric causes the orange background to ripple before the motifs are joined.
Project Information
| Skill Level | Construction | Motif Size | Example Bedspread | Hook |
|---|---|---|---|---|
| Intermediate | Modular 8-petal flower squares | Approx. 12 × 12 cm blocked | Approx. 180 × 210 cm | 5.0 mm |
The example uses approximately 15 squares across × 17 squares long, or 255 motifs. Mattress dimensions vary, so measure the intended bed and compare that measurement with one blocked square before committing to the full motif count.
Materials and Tools
Yarn
- Burnt orange or pumpkin orange — worsted/category 4 yarn — flower centers, square framework, joining, and border.
- Warm white or cream — worsted/category 4 yarn — eight petals on every motif.
Yarn consumption for a 255-square bedspread is substantial. Make one complete square, weave its tails, and weigh it. Multiply that weight by 255, then add approximately 10–15 percent for joining, border rounds, swatching, and gauge variation.
Tools
- 5.0 mm crochet hook
- Optional 4.5 mm hook if the flower centers ripple
- Tapestry needle
- Scissors
- Locking stitch markers
- Blocking mats
- Rust-resistant blocking pins
- Tape measure
Abbreviations
- MR — magic ring
- ch — chain
- sc — single crochet
- hdc — half double crochet
- dc — double crochet
- tr — treble crochet
- sl st — slip stitch
- st/sts — stitch/stitches
- sp — space
- ch-sp — chain space
- tr4tog — four treble crochet stitches closed together
A cluster is completed by leaving the final loop of each partial stitch on the hook and drawing the working yarn through all remaining loops together.
8 Petal Flower Granny Square Pattern
Make one test motif before beginning the full bedspread. The target is approximately 12 × 12 cm after blocking. Adjust hook size if the first square differs substantially from that measurement.
Orange Flower Center
Use burnt-orange yarn and the 5.0 mm hook.
Round 1: Make an MR. Ch 3, work 15 dc into the ring. Join with sl st to the top of the beginning ch-3. (16 dc)
Pull the center ring closed firmly.
Round 2: Ch 1. Sc in the same stitch, ch 2, skip 1 stitch, sc in the next stitch.
Repeat (ch 2, skip 1, sc in next stitch) around.
Join with sl st to the first sc. (8 ch-2 spaces)
Fasten off orange.
These eight chain spaces establish the positions for the eight white petals.
White Flower Petals
Join warm-white yarn in any ch-2 space.
Each chain space receives one broad petal.
Petal 1: Ch 3. Work tr4tog into the same ch-2 space. Ch 3. Sl st into the same space.
Sl st into the next ch-2 space.
Repeat the petal construction in every remaining space.
At the end of the round there should be exactly 8 white petals.
Join at the base of the first petal.
Fasten off white, leaving enough tail for secure weaving.
Fuller White Petal Option
The petals visible in the reference are broad rather than narrow spikes. If tr4tog produces petals that look too thin in the selected yarn, use a five-stitch cluster.
Work:
ch 3, tr5tog, ch 3, sl st
into each petal space.
Test the fuller version on one complete flower before applying it to every motif. Larger clusters consume more yarn and may increase the diameter of the flower enough to alter the squaring round.
Preparing the Flower for the Orange Square
Lay the completed flower flat.
Count all eight petals.
Place a marker after petals 2, 4, 6, and 8.
Those four positions define the future corners.
Each side of the square therefore corresponds visually to two petals.
This division is important. If a corner is shifted by one petal, the orange frame will pull the flower diagonally and the finished motif will not align correctly with neighboring squares.
Orange Squaring Round
Rejoin burnt-orange yarn behind the flower at one marked corner position.
Work into spaces behind the petals rather than across the raised white surface.
At the first corner work:
(3 dc, ch 3, 3 dc)
Work ch 2.
Anchor with 3 dc in the next available space behind the two-petal side section.
Ch 2.
At the next marked corner work:
(3 dc, ch 3, 3 dc)
Repeat this sequence around all four sides.
Join with sl st.
The motif should now show four distinct corners while the white petals remain above the orange background.
Second Orange Square Round
Sl st to the nearest corner ch-3 space.
Ch 3.
Work (2 dc, ch 2, 3 dc) in the same corner space so the beginning ch-3 functions as the first dc.
Ch 1.
Work 3 dc into the next side space.
Ch 1.
Continue across the side.
At each corner work:
(3 dc, ch 2, 3 dc)
Repeat around.
Join with sl st.
This round expands the orange framework while retaining the open appearance visible between the flowers.
Third Orange Square Round
Continue in burnt orange.
Sl st into the corner.
At each corner work:
(3 dc, ch 2, 3 dc)
Across each side, work 3 dc into every established ch-1 space with ch 1 between groups.
Repeat around.
Join with sl st.
Measure the square without stretching it.
If it is close to the 12 cm target, continue to the finishing round. If it remains noticeably smaller, add one additional orange expansion round using the same corner construction.
Motif Finishing Round
Ch 1.
Work sc evenly around the complete square.
Place one sc in each dc and one sc in each ch-1 space.
At each corner ch-2 space work:
(sc, ch 2, sc)
Join with sl st.
Fasten off and leave approximately 15–20 cm for weaving.
The final round provides a stable edge for joining hundreds of motifs.
Checking the Finished Motif
Place the square on a flat surface before blocking.
The orange center should sit close to the geometric center of the motif.
Count eight white petals.
Check that two petals visually correspond to each side.
Measure all four sides.
Small differences can be corrected during blocking, but one side should not differ from another by more than approximately 5 mm.
Blocking the Flower Squares
Block the motifs to approximately 12 × 12 cm.
Pin the four corners first.
Measure both diagonals. Similar diagonal measurements indicate that the square is not skewed.
Add pins along the orange edges where necessary.
Do not pin through the center of the white petal clusters.
The orange framework should flatten while the white flower retains some relief.
Allow the motif to dry completely before removing the pins.
Planning the Bedspread Layout
For an image-inspired bedspread around 180 × 210 cm, begin by testing a layout of approximately 15 squares across × 17 squares long.
That arrangement uses:
15 × 17 = 255 motifs.
At exactly 12 cm per blocked square, the unjoined motif field calculates to approximately 180 × 204 cm.
Joining can alter the measurement slightly, and the final border adds additional width and length.
Measure the actual mattress before finalizing the motif count. A bedspread intended to hang over the sides needs more width than a blanket designed to sit only on top of the mattress.
Batch Crocheting 255 Squares
A large bedspread becomes easier to control when the motifs are made in stages.
Make a batch of orange centers first.
Count eight chain spaces on every center before placing it into the completed batch.
Add white petals to the centers next.
Finish with the orange squaring rounds.
Batch construction reduces repeated yarn changes and makes stitch differences easier to notice before hundreds of motifs have been completed.
Joining the Flower Squares
The reference uses orange between the white flowers, so the joining yarn should match the orange framework.
Arrange the blocked squares in the planned grid.
Place two motifs with wrong sides together if a slightly raised joining line is wanted.
Insert the hook through corresponding outer stitches.
Work one sc through both edges.
Continue from corner to corner.
The orange seam should read as part of the existing motif framework rather than as an unrelated stripe.
Alternative Flat Slip-Stitch Join
For a flatter bedspread, place two squares with right sides together.
Join orange yarn at one corner.
Slip stitch through corresponding back loops along the complete edge.
Open the motifs after joining.
The seam should sit mostly behind the fabric while a narrow orange division remains visible from the front.
Use the same joining method throughout the bedspread. Switching between raised and flat joins creates inconsistent spacing between flower rows.
Joining the Complete Bedspread
Join the 15 squares in each horizontal row first.
Prepare all 17 rows.
Lay them in the planned order.
Join Row 1 to Row 2 along the complete width.
Continue until all rows are connected.
At every four-square intersection, align all corner chain spaces before securing the crossing.
Check the bedspread on a flat surface after every three or four joined rows. Correcting a distorted seam is easier before the complete weight of the blanket has been assembled.
Orange Border Foundation Round
Join burnt-orange yarn at any outer corner.
Ch 1.
Work sc evenly around the complete bedspread.
Place one sc in each established edge stitch or an equivalent distribution along the joins.
At each corner work:
(sc, ch 2, sc)
Join with sl st.
Count the stitches on opposite sides before continuing. Opposite edges should have matching counts or differ only where the motif arrangement requires it.
Border Round 2
Ch 3.
Dc in each stitch across the first side.
At the corner ch-2 space work:
(2 dc, ch 2, 2 dc)
Continue around.
Join with sl st.
This round gives the perimeter enough density to frame the open orange motif construction.
Border Round 3: Openwork
Ch 1.
Sc in the first stitch.
Work:
ch 2, skip 1 stitch, sc in next stitch
across the side.
At each corner work:
(sc, ch 3, sc)
Continue around all four sides.
Adjust one repeat near a corner if required so the openwork remains visually centered.
Optional Final Orange Edge
For a slightly heavier outline, work one final sc round.
Work one sc into each sc and two sc into each ch-2 space.
At the corners work:
(2 sc, ch 2, 2 sc)
Join with sl st.
Fasten off and weave the tail through several centimeters of orange stitches.
Assembly
- Crochet one complete orange-and-white flower motif and block it to the target 12 × 12 cm.
- Make the required orange centers, confirming that each center contains exactly eight petal spaces.
- Add eight broad white petal clusters to every center and check the flower count before squaring.
- Return to orange and work the background rounds, placing corner markers after petals 2, 4, 6, and 8.
- Finish and block all motifs to matching dimensions before beginning any permanent joining.
- Arrange approximately 15 × 17 motifs for the example bedspread and check the arrangement against the intended mattress.
- Join the motifs with orange yarn, completing horizontal rows before connecting those rows vertically.
- Inspect every four-square intersection and correct any open or distorted corner before adding the border.
- Work the orange foundation, dense, and openwork border rounds around the complete bedspread.
- Weave all remaining tails, shape the perimeter, and measure the completed bedspread on a flat surface.
The completed fabric should show a regular field of eight-petal white flowers surrounded by a continuous pumpkin-orange grid.
7 Technical Tips for the Flower Granny Square Bedspread
- Flower developing nine or seven petals: Count exactly eight ch-2 spaces before attaching the white yarn. An incorrect center division cannot produce the required two-petals-per-side square geometry.
- White petals becoming different sizes: Keep every cluster at the same stitch count and loop height. A difference of even 5–8 mm becomes visible when hundreds of identical flowers are arranged in rows.
- Orange square framework rippling: Reduce unnecessary chains or background stitches behind the petals. Excess circumference around the flower forces the square to wave instead of lying flat.
- Motif grid becoming uneven: Block every square to approximately 12 cm before joining. A 5 mm difference repeated across 15 motifs can change the row width by 7.5 cm.
- Four-square intersections opening: Match all corner spaces precisely during joining. A gap wider than approximately 1 cm is conspicuous because the surrounding orange framework forms a regular geometric grid.
- Border beginning to ruffle: Check stitch distribution after the first perimeter round. Too many stitches along the row ends add excess circumference and produce waves that later rounds amplify.
- White petals flattening after blocking: Pin the orange square edges rather than stretching the petal clusters. The flowers should retain several millimeters of relief above the orange framework.
Keeping the Eight-Petal Geometry Consistent
The entire pattern depends on dividing a circular flower into four equal sides.
Eight petals provide a clean division because each side receives two petals.
Mark the corner positions before starting the orange background if the geometry is difficult to read.
Place markers after petals 2, 4, 6, and 8.
Those markers should remain evenly distributed around the flower.
If one side appears crowded while another has excessive open space, correct the background attachment before adding another round.
Controlling the White Petal Shape
The reference flowers have broad oval-looking petals rather than narrow pointed spokes.
Cluster height creates the outer projection, while the anchoring chains determine how wide each petal can spread.
If the petals are too narrow, increase the cluster from tr4tog to tr5tog.
If they become excessively bulky, return to four partial trebles or reduce the hook by 0.5 mm for the white round only.
Use the same petal variation across the complete bedspread.
Keeping the Orange Center Flat
The center should remain circular without forming a cup.
If it curves upward before the petals are added, the stitch tension may be too tight for the hook size.
If it waves around the edge, the center contains too much circumference.
Make several centers and compare their diameters before batch-producing hundreds of them.
A consistent center is particularly important because the orange circle is the strongest focal point inside every white flower.
Color Placement
The two-color palette is part of the structure rather than an incidental decoration.
Orange forms the center, disappears during the petal round, then returns as the square framework.
White is confined to the petals.
This repetition produces a strong orange grid when the motifs are joined.
Adding a third color to random squares changes that effect substantially. For the closest image-inspired result, use the same orange and white arrangement on every motif.
Alternative Color Combinations
The same flower geometry can be worked in other two-color combinations.
Mustard centers and framework with cream petals produce a muted botanical palette.
Sage with ivory creates a lower-contrast version.
Terracotta with warm white remains close to the reference while reducing orange saturation.
For stronger contrast, navy can replace orange while white remains the petal color.
Keep the darker or stronger color in the center and framework if the goal is to preserve the visible square grid.
Estimating Yarn from One Finished Square
Large bedspreads require a project-specific yarn calculation.
Weigh one finished, blocked square with all tails trimmed.
If one motif weighs 20 g, for example, 255 motifs require approximately 5,100 g before joining and border yarn are considered.
If the square weighs 15 g, the same motif count requires approximately 3,825 g.
Those examples show why yarn weight should be measured rather than guessed from motif count alone.
Add approximately 10–15 percent after calculating the motif total.
Planning the Orange and White Quantities
Weigh the yarn before and after making one complete motif if separate color consumption is required.
Record how many grams of orange were used for the center and square framework.
Then record the white petal consumption.
Multiply each figure by the planned number of motifs.
Add the joining and border allowance entirely to the orange total if following the image-inspired palette.
Purchase enough yarn from matching dye lots to prevent visible color shifts across the large bedspread.
Changing the Bedspread Width
Width is easiest to modify by changing the number of motif columns.
At a blocked size of 12 cm, 12 squares create approximately 144 cm before border adjustments.
Thirteen squares create approximately 156 cm.
Fourteen produce approximately 168 cm, while 15 produce approximately 180 cm.
Use the actual blocked measurement rather than assuming every motif finishes at exactly 12 cm.
Add the expected border width only after calculating the central motif field.
Changing the Bedspread Length
Length follows the same modular calculation.
Fifteen 12 cm squares create approximately 180 cm.
Sixteen create approximately 192 cm.
Seventeen produce approximately 204 cm before the border.
Eighteen create approximately 216 cm.
For a bedspread that covers pillows or hangs over the foot of a mattress, additional rows may be needed.
Making a Sofa Throw
The motif does not have to be restricted to a full bedspread.
A smaller throw can use approximately 10 × 12 squares.
At 12 cm per motif, the central field measures roughly 120 × 144 cm before joining and border adjustments.
The same orange joining method and perimeter rounds can be retained.
Reducing the motif count is preferable to shrinking the individual flower when the broad eight-petal appearance is the desired feature.
Making a Baby-Size Version
A compact blanket can use approximately 7 × 9 motifs.
At 12 cm per square, that produces a center near 84 × 108 cm before the border.
Check yarn fiber and care requirements when making a blanket intended for frequent washing.
Keep joins flat and tails securely woven through multiple stitches.
The flower construction remains unchanged.
Coordinating Crochet Pillow Cover
The reference includes matching pillows with much larger flowers than the bedspread motifs.
Rather than attaching a single 12 cm square to a pillow, enlarge the flower geometry into a separate front panel.
A standard decorative pillow can target approximately 40–45 cm square.
Use the same orange center and eight white petals, then continue adding orange square rounds until the front reaches the required width.
This preserves the visual relationship between the bedspread and pillow while giving the pillow flower the larger scale visible in the reference.
Large Flower Pillow Front
Begin with the same eight-section orange center.
Increase the petal clusters proportionally by using taller stitches or additional cluster stitches.
After completing eight white petals, return to orange.
Work repeated square expansion rounds.
At every corner maintain:
(3 dc, ch 2, 3 dc)
Add side groups as the panel expands.
Continue until the front measures approximately 40–45 cm or matches the selected pillow insert.
Pillow Back Panel
A simple orange back keeps attention on the large flower front.
Crochet a square panel in dc or hdc until it matches the front dimensions.
Alternatively, make two overlapping rectangular back panels for a removable envelope-style cover.
Block all pillow pieces to matching dimensions before assembly.
Place the flower front and back together with wrong sides facing.
Join around the perimeter in orange.
Insert the cushion before closing the final side if a permanent cover is preferred.
Managing Hundreds of Yarn Tails
A 255-square project creates a large number of ends.
Weave tails after each production stage instead of saving all finishing work until the blanket is assembled.
Orange center tails can be secured before the white petals are added.
White tails should be woven into white stitches rather than carried visibly through orange sections.
Final orange tails can be hidden in the dense squaring rounds.
Trim only after each tail has changed direction at least once inside the fabric.
Final Bedspread Blocking
After joining and adding the border, place the bedspread on a sufficiently large clean surface.
Align the orange joining lines into straight rows and columns.
Shape all four corners.
Measure opposite sides.
Correct minor differences by distributing the fabric rather than stretching individual flowers.
Lift white petals that became compressed during joining.
Follow the selected yarn’s care instructions for wet or steam-related finishing methods.
Finishing the Orange and White Flower Granny Square Blanket
Inspect every orange intersection after the final shaping and correct any white petal caught beneath a joining stitch. Measure the central motif field, border width, and complete bedspread separately so the final dimensions can be recorded accurately. For the example 15 × 17 layout, 255 blocked 12 cm motifs produce a substantial bed-size project before the perimeter treatment. Matching pillow covers can repeat the same eight-petal geometry at a much larger scale without changing the two-color palette.
This orange and white flower granny square blanket pattern is easiest to resize by changing complete motif rows and columns. Record the blocked square measurement and actual grams used per motif before planning another size. Share the finished bedspread on Pinterest or Instagram with #OrangeWhiteFlowerBlanket. Would you keep all eight petals warm white, or use cream for every second flower while retaining the same pumpkin-orange grid?









