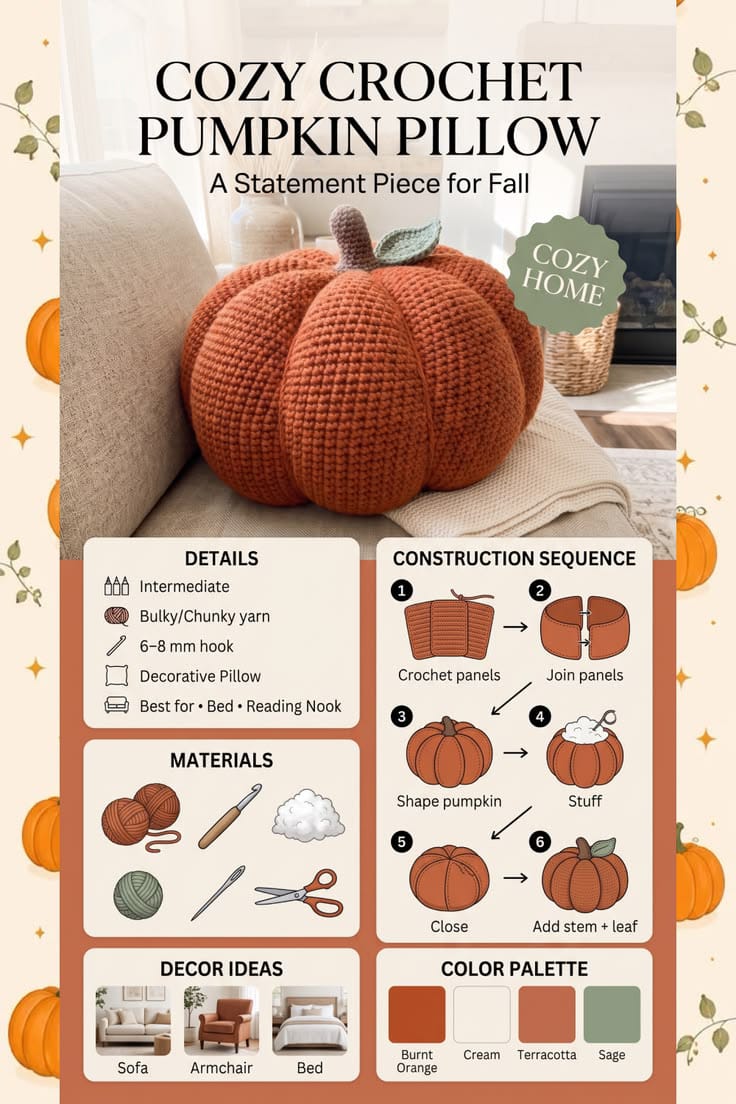
Six deeply curved lobes have to hold their shape under nearly a kilogram of stuffing or an oversized pumpkin quickly becomes a round cushion. This cozy crochet pumpkin pillow pattern uses six shaped burnt-orange panels, bulky yarn, a brown stem, and a sage leaf to build a three-dimensional fall pillow. With a 6.5 mm hook, the image-inspired pumpkin measures approximately 42–45 cm wide and 32–35 cm high before the stem.
What Makes This Crochet Pumpkin Pillow Different
The body is constructed from six matching panels rather than one flat rectangle. Each panel starts narrow, widens through the middle, then contracts toward the opposite end. Joining six curved sections creates natural valleys between the pumpkin lobes and gives the finished chunky crochet pumpkin a stronger segmented profile.
Stuffing density is the second structural decision. The center needs enough fiberfill to support a decorative pillow, but the seams must still pull inward. Overfilling removes the valleys and turns the pumpkin into a sphere.
A gathered top and bottom compress the vertical axis after assembly. That shaping makes the body wider than it is tall, which is important for a convincing 3D pumpkin crochet pattern. The most common construction error is making narrow panel ends too tight; the resulting openings become difficult to gather without puckering.
Project Information
| Skill Level | Construction | Finished Size | Hook | Yarn |
|---|---|---|---|---|
| Intermediate | Six shaped panels, joined and stuffed | Approx. 42–45 cm wide × 32–35 cm high | 6.5 mm | Bulky / Category 5 |
The finished measurement depends on yarn thickness, panel gauge, seam depth, and stuffing pressure. Make one panel first and measure it before crocheting the remaining five.
Materials and Tools
Yarn
- Burnt orange or terracotta — bulky/category 5 — approximately 500–650 g for the six body panels and assembly.
- Medium brown — bulky or heavy worsted — approximately 20–30 g for the stem.
- Muted sage green — bulky or heavy worsted — approximately 15–20 g for the leaf.
Other Materials
- Polyester fiberfill — approximately 700–1,000 g, adjusted according to firmness.
- 6.5 mm crochet hook
- Optional 6.0 mm hook for the stem
- Large tapestry needle
- Stitch markers
- Scissors
- Tape measure
- Long upholstery needle for center sculpting, optional but useful
Abbreviations
- MR — magic ring
- ch — chain
- sc — single crochet
- hdc — half double crochet
- dc — double crochet
- inc — 2 stitches in the same stitch
- dec — decrease
- sl st — slip stitch
- st/sts — stitch/stitches
- BLO — back loop only
For a decrease, work through the front loops of the next two stitches when a less visible reduction is needed.
Cozy Crochet Pumpkin Pillow Pattern
The pumpkin body consists of six matching curved panels. Each panel is worked from one narrow end toward the widest center and then reduced symmetrically. The panels are joined along their long edges before stuffing.
Pumpkin Body Panel — Make 6
Use burnt-orange bulky yarn and a 6.5 mm hook.
The exact row gauge determines the final scale. The following panel is designed as an image-inspired starting construction for an oversized decorative pumpkin.
Row 1: Ch 11. Sc in second ch from hook and across. (10)
Row 2: Ch 1, turn. Inc, sc 8, inc. (12)
Row 3: Ch 1, turn. Sc across. (12)
Row 4: Ch 1, turn. Inc, sc 10, inc. (14)
Row 5: Ch 1, turn. Sc across. (14)
Row 6: Ch 1, turn. Inc, sc 12, inc. (16)
Row 7: Ch 1, turn. Sc across. (16)
Row 8: Ch 1, turn. Inc, sc 14, inc. (18)
Row 9: Ch 1, turn. Sc across. (18)
Row 10: Ch 1, turn. Inc, sc 16, inc. (20)
Row 11: Ch 1, turn. Sc across. (20)
Row 12: Ch 1, turn. Inc, sc 18, inc. (22)
Row 13: Ch 1, turn. Sc across. (22)
Row 14: Ch 1, turn. Inc, sc 20, inc. (24)
Rows 15–24: Ch 1, turn. Sc across. (24)
The long plateau creates the rounded center of the pumpkin section.
Row 25: Ch 1, turn. Dec, sc 20, dec. (22)
Row 26: Ch 1, turn. Sc across. (22)
Row 27: Ch 1, turn. Dec, sc 18, dec. (20)
Row 28: Ch 1, turn. Sc across. (20)
Row 29: Ch 1, turn. Dec, sc 16, dec. (18)
Row 30: Ch 1, turn. Sc across. (18)
Row 31: Ch 1, turn. Dec, sc 14, dec. (16)
Row 32: Ch 1, turn. Sc across. (16)
Row 33: Ch 1, turn. Dec, sc 12, dec. (14)
Row 34: Ch 1, turn. Sc across. (14)
Row 35: Ch 1, turn. Dec, sc 10, dec. (12)
Row 36: Ch 1, turn. Sc across. (12)
Row 37: Ch 1, turn. Dec, sc 8, dec. (10)
Fasten off, leaving approximately 40 cm of yarn on panels that will be used for seaming.
Checking the First Pumpkin Panel
Lay the first panel flat without stretching it.
The center should be substantially wider than either end. Both halves should mirror one another, with a broad central plateau between the increase and decrease sections.
For the image-inspired pillow, aim for a panel length near 34–38 cm. The exact width varies with bulky yarn and gauge.
If the panel is too short, increase the number of central plateau rows rather than adding random rows near one end. If it is too narrow, move up a hook size or add another symmetrical increase on both sides.
Adding Ribbed Texture to the Panels
The reference pumpkin has a dense, clearly visible crochet surface. A subtle vertical texture can be added by working selected rows in BLO.
For a more ribbed variation, work all sc stitches through the back loop only.
This creates horizontal ridges across each flat panel that become vertical or curved texture lines after assembly.
Use the same stitch placement on all six sections. Mixing standard sc and BLO sc between panels produces inconsistent stretch and can make one lobe larger than the others.
Joining the First Two Panels
Place two panels with matching edges together.
Align Row 1 with Row 1 and Row 37 with Row 37.
Using burnt-orange yarn, join along one long curved edge with slip stitches or sc.
Keep the seam firm but not tight.
Open the joined panels and inspect the ridge. The seam should create a visible valley without shortening the panel.
Joining All Six Pumpkin Panels
Add the third panel to the free edge of the second.
Continue until all six panels form one long connected shell.
Join the free edge of Panel 6 to the free edge of Panel 1.
The result should resemble a large open-ended pumpkin tube divided into six sections.
Do not close the top and bottom yet.
Closing the Bottom Opening
Thread a long strand of burnt-orange yarn onto a large tapestry needle.
Run the yarn through sturdy stitches around the lower opening.
Pull gradually to gather the six panel ends toward the center.
Work around the opening a second time if necessary.
Pull firmly and secure the yarn.
Pass the needle across the small remaining hole several times to reinforce the closure.
The bottom should be closed before stuffing begins.
Stuffing the Pumpkin Pillow
Add fiberfill in several stages.
Begin by placing stuffing into each individual lobe.
Push the fiberfill toward the outer curve rather than packing all of it into the center cavity.
Add more stuffing gradually until the six panels expand into rounded sections.
For a pillow approximately 42–45 cm wide, total stuffing may fall around 700–1,000 g, depending on the fiberfill and desired firmness.
Stop before the seams disappear into the surface.
Controlling Stuffing Firmness
The pumpkin should support itself when placed on a sofa or bed, but each seam must still remain recessed.
Press one lobe with the palm of your hand.
The surface should compress slightly and recover without leaving a hollow area.
If the pumpkin becomes nearly spherical, remove some central stuffing and redistribute it toward the outer edges of the lobes.
Keep the top opening accessible while making these adjustments.
Closing the Top
Thread another long burnt-orange strand through the stitches around the top opening.
Pull the opening partially closed.
Add small pieces of fiberfill wherever the upper lobes appear hollow.
Pull again until the opening measures approximately 2–3 cm.
Secure the gathering strand firmly.
The remaining small opening will be covered by the stem.
Sculpting the Pumpkin Center
Cut a long strand of strong matching yarn.
Thread it through a long upholstery or tapestry needle.
Insert the needle through the bottom center and bring it out through the top center.
Pull until the top and bottom move slightly toward one another.
Return the needle through the center in the opposite direction.
Repeat several times.
Secure the yarn only after the pumpkin develops the wide, compressed profile visible in the reference.
Deepening the Six Lobe Valleys
The panel seams create the first level of segmentation. Additional sculpting can make the valleys deeper.
Cut a strand of burnt-orange yarn long enough to travel around the complete pumpkin several times.
Anchor it at the bottom center.
Guide the yarn upward inside or directly beside the first panel seam.
Pass through the top center.
Bring the strand down beside the opposite or next seam, depending on the sculpting method.
Pull gently until the valley becomes more pronounced.
Repeat around all six sections with equal tension.
Do not pull one seam substantially tighter than the others.
Brown Crochet Stem
Use brown yarn. A 6.0–6.5 mm hook can be used depending on yarn thickness.
The stem is worked in a continuous spiral.
Round 1: 6 sc in MR. (6)
Round 2: Inc in each stitch around. (12)
Rounds 3–10: Sc around. (12)
Add a small amount of stuffing as the stem grows.
Round 11: (Sc, inc) ×6. (18)
Round 12: Sc around. (18)
Fasten off and leave approximately 40 cm for attachment.
Creating a Curved Stem
A perfectly straight cylinder does not match the slight bend visible in the reference.
Before attaching the stem, push more stuffing against one side of its upper half.
Thread brown yarn through several stitches along the opposite side.
Pull lightly so that side shortens.
The stem should bend gradually rather than folding at one sharp point.
Secure the shaping strand inside the stem base.
Sage Crochet Leaf
Use muted sage-green yarn.
Ch 13.
Beginning in the second chain from the hook, work:
sl st, sc, hdc, dc, dc, tr, tr, dc, dc, hdc, sc, sl st.
Do not turn.
Continue around the opposite side of the foundation chain.
Work the reverse sequence back toward the starting point:
sl st, sc, hdc, dc, dc, tr, tr, dc, dc, hdc, sc, sl st.
Sl st at the tip.
Fasten off, leaving approximately 30 cm for sewing.
Adding a Center Vein to the Leaf
Thread the sage tail through a tapestry needle.
Work a line of surface stitches along the original foundation chain.
This creates a central vein and slightly stiffens the leaf.
For more structure, pass the yarn through the center a second time.
Do not over-tighten the stitches or the leaf will fold lengthwise.
Attaching the Stem
Position the widened 18-stitch base over the gathered top opening.
Pin or hold it in place.
Sew through one stem-base stitch and one sturdy pumpkin stitch at a time.
Work completely around the stem.
Pass around the base a second time if the stem moves more than approximately 1 cm when pushed sideways.
Hide the final brown tail inside the pumpkin.
Attaching the Sage Leaf
Place the leaf beside the stem with its pointed end angled outward.
Sew the lower third of the leaf to the pumpkin.
Leave the outer portion free so it remains dimensional.
Add two or three small attachment stitches near the stem if the leaf rotates.
Do not sew around the complete leaf edge.
Assembly
- Crochet six identical burnt-orange panels, checking that each reaches the same length and maximum width.
- Join the six panels edge-to-edge, keeping all seam tension consistent from top to bottom.
- Join Panel 6 to Panel 1 to form the complete pumpkin shell, leaving the top and bottom open.
- Gather and close the bottom opening with strong matching yarn before adding fiberfill.
- Stuff each lobe separately, then fill the center until the pillow supports itself without losing the seam valleys.
- Gather the top opening to approximately 2–3 cm and secure it firmly.
- Pass strong yarn through the top and bottom centers to compress the vertical axis and widen the pumpkin profile.
- Deepen the six valleys with matching sculpting strands where the panel seams need more definition.
- Crochet, stuff, shape, and sew the brown stem over the top opening.
- Crochet the sage leaf, add its center vein, and sew only its lower section beside the stem.
The completed pillow should have six rounded burnt-orange lobes, a compressed pumpkin profile, a slightly curved brown stem, and one dimensional sage leaf.
7 Technical Tips for a Large Crochet Pumpkin Pillow
- Lobes becoming different sizes: Measure all six panels before joining and keep the length difference below approximately 5 mm. A longer panel absorbs more stuffing and creates one visibly oversized section.
- Pumpkin becoming spherical: Stop adding fiberfill while the seam valleys are still approximately 2–4 cm deep. Excess central stuffing pushes the seams outward and removes the segmented silhouette.
- Bottom closure opening under pressure: Run the gathering strand through the lower opening at least twice. A single pass carries the full force of 700–1,000 g of compressed stuffing.
- Top remaining too tall: Pass the center-sculpting yarn from bottom to top and shorten the vertical axis by approximately 3–6 cm. This changes the body from an upright ball into a broad pumpkin shape.
- Seams puckering: Match corresponding panel rows during assembly rather than joining by eye. Skipping one or two row ends repeatedly can shorten a seam enough to twist the finished lobe.
- Stem falling sideways: Sew through the complete widened base and reinforce the attachment twice. Movement greater than approximately 1 cm at the base indicates that more anchoring stitches are needed.
- Leaf lying flat: Sew only the lower 25–35 percent of the leaf to the pumpkin. Attaching the full perimeter removes the raised botanical detail visible beside the stem.
Why Six Panels Work for This Pumpkin Shape
A large stuffed pumpkin needs more than surface decoration to create deep segmentation. Six separately shaped panels distribute the stuffing into distinct compartments while their seams establish natural valleys.
The widest part of each panel becomes the outermost curve of one lobe. Narrow ends converge at the top and bottom, where the body is gathered.
Six sections also provide enough segmentation for a recognizable pumpkin without creating a large number of narrow seams. The resulting lobes remain broad enough to support the oversized pillow proportions.
Changing the Number of Pumpkin Lobes
The construction can be altered to use five, seven, or eight panels, but the proportions change.
Five panels create broader lobes and a simpler silhouette. Eight produce narrower, more numerous sections.
For the closest image-inspired result, retain six major panels.
If the panel count changes, make a temporary shell before stuffing and check the circumference. Adding panels without reducing their width produces a much larger pumpkin.
Adjusting the Pumpkin Width
Width is controlled mainly by the maximum width of each panel and the number of panels.
For a larger pillow, add symmetrical increase rows before the central plateau.
For a smaller pillow, stop increasing earlier.
Keep both halves of every panel symmetrical. If three stitches are added before the center, the corresponding reductions must remove those same stitches after the plateau.
Make one complete test panel before committing to all six sections.
Adjusting the Pumpkin Height
The panel length controls much of the unstuffed height.
To make a taller pumpkin, add rows to the central 24-stitch plateau.
For a flatter pumpkin, remove several plateau rows and apply stronger center compression after stuffing.
Do not remove too many increase or decrease rows simply to shorten the project. Abrupt shaping creates pointed ends rather than the gradual curves visible in the reference.
Making a Smaller Pumpkin Cushion
A smaller decorative version can target approximately 30–34 cm wide.
Use the same six-panel method with fewer increase steps and a shorter central plateau.
Another option is to use worsted yarn with a smaller hook while retaining the panel proportions.
Stuff the reduced version according to shape rather than scaling the large pillow’s stuffing weight mathematically. Fiberfill compression varies substantially between brands.
Making an Extra-Large Pumpkin Pillow
An oversized floor pillow can exceed 50 cm in diameter.
Increase each panel gradually to a wider plateau and add several central rows.
Larger versions place much more force on the gathered openings and sculpting strands. Use doubled body yarn or another strong matching yarn for the internal shaping.
Reinforce the bottom closure before stuffing. Repairing a failed bottom seam after the pumpkin is fully filled is considerably more difficult.
Choosing Bulky Yarn
Bulky category 5 yarn creates a dense surface while keeping the individual crochet stitches visible.
A smooth plied yarn gives the strongest stitch definition. Chenille produces a softer surface but can obscure seams and makes sculpting strands harder to anchor securely.
For the image-inspired construction, choose a yarn that holds a firm sc fabric with a 6–8 mm hook.
Make a 10 cm swatch before beginning the first panel. If large holes appear between stitches, reduce the hook size.
Choosing the Burnt-Orange Color
The reference body uses a warm burnt orange rather than bright Halloween orange.
Terracotta, cinnamon, rust, copper, and muted pumpkin shades all fit the same construction.
A medium-dark orange also shows the lobe shadows clearly. Very dark brown-orange can hide the seam relief, while extremely pale orange reduces contrast with a neutral sofa.
Use yarn from the same dye lot across all six panels whenever possible.
Alternative Fall Color Palettes
The body can be worked in cream with a camel stem and olive leaf for a neutral version.
Sage green creates a less traditional pumpkin while retaining the same sculpted form.
Muted mustard works well with a dark-brown stem.
For a terracotta body, keep the leaf subdued rather than using a highly saturated green.
Only the colors change; panel shaping and assembly remain the same.
Estimating Yarn from the First Panel
Weigh the first completed body panel before making the remaining five.
Multiply that weight by six.
Add approximately 10–15 percent for seams, gathering, sculpting, swatching, and tails.
Calculate the stem and leaf separately.
This method is more accurate than relying only on a generic yardage figure because bulky yarns differ greatly in meters per gram.
Managing Fiberfill Distribution
Do not insert one large mass of stuffing into the center.
Separate the fiberfill into smaller portions.
Fill each lobe from the outer edge toward the middle.
Rotate the pumpkin regularly and compare opposite sections.
If one lobe projects farther than the others, remove a small amount from that section and redistribute it before closing the top.
Final sculpting should refine the lobes rather than correct major stuffing differences.
Keeping the Pumpkin Base Stable
The bottom should be broad enough for the pillow to rest without rolling.
After center sculpting, place the pumpkin on a flat surface.
If it rocks strongly, redistribute stuffing away from the exact bottom center and into the lower portions of the six lobes.
The center indentation should sit slightly above the lowest outer curves.
A stable base is especially useful when the pumpkin is displayed upright on an armchair or bed.
Washing and Care
Follow the care instructions printed on the selected yarn label.
A large stuffed pumpkin can become extremely heavy when saturated with water, so complete-machine washing may not suit every yarn or stuffing combination.
For minor marks, localized cleaning reduces stress on the seams and sculpting strands.
If the pillow is fully washed, support its weight while wet and reshape all six lobes during drying.
Check the stem and leaf attachment after cleaning.
Finishing the Cozy Crochet Pumpkin Pillow
Inspect all six panel seams after the final sculpting pass and compare the depth of each valley. Redistribute stuffing if one lobe projects substantially farther than its neighbors, then check that the gathered bottom remains closed and the stem base does not shift when handled. The image-inspired target is approximately 42–45 cm wide and 32–35 cm high before the full stem height, giving the pumpkin the broad proportions required for a decorative cushion.
This cozy crochet pumpkin pillow pattern can be resized by changing panel width and plateau length while retaining the six-section construction. Record the first panel’s dimensions, weight, and hook size before making another version. Share the finished pillow on Pinterest or Instagram with #CozyCrochetPumpkinPillow. Would you keep the single sage leaf beside the curved brown stem, or add a second smaller leaf on the opposite side?









