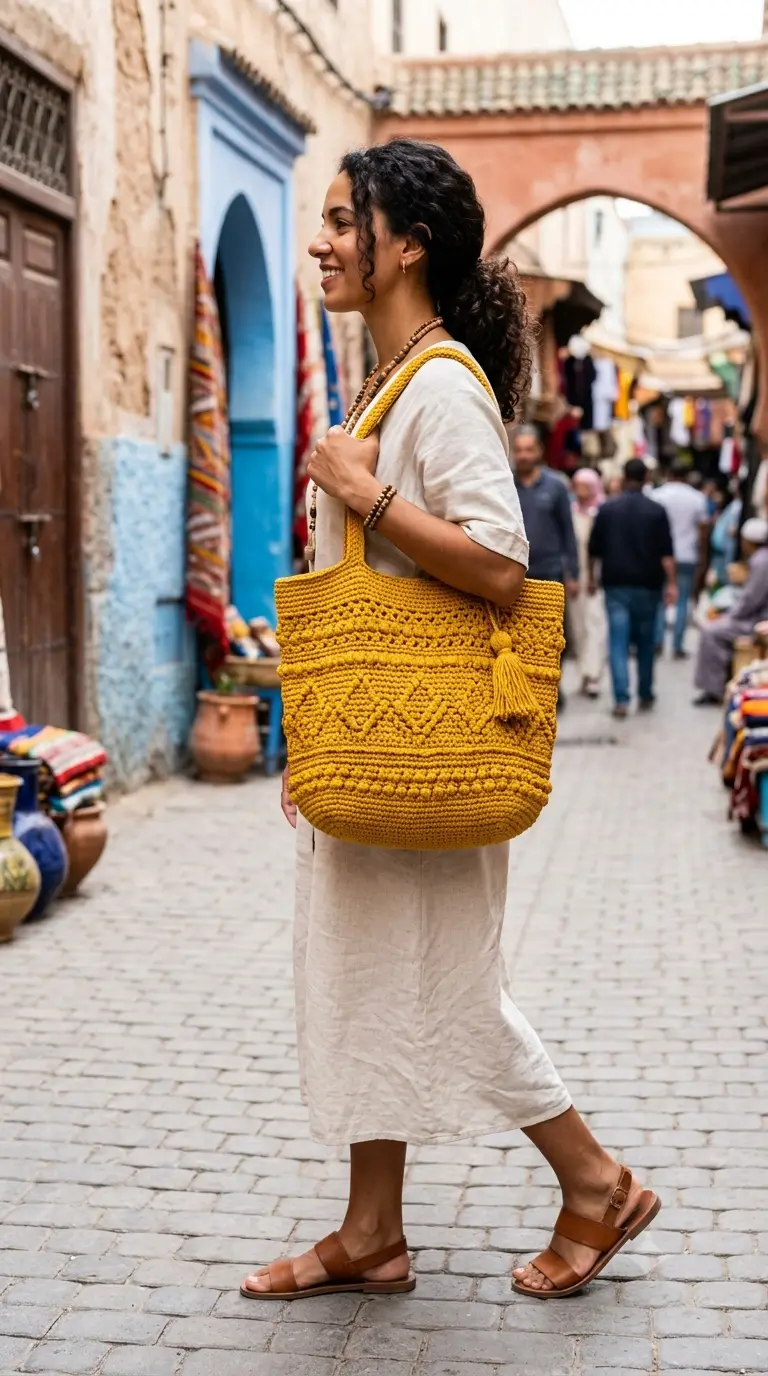
Rows of raised mustard bobbles frame the diamond geometry that defines this bag. This mustard crochet tote bag pattern reconstructs that combination with Aran/worsted cotton, a 4 mm hook, long shoulder straps, and a roughly 40 cm-wide body. It suits intermediate crochet skills because the texture requires controlled counting. The dense construction also makes the finished tote practical for books, yarn, and everyday shopping.
The Design: What Makes This Crochet Tote Different
Three structural choices distinguish this bag from a basic market tote. First, the lower section stays dense so weight is transferred across a firm base instead of an open mesh. Second, raised bobbles form horizontal boundaries around the central geometric panel. That placement gives the bobble stitch crochet bag visible texture without covering every round in yarn-heavy clusters.
The third decision concerns proportion. Long straps start several centimeters below the top edge, distributing load across more fabric than a narrow attachment point would. The photographed bag also has a broad body relative to its depth, characteristic of a large textured crochet tote.
A common mistake is adding bobbles without accounting for their tendency to distort neighboring stitches. Keep them evenly spaced and count the plain stitches between motifs instead of judging the spacing visually.
Project Info at a Glance
| Skill Level | Time | Finished Size | Hook | Best For |
|---|---|---|---|---|
| Intermediate | Approx. 10–14 hours | Approx. 40 cm wide × 35 cm high | 4 mm | Market bag, project bag, everyday shoulder tote |
The dimensions above describe this photo-inspired reconstruction. Exact dimensions vary with yarn, tension, and handle length.
Materials and Tools
Yarn
- Mustard/ochre — Aran or worsted cotton/cotton blend — approximately 500–600 g. Choose a firm cotton or cotton-rich yarn with clear stitch definition. A low-stretch yarn helps the finished bag hold its shape when loaded.
Tools
- 4.0 mm crochet hook
- Removable stitch markers
- Tapestry needle
- Sharp scissors
- Tape measure
- Pins or locking markers for handle placement
- 12–15 cm piece of cardboard for forming the tassel
- Optional cotton fabric for lining
Abbreviations
- MR — magic ring
- sc — single crochet
- inc — 2 sc in one stitch
- dec — single crochet decrease
- sl st — slip stitch
- ch — chain
- dc — double crochet
- BLO — back loop only
- bo — bobble stitch
- st/sts — stitch/stitches
- rep — repeat
For an invisible decrease, insert the hook through the front loops of the next two stitches, yarn over and pull through both front loops, then complete the single crochet.
Mustard Crochet Tote Bag Pattern
Construction note: This is an original photo-inspired reconstruction of the visible tote rather than a stitch-for-stitch transcription of an existing commercial pattern. The bag begins with an elongated oval base before the body is worked upward.
Bag Base
Yarn: mustard. Work with a 4 mm hook.
Ch 49.
R1: Sc in second ch from hook and next 46 ch, 3 sc in final ch. Continue along the opposite side of the foundation chain: sc in next 46 ch, 2 sc in final ch. (98)
R2: Inc, sc 46, inc ×3, sc 46, inc ×2. (104)
R3: Sc 1, inc, sc 46, (sc 1, inc) ×3, sc 46, (sc 1, inc) ×2. (110)
R4: Sc 2, inc, sc 46, (sc 2, inc) ×3, sc 46, (sc 2, inc) ×2. (116)
R5: Sc 3, inc, sc 46, (sc 3, inc) ×3, sc 46, (sc 3, inc) ×2. (122)
Measure the base before continuing. It should form a broad elongated oval without cupping strongly upward or developing pronounced ripples.
Lower Body
R6: BLO sc around. (122)
R7: Sc around. (122)
R8: Sc around. (122)
R9: Sc around. (122)
R10: Sc around. (122)
R11: Sc around. (122)
R12: Sc around. (122)
R13: Sl st loosely around. (122)
R14: Sc around. (122)
R15: Sc around. (122)
The BLO round creates a defined transition between the oval base and the vertical wall. Keep R13 loose. A tight slip-stitch round can pull the lower body inward.
How to Make the Bobble Stitch
Work five unfinished double crochets into the indicated stitch. Keep the final loop of each double crochet on the hook. Yarn over and draw through all remaining loops to close the bobble. Work the next single crochet firmly so the bobble projects toward the outside of the bag.
First Bobble Band
R16: Work sc stitches around while placing a bobble approximately every fourth stitch across the front and back decorative panels. Keep the side transition areas in plain sc. (122)
R17: Sc around. (122)
R18: Sc around. (122)
R19: Repeat the bobble arrangement from R16, centering each bobble relative to the first band. (122)
R20: Sc around. (122)
R21: Sc around. (122)
Place a stitch marker at each side before working the textured sections. This keeps the decorative areas centered even when the bobble repeat does not divide perfectly into the total circumference.
Central Geometric Bobble Panel
The photographed bag uses raised stitches to create a large geometric diamond or chevron effect. The following sequence recreates that visual structure while retaining 122 stitches in every round.
R22: Sc around. (122)
R23: Place paired bobbles approximately 20 stitches apart across the center of the front panel. Work all remaining stitches in sc. (122)
R24: Move each bobble position 2 stitches toward the center. Sc in all remaining stitches. (122)
R25: Move each bobble another 2 stitches toward the center. (122)
R26: Continue the inward progression by 2 stitches on each side. (122)
R27: Repeat the inward movement. (122)
R28: Work the closest central pair of bobbles to form the narrow point of the geometric motif. (122)
R29: Begin moving the bobbles outward by 2 stitches on each side. (122)
R30: Move each bobble another 2 stitches outward. (122)
R31: Continue the outward progression. (122)
R32: Continue moving the bobbles outward symmetrically. (122)
R33: Repeat the outward progression. (122)
R34: Complete the outer points of the geometric motif. (122)
R35: Sc around. (122)
Count from the center of the panel rather than from the beginning-of-round marker. That prevents a small tension difference from gradually moving the diamond sideways.
Upper Bobble Band
R36: Sc around. (122)
R37: Place regularly spaced bobbles across the front and back panels, with plain sc at both side transitions. (122)
R38: Sc around. (122)
R39: Sc around. (122)
R40: Repeat the bobble placement from R37. (122)
R41: Sc around. (122)
R42: Sc around. (122)
Top Reinforcement
R43: BLO sc around. (122)
R44: Sc around. (122)
R45: Sc around. (122)
R46: Sl st loosely around. (122)
Fasten off and weave in the end. The plain upper section creates a more stable attachment area for the straps than a bobble-covered edge.
Shoulder Straps — Make 2
Yarn: mustard.
Ch 9.
Row 1: Sc in second ch from hook and across. (8)
Rows 2–90: Ch 1, turn, sc across. (8)
Measure the strap at this point.
Rows 91–105: Continue in sc until the strap measures approximately 60–65 cm. (8)
Row 106: Sc across. (8)
Fasten off, leaving approximately 40 cm of yarn for sewing.
For additional resistance to stretching, join yarn at one lower corner and work slip stitches along each long edge of the strap. Do not tighten these stitches enough to shorten the strap.
Handle Reinforcement Tabs — Make 4
Ch 11.
Row 1: Sc in second ch from hook and across. (10)
Row 2: Ch 1, turn, sc across. (10)
Rows 3–8: Repeat Row 2. (10)
Fasten off with a 30 cm sewing tail.
Each reinforcement tab sits behind a strap attachment point. This spreads the pulling force over a wider section of the bag wall.
Decorative Tassel
Cut approximately 35–45 strands of mustard yarn, each measuring 28–30 cm.
Wrap the yarn around a 12–15 cm piece of cardboard, then cut through the strands at one end. Fold the bundle in half.
Cut a separate strand approximately 35 cm long. Wrap it tightly around the tassel 1.5–2 cm below the folded top and knot securely.
Trim the lower ends so the finished tassel measures approximately 12–13 cm.
For the hanging cord, ch 25.
Sl st into the second chain from the hook and along the remaining chains. Fasten off with a long tail.
Pass the cord through the folded top of the tassel and secure it. Attach the opposite end near the upper side of the tote, matching the position visible in the photographed design.
Assembly
- Lay the completed bag body flat and identify the exact center of the front and back panels.
- Mark the position of the first strap approximately 8–10 cm from the nearest side edge.
- Place the opposite end of the same strap at the corresponding position on the back panel.
- Repeat the placement process with the second strap on the opposite side.
- Check that neither strap is twisted before sewing.
- Position one reinforcement tab inside the bag behind each strap end.
- Sew through the strap, bag wall, and reinforcement tab using several horizontal and vertical passes.
- Repeat until all four strap ends are attached at equal heights.
- Attach the tassel near one upper side of the bag without sewing through the strap itself.
- Weave every yarn tail through several stitches on the inside, reverse direction once, trim the excess, and block the tote to its final dimensions.
The completed bag should stand approximately 35 cm high before the handles, with a broad oval lower edge and two balanced shoulder straps.
7 Technical Tips for a Structured Crochet Tote
- Mark both side centers. A beginning-of-round marker alone does not show whether the decorative panel has shifted. Add two side markers and check their positions every five rounds.
- Watch for base rippling. If the oval develops waves greater than about 1 cm high while lying flat, the gauge is too loose or the increases are producing excess circumference. Correct the problem before beginning the vertical wall.
- Control bobble tension. Loose bobbles can project more than 1.5 cm and pull open the surrounding single crochet. Close each bobble firmly and make the following sc at normal tension.
- Measure the straps under light tension. Cotton straps can lengthen after use. A finished 65 cm strap may gain several centimeters once the bag carries weight, so test the length before permanently attaching it.
- Pin all four strap ends simultaneously. Sewing one handle completely before positioning the other can create a 1–2 cm alignment error. Mark every attachment point first and compare the front and back measurements.
- Reinforce the load points. Eight-stitch-wide straps concentrate substantial force at four locations. Place a reinforcement tab behind every attachment rather than sewing the strap directly to a single layer of crochet fabric.
- Secure the tassel independently. Attaching the tassel to the handle seam adds unnecessary movement to a structural joint. Fix its cord through several body stitches approximately 2–3 cm away from the handle attachment.
Adjusting the Finished Size
The photographed tote has the proportions of a large shoulder bag rather than a compact handbag. For a smaller version, shorten the foundation chain and stop the body several rounds earlier. Do not simply reduce the hook size because that changes fabric density as well as dimensions.
For a wider tote, add an even number of chains to the foundation while retaining the same rounded-end increase structure. The central geometric motif must then be recentered against the new front-panel width.
Handle length should be selected independently from body size. Approximately 55 cm produces a shorter shoulder drop, while 60–65 cm more closely matches the long straps visible in the reference image.
Choosing Yarn for This Bag
Cotton and cotton-rich blends suit this construction because the raised geometric stitches need clear definition. The bag also carries weight, so excessive yarn elasticity can make the body and handles lengthen during use.
Aran or worsted yarn gives the bobbles enough volume to remain distinct against the dense single-crochet background. If DK yarn is substituted, make a gauge sample before changing the stitch count. A thinner yarn worked at the same count will produce a substantially smaller tote.
Very soft or fuzzy fibers obscure the geometric pattern. The photographed design depends on shadows around individual raised stitches, which means crisp stitch definition matters more than loft.
Optional Fabric Lining
A lining is useful when the bag will carry keys, pens, small crochet tools, or other objects that can work between stitches. Cut two fabric panels slightly larger than the flattened interior dimensions, adding approximately 1.5 cm for seam allowance.
Sew the fabric panels together along the sides and bottom. Fold the upper raw edge toward the wrong side, press it, then place the lining inside the finished crochet shell.
Hand-sew the lining approximately 1 cm below the top crochet edge. Keep the stitches in the interior loops so they remain inconspicuous from the outside. Do not anchor the lining solely to the decorative bobble rounds.
Blocking and Finishing
Measure the bag before blocking and compare the two side heights. Correct a difference greater than approximately 1 cm by shaping the shorter section rather than stretching the entire bag.
For cotton yarn, damp blocking can help flatten the oval base and align the geometric panel. Place the bag flat, shape the sides to equal dimensions, straighten the straps, and allow everything to dry fully before loading the tote.
Avoid aggressively stretching the bobble rows. Their raised profile is part of the design, and excessive blocking can flatten the texture.
Conclusion
The finished construction combines a dense oval base, plain structural sections, two raised bobble bands, a central geometric motif, reinforced shoulder straps, and a matching side tassel. Before using the bag, load it lightly and inspect all four handle attachment points for movement. Add a fabric lining if small objects will be carried regularly. Save this mustard crochet tote bag pattern to Pinterest or share the finished version on Instagram with #MustardBobbleTote. When adapting the photographed design, which detail would you keep most prominent: the central diamond geometry or the horizontal bobble bands?









