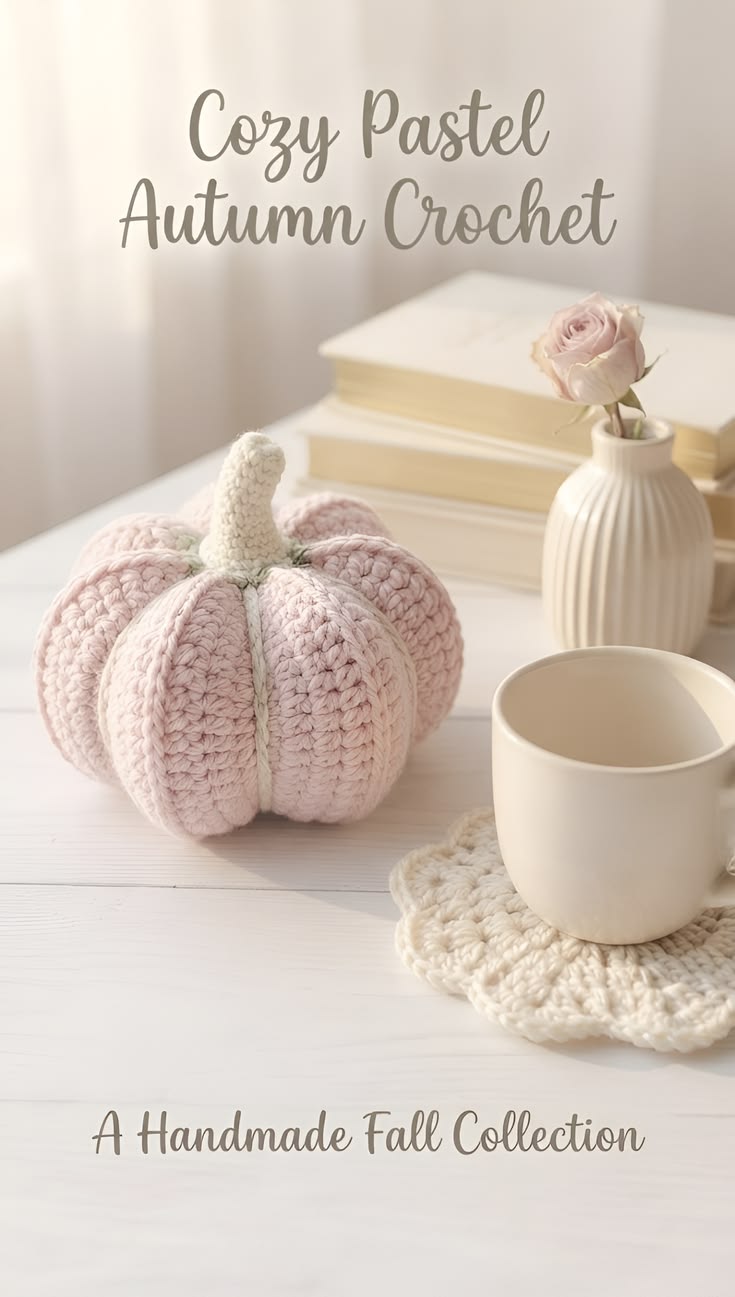
A pumpkin stops reading as a pumpkin when its vertical lobes disappear into a stuffed ball. This pastel pumpkin amigurumi crochet pattern uses a 36-stitch body, DK yarn, a 3.5 mm hook, and post-stuffing sculpting to retain those divisions. The finished target is roughly 14–17 cm including the stem and suits an advanced beginner. Its flat base makes it practical for shelf, table, or autumn display arrangements.
The Design: What Makes This Pumpkin Different
The body needs more width than height, so the increase sequence reaches a medium 36-stitch plateau before several straight rounds establish volume. Shorter vertical proportions stop the pumpkin becoming pear-shaped. After stuffing, separate sculpting strands compress the surface from top to bottom; those lines create the deep lobes that dominate the reference photograph.
The stem uses a narrow six-stitch tube before widening at its base. That geometry keeps the cream stem upright without producing an oversized cone. A small sage transition ring visually separates cream from blush pink.
A common mistake in a pink crochet pumpkin pattern is relying on crochet rounds alone for segmentation. Stuffing pushes those rounds outward. The shaping threads therefore carry structural load in this crochet pumpkin amigurumi, rather than serving as decoration.
Project Info at a Glance
| Skill Level | Time | Finished Size | Hook | Best For |
|---|---|---|---|---|
| Advanced beginner | 2–3 hours | Approx. 14–17 cm tall including stem | 3.5 mm | Tabletop fall décor |
Materials and Tools
Yarn
- Blush pink — DK (#3) — allow 50 g — tightly plied cotton or cotton/acrylic yarn.
- Cream/ivory — DK (#3) — allow 5 g — use the same yarn family where possible.
- Muted sage green — DK (#3) — approximately 2–3 g — used for the stem transition.
A 50 g allowance for the main color gives enough yarn for the pumpkin body and sculpting passes. Only small quantities are required for the cream stem and sage transition.
Tools
- 3.5 mm crochet hook
- Polyester fiberfill
- Yarn needle
- Locking stitch marker
- Scissors
- Pins
- Measuring tape
- Safety eyes: none
Abbreviations
- MR — magic ring
- sc — single crochet
- inc — 2 sc in one stitch
- dec — single-crochet decrease
- sl st — slip stitch
- ch — chain
- BLO — back loop only
- st/sts — stitch/stitches
- R/Rnd — round
For an invisible decrease, insert the hook through the front loops of the next two stitches, yarn over, pull through both front loops, then complete the single crochet.
Pattern — Step by Step
Work in a continuous spiral unless a section states otherwise. Move the stitch marker after every round.
Pumpkin Body — Make 1
Yarn: blush pink. The body uses standard six-stitch amigurumi increase and decrease math.
R1: 6 sc in MR (6)
R2: inc ×6 (12)
R3: (sc, inc) ×6 (18)
R4: (2 sc, inc) ×6 (24)
R5: (3 sc, inc) ×6 (30)
R6: (4 sc, inc) ×6 (36)
R7: sc around (36)
R8: sc around (36)
R9: sc around (36)
R10: sc around (36)
R11: sc around (36)
R12: sc around (36)
R13: sc around (36)
R14: sc around (36)
R15: sc around (36)
R16: sc around (36)
R17: (4 sc, dec) ×6 (30)
R18: (3 sc, dec) ×6 (24)
Begin stuffing. Fill the outer wall first, then the center. The body should remain compressible enough for the sculpting strands to create deep grooves.
R19: (2 sc, dec) ×6 (18)
R20: (sc, dec) ×6 (12)
Add the final stuffing before closing.
R21: dec ×6 (6)
Fasten off. Leave a 35 cm tail and close the remaining opening through the front loops.
The 36-stitch plateau produces a medium amigurumi body. The final pumpkin shape comes from compression rather than increasing the stitch count beyond the plateau.
Sculpted Pumpkin Ribs — Make 7 to 8 Passes
Yarn: blush pink.
Cut approximately 180 cm of blush yarn and thread a long yarn needle.
Insert the needle through the bottom center and bring it out through the top center. Run the yarn down the outside of the body, re-enter at the bottom center, and emerge again at the top.
Pull until the surface forms a visible groove.
Repeat around the circumference at roughly equal intervals. The pumpkin should have approximately seven to eight major lobes, so consistent spacing matters more than producing a mathematically exact octagon.
Do not pull one strand dramatically tighter than its neighbors. Unequal compression produces a tilted top opening and can distort the base.
Knot securely at the top where the stem will cover the join. Weave the remaining tail into the body.
Sage Stem Base — Make 1
Yarn: muted sage green.
R1: 6 sc in MR (6)
R2: inc ×6 (12)
R3: (sc, inc) ×6 (18)
R4: sc around (18)
Sl st into the next stitch.
Fasten off. Leave a 25 cm tail.
This shallow piece should sit beneath the cream stem rather than cover the top of the pumpkin like a large leaf.
Cream Pumpkin Stem — Make 1
Yarn: cream/ivory.
R1: 6 sc in MR (6)
R2: sc around (6)
R3: sc around (6)
R4: sc around (6)
R5: sc around (6)
R6: sc around (6)
R7: sc around (6)
R8: inc ×6 (12)
R9: (sc, inc) ×6 (18)
R10: sc around (18)
Stuff only the narrow upper section. Use small pieces of fiberfill so the stem stays slender instead of becoming cylindrical and rigid.
Fasten off. Leave a 30 cm tail for attachment.
Optional Stem Bend
The photographed stem is slightly irregular rather than mechanically straight. To reproduce that lean, thread approximately 25 cm of cream yarn through the stem from base to tip, catch one stitch near the top, and return through the stem.
Pull by approximately 3–5 mm before knotting the yarn at the underside.
This shortens one side without requiring wire. Do not pull far enough to fold the stem tube.
Assembly
- Place the pumpkin body on a level surface and rotate it until the flattest section becomes the base.
- Check the seven or eight sculpting grooves from directly above. Redistribute any groove that sits noticeably closer than 1 cm to its neighbor at the outer edge.
- Position the sage stem base over the top-center closure and pin it at four opposing points.
- Sew the sage piece to the pumpkin using small stitches around R4, keeping its 18-stitch perimeter flat.
- Center the cream stem over the sage base so its widest 18-stitch round covers the central opening.
- Pin the stem at four points before sewing. An off-center displacement greater than roughly 5 mm becomes visible on this squat body.
- Sew through the final cream round and into the sage layer, rotating the pumpkin after every few stitches rather than completing one side first.
- Add a small amount of stuffing through any remaining stem opening if the base collapses under finger pressure, then close the seam.
- Weave every tail through at least 3 cm of dense crochet before trimming it inside the body.
- Place the pumpkin on its base, adjust the lobes by hand, and correct any sculpting strand that prevents the piece from sitting level.
The completed piece should have a low segmented pink body, a narrow cream stem, and a small sage transition at the top.
7 Technical Tips for a Better Crochet Pumpkin
- Marker drift: Move the locking marker immediately after completing the first stitch of every round. Losing the start by even two stitches can make the decrease rounds spiral visibly toward one side.
- Stuffing firmness: Stop adding fiberfill while the body can still compress by approximately 1–1.5 cm under firm thumb pressure. Overstuffing resists the sculpting yarn and turns deep grooves into shallow lines.
- Invisible decrease gaps: Use front-loop invisible decreases on R17–R21. Standard sc2tog decreases can expose stuffing where the circumference contracts rapidly.
- No safety eyes: This decorative pumpkin uses no safety-eye hardware because the design has no face. Adding eyes changes it from a decorative pumpkin into character-style amigurumi.
- Yarn tension: With DK yarn and a 3.5 mm hook, check the fabric after R6 by stretching it lightly over two fingers. Openings large enough to expose stuffing indicate that a smaller hook or tighter tension is required.
- Pinning error: Pin the stem at four opposing points before sewing. Attaching one side completely before checking the opposite side commonly shifts the stem away from the center axis.
- Tail weaving: Run sculpting and assembly tails through at least 3 cm of stuffed fabric before cutting. A short buried tail can work back through the surface when the pumpkin lobes are adjusted.
Finishing the Pastel Pumpkin
Check the finished pumpkin from above before cutting the final sculpting tail. Seven or eight grooves should divide the body at comparable intervals, while the cream stem should remain centered over the sage transition.
For the next version, change only one variable—yarn weight, hook size, or body plateau—so its effect on proportion can be measured. A three-pumpkin set can also be made by repeating the construction at different yarn weights while retaining the same blush, cream, and sage palette.
Save this pastel pumpkin amigurumi crochet pattern to Pinterest and share the finished version on Instagram with #PastelPumpkinAmigurumi.
Which detail would you change first: the number of pumpkin lobes or the length of the cream stem?









