Pink Granny Square Blanket Crochet Pattern With Lace Border
Introduction
A pink granny square becomes a different design problem when half its neighbors are solid blocks and the entire grid must meet a deep lace border. This pink granny square blanket crochet pattern uses DK yarn, a 4 mm hook, and a modular throw construction based on a finished size of approximately 96 × 127 cm. The skill level is intermediate because accurate blocking and border spacing matter.
The Design: What Makes This Pink Granny Square Blanket Different
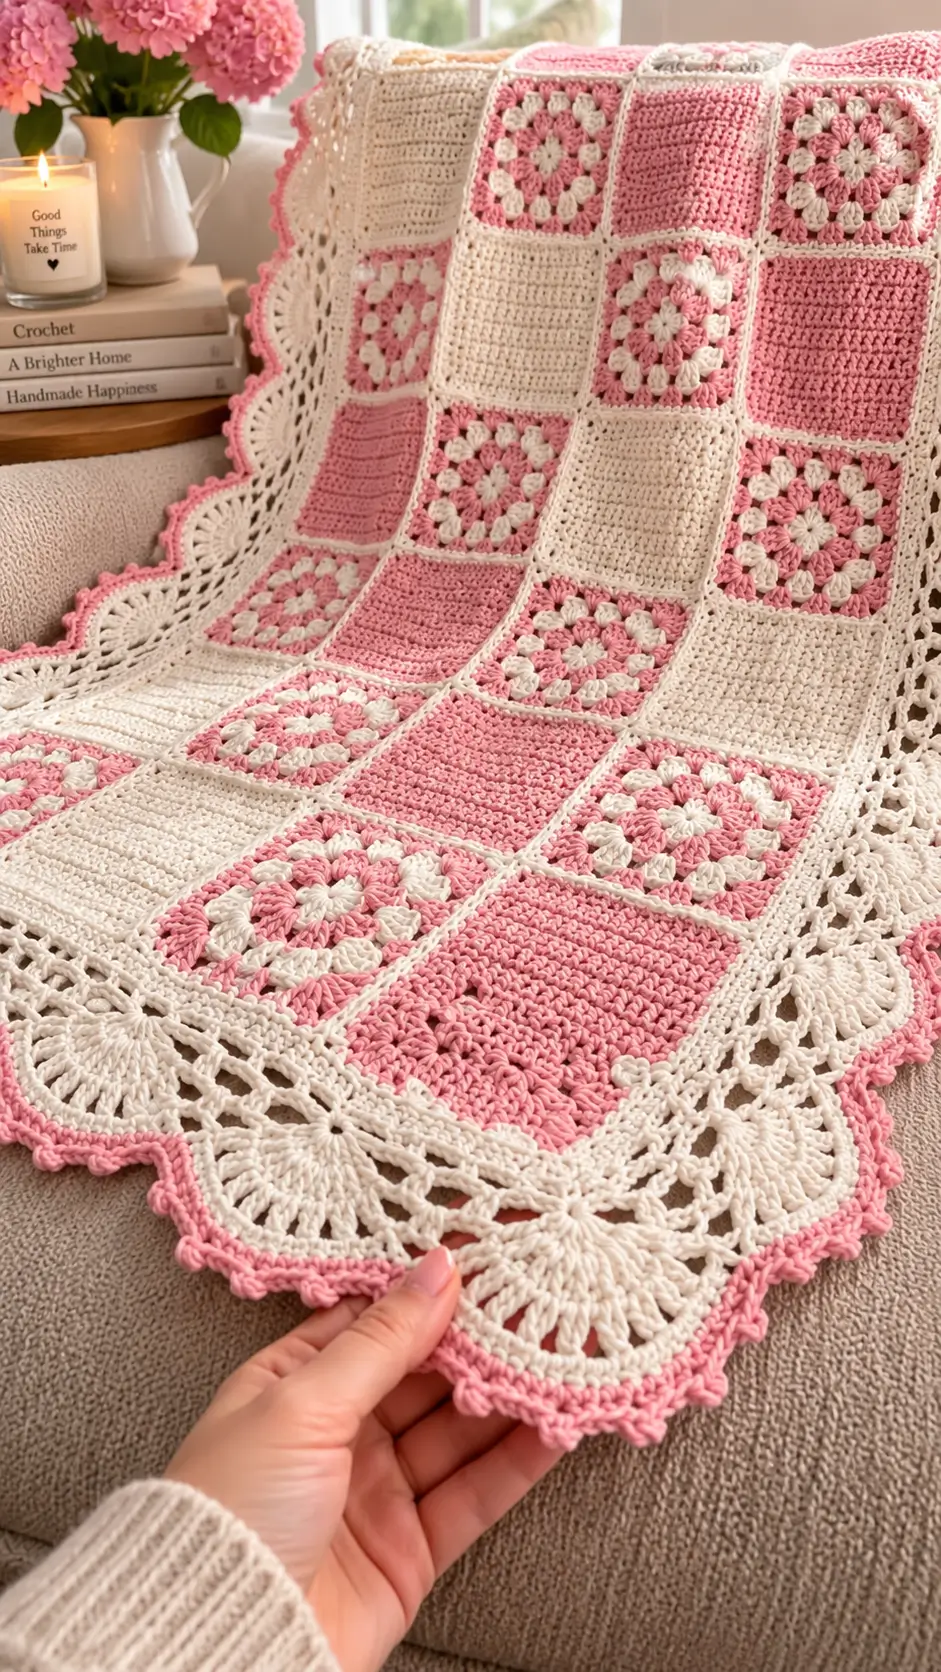
Three structural choices define this blanket. First, traditional pink-and-cream granny motifs alternate with solid squares, preventing the finished fabric from becoming uniformly open. Second, cream seams visually separate each module. That grid makes small variations in pink placement less noticeable while giving the blanket a controlled geometric structure.
The third decision is the border. Instead of stopping after one or two compact edging rounds, this pink and cream crochet blanket has a broad openwork section terminating in pink points. That changes the proportion of the whole throw.
Square consistency is the main technical risk. A common mistake in a two color granny square blanket is joining motifs before blocking them to one measurement. A 5 mm difference repeated across six columns becomes 30 mm before the border is even started.
Project Info at a Glance
| Skill Level | Time | Finished Size | Hook | Best For |
|---|---|---|---|---|
| Intermediate | Approx. 20–30 hours | Approx. 96 × 127 cm | 4 mm | Lap throw / decorative throw |
The exact dimensions depend on yarn, individual tension, blocked square size, and the number of motifs used. Make and block one test square before calculating the final blanket dimensions.
Materials and Tools
Yarn
For a close interpretation of the pictured blanket, use a smooth DK yarn with clear stitch definition.
- Cream/ivory: DK weight, approximately 500–700 g.
- Dusty pink/blush: DK weight, approximately 300–500 g.
Use the same yarn line for both colors where possible. Matching fiber content and yarn construction makes it easier to keep the solid squares, granny motifs, seams, and border at a consistent gauge.
Tools
- 4 mm crochet hook
- Tapestry needle
- Scissors
- Locking stitch markers
- Blocking pins
- Blocking mats
- Tape measure
Abbreviations
- MR – magic ring
- ch – chain
- sc – single crochet
- dc – double crochet
- sl st – slip stitch
- sp – space
- ch-sp – chain space
- st/sts – stitch/stitches
- RS – right side
- rep – repeat
This blanket does not require an invisible decrease because its components are worked flat rather than shaped as stuffed forms.
Pattern – Step by Step
The blanket uses modular construction rather than continuous spiral crochet. The individual squares are made separately, blocked to matching dimensions, joined into a rectangular grid, and finished with a wide decorative border.
Traditional Pink-and-Cream Granny Square
Make approximately 24, or enough to cover roughly half of your central blanket grid.
Start with cream yarn.
R1: Make an MR. Ch 3, 2 dc in ring, ch 2; repeat 3 dc in ring, ch 2 three more times. Join with sl st. You should have four 3-dc clusters.
Change to pink.
R2: Sl st to corner. Ch 3, 2 dc, ch 2, 3 dc in same corner; repeat ch 1, (3 dc, ch 2, 3 dc) in next corner three times. Ch 1 and join.
Change to cream.
R3: Sl st to corner. Work (ch 3, 2 dc, ch 2, 3 dc) in the corner. Ch 1, 3 dc in next side ch-sp, ch 1. Repeat the same structure around, working (3 dc, ch 2, 3 dc) into every corner and one 3-dc cluster into each side space. Join.
Change to pink.
R4: Work one corner group into every corner and one 3-dc group into each side ch-sp, separating neighboring groups with ch 1.
Change to cream.
R5: Repeat the established granny-square expansion. Each side gains another granny cluster while the four corners remain clearly defined.
Fasten off and weave in the ends.
Block every motif to the same target measurement before joining. A target around 14–15 cm works well for a medium throw, but the actual measurement depends on your yarn and tension.
Solid Pink Square
Make enough solid pink squares to create the alternating layout.
With pink yarn, make a foundation chain long enough to match the width of one blocked granny square.
Row 1: Dc in fourth ch from hook and in each remaining ch across. Turn.
Row 2: Ch 3, dc in each st across. Turn.
Rows 3 onward: Repeat Row 2 until the height matches the blocked granny square.
Fasten off.
Join cream yarn and work one round of sc evenly around the square. Place 3 sc at each corner.
The exact number of stitches along each side depends on your row gauge. Keep the same stitch distribution on every solid square so the pieces remain compatible during joining.
Solid Cream Square
Work the solid cream square exactly as described for the solid pink square, replacing the pink yarn with cream.
These dense cream blocks interrupt the open granny motifs and create the alternating patchwork appearance visible in the finished blanket.
Measure the square after blocking. It must match the dimensions of the traditional granny squares before assembly.
Cream Border Around Each Granny Square
Join cream yarn in any corner.
R1: Ch 1 and sc evenly around the complete motif. Work 3 sc into each corner to maintain the square shape. Join with sl st.
Fasten off and weave in the ends.
Measure the finished motif again. Compare it directly with the solid squares rather than relying on the measurement taken before the border was added.
Blanket Layout
Arrange every blocked motif on a large flat surface before joining.
For a medium throw, a 6 × 8 layout gives 48 squares. The final dimensions will depend on the blocked size of each motif, seam construction, and border depth.
Alternate traditional pink-and-cream motifs with solid pink and cream blocks. Offset neighboring rows so the granny motifs do not form rigid vertical lines unless that is the layout you specifically want.
Check the distribution of pink from several angles before joining. Photograph the completed arrangement. That photograph becomes the assembly reference when the squares are moved from the floor or table.
Cream Joining Seams
Place two matching square edges together.
Using cream yarn, join through corresponding loops with slip stitches. Keep the working tension slightly looser than normal crochet tension.
Join individual squares into complete horizontal strips first. Once all strips are finished, join those strips together vertically.
Check every four-square intersection as you work. The corners should meet at a single controlled point without one square extending beyond its neighbor.
A tight joining seam can shorten the grid and cause the blanket to buckle. If the joined edge is visibly shorter than an unjoined square edge, remove the seam and work it again with lighter tension.
Foundation Border
Join cream yarn at any outer corner of the assembled blanket.
R1: Ch 1 and sc evenly around the entire blanket. Work 3 sc at each corner. Join.
R2: Ch 3 and dc in each st around. At each corner work (2 dc, ch 2, 2 dc). Join.
Place the blanket on a flat surface before continuing.
If the outer edge ripples, too many stitches have been added. If the corners pull inward or the blanket cups toward the center, additional spacing is required.
Openwork Lace Border
The wide cream border is one of the defining features of this blanket. Its open spaces separate the dense central grid from the final pink edging.
R3: Ch 1, sc in first st. Repeat ch 5, skip 3 sts, sc in next st around the blanket. Adjust the final repeat near each corner as necessary. Work a larger ch-7 space at each corner.
R4: Sl st into the first ch-5 space. Ch 3 and work 6 dc into the same space. Sc in the next ch-5 space. Repeat 7 dc in next ch-5 space, sc in next space around. Work 9 dc into each corner ch-7 space.
R5: Ch 5, sc into the center dc of the next fan. Repeat ch 5, sc into center dc of next fan around. Use ch 7 at a corner if additional width is needed to keep the blanket flat.
R6: Work 7 dc into each ch-5 space and 9 dc into the larger corner spaces. Anchor neighboring fans with sc.
Lay the blanket flat again. The border should form an open scalloped frame without severe rippling or inward curling.
Pink Picot Edge
Change to pink yarn.
Join at the beginning of any cream fan.
R1: Sc across the first section until reaching the center of a fan. Ch 3, then sl st into the first ch to create a picot. Continue with sc toward the center of the next fan.
Repeat one picot at the center of each cream scallop.
For a more pointed outer edge, use ch 4 instead of ch 3 on selected fans. Keep the spacing consistent around all four sides.
Join with sl st. Fasten off.
Weave the yarn tail through at least 5 cm of neighboring stitches before trimming.
Assembly
- Block every granny motif and solid square to one target measurement before arranging the grid.
- Place all 48 squares in a 6 × 8 layout, distributing the pink sections across the complete blanket.
- Photograph the arrangement so individual rows cannot be reversed during joining.
- Join squares into horizontal strips with cream yarn, matching the corners first.
- Join the completed strips vertically and check every four-square intersection for alignment.
- Work the cream foundation border around the assembled rectangle.
- Measure opposing sides before starting the openwork section to identify significant differences in edge length.
- Crochet the cream chain-space and fan rounds, making spacing adjustments primarily at the corners.
- Add the pink picot edging only after the cream border lies flat.
- Weave in all remaining tails and block the completed blanket to its final rectangular dimensions.
The completed construction consists of a modular pink-and-cream grid framed by a wide cream lace border and contrasting pink outer points.
7 Technical Tips for a Cleaner Granny Square Blanket
- Mark every corner before joining. A square rotated by 90 degrees can put a color-change seam on a visible edge, producing inconsistent motif orientation across the grid.
- Block to a measured target, not by eye. Even a 5 mm error per square can accumulate to 30 mm across a six-square row.
- Control seam tension. Slip-stitch joins worked too tightly shorten the internal grid and create channels between motifs; compare each completed seam with an unjoined square edge.
- Check color-change placement. Put the final slip stitch of each granny round in the same relative corner so visible joins do not migrate randomly across the blanket.
- Pin the full grid before permanent assembly. One misplaced pink solid square can interrupt the planned color distribution and require several seams to be removed.
- Test the lace border after the first openwork round. Rippling indicates excessive chain-space density, while an edge curling toward the center indicates insufficient spacing.
- Weave each tail for at least 5 cm. Short tails near square intersections are more likely to loosen because these points receive repeated movement during handling and washing.
Conclusion
Block one test granny motif before purchasing the full yarn quantity. That measurement determines the square count, final grid dimensions, and the amount of space available for the lace border. For the pictured appearance, keep cream dominant through the seams and edging while distributing dusty pink across both solid and traditional motifs. Save the finished layout to Pinterest before joining so the arrangement remains available as a visual reference, then share the completed throw on Instagram with #PinkGrannySquareBlanket. The next practical step is making a DK test square with a 4 mm hook. For your pink granny square blanket crochet pattern, would you keep the wide cream fan border or make the pink outer edging wider?









