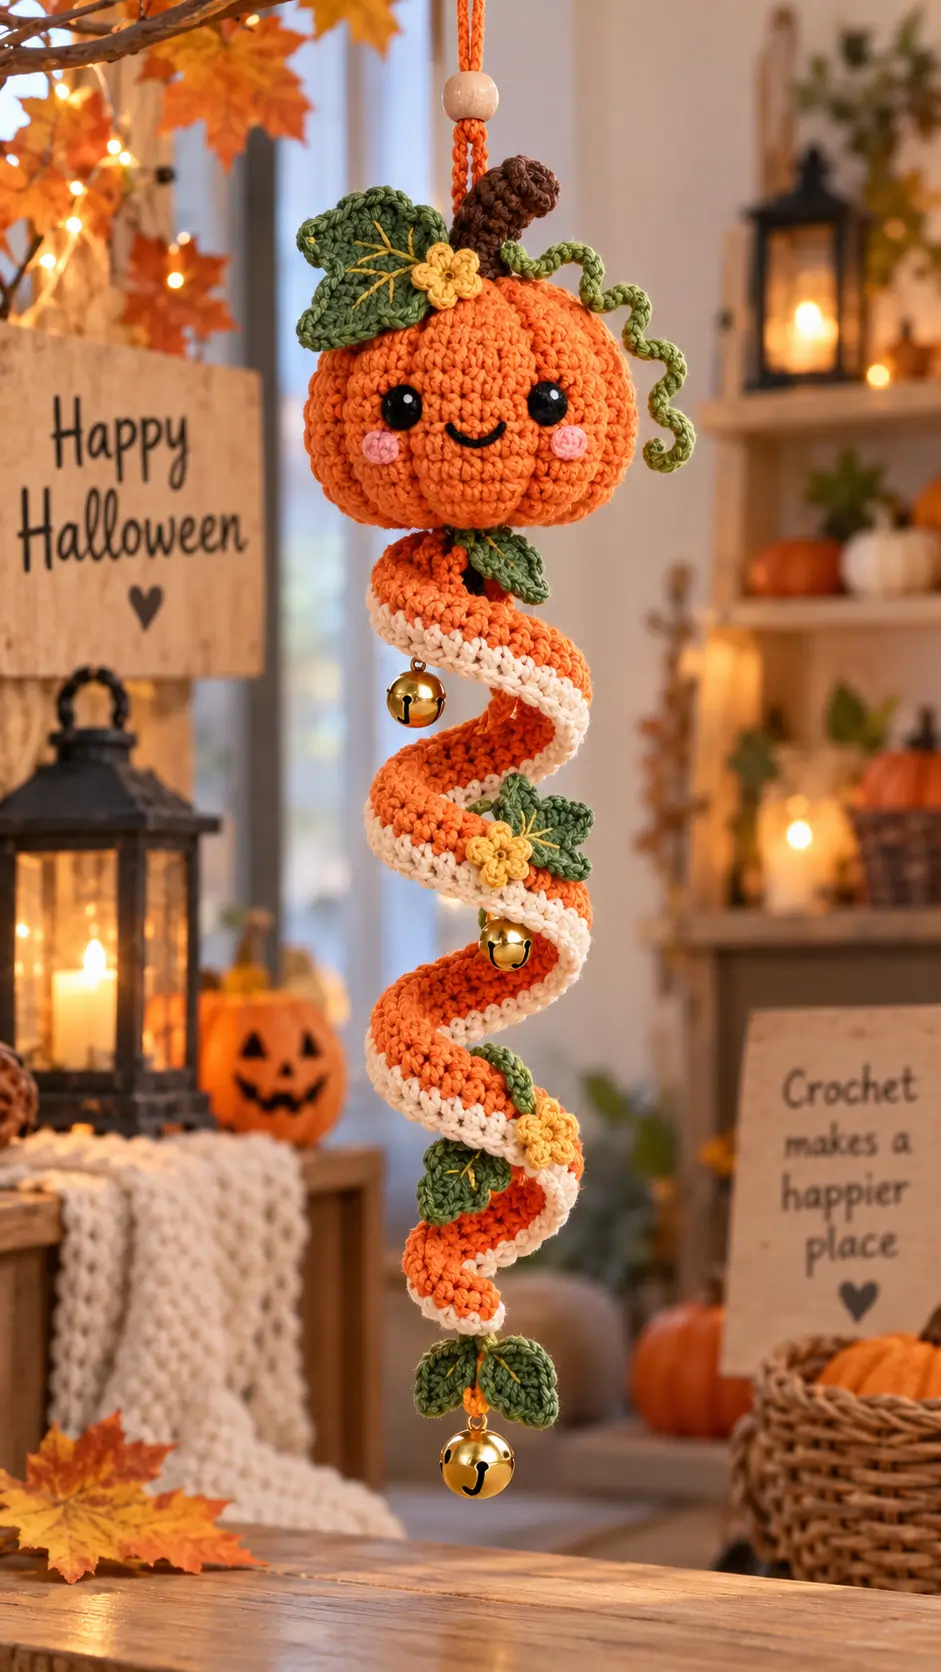
Pumpkins grow ribs from stem to base, so a round orange ball alone cannot reproduce the character in this hanging design. This pumpkin amigurumi crochet pattern combines a sculpted 11 cm head with a long spiral body, leaves, flowers and bells. Use worsted yarn with a 3.5 mm hook; the project suits intermediate crocheters. Its vertical construction works particularly well on doors, shelves and covered indoor display hooks.
The Design: What Makes This Pumpkin Different
The pumpkin head uses a 36-stitch plateau, giving it enough width for the large eyes and embroidered smile without producing an oversized sphere. After stuffing, external sculpting strands divide that sphere into six lobes. Those channels matter: without them, a Halloween crochet pumpkin reads as a generic orange head.
Below it, the crochet pumpkin hanging decoration changes construction completely. A flat strip is deliberately overfilled with stitches so it twists into a corkscrew rather than behaving like a stuffed limb. Cream edging separates adjacent orange turns when the ornament hangs vertically.
Leaves are concentrated around structural junctions, hiding attachment points while repeating the green accent down the piece. A common mistake in a pumpkin spiral crochet pattern is attaching bells before testing the suspension point; uneven hardware can rotate the face away from the viewer.
Project Info at a Glance
| Skill Level | Time | Finished Size | Hook | Best For |
|---|---|---|---|---|
| Intermediate | 5–7 hours | Head approx. 9 × 11 cm; full hanging length approx. 55–65 cm | 3.5 mm | Indoor Halloween and fall hanging décor |
Materials and Tools
Yarn
- Burnt orange — worsted/Aran #4 — 60 g
- Cream — worsted/Aran #4 — 20–25 g
- Olive green — worsted/Aran #4 — 10–15 g
- Dark brown — worsted/Aran #4 — 5 g
- Mustard yellow — worsted/Aran #4 — 3–5 g
- Blush pink — worsted/Aran #4 — 2 g
- Black — embroidery yarn or thin cotton — 1 g
Choose a tightly spun cotton or cotton-blend yarn with clear stitch definition.
Tools
- 3.5 mm crochet hook
- 10 mm safety eyes
- Polyester stuffing
- Yarn needle
- Locking stitch markers
- Pins
- Scissors
- 1 wooden bead, approximately 18–22 mm
- 3 lightweight bells, approximately 18–22 mm
- Strong cotton thread for securing bells
Safety eyes are small components. For decorations accessible to children under three, replace them with embroidered eyes.
Abbreviations
MR — magic ring
sc — single crochet
inc — 2 sc in one stitch
dec — single-crochet decrease
sl st — slip stitch
ch — chain
hdc — half double crochet
dc — double crochet
BLO — back loop only
st/sts — stitch/stitches
For an invisible decrease, work through the front loops of the next two stitches before completing one single crochet; this reduces the visible gap on the outside of the piece.
Pattern — Step by Step
Work stuffed pieces in a continuous spiral unless stated otherwise.
Pumpkin Head
Yarn: burnt orange
R1: 6 sc in MR (6)
R2: inc ×6 (12)
R3: (1 sc, inc) ×6 (18)
R4: (2 sc, inc) ×6 (24)
R5: (3 sc, inc) ×6 (30)
R6: (4 sc, inc) ×6 (36)
R7: sc around (36)
R8: sc around (36)
R9: sc around (36)
R10: sc around (36)
R11: sc around (36)
R12: sc around (36)
R13: sc around (36)
R14: sc around (36)
R15: sc around (36)
Insert 10 mm eyes between R10 and R11, approximately 8 stitches apart. Begin stuffing firmly.
R16: (4 sc, dec) ×6 (30)
R17: (3 sc, dec) ×6 (24)
R18: (2 sc, dec) ×6 (18)
Add stuffing, keeping the center firm enough to resist the sculpting threads.
R19: (1 sc, dec) ×6 (12)
R20: dec ×6 (6)
Fasten off. Leave a 40 cm tail and close the opening.
Thread a separate 80 cm length of orange yarn through the top and bottom centers. Wrap it externally around the head six times at equal intervals. Pull each strand just enough to create a pumpkin channel, then knot securely inside the lower attachment area.
Spiral Hanging Body
Yarn: burnt orange
Ch 91.
Row 1: Starting in second ch from hook, 2 hdc in each ch across (180).
Row 2: Ch 2, turn, 2 hdc in each st across (360).
The high increase rate makes the strip curl naturally into a corkscrew.
Fasten off. Leave a 30 cm tail.
Cream Spiral Edging
Yarn: cream
Join cream yarn at the lower edge of the orange spiral.
Row 1: sc evenly along the complete outer edge.
Keep the stitches relaxed so the cream border does not pull the spiral flat.
Fasten off. Leave a 15 cm tail.
Stem
Yarn: dark brown
R1: 6 sc in MR (6)
R2: sc around (6)
R3: sc around (6)
R4: sc around (6)
R5: sc around (6)
R6: sc around (6)
R7: sc around (6)
R8: sc around (6)
R9: sc around (6)
R10: sc around (6)
Stuff only the lower half. Bend the upper section slightly before sewing.
Fasten off. Leave a 25 cm tail.
Large Leaves — Make 2
Yarn: olive green
Ch 10.
Row 1: Starting in second ch, sl st, sc, hdc, dc, dc, dc, hdc, sc, 3 sc in final ch.
Rotate and work along the opposite side of the foundation chain:
sc, hdc, dc, dc, dc, hdc, sc, sl st.
Row 2: Sl st around the perimeter, working (sl st, ch 1, sl st) into the tip.
Fasten off. Leave a 25 cm tail.
Use mustard yarn to embroider one central vein and three diagonal veins.
Small Leaves — Make 5
Yarn: olive green
Ch 7.
Row 1: Starting in second ch, sl st, sc, hdc, dc, hdc, 3 sc in final ch.
Rotate:
hdc, dc, hdc, sc, sl st.
Fasten off. Leave a 20 cm tail.
Add a mustard center vein to three leaves.
Curly Vine
Yarn: olive green
Ch 31.
Row 1: Starting in second ch, alternate 2 sc and 3 sc in each chain across.
The extra stitches force the chain into a natural curl.
Fasten off. Leave a 20 cm tail.
Yellow Flowers — Make 3
Yarn: mustard yellow
R1: 6 sc in MR (6)
R2: Work (sl st, ch 2, 2 dc, ch 2, sl st) into each stitch around to form six petals.
Fasten off. Leave a 20 cm sewing tail.
Cheek Patches — Make 2
Yarn: blush pink
R1: 6 sc in MR (6)
R2: inc ×6 (12)
Sl st to the first stitch.
Fasten off. Leave a 15 cm tail.
Do not stuff the cheek patches.
Hanging Cord
Yarn: burnt orange
Ch 45.
Row 1: Sl st in each chain back toward the beginning (44).
Fasten off. Leave a 25 cm tail at both ends.
Fold the cord in half and feed the doubled section through the wooden bead.
Bell Loops — Make 3
Yarn: burnt orange
Ch 12.
Row 1: Sl st in each chain (11).
Fasten off. Leave 15 cm tails.
Attach one bell securely to every loop using strong cotton thread.
Assembly
- Sculpt the pumpkin head into six evenly spaced lobes, keeping the eyes centered inside the front section.
- Sew the brown stem over the top opening and angle the upper section about 20–30 degrees.
- Position the two large leaves beside the stem and overlap their bases slightly.
- Sew the pink cheek patches about one round below the eyes, then embroider a shallow black smile between them.
- Attach the curly green vine behind one side of the stem so it falls beside the pumpkin rather than across the face.
- Sew one yellow flower between the two upper leaves.
- Attach the upper end of the spiral body firmly to the bottom center of the pumpkin head, passing the sewing yarn through several head stitches.
- Pin the remaining leaves and flowers along the spiral while the ornament is hanging, then sew each piece in place.
- Attach two bell loops at separate positions along the spiral and the third bell at the bottom tip. Sew the final small leaves immediately above the bottom bell.
- Feed the hanging cord through the wooden bead, sew both ends securely into the stem and head junction, then hang the finished piece temporarily to check its balance.
The completed ornament should hang vertically with the pumpkin face forward and the spiral turning freely underneath.
7 Technical Tips
- Round-position drift: Place a locking stitch marker into the first stitch of every pumpkin-head round. Missing the round start by even one stitch can shift the decrease lines and make the sculpted lobes look uneven.
- Understuffed pumpkin: Fill the head until thumb pressure creates only about a 5 mm indentation. Loose stuffing allows the external sculpting yarn to collapse the sphere instead of forming controlled ribs.
- Visible decrease holes: Use invisible decreases through the front loops during R16–R20. Ordinary decreases can expose stuffing between the orange stitches.
- Incorrect eye spacing: Test the eyes approximately 8 stitches apart before attaching the safety washers. Permanent eye backs are difficult to reposition without enlarging the crochet fabric.
- Flat spiral: Do not block the orange strip flat. If the relaxed corkscrew measures less than roughly 5 cm across, remake the final row with looser tension rather than stretching it manually.
- Accessories facing sideways: Pin the leaves and flowers while the project is suspended vertically. The spiral rotates under its own weight, so placement judged on a flat table can change after hanging.
- Loose bell attachments: Weave each bell-loop tail through at least 5 cm of dense crochet before trimming. Repeated movement can pull short yarn ends back through the fabric.
Conclusion
This pumpkin amigurumi crochet pattern depends on three separate structures: a firmly stuffed 36-stitch pumpkin head, six external sculpting channels and an intentionally over-increased hanging spiral. Complete the crochet sections first, then suspend the ornament before permanently attaching the leaves, flowers and bells because gravity changes their final position.
After stuffing the head, mark six equal lobe sections before tightening the sculpting strands. Share the finished pumpkin on Pinterest or Instagram using #PumpkinSpiralAmigurumi, including a side photograph that shows the corkscrew shape clearly. Which part would you change on this pumpkin first: the vine length, the number of leaves or the spacing between the three bells?









