Introduction
Seven narrow loops carry the weight of this curtain before a single flower is added, so top-edge spacing matters as much as the lace itself. This crochet flower curtain pattern combines size 10 cotton thread, a 2.0–2.35 mm hook and a repeat-based valance with hanging botanical vines. The intermediate project suits windows where light should remain visible while the upper frame receives a structured decorative treatment.
The Design: What Makes This Curtain Different
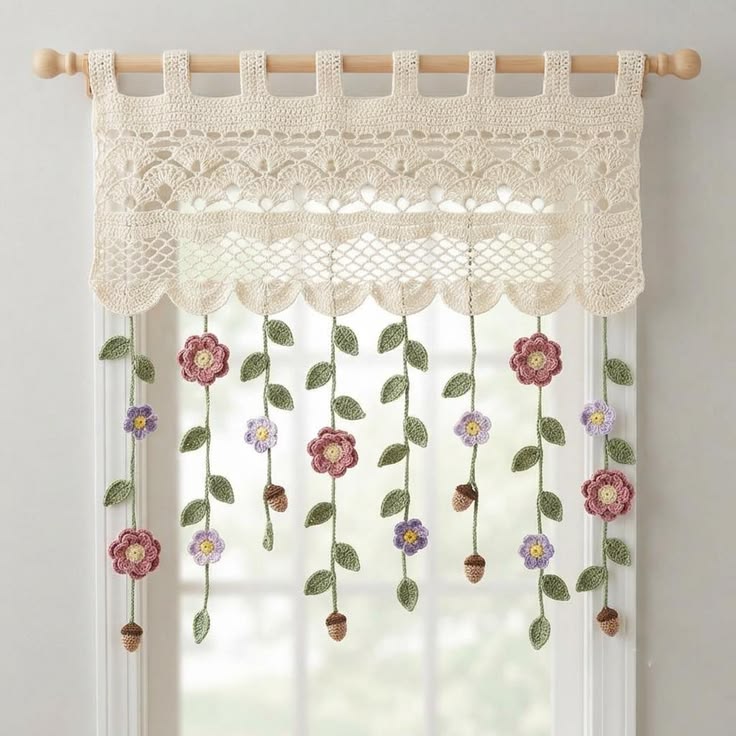
The photographed curtain is not one continuous sheet. Its upper section is a true lace valance, while the lower half is mostly open air interrupted by suspended vines. That separation keeps the window visually light.
Three structural decisions define the piece. First, narrow vertical loops attach the panel to a round wooden rod without gathering the lace. Second, an openwork fan section creates a broad decorative band before the lower scallops begin. Third, independent green vines hang from selected scallops, allowing flowers, leaves and brown terminal motifs to move without pulling the entire panel out of square.
A crochet window valance often stops at the lace border. Here, the crochet leaf garland section becomes an extension of the curtain rather than a separate decoration.
One common mistake is making every vine the same length. Equal drops create a rigid lower edge and lose the staggered botanical rhythm visible in the reference.
Project Info at a Glance
| Skill Level | Time | Finished Size | Hook | Best For |
|---|---|---|---|---|
| Intermediate | 18–30 hours | Approx. 85–90 cm wide × 75–80 cm total drop | 2.0–2.35 mm | Kitchen windows, reading corners, decorative valances |
Materials and Tools
Thread
- Ivory / natural — size 10 cotton crochet thread — approximately 700–900 yd for the main valance, depending on width
- Olive green — size 10 cotton thread — approximately 180–250 yd for vines and leaves
- Dusty rose — size 10 cotton thread — approximately 40–60 yd
- Mauve / dark rose — size 10 cotton thread — approximately 30–50 yd
- Lavender — size 10 cotton thread — approximately 30–50 yd
- Soft yellow — size 10 cotton thread — approximately 15–25 yd
- Brown — size 10 cotton thread — approximately 20–30 yd
Tools
- 2.0–2.35 mm steel crochet hook
- Tapestry needle
- Fine scissors
- Rust-proof blocking pins
- Blocking mat
- Flexible measuring tape
- Wood curtain rod approximately 20–25 mm diameter
- 7–9 locking stitch markers
Abbreviations
- ch — chain
- sl st — slip stitch
- sc — single crochet
- hdc — half double crochet
- dc — double crochet
- tr — treble crochet
- sp — space
- ch-sp — chain space
- st/sts — stitch/stitches
- rep — repeat
- RS — right side
Invisible decreases are not used because every component is worked flat or as a small appliqué rather than as a stuffed form.
Sizing the Valance
Measure the visible width of the window or curtain rod first.
The lace should hang flat rather than gather heavily.
For an approximately 85–90 cm finished width, start with a foundation chain that accommodates a 12-stitch repeat plus 4 edge stitches.
The sample below uses:
Ch 172
That gives:
14 repeats × 12 stitches = 168 stitches
plus four edge chains for turning and borders.
If your thread gauge differs, make a 24-stitch swatch first and calculate the number of full repeats required for the target width.
Keep the repeat count even if you want the scallops and hanging vines to remain balanced around the center.
Pattern — Step by Step
Upper Valance Panel
Foundation
With ivory thread:
Ch 172.
Row 1
Dc in 4th ch from hook.
Dc across.
You should have 169 dc positions including the turning chain structure.
Do not force the count if your foundation has been adjusted for width; maintain the established 12-stitch repeat.
Row 2
Ch 3, turn.
Dc in each dc across.
Row 3
Ch 3, turn.
Dc in next 3 sts, ch 2, sk 2 sts, dc in next 7 sts.
Repeat across.
Work edge stitches as needed to preserve symmetry.
Row 4
Ch 3, turn.
Dc in each dc.
Work 2 dc into each ch-2 space.
Row 5
Ch 3, turn.
Dc in next 2 sts, ch 3, sk 3 sts, dc in next 4 sts, ch 3, sk 3 sts.
Repeat across.
Row 6
Ch 3, turn.
Work dc into each dc.
Work 3 dc into each ch-3 space.
This creates a stable band above the more open decorative section.
Open Lace Fan Section
Row 7
Ch 3, turn.
Sk 2 sts, 5 dc in next st, sk 2 sts, dc in next st.
Repeat across.
Adjust only at the final edge if needed.
Row 8
Ch 5, turn.
Sc in center dc of next 5-dc fan, ch 5, dc in next single dc.
Repeat across.
Row 9
Ch 3, turn.
Work 5 dc into each ch-5 space.
Sc into each sc between fans.
Row 10
Ch 5, turn.
Sc into the center of each fan.
Ch 5 between anchoring points.
Row 11
Repeat Row 9.
Row 12
Repeat Row 10.
Three fan levels create the broad floral-lace appearance visible in the reference.
For a taller valance, repeat Rows 9–10 once more.
Stabilizing Band
Row 13
Ch 3, turn.
Work 2 dc into each ch-5 space, ch 1 between groups.
Row 14
Ch 3, turn.
Dc across, working one dc into every stitch and chain position necessary to return to a continuous horizontal band.
Row 15
Ch 1, turn.
Sc across.
This row becomes the foundation for the lower scallops.
Lower Scalloped Border
Row 16
Ch 1, turn.
Sk 2 sts, 7 dc in next st, sk 2 sts, sc in next st.
Repeat across.
The result should form a sequence of rounded shells.
Row 17
Ch 1, turn.
Sc in first st.
Around each 7-dc shell work:
sc, hdc, dc, 2 tr, dc, hdc, sc
distributed across the shell stitches.
Sl st between neighboring scallops.
Fasten off.
Block the valance before attaching vines.
The scallops should sit at roughly equal depth rather than curling upward.
Rod Loops — Make 7
The photo shows seven visible fabric loops across the wooden rod.
With ivory:
Row 1
Ch 9.
Sc in 2nd ch from hook and across. (8)
Rows 2–18
Ch 1, turn.
Sc across. (8)
The strip should measure approximately 7–9 cm long, depending on rod diameter.
Fasten off with a 20 cm tail.
Fold the strip in half over the rod.
Sew both short ends securely to the top edge of the valance.
Repeat for all seven loops.
For wider curtains, add loops so unsupported sections between them do not exceed approximately 12–14 cm.
Hanging Vines
Make 7 vines in different lengths.
Suggested finished lengths:
- Vine 1: 36 cm
- Vine 2: 49 cm
- Vine 3: 42 cm
- Vine 4: 55 cm
- Vine 5: 44 cm
- Vine 6: 50 cm
- Vine 7: 38 cm
Use olive green.
Vine Cord
Chain until the cord reaches the target measurement.
Starting in 2nd ch from hook, sl st loosely back through every chain.
Fasten off only after all leaves and flowers are positioned.
Slip-stitching back through the foundation chain makes the vine less likely to twist than a plain chain.
Leaves — Make 20–24
With olive green:
Ch 9.
Starting in 2nd ch from hook:
sl st, sc, hdc, dc, tr, dc, hdc, sc
Ch 2.
Working down the opposite side of the foundation chain:
sc, hdc, dc, tr, dc, hdc, sc, sl st
Join at the leaf base.
Fasten off with a 15 cm tail.
Each leaf should finish around 3–4 cm long with size 10 thread, depending on tension.
Sew leaves to alternating sides of each vine.
Space neighboring leaves approximately 5–7 cm apart.
Rotate each one slightly rather than keeping every leaf horizontal.
Large Rose Flowers — Make 5
Use dusty rose or mauve for petals and soft yellow or cream for centers.
Center
With yellow:
Ch 4, join with sl st to form a ring.
Round 1
Work 10 sc into ring. (10)
Join.
Fasten off yellow.
Petals
Join dusty rose.
Round 2
Sl st in next st, ch 2, 3 dc in next st, ch 2, sl st in next st.
Repeat around to form five petals.
Join.
Round 3
Join mauve behind the first petal.
Work behind each existing petal:
ch 4, sl st between petals
to create five back loops.
Into each ch-4 loop work:
sc, hdc, 3 dc, hdc, sc
Fasten off.
The second petal layer should sit behind the first rather than directly covering it.
Small Lavender Flowers — Make 5
With yellow center:
Make MR.
Work 8 sc in MR. (8)
Join.
Change to lavender.
Sl st in next st, ch 2, 2 dc, ch 2, sl st in same st.
Repeat in alternating stitches to form four or five compact petals, depending on spacing.
Fasten off.
Target diameter: approximately 2.5–3.5 cm.
Optional Small Pink Flowers — Make 2–3
Use the same construction as the lavender flower but work the petals in dusty rose.
These smaller blooms help distribute color between the large flower positions.
Brown Acorn Ornaments — Make 4
The photographed curtain shows small brown oval ornaments hanging near several vine ends.
With brown thread:
Round 1
Make MR.
6 sc in MR. (6)
Round 2
Inc ×6. (12)
Round 3
Sc around. (12)
Round 4
Sc around. (12)
Round 5
Sc, dec ×4. (8)
Lightly flatten rather than stuffing heavily.
Round 6
Dec ×4. (4)
Fasten off.
For the cap, join darker brown around the top and work one round of sc.
The ornament should remain light because excess weight can pull a fine vine out of line.
Vine Layout
Lay the blocked valance flat before sewing anything.
Place the vines beneath selected scallops.
Do not use every scallop.
Seven vines across an approximately 85–90 cm valance create enough open space to keep the window visible.
Distribute flowers approximately as follows:
- Vine 1: one large rose, one acorn
- Vine 2: one lavender flower, three leaves
- Vine 3: one large rose, one small pink flower
- Vine 4: one lavender flower, one acorn
- Vine 5: one large rose, one lavender flower
- Vine 6: one large rose, one acorn
- Vine 7: one lavender flower, one large rose
Treat that sequence as a placement plan rather than a fixed color chart.
The photograph uses asymmetry, so identical vines would look less accurate.
Assembly
- Wet-block the finished ivory valance to its target width before attaching any hanging pieces.
- Position all seven rod loops across the top edge, keeping the gaps between loops approximately equal.
- Sew each loop through at least eight neighboring top-edge stitches so the curtain weight is distributed rather than concentrated at one point.
- Lay the valance flat and mark seven hanging points along the scalloped lower edge.
- Attach the longest vine near the center and distribute shorter vines toward the outer edges.
- Sew leaves to alternating sides of each vine at approximately 5–7 cm intervals.
- Add large rose flowers first, then fill remaining visual gaps with lavender and smaller pink flowers.
- Attach brown acorn ornaments to selected lower vine sections rather than to every strand.
- Hang the curtain temporarily and correct any vine that pulls one scallop visibly lower than its neighbors.
- Weave all tails through matching-color stitches, trim only after final hanging, and lightly steam or wet-block the vines if they twist.
The finished curtain combines one lace valance, seven rod loops, a scalloped lower edge and staggered botanical strands suspended below the window panel.
7 Technical Tips
- Loop spacing failure: Too much unsupported lace between rod loops can make the top edge sag. Keep loop spacing at roughly 12–14 cm maximum for fine cotton thread.
- Scallop curling: Dense lower shells can roll upward if the final round is too tight. Block each scallop to approximately the same 4–5 cm depth before attaching vines.
- Vine twisting: A plain foundation chain can rotate under the weight of leaves. Slip stitch back through every chain so each vine becomes a firmer cord.
- Uneven flower weight: Placing all large flowers on one side can pull the curtain diagonally. Distribute the five large motifs across at least four separate vines.
- Leaf crowding: Leaves spaced closer than about 4 cm can overlap and hide the vine structure. Use 5–7 cm spacing for the open look.
- Thread stretch: Cotton curtain sections can lengthen after hanging. Measure vine lengths only after the cords have been lightly stretched by hand and released.
- Rod-loop distortion: Loops sewn through only one or two lace stitches can tear the upper edge. Catch at least eight top-edge stitches at every loop attachment point.
Adjusting the Curtain Width
The upper lace panel is repeat-based.
Add or remove complete 12-stitch repeats before beginning the first row.
For a narrow window, use fewer repeats and five rod loops.
For an approximately 85–90 cm decorative panel, seven loops work well.
For a wider window near 120 cm, use additional repeats and increase to nine or eleven loops.
Do not widen the curtain by stretching it during blocking.
Blocking should open the lace, not create permanent horizontal tension.
Adjusting the Curtain Drop
The total drop is controlled mainly by the hanging vines.
The valance itself can remain around 25–30 cm high.
For a short kitchen window, keep vines between 25 and 40 cm.
For a taller window, extend the central strands to 55–65 cm.
Keep at least three different vine lengths.
That variation creates a botanical lower silhouette instead of a rigid horizontal line.
Choosing Cotton Thread
Size 10 cotton is a practical choice because it produces lace fine enough for window light to pass through while still holding flower and leaf shapes after blocking.
Mercerized cotton gives sharper stitch definition than soft acrylic yarn.
It also accepts wet blocking well.
For a slightly heavier curtain, fingering-weight cotton can replace thread, but the entire project will become larger.
Increase hook size accordingly and make a width swatch before committing to the foundation chain.
Planning Flower Scale
Do not use one flower size everywhere.
The reference combines larger dusty-rose flowers with smaller lavender blooms.
Keep the larger flowers around 4.5–5 cm across.
Keep the smaller lavender flowers around 60–70% of that diameter.
That difference gives the hanging section more depth without adding physical thickness.
Centers should remain light yellow or cream so the blooms remain readable against the green vines.
Hanging and Blocking
Block the ivory section separately first.
Pin the upper edge straight.
Shape each fan.
Then pin every scallop to the same depth.
Allow the cotton to dry fully before removing the pins.
After vines are attached, hang the curtain for several hours.
Cotton thread may settle under its own weight.
If one strand becomes longer than planned, remove its lowest ornament or shorten the attachment point rather than trimming the entire vine.
The final hanging test should happen before every tail is cut short.
Conclusion
Start with the window width, not the flower count. Build the ivory lace panel in complete 12-stitch repeats, block the scalloped edge flat, then attach seven vines in deliberately different lengths so the lower section stays open rather than forming a solid curtain. Use the larger rose motifs across several strands and reserve the smallest flowers for visual gaps. The last step is a full hanging test before trimming any tails. Save this crochet flower curtain pattern to Pinterest and share the blocked valance plus finished window view on Instagram with #FloralVineCurtain. Which hanging detail would you repeat most often on your version: rose flowers, lavender blooms or the small brown acorns?









