Introduction
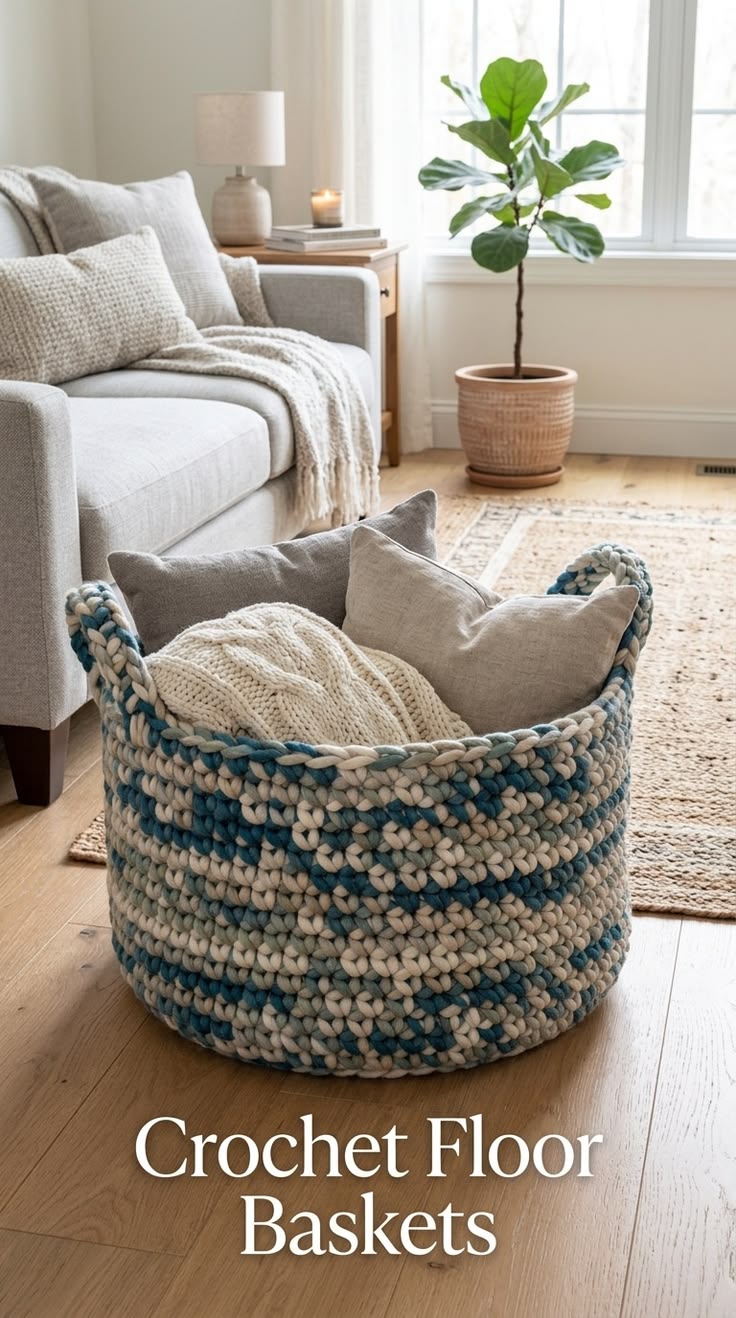
A floor basket holding two cushions and a blanket cannot rely on soft fabric alone; its walls have to resist almost half a meter of unsupported span. This crochet floor basket pattern uses bulky yarn held double, a 12 mm hook and dense single crochet to produce an approximately 46 cm basket. Integrated handles make it practical for blanket storage while preserving the thick cylindrical profile shown in the reference.
The Design: What Makes This Floor Basket Different
The reference basket uses proportion rather than decoration to create its structure. A broad circular base supports tall walls, while the lower edge curves gently instead of forming a sharp box-like corner. That shape is well suited to bulky crochet because the fabric can bend upward without creating a hard ridge.
Color is distributed in broken horizontal sections rather than clean stripes. Cream dominates, deep teal appears in interrupted bands, and pale blue yarn softens some transitions. Using two strands together lets one strand change independently, producing a marled chunky crochet basket without complex tapestry work.
The two handles are built directly into the top wall. No separate straps. This reduces attachment points on a crochet basket with handles intended to carry blankets.
The main maker error is continuing increases after the base is complete. Even two accidental increases per round can turn a tall cylinder into a flared bowl.
Project Info at a Glance
| Skill Level | Time | Finished Size | Hook | Best For |
|---|---|---|---|---|
| Confident beginner | 8–12 hours | Approx. 46 cm diameter × 33–36 cm tall | 12 mm | Blankets, cushions, yarn, toys |
Materials and Tools
Yarn
Hold two bulky strands together throughout.
- Cream / natural — bulky #5 — approximately 1,200–1,400 g
- Deep teal — bulky #5 — approximately 450–550 g
- Pale aqua / dusty blue — bulky #5 — approximately 150–250 g
Total working quantity: approximately 1.8–2.2 kg, depending on yarn density and final height.
For a lighter basket, use tube yarn or a lighter bulky fiber that still produces firm stitches.
Tools
- 12 mm crochet hook
- Large locking stitch marker
- Tapestry needle
- Scissors
- Flexible measuring tape
- Optional kitchen scale for dividing color quantities
Abbreviations
- MR — magic ring
- sc — single crochet
- inc — 2 sc in one stitch
- ch — chain
- sl st — slip stitch
- BLO — back loop only
- st/sts — stitch/stitches
- rnd — round
- sk — skip
An invisible decrease is unnecessary in the main basket body because the walls maintain a constant circumference rather than narrowing like an amigurumi form.
Gauge and Structure
A useful reference gauge is approximately 5.5 single crochet stitches × 6 rows per 10 cm when bulky yarn is held double with a 12 mm hook.
Gauge matters differently for a basket than for clothing.
The target is not merely dimensional accuracy. Fabric stiffness matters just as much.
Work a small swatch using both strands together. Bend it between two fingers.
If the swatch folds with almost no resistance, change to a 10–11 mm hook or use firmer yarn.
If inserting the 12 mm hook requires excessive force, the yarn bundle is too thick for practical work.
Color Setup
For the photographed effect, prepare three two-strand combinations:
Blend A — Cream: cream + cream
Blend B — Marled Teal: cream + deep teal
Blend C — Marled Aqua: cream + pale aqua
This method keeps at least one cream strand active in most rounds, which is why the finished surface remains light even when teal bands appear.
Avoid cutting both strands during every color change.
Change only one strand when possible.
That produces blended transitions rather than sharply separated stripes.
Pattern — Step by Step
Work in continuous spiral rounds unless stated otherwise.
Place a marker in the first stitch of every round.
Circular Base
Round 1
With Blend A, make a MR.
Work:
6 sc in MR. (6)
Pull the ring closed.
Round 2
Inc in each stitch.
Inc ×6. (12)
Round 3
Sc 1, inc.
Repeat 6 times.
(18)
Round 4
Sc 2, inc.
Repeat 6 times.
(24)
Round 5
Sc 3, inc.
Repeat 6 times.
(30)
Round 6
Sc 4, inc.
Repeat 6 times.
(36)
Round 7
Sc 5, inc.
Repeat 6 times.
(42)
Round 8
Sc 6, inc.
Repeat 6 times.
(48)
Round 9
Sc 7, inc.
Repeat 6 times.
(54)
Round 10
Sc 8, inc.
Repeat 6 times.
(60)
Round 11
Sc 9, inc.
Repeat 6 times.
(66)
Round 12
Sc 10, inc.
Repeat 6 times.
(72)
Lay the circle flat.
The base should measure approximately 42–46 cm across, depending on yarn and tension.
If it already exceeds 47 cm, undo Round 12 and use 66 stitches as the final circumference.
Preventing a Hexagonal Base
Six-increase circle math can create six visible corners if every increase is stacked directly above the previous round.
The stitch totals remain correct, but you can stagger increase positions.
For example, instead of working:
sc 8, inc
all the way around, split some sections:
sc 4, inc, sc 4
while retaining exactly six increases.
Do not alter the final stitch count.
The purpose is visual distribution, not additional shaping.
Base-to-Wall Transition
Round 13
Using Blend A:
Sc BLO in every stitch around.
(72)
No increases.
The unused front loops form a subtle ridge.
Round 14
Sc in both loops around.
(72)
Round 15
Change one cream strand to pale aqua for Blend C.
Sc around.
(72)
The basket should now begin lifting away from the circular base.
Lower Wall
Round 16
Blend C. Sc around. (72)
Round 17
Return to Blend A. Sc around. (72)
Round 18
Blend A. Sc around. (72)
Round 19
Change to Blend B. Sc around. (72)
Round 20
Blend B. Sc around. (72)
Round 21
Blend A. Sc around. (72)
Round 22
Blend A. Sc around. (72)
At this stage the basket should show interrupted teal and blue bands rather than equal-width stripes.
Middle Wall
Round 23
Blend C. Sc around. (72)
Round 24
Blend A. Sc around. (72)
Round 25
Blend B. Sc around. (72)
Round 26
Blend B. Sc around. (72)
Round 27
Blend A. Sc around. (72)
Round 28
Blend A. Sc around. (72)
Round 29
Blend C. Sc around. (72)
Round 30
Blend A. Sc around. (72)
Measure from the bottom.
The basket should now be approaching approximately 24–27 cm high, depending on row gauge.
Upper Wall
Round 31
Blend B. Sc around. (72)
Round 32
Blend B. Sc around. (72)
Round 33
Blend A. Sc around. (72)
Round 34
Blend C. Sc around. (72)
Round 35
Blend A. Sc around. (72)
Round 36
Blend A. Sc around. (72)
Check height.
Before forming the handles, aim for approximately 29–31 cm from the base.
Add plain 72-stitch rounds if necessary.
Do not loosen tension to gain height.
Integrated Handles
The two openings must sit directly opposite one another.
Place four stitch markers before starting.
With 72 stitches around, divide the circumference as:
13 stitches + 10 handle stitches + 26 stitches + 10 handle stitches + 13 stitches
Round 37 — Handle Openings
Using Blend A:
Sc 13.
Ch 10.
Skip 10 sts.
Sc 26.
Ch 10.
Skip 10 sts.
Sc 13.
You now have two equal handle openings.
The chain sections replace the ten skipped stitches, so the working circumference remains equivalent to 72 positions.
Keep both chain loops relaxed but not loose.
First Handle Reinforcement
Round 38
Sc in each of the first 13 sts.
Work 10 sc around or into the first ch-10 handle.
Sc 26.
Work 10 sc around or into the second ch-10 handle.
Sc 13.
(72)
Working around the chains produces a smoother, cord-like top to the opening.
Working into individual chains gives more stitch definition.
Either method is structurally valid as long as both handles are worked identically.
Second Handle Reinforcement
Round 39
Sc in every stitch and every handle stitch around.
(72)
Use firm tension through the handle sections.
Do not pull tightly enough to shrink the openings.
Reinforced Top Rim
Round 40
Change to Blend B for a narrow teal accent.
Sc around.
(72)
Round 41
Return to Blend A.
Sc BLO around.
(72)
Round 42
Sc in both loops around.
(72)
Round 43
Sl st loosely around.
(72 sl sts)
Fasten off, leaving a 25 cm tail.
Weave the tail downward through several dense wall rows.
The completed basket should measure approximately 33–36 cm tall, depending on the number of additional wall rounds used.
Creating the Broken Teal Pattern
The photographed basket does not use rigid full-width stripes.
To move closer to that appearance, alter one strand in the middle of selected rounds.
For example:
Start Round 25 with:
cream + teal
After approximately 18 stitches, replace teal with cream.
Work another 20 stitches.
Add teal again for 15 stitches.
Return to cream for the remainder.
This creates short color runs that appear to drift around the circumference.
On another round, use pale aqua instead of teal.
Do not align every transition vertically. That creates an obvious seam-like column.
Space color changes at least 8–12 stitches apart from the change point on the previous patterned round.
Adjusting the Diameter
The main version stops at 72 stitches.
For a smaller floor basket, stop the base after:
Round 10 — 60 sts
or
Round 11 — 66 sts
Then work the BLO transition.
For a larger version:
(Sc 11, inc) ×6 = 78 stitches
Next:
(Sc 12, inc) ×6 = 84 stitches
Every new base round adds six stitches.
Once you select a final circumference, every straight wall round must use that same count.
Handle placement also needs to be recalculated symmetrically.
For example, with 84 stitches, two 12-stitch handle openings could be separated by 30 stitches front and back.
Assembly and Finishing
- Place the completed basket on a hard floor and flatten the circular base without stretching it.
- Measure the base across two perpendicular directions; keep the difference under approximately 1.5 cm.
- Push the BLO transition outward so the lower edge sits evenly around the floor.
- Check all straight wall rounds against the final 72-stitch circumference.
- Position both handles directly opposite each other and compare their openings before weaving any remaining tails.
- Reinforce loose handle stitches by weaving the yarn tail through the upper two rows rather than knotting directly beside the opening.
- Move all bulky joins toward the interior and weave each tail through at least 5 cm of dense stitches.
- Shape the top rim into a circle and inspect it from above for sections pulled inward by tight slip stitches.
- Fill the basket with two folded blankets or several cushions for several hours to establish its cylindrical form.
- Remove the contents and confirm that the handles, rim and side walls remain symmetrical before trimming final yarn tails.
The completed basket has a broad circular base, vertical storage walls, two integrated carrying openings and a reinforced cream-dominant rim.
7 Technical Tips
- Base ruffling: Too much circumference creates visible waves before the wall even begins. Keep the base increase rate at exactly six increases per increase round, and inspect the circle flat after every two rounds.
- Base cupping: A base that forms a bowl before Round 13 may have a missed increase or excessive tension. Verify 72 stitches at Round 12 before adding any extra increase.
- Wall flare: An accidental increase during the straight section gradually widens the basket opening. Count the wall every four rounds and maintain exactly 72 stitches.
- Handle mismatch: A one-stitch difference between openings is very visible on a 46 cm basket. Mark both 10-stitch handle sections before crocheting Round 37.
- Handle stretch: One chain row alone can lengthen under the weight of blankets. Work at least two full reinforcement rounds over the handle openings before finishing the rim.
- Loose fabric: A jumbo basket can collapse if the hook is too large for the yarn bundle. Aim near 5.5 sc per 10 cm with a 12 mm hook; substantially fewer stitches per 10 cm indicates looser fabric.
- Tight rim: Slip stitches can reduce the top circumference even when the wall count remains correct. Match each final slip stitch to approximately the width of the single crochet directly beneath it.
Why Bulky Yarn Is Held Double
A floor basket needs substantially more bending resistance than a tabletop storage bowl.
Holding two bulky strands together creates an effective jumbo working thickness and a dense single-crochet fabric.
It also supports the marled effect visible in the image.
Two cream strands produce a solid light section.
Cream plus teal creates a mixed teal band.
Cream plus pale aqua creates a softer transition.
That means the basket can change appearance by replacing only one strand while maintaining almost the same physical yarn thickness.
Consistency matters. If one strand changes from bulky cotton to a very thin acrylic, wall gauge can contract even though the hook remains unchanged.
Keeping a Large Basket Upright
Size magnifies softness.
A 15 cm crochet bowl may stand with relatively loose stitches because the walls are short. A 33 cm floor basket places much more fabric above the base.
Three variables control stability:
Yarn firmness. Cotton, recycled cotton and dense tube yarns resist bending better than soft, lofty fibers.
Hook-to-yarn ratio. A smaller hook produces denser stitches, within a workable range.
Wall circumference. Wider baskets require more stiffness because the unsupported span increases.
If the completed wall collapses immediately, first check gauge.
Moving from a 12 mm to an 11 mm hook can add meaningful density without changing the pattern mathematics.
For very soft acrylic bulky yarn, adding a third thin strand may work better than forcing extremely tight tension with two strands.
Planning the Cream, Teal and Aqua Distribution
The reference remains predominantly neutral even though teal is visually strong.
A practical color division is approximately:
65% cream
25% teal
10% pale aqua
The percentages refer to visible color contribution, not necessarily exact yarn mass.
Because one cream strand can stay active while the second changes color, the project may consume significantly more cream yarn than all accent yarns combined.
Use teal most heavily through the lower-middle and upper-middle wall.
Keep the base mostly cream or cream/aqua.
Return to cream around the handles so the large openings have a unified border.
A narrow teal round immediately below the finishing rim provides enough contrast without making the top edge appear disconnected from the body.
Handle Position Matters
A floor basket filled with blankets can deform when lifted if the handles are too close together.
Opposing handle openings distribute the load across the diameter.
For the 72-stitch version, the pattern places equal groups around the circumference so the two openings remain centered across from each other.
Do not position the handles by eye after beginning the round.
Place markers first.
Count from the first marker to the second, then repeat that count on the opposite side.
After chaining each opening, place the basket flat and confirm that the handles form a straight line across the center of the basket.
A misalignment of even four or five stitches can cause the basket to rotate when carried.
Making the Basket Taller or Shorter
Height adjustments are simpler than diameter adjustments.
Do not change the 72-stitch circumference.
For a shorter toy or yarn basket, begin the handle section once the walls reach approximately 24–26 cm.
For the photographed blanket-basket proportions, start the handles at approximately 29–31 cm.
For a taller laundry-style basket, continue straight rounds to 38–42 cm before forming the openings.
Every extra round increases yarn use significantly on a 72-stitch circumference.
If yarn quantity is limited, weigh the basket after every five wall rounds and compare that number with the remaining yarn.
Reserve enough of the cream blend for at least the handle and finishing rounds.
What This Floor Basket Can Store
The photographed scale is appropriate for larger lightweight household items.
- throw blankets
- cushions
- yarn skeins
- stuffed toys
- rolled towels
- knitting or crochet works in progress
- scarves
- lightweight nursery supplies
Dense books, hand weights and metal tools are poor choices for a soft crochet base because concentrated weight can distort the circular floor and stretch the handles.
If heavier storage is required, cut a rigid plastic-canvas or thin plywood insert approximately 1 cm smaller than the finished internal base diameter.
Cover the insert with fabric before placing it inside.
Conclusion
Measure the circular base before committing to thirty centimeters of wall height. For this size, aim near 42–46 cm across, then maintain the same 72-stitch count through every straight round so the sides do not flare. Form the two handles directly opposite each other and reinforce them before finishing the upper rim. Cream should remain the dominant strand if you want the broken teal-and-aqua pattern shown in the reference. Save this crochet floor basket pattern to Pinterest and share a filled and empty view on Instagram using #ChunkyFloorBasket. For this basket, would you keep both handles cream or carry the teal accent through the handle openings?









