Introduction
Eight pumpkin lobes only work when every groove reaches the same top and bottom centers; miss either point and one section twists sideways. This large crochet pumpkin pattern builds a 42-stitch stuffed orange body, then divides it into eight deep rounded segments after stuffing. Use worsted or Aran yarn with a 4 mm hook for a pumpkin approximately 20–23 cm wide, suitable for tabletop and shelf displays.
The Design: What Makes This Pumpkin Different
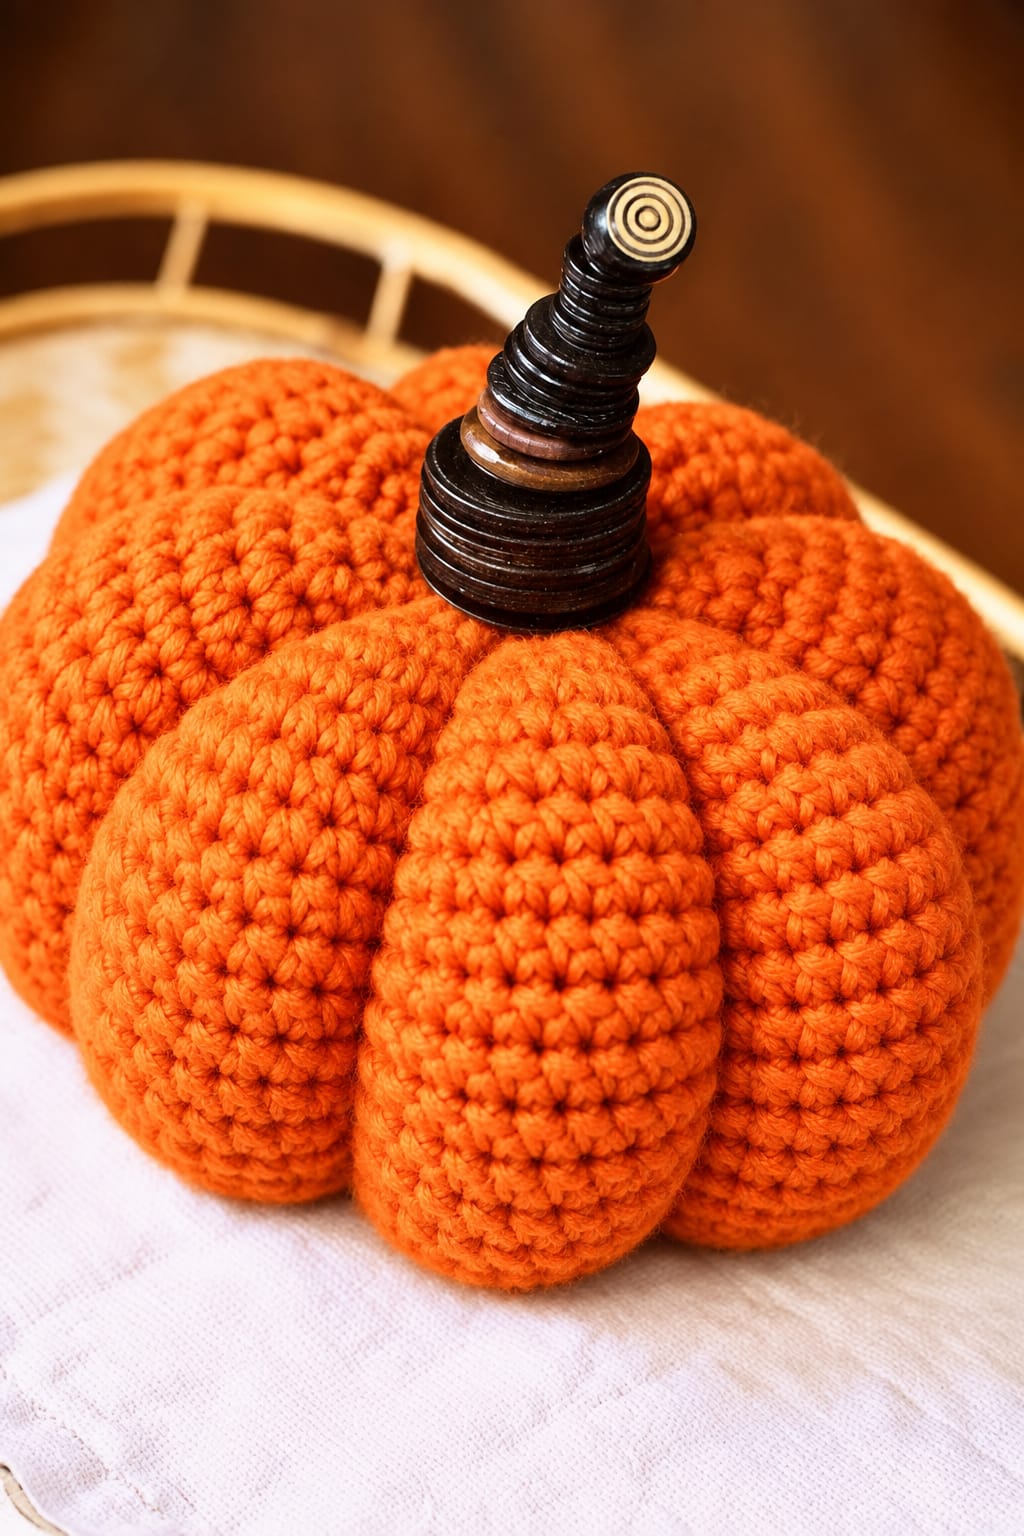
The photograph shows a strongly segmented pumpkin rather than a lightly ribbed ball. The body therefore stays simple during crochet and receives most of its final anatomy after stuffing. A 42-stitch plateau provides enough circumference for a large decorative form while keeping the single-crochet fabric dense. Eight exterior shaping passes compress the surface into the broad individual lobes visible in the reference.
The sculpted crochet pumpkin is also wider than it is tall. That proportion comes from compressing the central axis during shaping rather than adding excessive body rounds. The tall dark topper provides a strong vertical counterpoint to the low orange body. One common mistake in an 8 lobe crochet pumpkin is tightening the first groove completely before establishing the remaining seven. Stuffing then migrates to one side and produces uneven segments.
Project Info at a Glance
| Skill Level | Time | Finished Size | Hook | Best For |
|---|---|---|---|---|
| Intermediate beginner | 4–6 hours | Approx. 20–23 cm wide × 16–18 cm body height | 4 mm | Fall tables, shelves and seasonal displays |
The physical size depends on yarn density and stuffing. A published large sculpted pumpkin reference reaches approximately 20 cm wide, making that a practical target for the scale shown here.
Materials and Tools
Yarn
- Bright pumpkin orange — worsted / Aran #4 — approximately 180–220 g — complete pumpkin body and sculpting strands.
- Dark brown — worsted / Aran #4 — approximately 15–20 g — optional crochet stem if a wooden topper is not used.
A smooth plied yarn produces clearer single-crochet texture than fuzzy yarn. Choose a firm yarn that can tolerate compression from the sculpting strands without the stitches opening around the stuffing.
Tools
- 4 mm crochet hook
- Polyester fiberfill — approximately 180–250 g
- Long doll or tapestry needle
- Standard yarn needle
- Eight removable stitch markers
- Scissors
- Measuring tape
- Optional decorative wooden finial — approximately 8–11 cm high
The topper visible in the reference appears to be wood rather than crochet. A crocheted stem alternative is included below for an all-yarn version.
Abbreviations
- MR — magic ring
- sc — single crochet
- inc — 2 sc in one stitch
- dec — invisible decrease
- sl st — slip stitch
- ch — chain
- st / sts — stitch / stitches
- BLO — back loop only
An invisible decrease is worked through the front loops of the next two stitches before completing them together as one single crochet.
Pattern — Step by Step
Work the pumpkin body in a continuous spiral. Place a marker in the first stitch of each round and move it upward as the work progresses.
Large Orange Pumpkin Body
Yarn: bright pumpkin orange.
R1: 6 sc in MR (6)
R2: inc ×6 (12)
R3: (sc 1, inc) ×6 (18)
R4: (sc 2, inc) ×6 (24)
R5: (sc 3, inc) ×6 (30)
R6: (sc 4, inc) ×6 (36)
R7: (sc 5, inc) ×6 (42)
The body has now reached the 42-stitch plateau used for this large version.
R8: sc around (42)
R9: sc around (42)
R10: sc around (42)
R11: sc around (42)
R12: sc around (42)
R13: sc around (42)
R14: sc around (42)
R15: sc around (42)
R16: sc around (42)
R17: sc around (42)
R18: sc around (42)
Begin checking the profile at R18. The unstuffed body should have enough vertical depth to create rounded lobes without becoming taller than the finished width.
R19: (sc 5, dec) ×6 (36)
R20: sc around (36)
R21: (sc 4, dec) ×6 (30)
R22: sc around (30)
R23: (sc 3, dec) ×6 (24)
Begin stuffing firmly. Push fiberfill outward toward the side wall while leaving the central top-to-bottom axis slightly softer.
R24: (sc 2, dec) ×6 (18)
R25: (sc 1, dec) ×6 (12)
Add the remaining stuffing. Press the top and bottom centers toward one another slightly before closing.
R26: dec ×6 (6)
Fasten off with a 40 cm tail. Thread the tail through the six remaining front loops and pull the opening closed.
Preparing the Eight Lobe Positions
Yarn: matching pumpkin orange.
Place the pumpkin on a level surface with the closed R26 point facing upward.
Insert eight removable markers around the widest circumference. Space them as evenly as possible at approximately 45-degree intervals.
The markers indicate the centers of the eight grooves rather than the raised lobes.
View the pumpkin directly from above. Adjust the markers until the spaces between neighboring positions look equal.
First Pair of Sculpted Grooves
Cut approximately 220–250 cm of matching orange yarn and thread the long needle.
Anchor the yarn at the bottom center.
Pass the needle internally from the bottom center to the top center.
Carry the yarn down the outside over Marker 1 and return the needle through the bottom center.
Pull gradually until the groove sinks approximately 12–18 mm below the neighboring surface.
Do not knot yet.
Pass through the central axis again and create the second groove at the marker directly opposite Marker 1.
Tighten both opposite grooves until their depths match.
Second Pair of Sculpted Grooves
Move to the marker approximately 90 degrees from the first groove.
Pass from bottom center through top center, carry the yarn down the outside and return through the bottom.
Create the directly opposite groove next.
Four grooves should now divide the pumpkin into four equal quarters.
Massage the fiberfill toward any section that appears narrower before continuing.
Final Four Sculpted Grooves
Create one groove halfway between the first and second established channels.
Work its opposite groove next.
Repeat in the remaining two wide spaces.
The finished pumpkin should now have 8 grooves and 8 rounded lobes.
View the body from above and from the side. Adjust individual groove tension until every section has a comparable width.
Secure the shaping yarn at the bottom center and bury the tail through the stuffing.
Deepening the Top Recess
Cut a second 70 cm strand of orange yarn.
Insert the needle through the bottom center and bring it out through the top center.
Return through the center again and pull until the upper crown sinks approximately 2–3 cm.
Repeat once if additional compression is required.
Do not pull until the pumpkin flattens completely. The individual lobes should still curve upward around the recessed crown.
Knot securely at the bottom and bury the tails.
Optional Crochet Stem
Yarn: dark brown worsted / Aran #4.
This version replaces the rigid decorative topper visible in the photograph.
R1: 6 sc in MR (6)
R2: sc around (6)
R3: sc around (6)
R4: sc around (6)
R5: sc around (6)
R6: (sc 1, inc) ×3 (9)
R7: sc around (9)
R8: sc around (9)
R9: (sc 2, inc) ×3 (12)
R10: sc around (12)
Fasten off and leave a 35 cm tail.
Add a very small amount of stuffing to the lower half. The stem should measure approximately 7–9 cm depending on yarn and tension.
Photo-Matched Decorative Topper Option
The reference uses what appears to be a dark wooden finial with a wide lower base and tapered stacked-ring profile.
For a display-only pumpkin, use a purchased lightweight decorative finial approximately 8–11 cm tall. Select one with a base about 3–5 cm wide so it covers the gathered crown.
Place the topper over the recessed center only after all eight grooves have been completed. It can remain removable for seasonal storage, or it can be mounted to a small fabric-covered base disc fixed to the pumpkin.
Do not use a hard detachable topper on a pumpkin intended as a child’s soft toy.
Stem Base Disc for the Crochet Version
Yarn: dark brown.
R1: 6 sc in MR (6)
R2: inc ×6 (12)
R3: (sc 1, inc) ×6 (18)
Fasten off with a 30 cm tail.
Center the disc over the crown indentation. Stitch around its complete perimeter, then sew the 12-stitch lower edge of the crochet stem onto the middle of the disc.
Assembly
- Complete and firmly stuff the 42-stitch pumpkin body before creating any exterior channels.
- Close the final six stitches and place the pumpkin with the top center facing upward.
- Mark eight groove positions around the widest circumference at approximately 45-degree intervals.
- Create the first groove and then its directly opposite groove before tightening either one fully.
- Add the second opposite pair at approximately 90 degrees to the first pair.
- Place the remaining four grooves halfway between the existing channels to form eight equal lobes.
- Compress the top-to-bottom axis until the crown sinks approximately 2–3 cm and the pumpkin becomes slightly wider.
- Redistribute stuffing manually between adjacent grooves until all eight lobes appear similarly full.
- Attach the crochet stem and base disc, or position the photo-matched decorative topper over the recessed crown.
- Set the pumpkin on a flat surface and make final tension adjustments so all eight lobes touch the table evenly.
The completed pumpkin has one densely crocheted body, eight rounded lobes, eight recessed channels and one centered decorative stem or topper.
7 Technical Tips
- Uneven lobe width: Eight grooves require approximately 45-degree spacing around the circumference. Mark all eight locations before pulling the first shaping strand tight.
- Orange fabric gaps: Stuffing becomes visible when a 4 mm hook produces loose single crochet in the chosen yarn. Move to a 3.5 mm hook if the spaces between stitches open noticeably under pressure.
- Off-center crown: Every shaping pass must enter the same top and bottom centers. Moving the needle even 1–2 cm sideways causes the final lobes to spiral instead of running vertically.
- One compressed lobe: Working clockwise without alternating opposite grooves pushes stuffing progressively toward the unfinished side. Create channels in opposing pairs and redistribute fiberfill after each pair.
- Weak rib definition: A groove shallower than approximately 12 mm can disappear after the stuffing settles. Tighten gradually toward a 12–18 mm depression while keeping the neighboring lobes rounded.
- Flattened body: Pulling the central compression strand too far can turn the pumpkin into a disk. Limit the top indentation to approximately 2–3 cm and check the side profile before knotting.
- Loose stem: A tall stem attached only to the six-stitch crown area can tilt. Use an 18-stitch base disc so the attachment spreads across approximately 3–5 cm of the pumpkin surface.
Why Eight Lobes Change the Pattern
Six-section crochet pumpkins are common because six increase lines fit naturally into standard amigurumi math. The photographed pumpkin has a different visual rhythm. Eight narrower, rounded sections surround the crown.
The easiest way to reproduce that structure is not to force eight increases into every body round. Doing so changes the standard six-stitch increase progression and can make the sphere harder to control.
Instead, the body is crocheted with conventional six-point shaping up to a 42-stitch plateau. The eight-part structure is added after stuffing.
This separates two jobs. The crochet rounds create volume; the long shaping yarn creates anatomy.
Because the grooves are independent of the stitch increases, they can be placed at true 45-degree intervals around the finished circumference.
Getting the Wide Pumpkin Profile
The reference is not spherical. Its width is greater than the visible orange body height.
Start that proportion during stuffing. Fill the sides firmly but leave the vertical central axis slightly softer. Once the top and bottom centers are drawn together, the body shortens and the circumference expands visually.
The shaping strands then deepen that effect. Each groove pushes stuffing toward the neighboring lobes, making the pumpkin appear wider without adding stitches.
If the unsculpted body already looks unusually tall, do not compensate by pulling the grooves harder. Excessive tension narrows the channels and creates pointed lobes.
For a flatter pumpkin, remove one or two 42-stitch plateau rounds. For a taller version, add one or two plateau rounds before R19.
Stuffing for Rounded Lobes
Deep sculpting requires more control than simply filling the body until no space remains.
Add fiberfill in small pieces. Large compact clumps can sit between two grooves and make one lobe harder than the others.
Pack the outside wall first. Keep the top and bottom centers slightly softer so the long needle can pass through the axis without forcing a new exit point.
Before closing R26, rotate the pumpkin and press it from several angles. The body should return to shape after moderate hand pressure.
After the first four grooves are installed, stop and redistribute stuffing. Repeat after the final four. This is more effective than attempting to correct eight unequal sections after every shaping strand has been knotted.
Choosing Between a Crochet Stem and the Wooden Topper
The dark topper in the photograph contributes almost as much to the silhouette as the orange body. It is tall, tapered and visually heavier than the small stems used on many amigurumi pumpkins.
A crochet stem keeps the project entirely textile-based and makes the finished pumpkin easier to store. The 18-stitch base disc stabilizes the taller stem and covers the shaping knots.
A wooden finial creates a closer visual match to the reference. It also adds rigid height and sharper concentric detail that crochet cannot reproduce exactly at this scale.
For a household display, either option works. For a soft toy, use the crocheted version and omit hard removable components.
Changing the Pumpkin Size
The simplest size adjustment is yarn thickness rather than rewriting the full body progression.
Using DK yarn and a smaller hook produces a compact pumpkin while preserving the same 42-stitch maximum. Bulky yarn with an appropriately smaller-than-label hook creates a much larger body.
For a medium version, stop the increases at 36 stitches. Maintain that count through the center rounds before decreasing by six stitches at each shaping stage.
For a small version, stop at 30 stitches. Reduce the number of plateau rounds and shorten the stem proportionally.
Keep eight external grooves regardless of size when reproducing the photographed structure. Measure the circumference and divide it visually into eight equal sections before sculpting.
Finishing the Pumpkin for Display
Place the finished pumpkin on a flat table after the stem is attached. Each lower lobe should contact the surface without one section lifting the opposite side.
If the pumpkin rocks, massage stuffing away from the high section and toward the adjoining lower lobes. Do not solve the problem by pulling one groove substantially tighter because that changes the top view as well.
Inspect the crown next. All eight channels should converge beneath the stem or topper rather than stopping at different distances from the center.
Finally, check the orange surface for visible sculpting strands. Matching yarn should settle into the recessed grooves instead of running across the rounded tops of the lobes.
Conclusion
Finish the entire stuffed body before deciding how deep the grooves should be; the final circumference determines the tension required for eight balanced lobes. Mark every channel first, work in opposite pairs and keep the crown indentation near 2–3 cm. Save this large crochet pumpkin pattern to Pinterest with an overhead photo that shows all eight sections, then share the finished orange pumpkin on Instagram using #EightLobeCrochetPumpkin. Record the finished circumference and body height before making another size so the proportions can be repeated. For this exact pumpkin, would you use the dark wooden-style topper shown in the photo or make the entire stem in brown crochet?









