Introduction
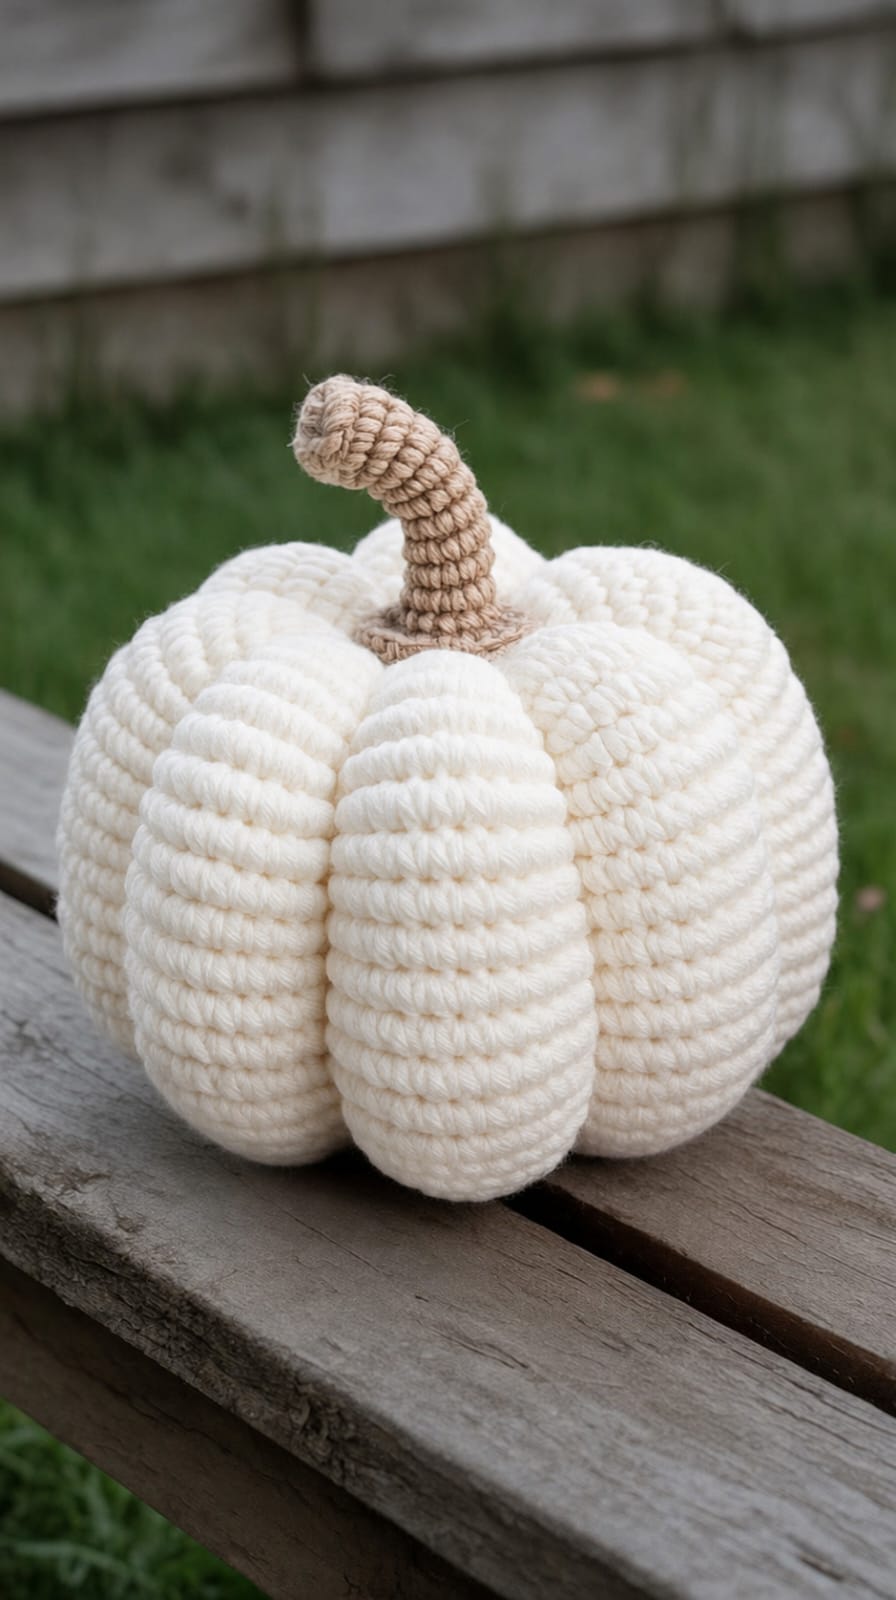
Eight ivory lobes leave no color change to disguise a groove that wanders five millimeters off course. This white crochet pumpkin pattern uses worsted or Aran yarn with 5 mm and 4 mm hooks to make an approximately 21–23 cm decoration. A smooth stuffed body, deep sculpting channels and tall curved taupe stem create an intermediate fall project for compact tabletop displays.
The Design: What Makes This White Pumpkin Different
The body is crocheted as one continuous form rather than a ribbed rectangle, which preserves the horizontal stitch lines visible across every lobe in the reference. A 42-stitch plateau gives the pumpkin enough width to form eight substantial sections without producing a tall spherical shape. After filling, the top and bottom centers are compressed toward one another and eight external shaping strands create the deep grooves. The stem is intentionally long, narrow and curved, supplying the only contrasting color in this farmhouse crochet pumpkin. No leaf or vine is added because the plain crown is part of the design. One common mistake with a sculpted crochet pumpkin is pulling one channel much tighter than the others. On an ivory surface, uneven groove depth changes the apparent width of neighboring lobes immediately.
Project Info at a Glance
| Skill Level | Time | Finished Size | Hooks | Best For |
|---|---|---|---|---|
| Intermediate | 4–6 hours | Approx. 21–23 cm diameter | 5.0 mm body / 4.0 mm stem | Neutral fall décor, table displays and farmhouse arrangements |
Materials and Tools
Yarn
- Warm ivory / off-white — worsted or Aran #4 — approximately 150–180 g — complete pumpkin body and sculpting strands.
- Mushroom taupe / light brown — worsted or Aran #4 — approximately 20–25 g — curved crochet stem.
A firm, smooth worsted yarn works well for this structure because deep sculpting needs enough stitch definition to keep the horizontal rounds visible after filling.
Tools
- 5.0 mm crochet hook for the pumpkin body
- 4.0 mm crochet hook for the stem
- Polyester fiberfill — approximately 180–220 g
- Long tapestry needle
- Standard yarn needle
- Stitch marker
- Dressmaking pins
- Scissors
- Measuring tape
Abbreviations
- MR — magic ring
- sc — single crochet
- inc — increase
- dec — decrease
- sl st — slip stitch
- ch — chain
- BLO — back loop only
An invisible decrease is worked through the front loops of the next two stitches before one single crochet is completed through both loops.
Pattern — Step by Step
Work the pumpkin in a continuous spiral. Move the stitch marker after every round and check the final count before starting the next one.
Pumpkin Body
Yarn: warm ivory — Source: original reconstruction using standard six-stitch amigurumi expansion.
R1: 6 sc in MR. (6)
R2: inc ×6. (12)
R3: (sc, inc) ×6. (18)
R4: (2 sc, inc) ×6. (24)
R5: (3 sc, inc) ×6. (30)
R6: (4 sc, inc) ×6. (36)
R7: (5 sc, inc) ×6. (42)
R8: sc around. (42)
R9: sc around. (42)
R10: sc around. (42)
R11: sc around. (42)
R12: sc around. (42)
R13: sc around. (42)
R14: sc around. (42)
R15: sc around. (42)
R16: sc around. (42)
R17: sc around. (42)
R18: sc around. (42)
R19: sc around. (42)
R20: (5 sc, dec) ×6. (36)
R21: (4 sc, dec) ×6. (30)
R22: (3 sc, dec) ×6. (24)
Begin stuffing here. Put filling against the outer wall first rather than packing the center immediately.
R23: sc around. (24)
R24: (2 sc, dec) ×6. (18)
R25: sc around. (18)
R26: (sc, dec) ×6. (12)
Add the remaining stuffing.
R27: dec ×6. (6)
Fasten off with approximately 90 cm of ivory yarn.
Close the Lower Opening
Thread the tail through the front loops of the six remaining stitches.
Pull until the opening closes.
Pass the needle through the center and exit at the opposite crown.
Do not cut the yarn yet.
Compress the Pumpkin Vertically
Push the top and bottom centers toward one another by hand.
Pull the long yarn tail through the center until the overall body height drops to approximately 16–18 cm.
Return the needle through the opposite direction once more.
Hold the compression with a temporary knot.
The body should now be broader than it is tall.
Mark Eight Groove Positions
Look at the pumpkin directly from above.
Use eight pins around the circumference.
Space them approximately 45 degrees apart.
The positions do not have to fall on exact stitch columns, but the distances between neighboring markers should remain visually equal.
First Sculpting Groove
Yarn: warm ivory.
Cut approximately 110 cm of yarn.
Insert the needle through the bottom center and exit through the top depression.
Bring the yarn around the exterior beside the first pin.
Return the needle through the lower center.
Pull until the groove sinks approximately 15–20 mm.
Do not knot yet.
Second Sculpting Groove
Repeat directly opposite the first groove.
Match its depth before continuing.
Working opposite channels in pairs keeps the body from drifting sideways.
Grooves Three and Four
Work the next opposing pair at approximately 90 degrees to the first pair.
Compare all four lobes from above.
Correct tension now rather than after all eight strands are locked.
Grooves Five Through Eight
Add the four remaining channels between the existing grooves.
Each finished recess should measure roughly 15–20 mm deep near the widest body area.
Secure the shaping yarn inside the top depression.
Weave the remaining tail through several ivory stitches.
Check the Eight Lobes
Set the pumpkin on a rigid table.
Rotate it slowly.
No single lobe should project noticeably farther than the others.
The lower center should touch the table slightly above the outer lobes, creating a shallow base recess.
Loosen an individual sculpting strand if one section looks substantially narrower.
Curved Taupe Stem
Yarn: mushroom taupe — Source: original reconstruction using standard amigurumi tube math.
R1: 6 sc in MR. (6)
R2: inc ×6. (12)
R3: BLO sc around. (12)
R4: sc around. (12)
R5: sc around. (12)
R6: sc around. (12)
R7: sc around. (12)
R8: sc around. (12)
R9: sc around. (12)
R10: sc around. (12)
R11: sc around. (12)
R12: sc around. (12)
R13: sc around. (12)
R14: sc around. (12)
R15: sc around. (12)
R16: sc around. (12)
R17: sc around. (12)
R18: sc around. (12)
R19: sc around. (12)
R20: sc around. (12)
Fasten off with a 45 cm sewing tail.
Stuff the first twelve rounds firmly. Fill R13–R20 only lightly so the upper section can bend.
Shape the Stem Curve
Thread approximately 45 cm of taupe yarn through a needle.
Insert at the lower rear of the stem.
Exit around R16.
Take a concealed stitch spanning approximately 6–7 cm along the inner side of the desired bend.
Pull slowly until the upper stalk curves by roughly 25–35 degrees.
Secure the shaping strand near the stem base.
Create the Stem Socket
Use the blunt end of a crochet hook or your thumb to deepen the pumpkin crown.
Target a recess about 20–25 mm wide.
Do not open the body stitches.
The recess only needs enough depth to hide the stem’s first round and distribute its weight across the eight lobes.
Attach the Stem
Place the 12-stitch stem base inside the crown depression.
Pin at four opposing points.
Sew through the stem base and pumpkin surface twice around.
Add two deeper anchor stitches through the compressed pumpkin center.
Keep the curved tip aimed slightly forward rather than directly sideways.
Adjust the Crown
After the stem is attached, inspect the eight upper grooves.
If one channel stops too far from the stem, use a short additional ivory stitch to extend the depression inward.
Avoid running sculpting yarn over the taupe stem base.
The crown should look compressed naturally around the stalk.
Adjust the Base
Set the pumpkin upright.
If it rocks, press the bottom center inward another 10–15 mm.
Move a small amount of filling toward the outer lobes through massage rather than reopening the body.
Check stability again on a hard surface.
Assembly
- Crochet the ivory body from 6 stitches through the 42-stitch plateau and back to the six-stitch closing round.
- Stuff the outer walls evenly, keeping the center moderately filled so the finished form can be compressed vertically.
- Close the six-stitch opening and pull the top and bottom centers toward one another until body height reaches approximately 16–18 cm.
- Mark eight equal positions around the circumference using pins viewed from directly above.
- Add sculpting strands in opposite pairs until eight grooves approximately 15–20 mm deep divide the body.
- Check the pumpkin on a level surface and correct any unusually narrow lobe before securing all shaping strands permanently.
- Crochet the 20-round taupe stem, filling the lower twelve rounds more firmly than the upper eight.
- Add an internal shaping strand to bend the upper stem approximately 25–35 degrees.
- Create a 20–25 mm crown recess and sew the stem base twice around, adding two deeper central anchor stitches.
- Correct the base depression, reshape all eight lobes by hand and weave the remaining ivory and taupe tails through matching stitches.
The completed pumpkin should stand independently with eight evenly distributed ivory lobes, a recessed crown and a tall taupe stem that curves without pulling the body sideways.
7 Technical Tips
- One lobe becomes narrower than the others: Its shaping strand is tighter. Keep each groove approximately 15–20 mm deep and compare opposite sections before knotting the yarn.
- Pumpkin looks like a ball instead of a squash: The top and bottom centers have not been compressed enough. Reduce the body height to approximately 16–18 cm before adding the external groove strands.
- Stuffing shows between stitches: The body is packed beyond the capacity of the 42-stitch shell. Remove filling until the single-crochet openings close naturally when the surface is pressed.
- Pumpkin rocks on the table: The bottom center is too full. Press the lower recess inward approximately 10–15 mm and move filling toward the eight outer lobes.
- Stem remains straight: The upper eight rounds contain too much fiberfill. Keep R13–R20 lightly filled and shorten the inner shaping strand across approximately 6–7 cm.
- Stem leans at its base: The attachment is relying only on perimeter sewing. Add two deep anchoring stitches through the crown center after sewing twice around the 12-stitch base.
- Top depression disappears after stem attachment: The stem socket is too shallow. Form a 20–25 mm crown recess before attaching the stalk and extend individual grooves inward afterward if required.
Why a Continuous Body Fits This Pumpkin
The image shows horizontal crochet rows traveling across the lobes. That distinguishes the structure from the common rectangle method, where back-loop rows create vertical ribs automatically.
A continuous round body produces a cleaner monochrome shell first.
Sculpting happens afterward.
This separation gives the maker more control over the number and depth of the large pumpkin sections. Eight grooves can be positioned independently of the stitch columns, and a section can be loosened without rebuilding the body.
Why 42 Stitches Are Used
A 36-stitch body would produce a smaller medium pumpkin at the same yarn weight. Increasing to 48 stitches would move the project toward a broader body and increase stuffing consumption.
The 42-stitch plateau sits between those sizes and matches the substantial but compact profile visible in the photograph.
Twelve straight rounds at that count provide enough side-wall height before the decreases begin.
Controlling Groove Depth on White Yarn
Ivory does not provide color boundaries between lobes.
Shadow does that work instead.
For this reason, shallow sculpting can leave the pumpkin looking almost spherical.
Target a visible 15–20 mm depression near the widest portion of every channel.
Do not simply pull harder at the crown. Tension needs to travel around the complete outside surface so the lobe edges remain rounded.
Working in Opposite Pairs
Add the first groove and then its opposite.
Repeat at 90 degrees.
Only after four balanced sections exist should the intermediate channels be added.
This sequence controls lateral distortion. Working clockwise around the pumpkin instead can gradually pull the body toward the side where the most recent strands were tightened.
Changing the Pumpkin Size
For a smaller version, stop the increase sequence at 36 stitches and work approximately ten straight rounds.
For a larger pumpkin, expand to 48 stitches and work thirteen to fifteen straight rounds before decreasing.
Keep the six-stitch increase and decrease rhythm intact.
Resize the stem as well; a 20-round stalk can overpower a pumpkin that stops at 36 stitches.
Changing the Stem Proportions
The supplied image uses an unusually tall stalk.
A shorter farmhouse version can stop after R12 or R14.
For the photographed silhouette, twenty rounds give enough length for an obvious curve above the crown.
If the stem is lengthened beyond twenty rounds, use only minimal filling near the tip or the stalk can become top-heavy.
Changing the Color Palette
Warm ivory and mushroom taupe reproduce the neutral reference closely.
Pure white with medium brown creates stronger contrast.
Oatmeal can replace ivory for a warmer harvest version.
Sage, rust or mustard can replace the taupe stem, although brown keeps the botanical structure easiest to read against a pale body.
Using Different Yarn Weights
Bulky yarn can produce a larger pumpkin with fewer visible stitches, while DK yarn creates a smaller and more detailed surface.
Keep the hook smaller than the yarn label’s typical garment recommendation when the fabric needs to contain stuffing.
Before committing to the full body, crochet the first seven rounds and stretch the fabric lightly. If fiberfill would be visible through the stitches, move down one hook size.
Controlling Stuffing Firmness
The body needs enough filling to hold each rounded lobe but not so much that external sculpting becomes difficult.
Fill the perimeter first.
Keep the central core softer.
That softer core allows the crown and base to move toward each other when the compression strand is tightened.
A rigidly packed sphere can require excessive force, which may distort the magic ring or closing stitches.
Final Shaping
Rotate the finished pumpkin on a hard surface.
Compare every pair of opposite lobes.
Run your fingers through each groove and distribute stuffing toward the rounded outer sections.
Check the stalk from the front and side.
The tip should curve above the center rather than extending far enough forward to make the pumpkin look visually unbalanced.
Only after these checks should the sculpting tails be buried deeply inside the body.
Conclusion
Shape the body before attaching the stalk because the eight grooves determine the exact location and depth of the crown socket. Your next step is to crochet the 42-stitch ivory body, fill it moderately and compress its top and bottom before marking eight equal channels. Keep opposite groove depths matched and leave the upper stem lightly filled. Share the finished white crochet pumpkin pattern project on Pinterest with the complete lobe structure visible, then post the curved-stem detail on Instagram using #SculptedIvoryPumpkin. For this pumpkin specifically, would you keep the plain taupe stalk or add one small sage leaf at its base?









