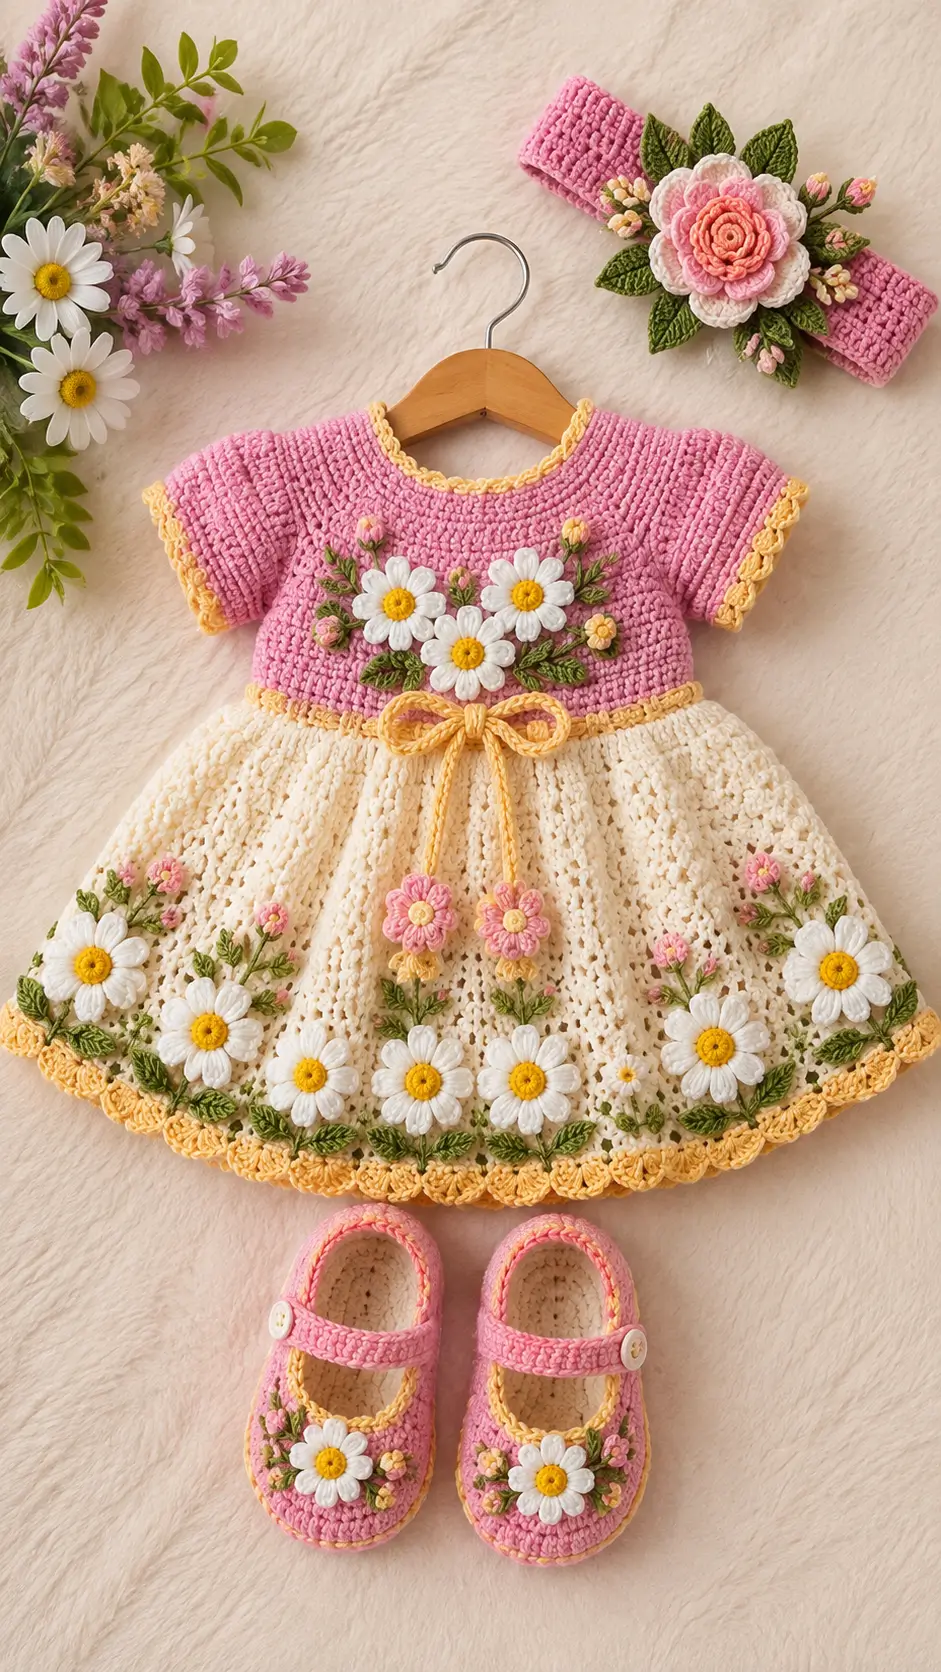
A daisy-covered skirt needs enough blank fabric between flowers or the petals merge into one heavy border. This daisy crochet baby dress pattern targets a 6–12 month size with DK yarn, a 3.5 mm hook, a 56 cm chest benchmark and intermediate construction. The coordinated design includes a pink bodice, cream flared skirt, appliqués, headband and Mary Jane shoes, making one pattern plan useful for a complete photographed-style set.
The Design: What Makes This Daisy Dress Different
The photographed design depends on three structural contrasts. First, the pink yoke is dense enough to support raised daisies without sagging. Second, the cream skirt expands rapidly below the waist so the hem has room for repeated flowers and leaves; insufficient increases can produce a tube-shaped skirt instead of an A-line silhouette. Third, the embellishments are distributed asymmetrically above the waist but become more rhythmic around the lower skirt.
A crochet flower baby dress can become front-heavy when every motif is thick. Keep the bodice flowers compact and reserve the largest daisies for the skirt. The same rule applies to a floral crochet baby dress with leaves: attach foliage through several base stitches rather than one point, or the leaves can twist after washing.
Project Info at a Glance
| Skill Level | Time | Finished Size | Hook | Best For |
|---|---|---|---|---|
| Intermediate | Approx. 12–18 hours for full set | 6–12 months; target chest about 56 cm | 3.5 mm | Layered floral baby dress set |
The 56 cm figure is a chest-circumference benchmark converted from a published 22-inch measurement for 6–12 months. Actual fit must be checked against the intended wearer or a reliable garment measurement before finishing.
Materials and Tools
Yarn
For the photographed effect, use smooth DK cotton or a washable cotton-blend yarn.
- Rose pink — DK / Light #3 — approximately 80–100 g for bodice, shoes and headband
- Cream/ivory — DK / Light #3 — approximately 100–130 g for skirt and shoe interiors
- White — DK / Light #3 — approximately 20–30 g for daisy petals
- Golden yellow — DK / Light #3 — approximately 15–20 g for centers, piping and edging
- Leaf green — DK / Light #3 — approximately 15–20 g
- Pale pink/coral — DK / Light #3 — approximately 10–20 g for buds and layered flowers
Those color allocations are planning estimates for this original set. Exact yarn use changes with gauge, dress length, skirt fullness and the number of appliqués.
Tools
- 3.5 mm crochet hook
- 2.5–3 mm hook for tighter appliqués if required
- Tapestry needle
- Locking stitch markers
- Tape measure
- Rustproof pins
- Small garment buttons, only where required for closure
- Sewing thread for reinforcement of decorative attachments
Any appliqué, button or three-dimensional flower used on infant clothing must be attached securely and checked regularly for loosening.
Abbreviations
- MR — magic ring
- sc — single crochet
- hdc — half double crochet
- dc — double crochet
- tr — treble crochet
- inc — increase
- dec — decrease
- sl st — slip stitch
- ch — chain
- BLO — back loop only
- st/sts — stitch/stitches
- sp — space
Invisible decrease is mainly relevant to the three-dimensional flower centers and shoe shaping in this project; work through the front loops when a less visible reduction is required.
Pattern — Step by Step
Sizing basis: 6–12 months, target chest approximately 56 cm. Make a gauge swatch before starting because yarn, hand tension and stitch construction can shift the finished circumference.
Bodice Yoke
Yarn: rose pink.
This draft uses a top-down yoke with an opening at the back.
Foundation: Ch 66.
R1: Dc in 3rd ch from hook and across.
R2: Ch 2, turn. Work dc with four evenly spaced raglan increase points, placing 2 dc, ch 1, 2 dc at each corner.
R3: Repeat raglan increases at each ch-1 corner.
R4: Repeat increase row.
R5: Repeat increase row.
R6: Repeat increase row.
R7: Repeat increase row and measure yoke depth.
Pin the yoke before joining the underarm. Compare the measured circumference with the intended garment rather than relying on age alone.
Bodice Body
Join the front and back sections under each arm, skipping the sleeve groups.
R1: Dc evenly around body opening; join with sl st.
R2: Ch 2, dc around.
R3: Dc around.
R4: Dc around.
R5: Dc around or until the waist sits at the required depth.
Aim for approximately 55–57 cm unstretched circumference at the lower bodice for the 6–12 month target.
Fasten off rose pink.
Short Sleeves — Make 2
Yarn: rose pink.
Join yarn at underarm.
R1: Dc evenly around armhole.
R2: Dc around without increases.
R3: Dc around.
R4: Hdc around.
Change to golden yellow.
R5: *Sl st in next st, ch 3, skip 1 st* around for a narrow decorative edge.
Fasten off and weave tails into the inside of the sleeve.
Flared Cream Skirt
Yarn: cream.
Join at waist. Skirt flare is intentional; gradual increases create the A-line shape visible in the reference image.
R1: Ch 2, 2 dc in every fourth waist stitch, dc in all remaining sts.
R2: Dc around.
R3: *Dc 5, 2 dc in next st* around.
R4: Dc around.
R5: *Dc 6, 2 dc in next st* around.
R6: Dc around.
R7: *Dc 7, 2 dc in next st* around.
R8–R10: Dc around.
R11: *Dc 8, 2 dc in next st* around.
R12–R15: Dc around.
R16: *Dc 9, 2 dc in next st* around.
R17–R22: Dc around.
For a lacier appearance closer to the image, replace alternate plain dc rounds after R8 with dc, ch 1, skip 1 mesh while preserving equivalent increase positions.
Stop when the garment reaches the required dress length.
Yellow Scalloped Hem
Yarn: golden yellow.
R1: Sc evenly around lower edge.
R2: *Skip 1 st, 5 dc in next st, skip 1 st, sl st in next st* around.
Adjust the final repeat by spreading one extra skipped stitch if the circumference is not an exact multiple.
Fasten off.
Waist Cord
Yarn: golden yellow.
Ch 120–140 or until the cord measures enough to pass around the waist and form the photographed front bow.
R1: Sl st back through every chain for a firm cord.
Fasten off.
Thread through the waistline with the bow centered at the front. The cord should be decorative rather than restrictive.
Small Daisy Appliqué — Make 8–12
Yarn: yellow and white.
With yellow:
R1: 6 sc in MR (6).
R2: Inc ×6 (12).
Change to white.
R3: *Sl st in next st, ch 5, hdc in 2nd ch, dc in next 2 ch, hdc in final ch, sl st into next center st* ×6.
Fasten off. Leave a 25 cm sewing tail.
Attach daisies at multiple points around the yellow center rather than catching only one petal.
Pink Five-Petal Flower — Make 4–6
Yarn: golden yellow and pale pink.
With yellow:
R1: 6 sc in MR (6).
R2: Inc ×6 (12).
Change to pink.
R3: *Sl st, ch 3, 2 dc in same st, ch 3, sl st in next st* repeated evenly to form five or six petals according to the desired scale.
Fasten off. Leave 20–25 cm for attachment.
Green Leaves — Make 16–24
Yarn: leaf green.
Ch 7.
R1: Sc in 2nd ch, hdc, dc, tr, dc, 3 sc in last ch. Work down opposite side: dc, tr, dc, hdc, sc.
Sl st to first sc.
Fasten off. Leave a 20 cm sewing tail.
Flower Buds — Make 8–12
Yarn: pale pink with green.
With pink:
R1: 6 sc in MR (6).
R2: Sc around (6).
R3: Dec ×3 (3).
Fasten off pink.
With green, embroider a short stem directly onto the garment and stitch the bud at its upper end.
Large Layered Headband Flower
Yarn: yellow, coral pink, pale pink and white.
R1: 6 sc in MR (6).
R2: Inc ×6 (12).
R3: *(Sc, inc) ×6* (18).
For the inner coral petals, work repeated short chain-and-double-crochet petals around all 18 stitches.
Join pale pink behind the inner layer and work slightly longer petals using ch 4 and dc/tr combinations.
Join white behind the pink layer. Work broad petals with ch 5, 2 tr, 2 dc and a return sl st for each petal.
Fasten off each layer separately and weave tails toward the back.
Headband
Yarn: rose pink.
Ch to the required head circumference minus approximately 1–2 cm for light stretch.
R1: Hdc in 2nd ch and across.
R2–R7: Ch 1, turn, hdc across.
Join short ends with slip stitches or sew them together.
Position the large flower over the seam, then add 4–6 leaves and several small buds.
Mary Jane Shoe Sole — Make 2
Yarn: cream.
Ch 12.
R1: 2 hdc in 2nd ch, hdc across, 5 hdc in final chain; work along opposite side, hdc across, 3 hdc in starting chain.
R2: Increase around toe and heel curves while keeping sides flat.
R3: Repeat controlled increases at toe and heel.
Measure against the intended foot before continuing. Infant shoe sizing varies too much to infer safely from a photograph.
Mary Jane Shoe Upper — Make 2
Yarn: rose pink.
R1: Work sc BLO around sole to create a vertical edge.
R2: Sc around.
R3: Sc along sides and heel; begin decreases across toe.
R4: Repeat toe decreases until the photographed rounded opening is formed.
R5: Sc around heel and sides only, leaving the instep open.
Fasten off.
Shoe Strap — Make 2
Join rose pink at one side.
R1: Ch long enough to cross the instep comfortably.
R2: Sl st back to base.
A decorative button can reproduce the photographed appearance, but any button used on baby footwear must be sewn through multiple yarn strands and checked for looseness before each use.
Shoe Daisy — Make 2
Use the small-daisy instructions above with a slightly smaller hook, approximately 2.5–3 mm, if a compact motif is required.
Sew one flower to each toe. Add two small green leaves and one miniature pink bud.
Assembly
- Block the bodice and skirt to the intended dimensions before placing any appliqués.
- Join or finish the back bodice opening and confirm that the neckline passes comfortably over the intended wearer.
- Attach three compact daisies across the front bodice, leaving clear space beneath the neckline.
- Sew leaves behind the bodice flowers with two or three anchor points per leaf.
- Arrange larger white daisies around the lower third of the skirt before sewing; keep their centers on a visually balanced horizontal band.
- Fill larger gaps with pink buds, small flowers and green stems rather than adding another full-size daisy.
- Thread the yellow waist cord and form a centered bow without tightening the waist circumference.
- Sew the layered flower, leaves and buds firmly to the headband, covering the headband seam.
- Finish both Mary Jane shoes, attach straps, then stitch a small daisy and foliage group onto each toe.
- Weave every yarn tail through several stitches on the wrong side, trim only after tension testing, and inspect buttons and dimensional motifs for movement.
The completed set consists of one floral dress, one coordinated headband and two matching crochet shoes.
7 Technical Tips
- Skirt flare failure: A skirt that stays close to the 56 cm bodice circumference will hang like a tube. Add increases progressively through the upper half of the skirt instead of placing all extra stitches in one round.
- Marker drift: Moving the round marker by even two stitches on repeated increase rounds can create a diagonal seam. Place a locking marker in the first stitch of every joined or spiral section and move it immediately after completing that stitch.
- Appliqué puckering: A daisy sewn through every petal can pull the skirt inward. Anchor the yellow center at four to six points, then tack only the petals that lift away from the fabric.
- Flower weight: Large layered motifs can drag a soft DK bodice downward. Keep the largest headband flower off the dress and restrict bodice daisies to roughly 4–5 cm diameter.
- Measurement timing: Check the waist and neckline before attaching flowers because appliqués can hide adjustment rows. Measure those areas while the garment still lies flat.
- Pinning error: Sewing a border motif immediately after placing it often produces uneven spacing. Pin every skirt daisy first, measure the gaps between flower centers, and correct the full layout before stitching the first motif.
- Tail-weaving failure: Short tails can pull free from dimensional flowers after washing. Leave approximately 20–25 cm on appliqués and weave the tail in at least three directions across the wrong side before trimming.
Conclusion
Finish the garment measurements before committing to the floral layout: check the approximately 56 cm target chest, skirt length, arm openings and shoe sole against the intended size, then pin every daisy in place. Photograph the completed set flat so the flower distribution across the pink bodice and cream skirt remains visible. Save the finished daisy crochet baby dress pattern project to Pinterest and share the dress, headband and shoes on Instagram with #DaisyCrochetBabyDress. The next practical step is a DK gauge swatch with the 3.5 mm hook. For your version, would you keep the lower skirt daisies evenly spaced like the photograph, or cluster them more heavily toward one side?









