Introduction
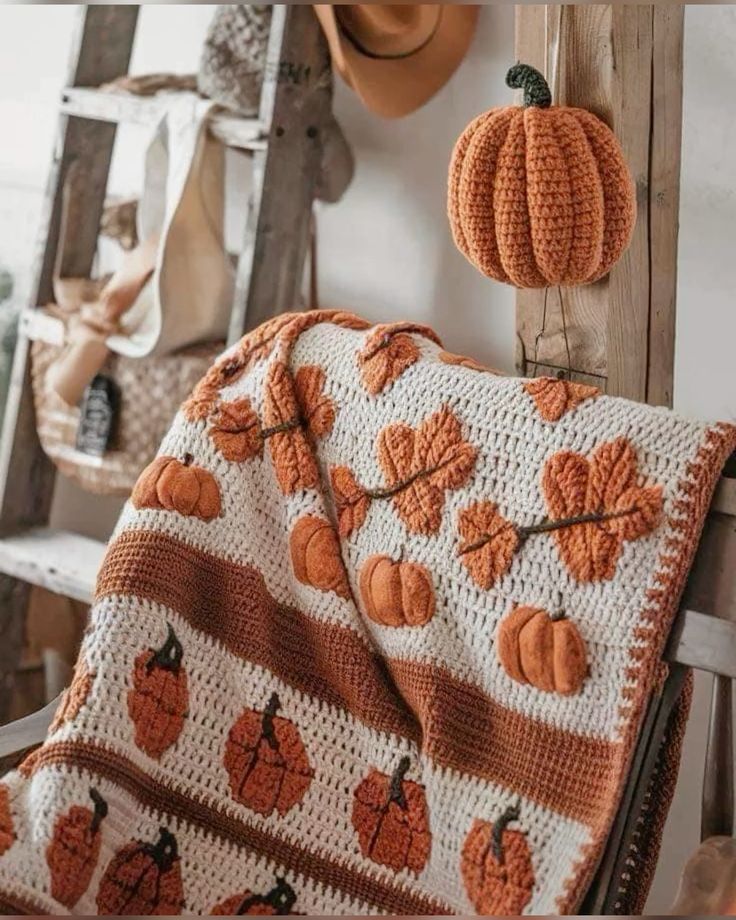
A maple vine crossing three blanket sections will expose any change in row tension long before the pumpkins are attached. This pumpkin and maple leaf crochet blanket pattern uses worsted yarn with 5 mm and 4 mm hooks to make an approximately 115 × 150 cm throw. Cream openwork rows, terracotta bands, raised pumpkins and autumn leaves create an intermediate modular-appliqué project.
The Design: What Makes This Autumn Blanket Different
The background is worked as one mostly cream field rather than a grid of clearly separated granny squares. Broad terracotta stripes divide the length and create visual breaks between groups of pumpkins and leaves. The pumpkins are separate ribbed appliqués, which gives them more depth than the foliage without adding excessive bulk to the blanket. Maple leaves sit flatter and are connected visually by brown or olive vine lines. That difference in relief keeps the surface readable. A fall pumpkin crochet blanket can distort quickly if every motif is sewn with identical tension. Pumpkins need relaxed attachment around their perimeter, while leaf stems and vines need firmer center anchoring. The cream field therefore acts as the structural base, and the autumn motifs are added only after its final size has been checked.
Project Info at a Glance
| Skill Level | Time | Finished Size | Hooks | Best For |
|---|---|---|---|---|
| Intermediate | 38–50 hours | Approx. 115 × 150 cm | 5.0 mm blanket / 4.0 mm appliqués | Fall sofa throws, chair blankets and seasonal bedroom decor |
Materials and Tools
Yarn
- Warm cream / ivory — worsted or Aran #4 — approximately 900–1,100 g — main blanket field and border.
- Terracotta orange — worsted or Aran #4 — approximately 220–270 g — horizontal stripes, pumpkins and border detail.
- Deep rust — worsted or Aran #4 — approximately 80–110 g — maple leaves and accent motifs.
- Olive green — worsted or Aran #4 — approximately 100–130 g — leaves, vines and pumpkin stems.
- Warm brown — worsted or Aran #4 — approximately 50–70 g — stems and long vine lines.
Use yarns from the same weight category throughout. A heavier rust yarn can make one maple leaf noticeably thicker than its neighbors and can pull harder against the cream field during attachment.
Tools
- 5.0 mm crochet hook for the blanket body
- 4.0 mm crochet hook for pumpkins and leaves
- Yarn needle
- Stitch markers
- Dressmaking pins
- Blocking mats
- Rust-resistant blocking pins
- Scissors
- Measuring tape
- Polyester fiberfill — approximately 120–180 g for shallow pumpkin padding
Abbreviations
- MR — magic ring
- ch — chain
- sc — single crochet
- hdc — half double crochet
- dc — double crochet
- tr — treble crochet
- sl st — slip stitch
- inc — increase
- dec — decrease
- BLO — back loop only
An invisible decrease is worked through the front loops of the next two stitches before one single crochet is completed through both loops.
Pattern — Step by Step
The blanket body is worked first. Complete the entire field, add the side edging and block it before attaching pumpkins, leaves or long vine lines.
Main Cream Foundation
Yarn: warm cream — original reconstruction based on standard openwork blanket geometry.
Ch 182.
Row 1: dc in fourth ch from hook and in each ch across. (179 dc plus turning chain)
Row 2: ch 3, turn, dc across.
Row 3: ch 3, turn, dc in next 2 sts, *ch 1, skip 1, dc in next 3 sts*. Repeat across, adjusting the final repeat to keep the edge solid.
Row 4: ch 3, turn, dc in every dc and one dc in each ch-1 space.
Rows 5–12: repeat Rows 3–4 four times.
This forms the first cream openwork section.
Terracotta Stripe 1
Yarn: terracotta orange.
Rows 13–22: ch 3, turn, dc across each row.
Keep the color-change edge on the same side of the blanket.
Cream Section 2
Change back to cream.
Rows 23–42: alternate the openwork Row 3 and solid Row 4 pattern.
Terracotta Stripe 2
Rows 43–52: work solid dc rows in terracotta.
Cream Section 3
Rows 53–82: return to cream and repeat alternating openwork and solid rows.
Terracotta Stripe 3
Rows 83–92: work solid terracotta dc rows.
Cream Section 4
Rows 93–122: work the cream openwork sequence again.
Terracotta Stripe 4
Rows 123–132: work solid terracotta dc rows.
Final Cream Section
Rows 133–162: repeat the cream openwork sequence.
Fasten off.
Target pre-border size: approximately 108–112 cm wide × 142–146 cm long after blocking.
Block the Blanket Field
Lay the cream-and-terracotta field flat.
Pin the four corners first.
Measure the top and bottom edges.
Keep their difference below approximately 10 mm.
Measure both long sides.
If one side is shorter by more than about 15 mm, adjust the blocking pins before adding motifs.
Side Stabilizing Round
Yarn: warm cream.
Join at one corner.
Sc evenly around the full rectangle.
Use approximately two sc per dc-row end along the long sides, adjusting locally so the edge lies flat.
At each corner work (2 sc, ch 2, 2 sc).
Join and fasten off.
Raised Pumpkin Appliqué — Make 10 to 12
The pumpkins in the reference are flatter than table ornaments but thicker than the leaves.
Ribbed Pumpkin Panel
Yarn: terracotta or rust.
Foundation: ch 13.
Row 1: starting in second chain, hdc across. (12)
Row 2: ch 1, turn, hdc BLO across. (12)
Rows 3–24: ch 1, turn, hdc BLO across. (12)
Fasten off with approximately 60 cm of matching yarn.
Target panel: approximately 9–10 cm high × 26–30 cm long.
Seam the Pumpkin Tube
Bring Row 1 and Row 24 together.
Match all 12 stitch positions.
Join with relaxed mattress stitch.
Do not pull the seam below the depth of the neighboring rib.
Gather the First Edge
Thread matching yarn through the 24 row ends.
Pull gradually until the opening measures approximately 8 mm.
Cross the center once.
Push the gathered point slightly inward.
Add Minimal Filling
Place a narrow ring of fiberfill around the outer wall.
Keep the middle almost empty.
Maximum depth should remain approximately 12–16 mm.
The pumpkin must stay flexible enough to drape with the blanket.
Gather the Second Edge
Thread yarn through the remaining 24 row ends.
Pull to an opening about 8 mm wide.
Press both centers toward one another.
Shape the pumpkin to approximately 11–14 cm across.
Define the Pumpkin Ribs
Use the BLO texture as the primary segmentation.
If the center appears too flat, add three or four external shaping passes.
Pull each extra valley only about 3–4 mm deeper than the built-in ribbing.
Keep the shaping symmetrical.
Pumpkin Stem — Make One per Pumpkin
Yarn: olive or brown.
R1: 6 sc in MR (6)
R2: sc around (6)
R3: sc around (6)
R4: sc around (6)
R5: (2 sc, inc) ×2 (8)
Fasten off with a 20 cm sewing tail.
Flatten the lower section.
Sew approximately 10 mm behind the upper pumpkin center.
Five-Lobed Maple Leaf
Make the leaves in terracotta, rust and olive.
Leaf Center
Yarn: chosen leaf color.
Work 10 sc in MR.
Join with sl st.
Center Lobe
Ch 11.
Starting in the second chain work:
sl st, sc, hdc, dc, tr, tr, dc, hdc, sc, sl st.
Work 3 sc in the final chain.
Return down the opposite side in mirrored stitch order.
Upper Side Lobes — Make 2
Ch 9.
Starting in second chain:
sl st, sc, hdc, dc, tr, dc, hdc, sc.
Work 3 sc at the tip.
Return in mirrored order.
Repeat on the opposite side.
Lower Side Lobes — Make 2
Ch 7.
Starting in second chain:
sl st, sc, hdc, dc, hdc, sc.
Work 3 sc at the tip.
Return in mirrored order.
Repeat for the final lobe.
Leaf Stem
Ch 8.
Sl st back through seven chains.
Fasten off with a 25 cm sewing tail.
Target finished size: approximately 8–11 cm.
Add Maple Leaf Veins
Thread darker matching yarn onto a needle.
Work one surface line from the stem into the center lobe.
Add one branch toward each side lobe.
Keep the surface stitches approximately 6–8 mm long.
Stop pulling when the vein becomes visible.
Small Olive Leaf
Yarn: olive green.
Ch 7.
Starting in the second chain:
sl st, sc, hdc, dc, hdc, sc.
Work 3 sc in the final chain.
Rotate and return:
sc, hdc, dc, hdc, sc, sl st.
Fasten off.
Use these smaller leaves near vine lines and between major pumpkins.
Long Surface Vine
The supplied blanket uses several dark curved lines running beneath or between leaf groups.
These can be worked as crocheted cords and sewn to the surface.
Brown Vine Cord
Yarn: warm brown.
Ch 45–70 depending on required length.
Sl st loosely back through every chain.
Fasten off with 25 cm tails at both ends.
Do not stretch the cord after finishing.
Short Curled Vine
Yarn: olive green.
Ch 16.
Starting in second chain, work 3 sc in every chain.
Fasten off.
The dense stitch count will create the curl automatically.
Plan the Motif Arrangement
Spread the entire blanket flat.
Place the pumpkins first.
Keep most pumpkin centers approximately 25–35 cm apart.
Add large maple leaves in the open cream spaces.
Run the long brown vine cords between selected leaf groups rather than across every section.
Use small green leaves and curls to fill narrow gaps.
Photograph the complete layout before sewing.
Attach the Pumpkins
Pin each pumpkin at the top, bottom and both widest sides.
Sew around the rear outer edge at approximately 10–12 mm intervals.
Leave the center free.
The finished pumpkin should project approximately 12–16 mm above the blanket.
Check the background after half the perimeter has been attached.
If the cream fabric dips more than approximately 5 mm, loosen the seam.
Attach the Maple Leaves
Pin each leaf by the stem, center lobe and side points.
Sew firmly along the center vein.
Add one small tack near the tip of each lobe.
Leave most side edges unsewn.
The leaf should remain slightly raised without behaving like a stuffed motif.
Attach the Small Leaves
Sew each small leaf through its center line and base.
Leave the outer 15–20 mm free.
Angle some leaves by approximately 15–30 degrees so the botanical groups do not form rigid rows.
Attach the Vine Cords
Lay each brown cord in a gentle curve.
Pin every 4–5 cm.
Use matching brown yarn to tack the cord at approximately 25–30 mm intervals.
Do not pull the cord tight between anchor points.
The blanket must remain able to stretch independently beneath it.
Border Round 1 — Cream
Join cream at one corner.
Sc evenly around.
Work (2 sc, ch 2, 2 sc) in each corner.
Join.
Border Round 2 — Olive
Join olive yarn.
Repeat sc, ch 1, skip 1 around each straight edge.
Work (sc, ch 2, sc) in every corner.
Join and fasten off.
Border Round 3 — Cream
Join cream into a ch-1 space.
Sc in each sc and each ch-1 space.
Work (sc, ch 2, sc) in each corner.
Border Round 4 — Terracotta
Join terracotta.
Hdc evenly around.
At corners work (2 hdc, ch 2, 2 hdc).
Join.
Final Cream Edge
Join cream.
Sc around the complete perimeter.
Add one picot every 6–8 stitches if a lightly decorative edge is preferred.
Keep the final round narrow so it does not overpower the striped center.
Assembly
- Crochet the cream-and-terracotta blanket field through all 162 rows and add the first cream stabilizing round.
- Block the background to approximately 108–112 cm by 142–146 cm before making final motif-placement decisions.
- Make 10–12 shallow ribbed pumpkins using 12 hdc across and 24 BLO rows, then add short olive or brown stems.
- Crochet the five-lobed maple leaves in rust, terracotta and olive plus smaller green leaves for narrow spaces.
- Make several long brown surface-vine cords and short olive curls, keeping them relaxed before attachment.
- Place every pumpkin first, then position large leaves, vines and smaller foliage in the remaining cream areas.
- Sew pumpkin perimeters with stitches approximately 10–12 mm apart while leaving their central ribbed surfaces raised.
- Attach maple leaves mainly through the vein and tips, then tack vine cords at approximately 25–30 mm intervals.
- Work the cream, olive, cream and terracotta border rounds followed by the final narrow cream finish.
- Block the finished blanket from the outer border only, reshape the pumpkin ribs and leaves by hand and weave all tails into matching fabric.
The completed blanket should lie flat through the cream and terracotta field while pumpkins rise modestly above the surface and maple leaves remain lightly dimensional along their free edges.
7 Technical Tips
- Pumpkin blocks pull the blanket inward: Their sewing thread is too tight. Keep attachment stitches approximately 10–12 mm apart and loosen them if the cream field sinks more than 5 mm.
- Horizontal rust bands become narrower at one edge: Side tension is changing during color transitions. Count edge stitches every ten rows and keep the long-side difference below approximately 10–15 mm before blocking.
- Maple leaves become cup-shaped: The vein embroidery is contracting the center. Use 6–8 mm surface stitches and leave most of the lobe edges completely unsewn.
- Vines make the blanket pucker: The cords were stretched during attachment. Pin them in their natural relaxed length and tack only every 25–30 mm.
- Pumpkins look like flat discs: Too little relief remains after sewing. Keep approximately 12–16 mm of maximum depth and leave the center unattached.
- Large background waves before motifs are added: The cream openwork and solid rust rows have different row gauge. Block the field before appliqué work and correct any side difference greater than about 15 mm.
- Border flares at the corners: Too many stitches have accumulated in the side edging. Use only the stated corner increases and skip duplicated loops where a row transition creates extra edge strands.
Why the Horizontal Bands Matter
The terracotta stripes do more than add color. They divide a long blanket into visual zones and stop the scattered appliqués from looking random.
Pumpkins can sit partly above, below or across those bands, while maple leaves bridge cream areas between them.
The stripe system also gives the maker fixed reference points during placement.
If one pumpkin group begins too low, its distance from the nearest band reveals the imbalance quickly.
That makes this autumn leaf crochet throw easier to compose than a completely plain cream background of the same size.
Why the Pumpkins Stay Shallow
A blanket needs to fold, drape and compress.
Deep stuffed pumpkins interfere with all three functions.
The 12–16 mm target relief is enough to create shadows along the BLO ribs without turning the appliqués into hard ornaments.
Most of the volume belongs around the outer edge.
The center remains soft.
This lets the pumpkin flatten temporarily when the blanket is folded and recover after it is spread out again.
Adjusting the Blanket Size
This pumpkin and maple leaf crochet blanket pattern can be made shorter by removing one cream section and one terracotta stripe.
For a longer bed throw, repeat another cream section followed by one rust band before the final cream rows.
To increase width, add foundation chains in multiples of four so the openwork repeat remains easy to maintain.
Measure the finished field before deciding how many pumpkins to add.
A useful working ratio is one large pumpkin per approximately 0.12–0.16 square meter of finished blanket area.
Changing the Pumpkin Palette
Terracotta matches the reference most closely.
Rust creates a darker lower section, while mustard can be introduced for one or two pumpkins.
Sage pumpkins can replace orange motifs if a more botanical blanket is preferred.
Keep the broad background stripes in one dominant warm color. If both the stripes and pumpkins use several unrelated shades, the layout can become visually fragmented.
Changing the Leaf Palette
Rust leaves create the strongest contrast with cream.
Olive leaves connect visually to the stems and vines.
Mustard adds a lighter transition between orange and green.
You can also work all maple leaves in one color and reserve green for the smaller foliage.
Keep the vein yarn close to the leaf color unless a deliberately graphic outline is wanted.
Controlling the Vines
The long vine lines are easiest to manage as separate cords.
Surface crochet directly through the blanket is possible, but it locks the decoration tightly to the background and makes tension corrections harder.
A sewn slip-stitch cord can be moved before final attachment.
It can also cross a color band without changing the blanket’s base stitch count.
Pin the complete curve first, then tack it from the center toward both ends.
Final Blocking
Do not pin through the raised pumpkin centers.
Set the blanket on a large surface and pin the four corners.
Add pins along the cream outer edge and at the ends of each terracotta band if needed.
Allow the background to settle flat.
After drying, lift the pumpkin ribs and maple leaf points by hand.
Reposition the vine curves where necessary rather than stretching the blanket underneath them.
Conclusion
Complete and block the striped background before attaching any motif because the pumpkins, leaves and long vines all respond differently to sewing tension. Your next step is to make one 12-by-24-row pumpkin and one maple leaf, pin both to the finished cream field and compare their relief before producing the full batch. Keep the pumpkins shallow and the vine cords relaxed. Share the finished pumpkin and maple leaf crochet blanket pattern project on Pinterest with the horizontal bands visible, then post a leaf-and-pumpkin close-up on Instagram using #PumpkinMapleCrochetBlanket. For this blanket specifically, would you keep every pumpkin terracotta or add a few olive pumpkins?









