Introduction
The darkest rose section has to remain at the pumpkin base or the entire gradient reads upside down after gathering. This ombre crochet pumpkin pattern uses worsted yarn and a 5 mm hook to make an approximately 20–23 cm decoration. A ribbed peach-to-rose body and narrow taupe stem create an easy-to-intermediate project that can be scaled by changing the rectangle dimensions.
The Design: What Makes This Ombre Pumpkin Different
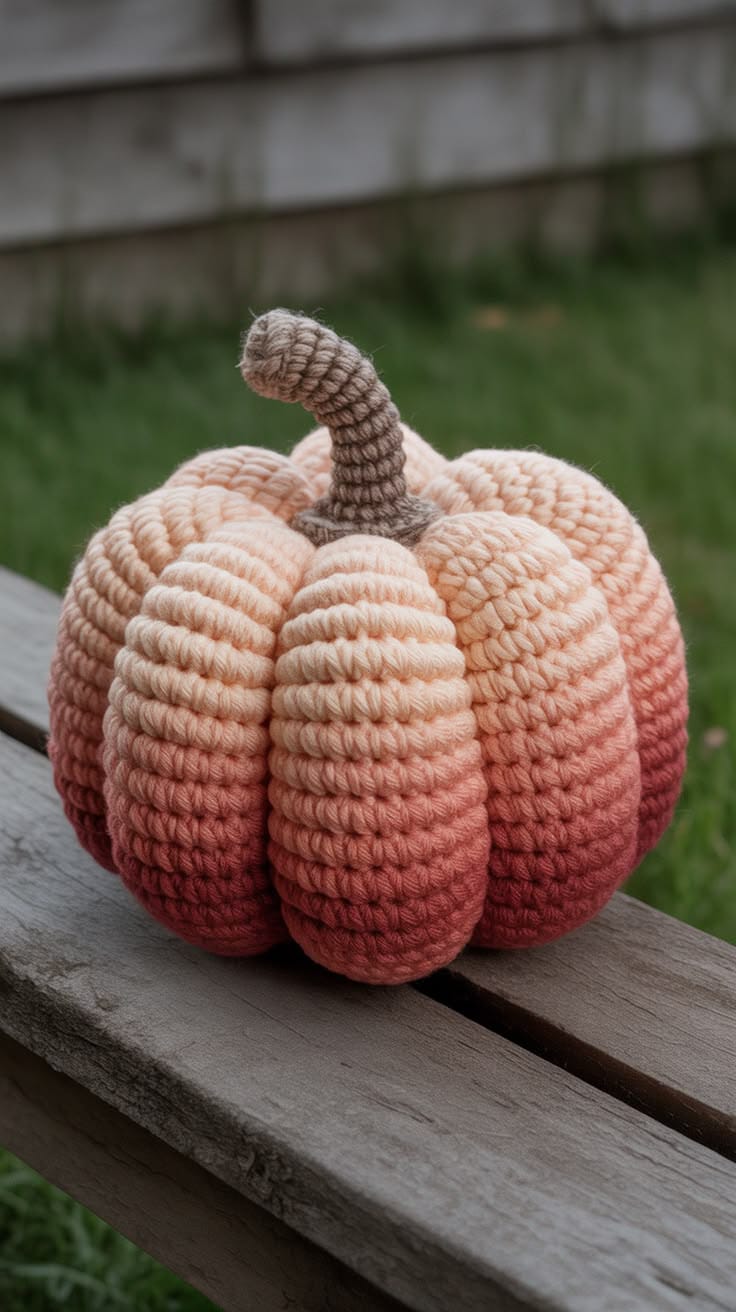
The color fade is structural rather than decorative afterthought. Pale peach begins at the upper body, moves through warm blush and finishes in dusty rose near the bottom, so the transition remains visible across every lobe. Back-loop half double crochet creates the vertical ribs after the flat panel is seamed into a tube. Those built-in channels reduce the amount of external sculpting yarn needed later. The body stays broad and comparatively low, while a narrow curved stem adds height without covering the recessed crown. This gradient crochet pumpkin also avoids leaves, flowers and vines, keeping the color transition as the dominant feature. One common mistake is gathering both ends before checking gradient direction. Once the body is stuffed and compressed, reversing the top and bottom means removing the closure or accepting the darker color at the crown.
Project Info at a Glance
| Skill Level | Time | Finished Size | Hooks | Best For |
|---|---|---|---|---|
| Easy–Intermediate | 4–6 hours | Approx. 20–23 cm wide × 17–19 cm high | 5.0 mm body / 4.0 mm stem | Fall displays, shelves, tables and gradient yarn projects |
Materials and Tools
Yarn
- Pale peach to dusty rose ombre — worsted / Aran #4 — approximately 100–130 g — complete pumpkin body.
- Taupe or gray-brown — worsted / Aran #4 — approximately 8–12 g — crochet stem.
A single long-gradient cake is the easiest way to produce the fade, but three coordinated solid colors can also be used. Choose pale peach, medium blush and dusty rose with similar yarn thickness and fiber content.
Tools
- 5.0 mm crochet hook for the pumpkin body
- 4.0 mm crochet hook for the stem
- Polyester fiberfill — approximately 120–160 g
- Long tapestry needle
- Standard yarn needle
- Stitch markers
- Scissors
- Measuring tape
Abbreviations
- MR — magic ring
- ch — chain
- sc — single crochet
- hdc — half double crochet
- inc — increase
- dec — decrease
- sl st — slip stitch
- BLO — back loop only
An invisible decrease is worked through the front loops of two neighboring stitches before completing one single crochet through both loops.
Pattern — Step by Step
The pumpkin body is worked flat. After seaming, the horizontal ribbing of the rectangle turns ninety degrees and becomes the vertical segmentation visible on the finished pumpkin.
Ombre Ribbed Body
Yarn: peach-to-rose ombre — original reconstruction using standard BLO pumpkin geometry.
Foundation: ch 17.
Row 1: Starting in the second chain from the hook, hdc across. (16)
Row 2: ch 1, turn, hdc BLO across. (16)
Row 3: ch 1, turn, hdc BLO across. (16)
Row 4: ch 1, turn, hdc BLO across. (16)
Row 5: ch 1, turn, hdc BLO across. (16)
Row 6: ch 1, turn, hdc BLO across. (16)
Row 7: ch 1, turn, hdc BLO across. (16)
Row 8: ch 1, turn, hdc BLO across. (16)
Row 9: ch 1, turn, hdc BLO across. (16)
Row 10: ch 1, turn, hdc BLO across. (16)
Row 11: ch 1, turn, hdc BLO across. (16)
Row 12: ch 1, turn, hdc BLO across. (16)
Row 13: ch 1, turn, hdc BLO across. (16)
Row 14: ch 1, turn, hdc BLO across. (16)
Row 15: ch 1, turn, hdc BLO across. (16)
Row 16: ch 1, turn, hdc BLO across. (16)
Row 17: ch 1, turn, hdc BLO across. (16)
Row 18: ch 1, turn, hdc BLO across. (16)
Row 19: ch 1, turn, hdc BLO across. (16)
Row 20: ch 1, turn, hdc BLO across. (16)
Row 21: ch 1, turn, hdc BLO across. (16)
Row 22: ch 1, turn, hdc BLO across. (16)
Row 23: ch 1, turn, hdc BLO across. (16)
Row 24: ch 1, turn, hdc BLO across. (16)
Row 25: ch 1, turn, hdc BLO across. (16)
Row 26: ch 1, turn, hdc BLO across. (16)
Row 27: ch 1, turn, hdc BLO across. (16)
Row 28: ch 1, turn, hdc BLO across. (16)
Row 29: ch 1, turn, hdc BLO across. (16)
Row 30: ch 1, turn, hdc BLO across. (16)
Fasten off with approximately 100 cm of yarn remaining.
Target relaxed panel: approximately 13–15 cm high × 35–40 cm long.
Manual Three-Color Gradient Option
If one ombre yarn is not available, work the first ten rows in pale peach.
Change to medium blush for Rows 11–20.
Use dusty rose for Rows 21–30.
Make every color change at the same panel edge.
Carry neither color through the complete row because the unused yarn can tighten one side of the rectangle.
Leave 10–12 cm tails and weave them horizontally through matching rib sections before assembly.
Check the Panel Dimensions
Lay the rectangle on a table without stretching it.
Measure the short edge first.
Target approximately 13–15 cm.
Then measure the long edge.
Target approximately 35–40 cm.
The long dimension controls pumpkin circumference, while the short dimension controls body height.
If the panel is shorter than 35 cm, add BLO rows in pairs.
If it exceeds 40 cm, test-wrap it into a cylinder before removing rows.
Choose the Gradient Direction
Place the rectangle with its lightest section upward.
Mark that long edge as the crown.
The darker dusty-rose edge becomes the base.
If your self-striping cake transitions in the opposite direction, either reverse the finished orientation or begin from the darker end of the cake before crocheting the rectangle.
Seam the Pumpkin Tube
Bring Row 1 and Row 30 together with right sides facing outward.
Match all 16 stitch positions.
Use mattress stitch or a relaxed whipstitch to join the short edges.
Pull only until the edges meet.
The seam should resemble another rib rather than a deep groove.
Gather the Dusty-Rose Base
Thread approximately 80 cm of matching yarn through a long tapestry needle.
Run the needle through the row ends around the darker open edge.
Pick up approximately one row end at a time.
Pull in several stages.
Stop briefly when the opening reaches about 20 mm and distribute the folds.
Continue until the hole measures approximately 8–10 mm.
Cross the center twice with the yarn needle.
Push the gathered point about 5 mm into the pumpkin body.
Stuff the Ombre Pumpkin
Place fiberfill around the outer wall first.
Rotate the body while adding small handfuls.
Keep the central vertical axis softer than the outside.
The ribs need enough filling behind them to stay rounded, but the center needs to compress later.
Stop when the body feels firm around its circumference yet still shortens approximately 15–20 mm when the top is pressed toward the bottom.
Gather the Pale Peach Crown
Thread another long strand through the row ends at the pale edge.
Gather until the opening measures approximately 20 mm.
Add the last small amount of stuffing around the outer crown.
Keep the center relatively soft.
Continue pulling until the opening measures about 10 mm.
Secure temporarily rather than burying the tail immediately.
Compress the Body
Pass a long matching strand from the crown center through the entire pumpkin and out through the base center.
Return through the same axis.
Pull in small increments.
Reduce the body height by approximately 15–20 mm.
The circumference should expand slightly as the top and bottom recess.
Stop when the body is approximately 13–15 cm high before the stem.
Secure the compression yarn underneath.
Refine the Built-In Ribs
The thirty BLO rows create numerous narrow channels already.
Do not add a shaping strand to every rib.
The supplied image reads as approximately seven or eight broad lobes made from groups of smaller crochet ridges.
Mark six additional major valleys if more definition is needed.
Space them evenly around the circumference.
Major Sculpting Groove 1
Yarn: matching body color.
Anchor yarn at the base center.
Bring it over the outside through one low rib channel.
Insert at the crown center and return through the body.
Pull until the valley deepens approximately 4–5 mm.
Major Sculpting Groove 2
Work directly opposite Groove 1.
Use the same method.
Compare the two resulting sections from above before tightening further.
Major Sculpting Grooves 3 and 4
Divide one remaining side approximately in half.
Make Groove 3.
Rotate the pumpkin 180 degrees and make Groove 4 opposite it.
Keep the visible depths similar.
Major Sculpting Grooves 5 and 6
Complete the final opposing pair.
Set the pumpkin on a level surface.
Redistribute fiberfill by hand if one lobe is narrower.
Do not correct every width difference by pulling the shaping yarn tighter.
Check the Final Body Shape
View the pumpkin from above.
The crown should be recessed and approximately centered.
Turn the body and inspect the gradient.
The pale peach section should occupy the upper part, medium blush the center and dusty rose the lower part.
At least three lower lobes should contact the table while the gathered center remains slightly recessed.
Curved Taupe Stem
Yarn: taupe or gray-brown, 4.0 mm hook.
R1: 6 sc in MR (6)
R2: sc around (6)
R3: sc around (6)
R4: sc around (6)
R5: sc around (6)
R6: sc around (6)
R7: sc around (6)
R8: sc around (6)
R9: (2 sc, inc) ×2 (8)
R10: sc around (8)
R11: (3 sc, inc) ×2 (10)
R12: (4 sc, inc) ×2 (12)
Fasten off with a 35 cm sewing tail.
Target visible stem height: approximately 5–6 cm.
Shape the Stem Curve
Stuff only the lower 2–3 cm lightly.
Leave the upper six-stitch section almost empty.
Bend the top gently to one side.
If it straightens again, thread taupe yarn through the inside curve.
Take one concealed stitch spanning approximately 25–30 mm.
Pull until the stem holds a soft arc rather than a hard angle.
Attach the Stem
Place the 12-stitch stem base over the gathered crown.
Pin at four points.
Sew through the stem base and surrounding pale-peach stitches.
Do not sew only into the central closure because that creates a narrow pivot.
Check the stem after every quarter of the seam.
The base should remain centered while the upper section curves slightly.
Assembly
- Crochet a 16-stitch by 30-row BLO rectangle using ombre yarn or three coordinated peach, blush and dusty-rose colors.
- Check for approximately 13–15 cm of panel height and 35–40 cm of relaxed length before joining the short edges.
- Mark the pale edge as the crown and gather the dusty-rose edge first to create the recessed pumpkin base.
- Add fiberfill around the outer wall while keeping the central axis soft enough for approximately 15–20 mm of compression.
- Gather the pale crown to about a 10 mm opening and compress the body vertically until it measures approximately 13–15 cm high.
- Use the built-in BLO channels as the primary rib texture and add six shallow major grooves only if the broad lobes need stronger definition.
- Crochet the taupe stem from a 6-stitch tube to a 12-stitch base and stuff only its lower portion.
- Curve the upper stem with one concealed internal stitch rather than packing it with additional filling.
- Sew the complete 12-stitch stem base over the crown opening through several surrounding pale-peach stitches.
- Set the pumpkin on a flat surface, reshape any narrow lobe and weave the remaining tails through matching rib sections inside the body.
The completed pumpkin should show a pale-to-dusty-rose vertical gradient, numerous narrow crochet ribs, several broader sculpted lobes and one curved taupe stem.
7 Technical Tips
- Gradient finishes upside down: Both openings were gathered before top orientation was marked. Mark the pale edge as the crown before seaming and keep the darker dusty-rose edge at the base.
- Pumpkin becomes tall and cylindrical: The panel circumference is too short compared with its height. Target approximately 35–40 cm of panel length for a 13–15 cm short edge before assembly.
- Built-in ribs disappear: Too much fiberfill is stretching the BLO channels. Stop stuffing while the body can still compress approximately 15–20 mm from crown to base.
- One major lobe becomes narrower: A shaping strand has been pulled harder than its opposite strand. Work major grooves in opposing pairs and keep added depth close to 4–5 mm.
- Seam becomes the deepest groove: Mattress stitches are too tight. Match all 16 edge positions and pull only until the two panel edges touch.
- Stem falls sideways at the base: Sewing only into the central gathering creates a hinge. Attach the complete 12-stitch base to a wider ring of crown stitches.
- Lower rose section looks compressed: The base gathering is tighter than the crown and has pulled the dark color inward. Recess the center only about 5 mm and distribute the folds before securing the yarn.
Why Back-Loop Ribbing Works for an Ombre Pumpkin
The gradient and the rib texture run in different visual directions during construction. On the flat rectangle, the color bands extend across the short dimension while the raised BLO ridges run row by row across the long dimension.
Assembly changes that relationship.
Once the short edges are joined, each crochet ridge turns into a vertical line from crown to base. The color fade remains horizontal across the height.
That crossing of vertical structure and horizontal color is what gives the ombre crochet pumpkin pattern its distinct appearance.
A smooth round body would still display the gradient, but it would not reproduce the narrow channels visible in the supplied image.
Using Self-Striping Ombre Yarn
A long-gradient cake produces the most gradual transition.
Before beginning, pull out several meters and inspect the order of the colors.
Decide which end should appear at the crown.
If the cake moves from dark to light but you want a pale crown, begin from the light end whenever the yarn construction allows it.
Short-repeat variegated yarn creates speckles or narrow stripes rather than the broad peach-to-rose field shown here.
Look for long color sections rather than frequent color changes.
Using Three Solid Colors
Three solids give more control over placement.
Use ten rows per shade for an equal division.
For a more gradual visual balance, work twelve rows in pale peach, ten in blush and eight in dusty rose.
The darker shade appears visually heavier, so it does not need to occupy exactly one-third of the height.
A four-color version can add a pale cream or coral transition without changing the 30-row total.
Adjusting the Pumpkin Size
For a smaller pumpkin, use 12 hdc across and continue BLO rows until the rectangle measures approximately 27–30 cm long.
For a larger centerpiece, begin with 21 chains for 20 hdc and continue until the panel reaches approximately 45–50 cm long.
Measure the rectangle rather than relying only on row count after changing yarn or hook size.
Physical proportions matter more than duplicating the original stitch numbers.
Changing the Gradient Palette
Peach, blush and dusty rose match the photograph closely.
An autumn version can fade from cream into mustard and rust.
A neutral pumpkin can transition from ivory through oatmeal to taupe.
Sage through forest green creates a botanical version.
For stronger Halloween contrast, use pale orange through burnt orange to burgundy.
Keep the stem visually distinct from the darkest body section so it remains readable at the crown.
Controlling the Pumpkin Width
The long panel measurement sets the circumference, but stuffing changes the final apparent width.
If your seamed tube looks narrow, do not immediately add more filling.
Press the top and bottom toward each other first.
Vertical compression forces the side wall outward.
A pumpkin that begins at 17 cm wide can gain several centimeters after the crown and base are pulled together.
Adding more fiberfill before compression often creates a sphere rather than a broad pumpkin.
Controlling the Stem
The stem in the reference is narrow, relatively tall and gently curved.
A large flared stem would cover too much of the pale crown.
Keep the upper section at six stitches for most of its length.
Expansion occurs only near the bottom.
Minimal filling lets the crochet tube bend naturally.
A tightly packed stem usually stands rigidly upright and loses the curved silhouette.
Finishing the Pumpkin
Final wet blocking is unnecessary after the body has been stuffed.
Rotate the pumpkin and lift any flattened ribs with your fingertips.
Check the color transition from all sides.
Place the darkest rose area toward the lower third and keep the pale peach visible around the crown.
Set the pumpkin on a hard surface and confirm that several lobes share the weight.
The gathered center should remain slightly above the table rather than creating one hard contact point.
Conclusion
Mark the pale edge before assembling the body because the gradient direction cannot be changed easily after both openings are gathered. Your next step is to crochet one 16-stitch by 30-row ribbed panel, check for a 35–40 cm circumference length and test the color placement before seaming. Keep the stuffing moderate and use the built-in ridges before adding extra shaping. Share the finished ombre crochet pumpkin pattern project on Pinterest with the full color fade visible, then post a close-up of the rib texture on Instagram using #PeachRoseOmbrePumpkin. For this pumpkin specifically, would you keep the taupe stem or change it to muted green?









