Introduction
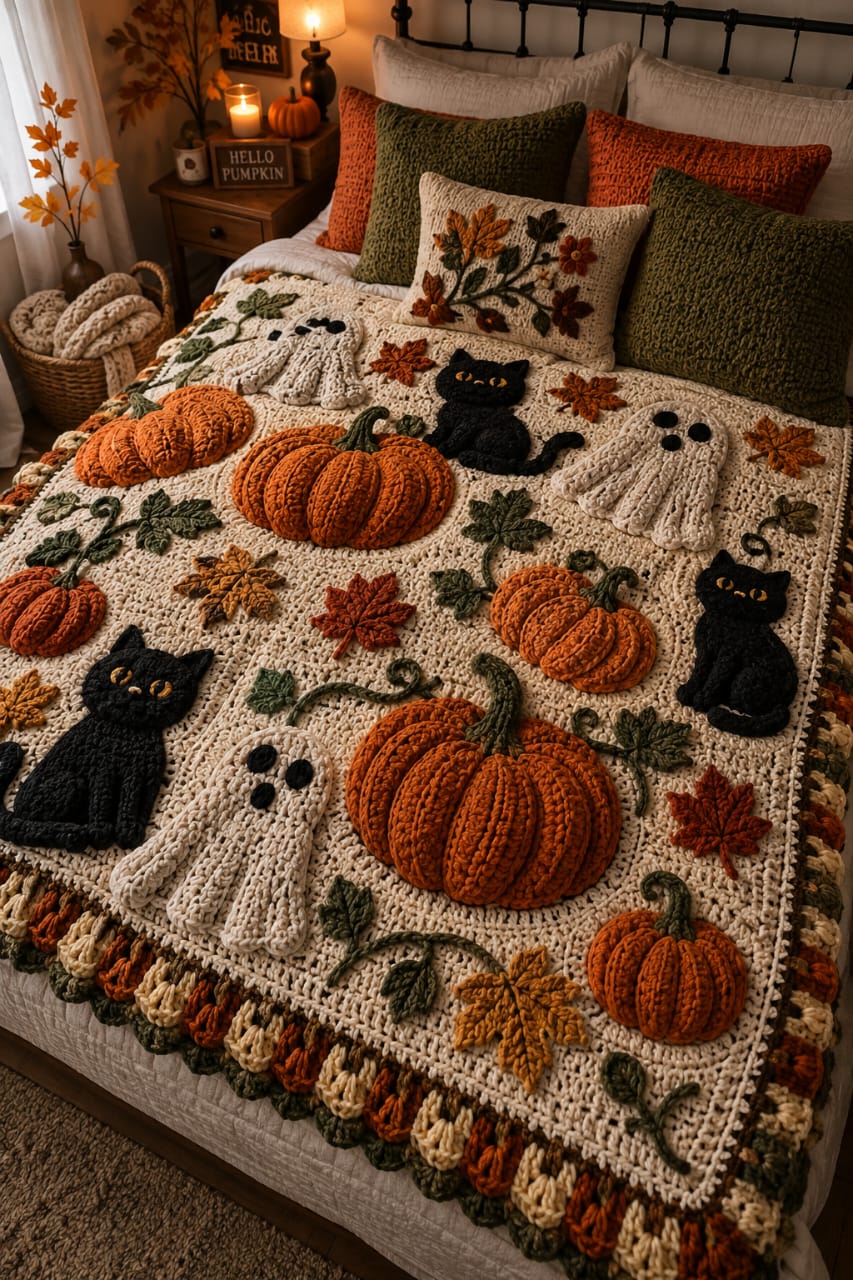
A stuffed pumpkin beside a flat black cat can distort the same cream panel in two completely different directions. This Halloween crochet blanket pattern uses worsted yarn with 5 mm and 4 mm hooks to make an approximately 155 × 195 cm bedspread. Raised pumpkins, cream ghosts, black cats and scattered fall leaves create an intermediate-to-advanced appliqué project built on a neutral openwork field.
The Design: What Makes This Halloween Blanket Different
The blanket uses one cream background but three distinct levels of surface relief. Ribbed pumpkins project the farthest, ghost bodies sit at medium depth, and black cats plus autumn leaves remain comparatively flat. That variation gives the bedspread dimension without turning every square into a heavy stuffed motif. Large pumpkins occupy major visual positions, while smaller leaves and vines fill the gaps between cats and ghosts. Black appliqués create the strongest contrast and need more surrounding cream space than the orange motifs. A pumpkin ghost cat crochet blanket can develop severe waves when every decoration is attached with one sewing method. Pumpkins need relaxed perimeter stitches, cats need stable body-center seams, and leaves require only selected vein and tip attachments.
Project Info at a Glance
| Skill Level | Time | Finished Size | Hooks | Best For |
|---|---|---|---|---|
| Intermediate–Advanced | 60–80 hours | Approx. 155 × 195 cm | 5.0 mm background / 4.0 mm motifs | Halloween bedspreads, large seasonal throws and bedroom decor |
Materials and Tools
Yarn
- Warm cream / ivory — worsted or Aran #4 — approximately 1,500–1,800 g — background, ghosts, joins and border.
- Pumpkin orange — worsted or Aran #4 — approximately 280–340 g — dimensional pumpkins and some leaves.
- Deep rust — worsted or Aran #4 — approximately 160–210 g — pumpkins, leaves and border accents.
- Black — worsted or Aran #4 — approximately 180–230 g — three cat appliqués and ghost faces.
- Moss / olive green — worsted or Aran #4 — approximately 180–230 g — leaves, vines and pumpkin stems.
- Mustard gold — worsted or Aran #4 — approximately 60–80 g — autumn leaves.
- Medium brown — worsted or Aran #4 — approximately 70–90 g — pumpkin stems.
Tools
- 5.0 mm crochet hook for the background blocks
- 4.0 mm crochet hook for appliqués
- Polyester fiberfill — approximately 200–300 g for shallow pumpkin padding
- Long yarn needle
- Stitch markers
- Dressmaking pins
- Blocking mats or large blocking surface
- Rust-resistant pins
- Scissors
- Measuring tape
Abbreviations
- MR — magic ring
- ch — chain
- sc — single crochet
- hdc — half double crochet
- dc — double crochet
- tr — treble crochet
- inc — increase
- dec — decrease
- sl st — slip stitch
- BLO — back loop only
An invisible decrease is worked through the front loops of the next two stitches before completing one single crochet through both loops.
Pattern — Step by Step
Construct the cream field first. Finish, join and block it before producing the complete motif batch, because every appliqué measurement depends on the final background dimensions.
Large Cream Openwork Square — Make 20
Yarn: warm cream — original reconstruction based on standard granny-square geometry.
R1: Make an MR. Ch 3, 2 dc, ch 2. Work (3 dc, ch 2) three more times. Join with sl st.
R2: Sl st to a corner. Work (3 dc, ch 2, 3 dc) in that corner, ch 1. Repeat in all remaining corners. Join.
R3: Work (3 dc, ch 2, 3 dc) in every corner and one 3-dc group in each side space. Ch 1 between neighboring groups. Join.
R4: Repeat the standard granny construction, adding one 3-dc group to each new side space.
R5: Repeat R4.
R6: Repeat R4.
R7: Repeat R4.
R8: Repeat R4.
R9: Repeat R4.
R10: Repeat R4.
Fasten off.
Target approximately 30–32 cm before the finishing edge.
Cream Finishing Edge
Join cream at one corner.
Ch 1.
Sc once in each dc and once in each ch-1 side space.
Work (sc, ch 1, sc) in every corner.
Join and fasten off.
Target blocked size: approximately 31–33 cm.
Block the 20 Background Squares
Use one fixed target measurement for the complete set.
A practical target is 32 cm.
Measure all four edges and both diagonals.
Keep each edge within approximately 5 mm of the target.
Across four blocks, even an 8 mm difference per square creates more than 3 cm of row distortion.
Join the Cream Field
Arrange the squares four across and five down.
Join four squares into each horizontal strip with mattress stitch.
Make five strips.
Lay all strips flat and compare their widths.
Join the five rows vertically.
Match every four-square intersection before tightening the neighboring seam.
The background should lie flat before any raised motif is added.
Raised Ribbed Pumpkin — Make 6 or 7
Pumpkin Panel
Yarn: pumpkin orange or rust.
Foundation: ch 19.
Row 1: Starting in the second chain, hdc across. (18)
Row 2: ch 1, turn, hdc BLO across. (18)
Rows 3–30: ch 1, turn, hdc BLO across. (18)
Fasten off with approximately 80 cm of matching yarn.
Target approximately 12–13 cm high × 36–40 cm long.
Form the Pumpkin
Bring Row 1 and Row 30 together.
Join all 18 stitch positions with a relaxed mattress seam.
Thread matching yarn through the 30 row ends around one open side.
Gather to an opening approximately 8–10 mm wide.
Push that center slightly inward.
Add only a shallow ring of fiberfill around the outer portion.
Gather the second opening.
Press both centers toward each other until the pumpkin is approximately 18–23 cm wide and no more than about 20–25 mm deep.
Define the Pumpkin Ribs
The BLO rows already create narrow vertical ridges.
Add four external shaping passes if stronger sections are wanted.
Anchor matching yarn behind the pumpkin.
Bring it over the front in an existing valley.
Return to the rear and pull until the channel deepens approximately 4–6 mm.
Repeat symmetrically.
Brown Pumpkin Stem
Yarn: medium brown.
R1: 6 sc in MR (6)
R2: sc around (6)
R3: sc around (6)
R4: sc around (6)
R5: sc around (6)
R6: (2 sc, inc) ×2 (8)
R7: sc around (8)
R8: (3 sc, inc) ×2 (10)
Fasten off with a 25 cm tail.
Stuff only the lower part lightly.
Sew the 10-stitch base behind the pumpkin crown.
Cream Ghost — Make 3
Yarn: warm cream — original reconstruction informed by standard round-head ghost geometry.
R1: 6 sc in MR (6)
R2: inc ×6 (12)
R3: (sc, inc) ×6 (18)
R4: (2 sc, inc) ×6 (24)
R5: (3 sc, inc) ×6 (30)
R6: sc around (30)
Do not fasten off.
Ghost Body Rows
Row 1: sc in next 15 stitches. (15)
Row 2: ch 1, turn, sc across. (15)
Row 3: ch 1, turn, inc, 13 sc, inc. (17)
Row 4: ch 1, turn, sc across. (17)
Row 5: ch 1, turn, inc, 15 sc, inc. (19)
Row 6: ch 1, turn, sc across. (19)
Row 7: ch 1, turn, sc, hdc, 3 dc, hdc, sl st, hdc, 3 dc, hdc, sl st, hdc, 3 dc, hdc, sc.
Fasten off with a long sewing tail.
Target approximately 18–22 cm high after gentle blocking.
Ghost Arms — Make 6
Ch 8.
Starting in the second chain work:
sl st, sc, hdc, dc, hdc, sc, sl st.
Fasten off with a 15 cm tail.
Sew one arm to each side of every ghost.
Ghost Face
Using black yarn, embroider two oval eyes approximately 12–15 mm high.
Place them level and approximately 20–25 mm apart.
For the lower ghost in the reference style, add a small round mouth approximately 8–10 mm across.
Black Cat Appliqué — Make 3
Cat Body
Yarn: black.
R1: 6 sc in MR (6)
R2: inc ×6 (12)
R3: (sc, inc) ×6 (18)
R4: (2 sc, inc) ×6 (24)
R5: (3 sc, inc) ×6 (30)
R6: sc around (30)
Flatten the circle slightly into an oval.
Fasten off with a 30 cm tail.
Cat Head
R1: 6 sc in MR (6)
R2: inc ×6 (12)
R3: (sc, inc) ×6 (18)
R4: (2 sc, inc) ×6 (24)
R5: sc around (24)
Fasten off with a 25 cm tail.
Flatten lightly.
Cat Ears — Make 6
Ch 5.
Starting in second chain:
sc, hdc, dc, tr.
Fasten off.
Make two per cat and sew to the upper head.
Cat Tail — Make 3
Ch 24.
Starting in the second chain, sc across.
Work one additional row of sc.
Fasten off with a 25 cm attachment tail.
Curve the final 5–7 cm upward when pinning the tail.
Cat Face
Embroider two gold or mustard oval eyes approximately 10–12 mm wide.
Add black vertical pupils through the center.
Keep the eyes approximately 18–22 mm apart.
A tiny mustard nose or short mouth stitches can be added if desired.
Assemble Each Cat
Overlap the head onto the upper quarter of the body.
Sew through the shared center area.
Attach the tail behind one lower side and curve it upward.
Do not sew the entire tail length to the blanket later; leaving the outer curve free gives more relief.
Five-Lobed Maple Leaf
Yarn: rust, mustard, orange or olive.
Work 10 sc in MR and join.
Center Lobe
Ch 11.
Starting in the second chain:
sl st, sc, hdc, dc, tr, tr, dc, hdc, sc, sl st.
Work 3 sc in the end chain.
Return along the opposite side in mirrored order.
Upper Side Lobes — Make 2
Ch 9.
Starting in the second chain:
sl st, sc, hdc, dc, tr, dc, hdc, sc.
Work 3 sc at the tip and return in mirrored order.
Lower Side Lobes — Make 2
Ch 7.
Starting in the second chain:
sl st, sc, hdc, dc, hdc, sc.
Work 3 sc at the tip and return along the other side.
Leaf Stem
Ch 8.
Sl st back through seven chains.
Fasten off.
Target approximately 9–11 cm.
Leaf Veins
Use matching or darker yarn.
Backstitch one line from the stem into the center lobe.
Add four branches toward the side lobes.
Keep surface stitches approximately 7–9 mm long.
Small Green Leaf
Ch 7.
Starting in second chain:
sl st, sc, hdc, dc, hdc, sc.
Work 3 sc in the final chain.
Return along the opposite side in mirrored order.
Fasten off.
Curled Vine
Ch 18.
Starting in the second chain, work 3 sc into every chain.
Fasten off with a 15 cm tail.
Do not stretch the spiral after crocheting.
Plan the Motif Layout
Spread the joined cream blanket flat.
Place the largest pumpkins first.
Position the three ghosts next, then the three cats.
Keep black cats separated by substantial cream areas because their high contrast makes them appear visually larger than equally sized orange motifs.
Add maple leaves, small leaves and curls after the main characters are positioned.
Photograph the complete arrangement before removing anything for sewing.
Attach the Raised Pumpkins
Pin each pumpkin at top, bottom and both widest sides.
Sew around the rear edge at approximately 12–15 mm intervals.
Leave the center completely free.
Maximum projection should remain around 20–25 mm.
If the cream background dips more than approximately 5 mm around the motif, loosen the seam.
Attach the Ghosts
Sew around the upper head curve and down the center third of the body.
Add small tacks to the lower scallops.
Leave the outer sides and arms slightly raised.
This creates medium relief without the weight of stuffing.
Attach the Cats
Sew firmly through the body center and head center.
Add several perimeter tacks around the outer torso.
Leave approximately the final 4–5 cm of the tail unattached.
The ears can also remain free at their upper tips.
Attach the Leaves and Vines
Sew maple leaves along their center veins.
Add one tack near each major point.
Leave the side edges free.
For small leaves, sew only the center and base.
Attach curled vines through their first 10–15 mm and leave the rest of each spiral loose.
Border Round 1 — Cream
Join cream yarn at one corner.
Sc evenly around the complete blanket.
At each corner work (2 sc, ch 2, 2 sc).
Skip duplicated seam loops when necessary to keep the edge flat.
Border Round 2 — Olive
Join olive yarn.
Repeat sc, ch 1, skip 1 along each straight side.
Use (sc, ch 2, sc) in every corner.
Border Round 3 — Rust
Join rust yarn.
Sc in each sc and each ch-1 space.
Work (sc, ch 2, sc) in the corners.
Border Round 4 — Cream
Hdc around.
Use (2 hdc, ch 2, 2 hdc) in every corner.
Textured Halloween Finish
Alternate short sections of cream, rust and olive shells around the perimeter.
For each shell work:
skip 1 stitch, 5 dc in next stitch, skip 1 stitch, sl st in next stitch.
Change color every one or two shells to reproduce the multicolor edge effect.
Fasten off and weave all tails into the border rather than the open center fabric.
Assembly
- Crochet twenty large cream openwork squares, block them to approximately 32 cm and join them four across by five down.
- Make six or seven shallow ribbed pumpkins using 18 hdc across and 30 BLO rows, then add brown stems.
- Crochet three cream ghosts with separate arms and embroider their black facial details instead of using hard eyes.
- Make three black cats from separate head, body, ears and curled-tail pieces, then embroider mustard eyes.
- Crochet the rust, orange, mustard and olive maple leaves plus smaller green leaves and curled vines.
- Lay all major motifs on the completed cream field and photograph the arrangement before sewing any piece permanently.
- Attach pumpkins through relaxed rear perimeter stitches, ghosts through their head and body centers, and cats through their head/body cores.
- Add maple leaves mainly through the center veins, then place smaller leaves and curls in the remaining negative spaces.
- Work the cream, olive, rust and cream border rounds followed by the multicolor shell edging.
- Block only the cream field and perimeter, reshape all raised appliqués by hand and weave remaining tails through at least 4 cm of matching stitches.
The completed blanket should lie flat through the cream background while pumpkins remain strongly raised, ghosts retain moderate relief and black cats stay readable as flatter silhouettes.
7 Technical Tips
- Pumpkins create circular depressions: Their sewing thread is too tight. Keep perimeter stitches approximately 12–15 mm apart and loosen them when the background sinks more than 5 mm.
- Ghost bodies twist: The upper head has been attached before the lower body was aligned. Pin the vertical center line first and keep the lower scallops within approximately 5 mm of level before sewing.
- Black cats distort the cream mesh: Dense black fabric is pulling against open granny spaces. Sew through the central body area first and add outer tacks only every 15–20 mm.
- Pumpkins become too heavy: Excess filling turns appliqués into ornaments. Keep their maximum projection around 20–25 mm and leave the central cavity lightly filled.
- Maple leaves curl into cups: The vein stitches are contracting the motif. Use 7–9 mm surface stitches and stop pulling before the leaf loses more than about 4 mm of width.
- Joined background bows before decoration: Individual 32 cm blocks vary too much. Keep each blocked square within approximately 5 mm of the target measurement before completing the four-by-five field.
- Multicolor border waves: Extra stitches accumulate where seams meet the perimeter. Skip duplicated loops at joins and use only the stated corner increases before changing colors.
Why the Motifs Need Three Levels of Relief
The strongest feature of this Halloween crochet blanket pattern is not simply the number of motifs. It is the difference in depth between them.
The pumpkins act as the highest surface elements.
Ghosts project less because only selected edges remain free.
Cats are mostly flat, which gives their black silhouettes clean outlines against the cream field.
If every element were equally stuffed, the bedspread would become bulky and difficult to drape.
If everything were completely flat, the pumpkins would lose the sculptural effect visible in the reference.
Adjusting the Blanket Size
For a smaller throw, use twelve background panels arranged three across by four down.
A four-by-four layout gives sixteen panels and a squarer proportion.
For a wider bed cover, use five columns while keeping the same 32 cm panel size.
Change motif quantity only after the background has been joined.
As a practical spacing rule, leave at least approximately 8–12 cm of visible cream between neighboring large character motifs.
Changing the Halloween Motif Mix
The reference balances pumpkins, ghosts and cats rather than repeating one subject across every block.
You can reduce the pumpkins to four and add two more ghosts for a lighter blanket.
For a darker version, add another black cat and reduce the number of mustard leaves.
A bat or crescent moon could replace one leaf cluster, but keep the number of high-contrast black motifs controlled.
Too many black appliqués can dominate the cream field from normal viewing distance.
Changing the Pumpkin Palette
Burnt orange and rust form the primary pumpkin colors.
Mustard can be used for one smaller pumpkin if a lighter accent is wanted.
Sage creates a softer botanical variation.
Keep every stem brown or dark olive so pumpkins in different body colors still belong to one visual family.
Controlling the Ghost Shape
Block ghost pieces before attaching their arms.
The head should remain round while the lower edge spreads into three soft points.
If the body narrows too much, add one extra sc at both ends of Rows 3 and 5.
If it becomes too wide for your background spacing, omit the increases in Row 5.
Measure all three ghosts before sewing so their heights remain within approximately 10 mm.
Controlling the Cat Silhouette
Black yarn hides stitch definition, so outline matters more than surface detail.
Pin the two ears before sewing the head to the body.
Keep the tail curve visible outside the body silhouette.
Gold or mustard eyes need enough contrast to remain readable from several feet away.
Do not add dense facial embroidery. The simplest face preserves the strong black shape.
Final Blocking
Do not press directly through pumpkins, cats or ghost arms.
Pin the outside border first.
Add pins along the cream joins where required.
Allow the background to dry flat.
Afterward, lift pumpkin ribs, ghost arms, cat ears, tail tips and leaf edges by hand.
Inspect the full blanket from a distance and correct any motif that appears tilted or compressed.
Conclusion
Finish the cream field before choosing the final Halloween layout because pumpkins, ghosts and black cats require different amounts of negative space. Your next step is to block one 32 cm background square, make one raised pumpkin, one ghost and one cat, then compare their attachment behavior before starting the full motif batch. Keep pumpkins shallow and cats mostly flat. Share the finished Halloween crochet blanket pattern project on Pinterest with the complete bed layout visible, then post the raised motifs on Instagram using #PumpkinGhostCatCrochetBlanket. For this blanket specifically, would you add another black cat or another cream ghost?









