Introduction
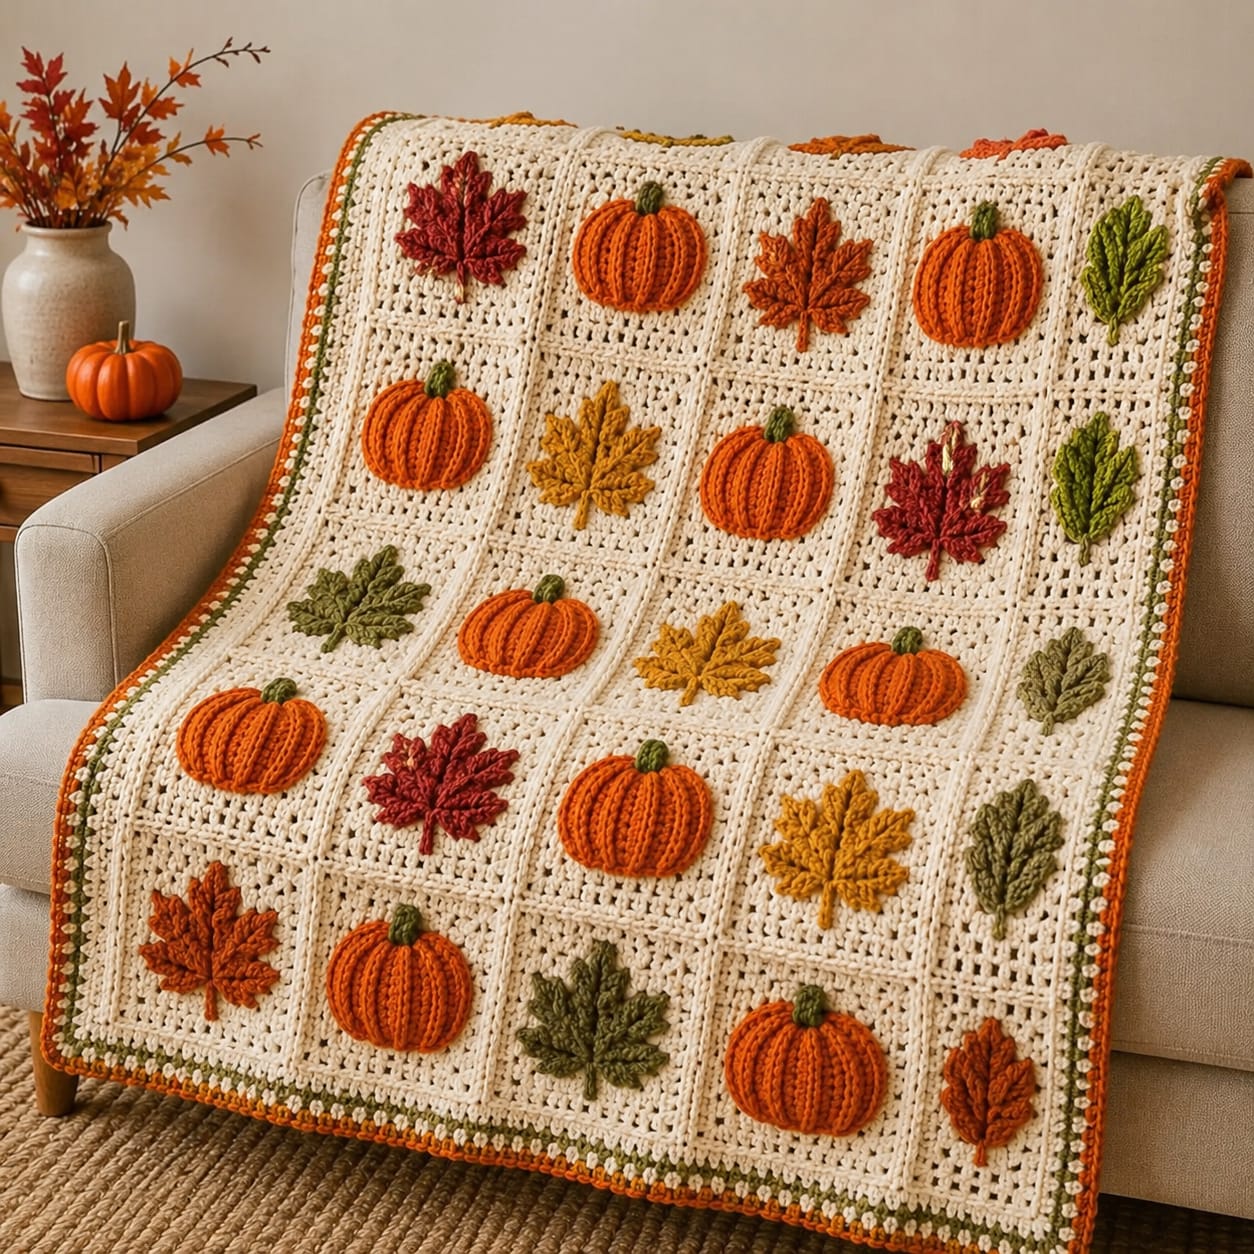
Eight pumpkins and twelve leaves create twenty different centers, so a one-centimeter block error becomes a five-centimeter problem across the finished row. This fall pumpkin granny square blanket crochet pattern uses worsted yarn with 5 mm and 4 mm hooks to make an approximately 105–115 cm throw. Cream openwork blocks, ribbed orange pumpkins and multicolor autumn leaves make it an intermediate modular project.
The Design: What Makes This Fall Blanket Different
The blanket uses a five-by-four grid rather than dozens of small granny squares. Larger 20–22 cm cream blocks provide enough negative space for dimensional pumpkin and leaf appliqués without crowding the joining seams. Eight orange pumpkins repeat through the layout, while twelve leaf blocks introduce rust, mustard and olive in several botanical shapes. That uneven motif split prevents the blanket from reading as a simple checkerboard. Pumpkin sections project above the background, whereas the leaves stay comparatively flat, so attachment tension must be controlled separately for each motif type. An autumn granny square blanket can develop visible waves when every appliqué is sewn with the same tight seam. Dense pumpkins need relaxed perimeter stitches; thin leaves require only strategic attachment along the vein and outer points.
Project Info at a Glance
| Skill Level | Time | Finished Size | Hooks | Best For |
|---|---|---|---|---|
| Intermediate | 34–44 hours | Approx. 105–115 × 85–95 cm | 5.0 mm square / 4.0 mm appliqués | Fall sofa throws, chair blankets and seasonal display |
Materials and Tools
Yarn
- Warm cream / ivory — worsted or Aran #4 — approximately 700–850 g — twenty background blocks, joins and border.
- Pumpkin orange — worsted or Aran #4 — approximately 180–230 g — eight raised pumpkins and outer border.
- Rust red — worsted or Aran #4 — approximately 45–55 g — autumn leaves.
- Mustard gold — worsted or Aran #4 — approximately 40–50 g — autumn leaves.
- Moss / olive green — worsted or Aran #4 — approximately 65–80 g — leaves, pumpkin stems and border detail.
- Burnt orange — worsted or Aran #4 — approximately 30–40 g — additional leaf motifs.
Use one yarn family for the cream blocks if possible. Twenty large squares amplify small differences in stretch, twist and stitch height much more than compact four-inch motifs.
Tools
- 5.0 mm crochet hook for cream squares and border
- 4.0 mm crochet hook for pumpkins and leaves
- Yarn needle
- Stitch markers
- Dressmaking pins
- Blocking mats
- Rust-resistant blocking pins
- Scissors
- Measuring tape
Abbreviations
- MR — magic ring
- ch — chain
- sc — single crochet
- hdc — half double crochet
- dc — double crochet
- tr — treble crochet
- sl st — slip stitch
- inc — increase
- dec — decrease
- BLO — back loop only
An invisible decrease is worked through the front loops of two neighboring stitches before one single crochet is completed through both loops.
Pattern — Step by Step
Make all twenty cream blocks before starting the full appliqué batch. Block size determines the final scale of the pumpkins and leaves.
Cream Openwork Granny Square — Make 20
Yarn: warm cream — original reconstruction using standard granny-square geometry.
R1: Make an MR. Ch 3, 2 dc, ch 2. Work (3 dc, ch 2) three more times into the ring. Join with sl st.
R2: Sl st to a corner. Work (3 dc, ch 2, 3 dc) in the corner, ch 1. Repeat in all remaining corners. Join.
R3: Work (3 dc, ch 2, 3 dc) in each corner. Place one 3-dc group in each side space with ch 1 between groups. Join.
R4: Repeat the same granny construction, adding one 3-dc group to every new side space.
R5: Repeat R4.
R6: Repeat R4.
R7: Repeat R4.
Fasten off.
Target approximately 18–20 cm before the finishing edge.
Cream Square Finishing Edge
Join cream yarn in any corner.
Sc across the side, placing one sc in each dc and one sc in each ch-1 space.
Work (sc, ch 1, sc) in every corner.
Continue around.
Join and fasten off.
Target blocked size: approximately 20–22 cm.
Block the Twenty Background Squares
Choose one target measurement before pinning the first block.
A practical working target is 21 cm.
Measure all four sides and both diagonals.
Opposite sides should differ by no more than approximately 5 mm.
Across five blocks, a 5 mm difference repeated in one direction already creates 25 mm of row distortion.
Do not rely on the joining seam to correct badly mismatched squares.
Raised Pumpkin Appliqué — Make 8
The photographed pumpkins show strong vertical ribbing. A shallow BLO panel produces that texture while remaining flat enough for blanket attachment.
Orange Pumpkin Panel
Yarn: pumpkin orange.
Foundation: ch 15.
Row 1: starting in second ch, hdc across. (14)
Row 2: ch 1, turn, hdc BLO across. (14)
Rows 3–26: ch 1, turn, hdc BLO across. (14)
Fasten off with approximately 60 cm of orange yarn remaining.
Target panel: approximately 9–10 cm high × 27–30 cm long.
Form the Pumpkin Shape
Bring Row 1 and Row 26 together.
Join through all 14 stitch positions using a relaxed mattress stitch.
Gather one open edge by threading through the 26 row ends.
Pull until the opening measures approximately 8 mm.
Flatten that gathered center rather than pushing it outward.
Add a very small amount of fiberfill or spare orange yarn.
Gather the opposite edge.
Press the two centers toward one another until the pumpkin measures approximately 12–14 cm wide and 7–8 cm high.
Sculpt the Pumpkin Ribs
The BLO texture already creates narrow vertical ridges.
Add four broad shaping passes if stronger sections are needed.
Anchor orange yarn behind the appliqué.
Run the strand from lower center to upper center through a natural valley.
Pull until the groove sits approximately 4–6 mm below the neighboring ridges.
Repeat symmetrically.
A flat blanket appliqué needs much less sculpting tension than a freestanding stuffed pumpkin.
Green Pumpkin Stem — Make 8
Yarn: moss green.
R1: 6 sc in MR. (6)
R2: sc around. (6)
R3: sc around. (6)
R4: (2 sc, inc) ×2. (8)
R5: sc around. (8)
Fasten off with a 20 cm sewing tail.
Flatten the lower section.
Sew approximately 10–12 mm behind the upper pumpkin center.
Maple-Style Autumn Leaf — Make 8
Use rust, mustard, burnt orange and olive. The maple-style version has five pointed lobes and a short stem.
Leaf Center
Yarn: chosen leaf color.
Make 10 sc in MR.
Join with sl st.
Center Leaf Lobe
Ch 11.
Starting in second ch, work:
sl st, sc, hdc, dc, tr, tr, dc, hdc, sc, sl st.
Work 3 sc in the final chain.
Return along the opposite side in mirrored stitch order.
Sl st into the next center stitch.
Upper Side Lobe — Make 2
Ch 9.
Starting in second ch:
sl st, sc, hdc, dc, tr, dc, hdc, sc.
Work 3 sc at the tip.
Return in mirrored order.
Sl st into the next two center stitches.
Repeat on the opposite side.
Lower Side Lobe — Make 2
Ch 7.
Starting in second ch:
sl st, sc, hdc, dc, hdc, sc.
Work 3 sc at the tip.
Return in mirrored order.
Repeat for the second lower lobe.
Leaf Stem
Ch 8 from the center ring.
Sl st back through all 7 chains.
Fasten off with a 30 cm attachment tail.
Target leaf size: approximately 10–12 cm high × 9–11 cm wide.
Add Raised Veins to the Maple Leaf
Thread matching yarn onto a needle.
Work one surface line from the base through the center lobe.
Add one branch toward each side lobe.
Use stitches approximately 7–9 mm long.
Keep the surface yarn relaxed enough that the leaf width does not contract by more than approximately 3–4 mm.
Three-Lobe Pointed Leaf — Make 4
The image also includes narrower green botanical motifs. Use this variation for four blocks.
Yarn: olive or brighter leaf green.
Center
8 sc in MR.
Join.
Long Center Lobe
Ch 12.
Starting in second chain:
sl st, sc, hdc, dc, tr, tr, dc, dc, hdc, sc, sl st.
Work 3 sc in the tip chain.
Return in mirrored order.
Side Lobe — Make 2
Ch 9.
Starting in second chain:
sl st, sc, hdc, dc, tr, dc, hdc, sc.
Work 3 sc at the tip.
Return in mirrored order.
Repeat on the opposite side.
Stem
Ch 7.
Sl st back through all 6 chains.
Fasten off.
Target approximately 10–11 cm tall.
Add Veins to the Three-Lobe Leaf
Backstitch one central green line from the stem toward the tip.
Branch one short line into each side lobe.
Keep the vein yarn close to the leaf color so it reads primarily as texture rather than contrast embroidery.
Attach the Pumpkins to Their Squares
Place one blocked cream block on a flat surface.
Center the pumpkin with approximately 35–45 mm of visible background at each side.
Pin the upper center, lower center and both widest side points.
Sew the outer pumpkin edge to the square at approximately 10–12 mm intervals.
Leave most of the central ribbed surface unsupported.
The pumpkin should project approximately 10–15 mm from the cream background.
Attach the Maple Leaves
Center each leaf on its square.
Rotate several by approximately 5–15 degrees so the blanket does not resemble a rigid icon chart.
Sew along the central vein first.
Add one tack near the tip of every lobe.
Leave the sections between those points free.
That attachment method preserves the raised leaf edges visible in the reference.
Attach the Pointed Leaves
Position each narrower leaf vertically or at a slight diagonal.
Sew the stem and central vein securely.
Add one small tack near each outer tip.
Do not sew around the complete perimeter.
The free edges should lift approximately 5–10 mm from the cream square.
Recommended 5 × 4 Layout
Arrange twenty blocks in five columns and four rows.
Row 1: Rust Maple Leaf – Pumpkin – Burnt Orange Maple Leaf – Pumpkin – Green Pointed Leaf.
Row 2: Pumpkin – Mustard Maple Leaf – Pumpkin – Rust Maple Leaf – Green Pointed Leaf.
Row 3: Olive Maple Leaf – Pumpkin – Mustard Maple Leaf – Pumpkin – Olive Pointed Leaf.
Row 4: Burnt Orange Maple Leaf – Pumpkin – Olive Maple Leaf – Pumpkin – Rust Maple Leaf.
This gives eight pumpkin blocks and twelve leaf blocks.
Photograph the arrangement before stacking the squares for joining.
Join the Squares
Yarn: warm cream.
Use mattress stitch for a flat cream join or a relaxed slip-stitch join if a slightly raised grid is preferred.
Join the five squares in Row 1.
Repeat for Rows 2–4.
Lay all four strips flat.
A five-square strip should lose no more than approximately 15–20 mm compared with the combined blocked widths.
Join the four horizontal strips vertically.
Align all four-square intersections before tightening the neighboring seam.
Outer Border — Round 1
Yarn: warm cream.
Join at any blanket corner.
Sc evenly around the entire perimeter.
At each corner work (2 sc, ch 2, 2 sc).
Skip duplicated seam loops when necessary so the edge stays flat.
Outer Border — Round 2
Yarn: olive green.
Join in one corner.
Repeat sc, ch 1, skip 1 around each straight edge.
In each corner work (sc, ch 2, sc).
Join and fasten off.
Outer Border — Round 3
Yarn: warm cream.
Join into any ch-1 space.
Work one sc in each sc and one sc in every ch-1 space.
Use (sc, ch 2, sc) at each corner.
Join.
Orange Finishing Round
Yarn: pumpkin orange.
Sc in every stitch around.
Work (sc, ch 2, sc) in every corner.
Join and fasten off.
The orange should remain a narrow final line rather than a broad outer band.
Assembly
- Crochet twenty seven-round cream granny squares, add the cream finishing edge and block every piece to approximately 20–22 cm.
- Make eight orange 14-stitch by 26-row ribbed pumpkin panels, assemble them into shallow appliqués and add green stems.
- Make eight five-lobed maple-style leaves distributed among rust, mustard, burnt orange and olive yarn.
- Make four narrower three-lobe leaves in green or olive and add relaxed surface veins to all twelve leaf motifs.
- Center each pumpkin on a cream square and sew around the perimeter at approximately 10–12 mm intervals while leaving the ribbed center raised.
- Attach each leaf mainly through its stem, central vein and pointed tips so the outer edges remain slightly lifted.
- Arrange the finished blocks in a five-column by four-row layout with eight pumpkin blocks and twelve leaf blocks.
- Join each five-square horizontal strip first, then connect the four strips vertically while matching every intersection.
- Work the cream foundation border, olive detail round, second cream round and narrow orange finishing edge.
- Block the completed blanket without flattening the appliqués, correct any bowed seam and weave all remaining tails through matching yarn on the reverse.
The finished blanket should show a regular cream grid containing eight raised pumpkins and twelve autumn leaves, framed by cream, olive and orange edging.
7 Technical Tips
- Five-square rows finish different lengths: Block variation is accumulating across the width. Keep individual squares within approximately 5 mm of the target size before joining and reject any block more than about 10 mm outside the set.
- Pumpkin blocks cup inward: The appliqué perimeter has been sewn too tightly. Use attachment stitches approximately 10–12 mm apart and loosen them if any square corner lifts more than 5 mm.
- Leaf points curl under: Sewing the full perimeter removes the raised botanical shape. Attach through the center vein and tips only, leaving roughly 20–30 mm of each side edge free.
- Pumpkin ribbing looks flat: The appliqué contains too much internal filling or has been stitched through its center. Keep maximum depth near 10–15 mm and leave the ribbed middle unsupported.
- Maple leaf contracts after adding veins: Surface embroidery is too tight. Keep vein stitches approximately 7–9 mm long and stop pulling before the leaf loses more than about 3–4 mm of width.
- Joined blanket develops vertical waves: Mattress seams are shorter than the blocked square edges. A five-block strip should lose no more than approximately 15–20 mm from its theoretical blocked width.
- Border flares at square intersections: Repeated seam loops add extra stitches. Skip duplicated loops at joins and use only the stated corner increases before checking the blanket on a flat surface.
Why Pumpkins and Leaves Need Different Attachment Methods
The two motif families have different structural behavior. A pumpkin is relatively dense, broad and dimensional. Most of its weight sits around the outer edge, so a relaxed perimeter seam controls the shape while the center remains free.
A leaf is lighter and thinner.
Sewing only its perimeter lets the middle shift, but sewing every edge removes the raised points. Attaching through the vein solves both problems. The center stays stable while the side lobes retain movement.
Using one sewing method for every block would produce inconsistent surface depth across the finished fall harvest crochet blanket.
Adjusting the Blanket Size
This fall pumpkin granny square blanket crochet pattern scales by adding complete 20–22 cm blocks.
For a smaller lap blanket, use four columns by four rows for sixteen squares.
A five-by-five layout gives twenty-five blocks and a more nearly square throw.
For a larger sofa blanket, use five columns by six rows for thirty blocks.
Maintain approximately the same pumpkin-to-leaf ratio. A useful target is about 40 percent pumpkin blocks and 60 percent leaf blocks.
Changing the Leaf Palette
Rust, mustard, olive and burnt orange match the reference closely.
Deep burgundy can replace rust for stronger contrast.
Sage gives the green blocks a lighter result.
A neutral version could use camel, oatmeal, moss and cinnamon leaves against the cream squares.
Keep the pumpkins consistently orange if you want them to remain the strongest repeated motif. Varying both pumpkins and leaves across many colors reduces the distinction between the two block families.
Changing the Pumpkin Size
The 12–14 cm pumpkin occupies about 60 percent of a 21 cm square width.
For a smaller motif, reduce the panel to 12 hdc and approximately 22 BLO rows.
For a larger pumpkin, increase the foundation to 16 hdc and extend to roughly 30 rows.
Pin one finished appliqué to a blocked square before making the full batch.
Leave at least approximately 30 mm of cream background between the pumpkin and the joining edge.
Controlling the Cream Background
The open granny fabric should stay comparatively flat and visually quiet.
If the 5 mm hook produces very loose side spaces, move down to 4.5 mm for the blocks.
If seven rounds finish below approximately 20 cm, add one additional granny round rather than stretching the square several centimeters during blocking.
Large dimensional appliqués need a stable background. Excessive blocking can weaken the square around the sewing line.
Final Blocking
Block the assembled blanket by pinning the outer corners first.
Then pin each point where two square seams meet the border.
Do not pin through pumpkin centers or leaf lobes.
Allow the cream grid to dry flat.
Afterward, lift the pumpkin ribs and leaf edges with your fingertips.
The background should remain level while the appliqués project visibly from the surface.
Conclusion
Block every cream square before starting the appliqué batch because the five-block width magnifies even small size errors. Your next step is to make one 21 cm test block, one raised pumpkin and one maple leaf, then compare attachment tension before producing the remaining nineteen motifs. Keep pumpkin centers dimensional and leaf edges partly free. Share the finished fall pumpkin granny square blanket crochet pattern project on Pinterest with the entire five-by-four layout visible, then post a leaf-and-pumpkin close-up on Instagram using #FallHarvestGrannyBlanket. For this blanket specifically, would you keep all eight pumpkins orange or replace two with cream pumpkins?









