Introduction
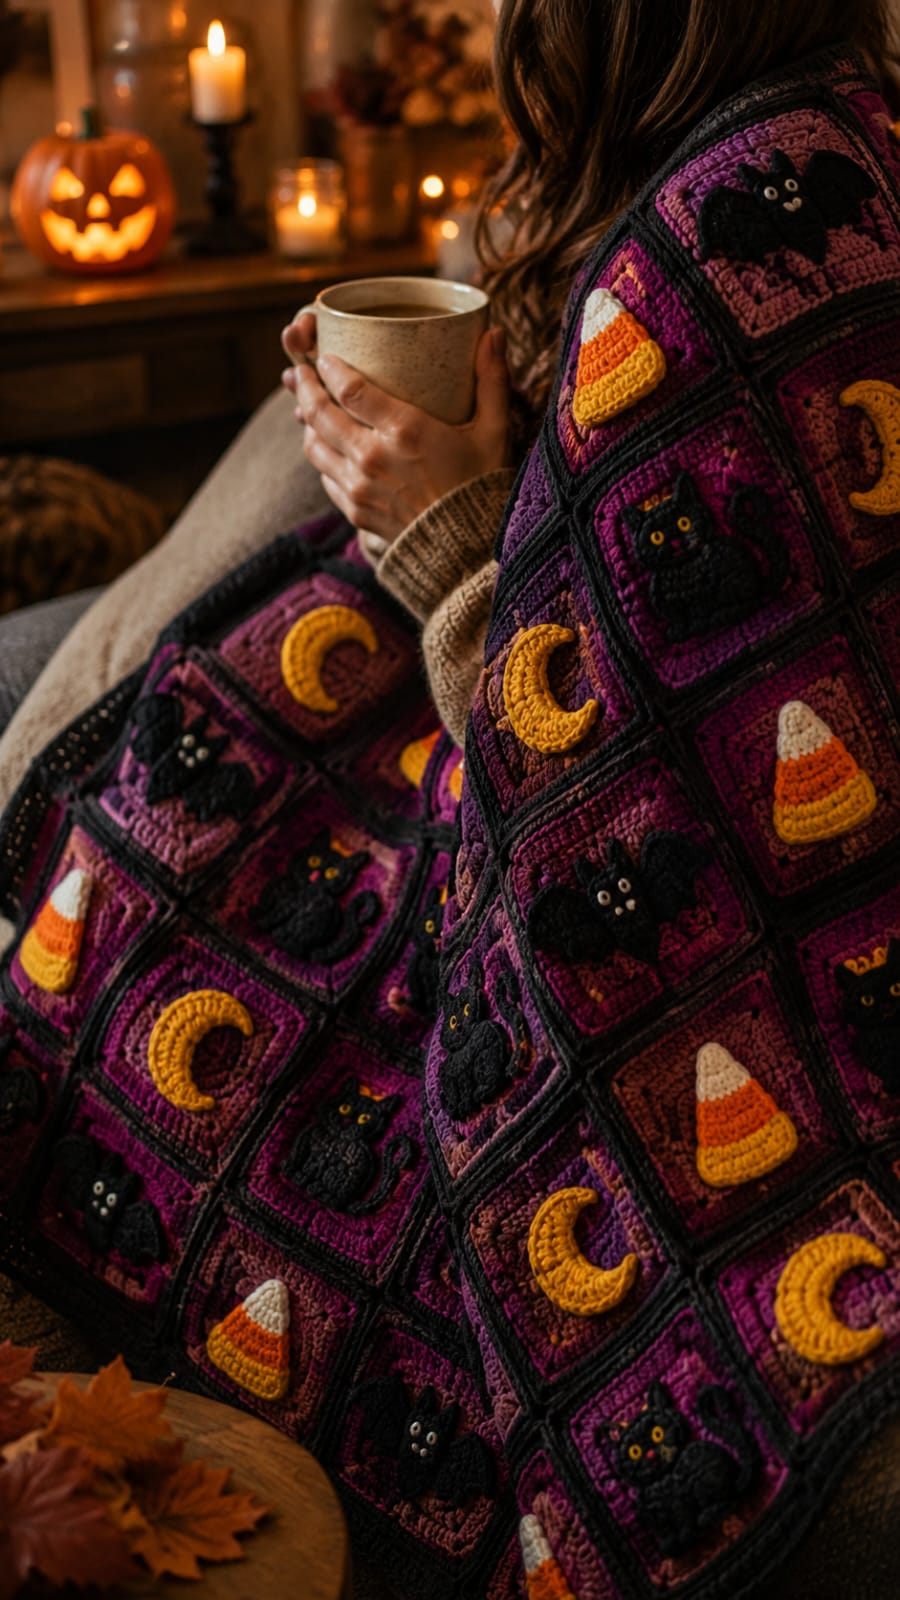
A crescent moon occupies half the area of a spread-wing bat, so those two squares cannot be judged by motif width alone. This Halloween granny square blanket crochet pattern uses worsted yarn with 5 mm and 4 mm hooks to make an approximately 90 × 115 cm throw. Cats, bats, candy corn and yellow moons sit on dark purple squares separated by black crochet joins.
The Design: What Makes This Halloween Blanket Different
The black grid is as important as the appliqués. Every background square stays within a plum, aubergine and magenta range, then a black finishing round creates the heavy framing visible across the blanket. Four motifs repeat: compact black cats, wide black bats, narrow candy corn pieces and mustard crescent moons. Their dimensions differ, so placement is based on occupied area rather than forcing every appliqué to measure the same width. The raised motifs are made separately with a smaller hook, which keeps their edges sharper than the softer background squares. A common mistake in a purple Halloween crochet blanket is making the cat and bat pieces from the same amount of yarn and expecting equal scale. The bat needs more horizontal space, while the seated cat needs more height and a smaller overall silhouette.
Project Info at a Glance
| Skill Level | Time | Finished Size | Hooks | Best For |
|---|---|---|---|---|
| Intermediate | 30–40 hours | Approx. 90 × 115 cm | 5.0 mm + 4.0 mm | Halloween throws, sofa blankets and seasonal bedroom decor |
Materials and Tools
Yarn
- Deep aubergine — worsted / Aran #4 — approximately 200–230 g — background squares.
- Dark plum — worsted / Aran #4 — approximately 160–190 g — background squares.
- Berry magenta — worsted / Aran #4 — approximately 140–170 g — background squares.
- Black — worsted / Aran #4 — approximately 250–300 g — square edging, joins, cats and bats.
- Mustard yellow — worsted / Aran #4 — approximately 70–90 g — crescent moons and candy corn bases.
- Pumpkin orange — worsted / Aran #4 — approximately 55–70 g — candy corn centers.
- Warm cream — worsted / Aran #4 — approximately 25–35 g — candy corn tips and small facial accents.
Use yarns from similar weight classes across the three purple shades. A thicker magenta square can add several millimeters to every edge, which becomes visible after six blocks are joined in one row.
Tools
- 5.0 mm crochet hook — background squares
- 4.0 mm crochet hook — appliqués
- Yarn needle
- Stitch markers
- Scissors
- Dressmaking pins
- Blocking mats
- Rust-resistant blocking pins
- Measuring tape
Abbreviations
- MR — magic ring
- ch — chain
- sc — single crochet
- hdc — half double crochet
- dc — double crochet
- tr — treble crochet
- sl st — slip stitch
- inc — increase
- dec — decrease
- BLO — back loop only
An invisible decrease is worked through the front loops of two neighboring stitches before completing one single crochet through both loops.
Pattern — Step by Step
Make 48 background squares. Use 16 aubergine, 16 plum and 16 berry-magenta squares, distributing the colors evenly through the final layout.
Purple Background Square — Make 48
Yarn: one of the three purple shades — original solid-square construction.
R1: In MR, ch 3, 2 dc, ch 2, 3 dc, ch 2, 3 dc, ch 2, 3 dc, ch 2. Join with sl st. You have 12 dc and four corners.
R2: Sl st to a corner. Work (2 dc, ch 2, 2 dc) in every corner and 1 dc in each stitch across every side. Join. Each side now contains 7 dc between corner spaces.
R3: Work (2 dc, ch 2, 2 dc) in each corner and 1 dc in every dc across. Join. Each side contains 11 dc.
R4: Repeat the same construction. Each side contains 15 dc.
R5: Repeat once more. Each side contains 19 dc.
Do not fasten off if you are using the same yarn for another decorative round. Otherwise cut the purple yarn.
Target approximately 13–14 cm before the black edging.
Black Square Edging
Yarn: black.
Join black yarn in any corner.
Ch 1.
Sc in every dc across the side.
In each corner space work (sc, ch 1, sc).
Continue around all four sides.
Join with sl st and fasten off.
Block every square to approximately 14–15 cm.
Block the Background Squares First
Do not add appliqués to unblocked squares.
Pin all four corners to the same measurement and compare the horizontal and vertical dimensions.
The two measurements should differ by no more than approximately 5 mm.
Sort the 48 finished squares into three color stacks.
If one yarn shade consistently produces larger squares, change hook size by approximately 0.25–0.5 mm for that shade before making the complete batch.
Black Cat Body — Make 12
Yarn: black.
R1: 6 sc in MR (6)
R2: inc ×6 (12)
R3: (sc, inc) ×6 (18)
R4: (2 sc, inc) ×6 (24)
Sl st to finish.
Fasten off with a 30 cm sewing tail.
Flatten the circle into a slight vertical oval.
Black Cat Head — Make 12
Yarn: black.
R1: 6 sc in MR (6)
R2: inc ×6 (12)
R3: (sc, inc) ×6 (18)
Fasten off with a sewing tail.
Cat Ears — Make 24
Yarn: black.
Ch 4.
Row 1: starting in second chain, sc across. (3)
Row 2: ch 1, turn, dec, sc. (2)
Row 3: ch 1, turn, dec. (1)
Fasten off.
Sew two ears behind every cat head.
Cat Tail — Make 12
Yarn: black.
Ch 15.
Beginning in the second chain, sl st in 5 chains, sc in 5 chains, hdc in 4 chains.
Fasten off with a 20 cm attachment tail.
Curve the tail beside the seated body.
Cat Face
Yarn: mustard and cream.
Embroider two small mustard eyes approximately 8–10 mm apart.
Add a cream or pale-pink nose about 6 mm below the eye line.
Work two short whisker stitches on each side.
Assemble head, body and tail before attaching the finished cat to a square.
Target approximately 7–8 cm high.
Bat Body — Make 12
Yarn: black.
R1: 6 sc in MR (6)
R2: inc ×6 (12)
R3: (sc, inc) ×6 (18)
Fasten off.
Flatten into an oval approximately 4–5 cm high.
Bat Ears — Make 24
Ch 4.
Starting in second chain: sc, hdc, dc.
Fasten off with a sewing tail.
Attach one small pointed ear to each upper side of the bat body.
Left Bat Wing — Make 12
Yarn: black.
Ch 9.
Row 1: starting in second ch, sc, hdc, dc, tr, tr, dc, hdc, sc. (8)
Turn.
Row 2: sl st, sc, hdc, 3 dc in next st, hdc, sc, sl st, sl st.
Fasten off.
Shape the lower edge into three shallow points with your fingers.
Right Bat Wing — Make 12
Repeat the left wing.
Reverse its orientation during assembly.
Bat Face
Embroider two small mustard eyes about 8 mm apart.
Add two tiny cream stitches beneath them for fangs if desired.
Sew the wings behind the body so the complete bat measures approximately 8–9 cm across.
Candy Corn — Make 12
Yarn: mustard, pumpkin orange and warm cream.
Begin with mustard.
Row 1: ch 11. Starting in second chain, sc across. (10)
Row 2: ch 1, turn, dec, 6 sc, dec. (8)
Row 3: ch 1, turn, sc across. (8)
Change to pumpkin orange.
Row 4: ch 1, turn, dec, 4 sc, dec. (6)
Row 5: ch 1, turn, sc across. (6)
Row 6: ch 1, turn, dec, 2 sc, dec. (4)
Change to warm cream.
Row 7: ch 1, turn, sc across. (4)
Row 8: ch 1, turn, dec ×2. (2)
Row 9: ch 1, turn, dec. (1)
Fasten off with a 30 cm sewing tail.
Work one relaxed sc edging around the complete triangle if the sides need a cleaner outline.
Target approximately 7–8 cm high.
Mustard Moon Disc — Make 12
Yarn: mustard yellow.
R1: 6 sc in MR (6)
R2: inc ×6 (12)
R3: (sc, inc) ×6 (18)
R4: (2 sc, inc) ×6 (24)
Fasten off with a 30 cm tail.
Target approximately 6–7 cm across.
Purple Moon Overlay — Make 12
Yarn: match the background square receiving the moon.
R1: 6 sc in MR (6)
R2: inc ×6 (12)
R3: (sc, inc) ×6 (18)
Fasten off.
Place this smaller purple circle over the mustard disc, offset approximately 12–15 mm toward one side.
Sew only the purple overlay to the yellow disc.
The exposed mustard section becomes a crescent.
Attach the Cat Motifs
Center each black cat on a blocked square.
Leave approximately 25–30 mm of visible purple above the ear tips.
Sew the body and head through their outside edges.
Attach only the base and one middle point of the tail so the curve remains raised.
Keep the cat centered within approximately 5 mm from left to right.
Attach the Bat Motifs
Place the bat slightly higher than the square center because its lower body occupies less space than its wings.
Sew the central body first.
Tack each wing at its outer tip and one inner section.
Leave part of the lower wing edge free.
The complete bat should remain inside the black border with at least approximately 15–20 mm of purple showing around its broadest span.
Attach the Candy Corn Motifs
Center each candy corn vertically.
The mustard base should sit about 20–25 mm above the lower black border.
Sew through the outer edge at intervals of approximately 7–10 mm.
Keep the appliqué flat because multiple layers beneath one blanket square create a noticeable hard spot.
Attach the Crescent Moons
Rotate the crescent so its points face slightly upward rather than exactly sideways.
Pin the yellow disc first.
Sew the complete outer yellow perimeter to the purple background.
Leave the purple overlay already attached to the moon.
Target approximately 20–25 mm of space between the yellow points and the nearest black border.
Blanket Layout
Arrange the 48 squares into six columns and eight rows.
Use a repeating four-motif sequence, but shift its starting point on each new row.
Row 1: Cat – Moon – Bat – Candy Corn – Cat – Moon.
Row 2: Bat – Candy Corn – Cat – Moon – Bat – Candy Corn.
Row 3: Moon – Cat – Candy Corn – Bat – Moon – Cat.
Row 4: Candy Corn – Bat – Moon – Cat – Candy Corn – Bat.
Repeat Rows 1–4 for Rows 5–8.
This layout produces exactly 12 squares of every motif.
Distribute the aubergine, plum and magenta backgrounds so identical colors do not form long vertical columns.
Join the Squares
Yarn: black.
Arrange one six-square row on a table.
Place adjacent squares with wrong sides together.
Use a relaxed slip-stitch join through the inner loops of both black edging rounds.
Join all horizontal rows first.
Then connect the eight completed strips vertically.
Check every intersection before continuing past it. Four square corners should meet at one point rather than forming a shifted cross.
Black Border — Round 1
Yarn: black.
Join in one blanket corner.
Sc evenly around all four sides.
Work (2 sc, ch 2, 2 sc) in every corner.
At square seams, skip any duplicated joining loop that causes the edge to flare.
Purple Border — Round 2
Yarn: deep aubergine.
Join in a corner.
Hdc in every stitch around.
Work (2 hdc, ch 2, 2 hdc) in each corner.
Join.
Black Border — Round 3
Change back to black.
Sc in every stitch.
Work (sc, ch 2, sc) at each corner.
Fasten off.
Assembly
- Crochet all 48 five-round purple squares and add one black edging round to every block.
- Block all squares to approximately 14–15 cm and separate them into 16 aubergine, 16 plum and 16 magenta backgrounds.
- Make 12 complete black cats, including heads, ears, tails and embroidered faces.
- Make 12 black bats with separate wings, ears and small embroidered facial details.
- Make 12 three-color candy corn appliqués and 12 mustard crescent moons with matching purple overlays.
- Pin each motif to an individual blocked square and leave approximately 15–30 mm of visible background around the appliqué.
- Arrange the 48 completed blocks into a six-column by eight-row layout with 12 instances of each motif.
- Join each horizontal strip in black, then connect all eight strips while aligning every four-square intersection.
- Work a black, purple and black three-round border around the assembled throw.
- Block the finished blanket to approximately 90 × 115 cm and weave every remaining tail into matching stitches on the reverse.
The completed throw should form a dark black grid containing evenly distributed cats, bats, candy corn pieces and mustard crescents across varied purple backgrounds.
7 Technical Tips
- Squares finish at different sizes: A 5 mm error across one block can become 30 mm across a six-square row. Block every square to the same 14–15 cm target before sewing on appliqués.
- Cat squares pucker: A tight tail or body attachment contracts the background. Sew at approximately 7–10 mm intervals and keep the curved tail attached at only two points.
- Bat wings fold inward: Sewing the complete wing perimeter removes their spread. Fix each wing at the body, outer tip and one intermediate point while leaving the lower edge mostly free.
- Candy corn looks too narrow: Excessively tight decreases create a needle-like triangle. The base should remain about 60–70 percent as wide as the finished motif height.
- Moon loses its crescent: Centering the purple overlay leaves an even yellow ring rather than a moon. Offset the smaller disc approximately 12–15 mm toward one side before sewing.
- Black joins become raised cords: Tight slip stitches shorten every shared edge. Keep the joining tension loose enough that a completed six-square row loses less than approximately 15 mm from its blocked length.
- Blanket border waves: Extra stitches accumulate at square seams. Skip redundant seam loops and work only the stated corner stitches before checking the blanket on a flat surface.
Balancing the Four Motifs
The four appliqués should not share identical dimensions. A bat needs approximately 8–9 cm of horizontal room, while the cat reads better around 7–8 cm high. Candy corn is narrow and vertical. The crescent occupies less solid area because part of its disc is visually removed by the purple overlay.
Compare the motifs from normal viewing distance after they are pinned to sample squares.
If the crescent looks too small, increase the mustard disc by one standard six-stitch expansion round. If the bat dominates, reduce each wing foundation by one chain rather than shrinking the body.
Changing the Blanket Size
This Halloween granny square blanket crochet pattern can be resized by adding or removing complete square rows.
For a smaller lap blanket, use five columns by six rows for 30 blocks. Rotate the four motifs through the grid instead of trying to keep equal totals.
For a larger throw, use seven columns by nine rows for 63 squares. Make approximately equal quantities of the four motifs and distribute any extra three squares across different motif families.
Keep the individual squares at the same blocked measurement. Changing square dimensions also changes appliqué scale and makes the existing motif instructions less predictable.
Planning the Purple Palette
The reference depends on several close purple shades rather than one flat background color. Aubergine provides the darkest field, plum supplies the middle value and berry magenta lifts selected squares.
Keep the black border identical on every block. That repeating dark outline lets different purples coexist without the blanket becoming visually fragmented.
If you prefer two background colors, remove the berry shade and alternate aubergine with plum.
A brighter Halloween version can replace plum with violet, but the black bats and cats still need enough contrast to remain readable.
Finishing and Blocking
Block the complete throw after the three-round border is finished.
Pin the four outer corners first.
Measure both diagonals. A large difference indicates that one joined section has been stretched more than the opposite side.
Pin the black seam intersections along the perimeter next.
Allow the appliqués to retain their slight dimensional lift rather than pressing every wing, tail and moon edge flat.
After drying, check the reverse for unsecured embroidery tails before placing the blanket in regular use.
Conclusion
Make one sample of all four motifs before starting the full batch because the bat, cat, moon and candy corn need comparable visual weight rather than identical measurements. Your next step is to block four purple test squares to 14–15 cm, pin one appliqué to each and compare them together from several feet away. Adjust scale before producing the remaining pieces. Share the finished Halloween granny square blanket crochet pattern project on Pinterest with the full black grid visible, then post close views of the raised motifs on Instagram using #CatsBatsHalloweenBlanket. For this blanket specifically, would you keep the candy corn squares or replace half of them with orange pumpkins?









