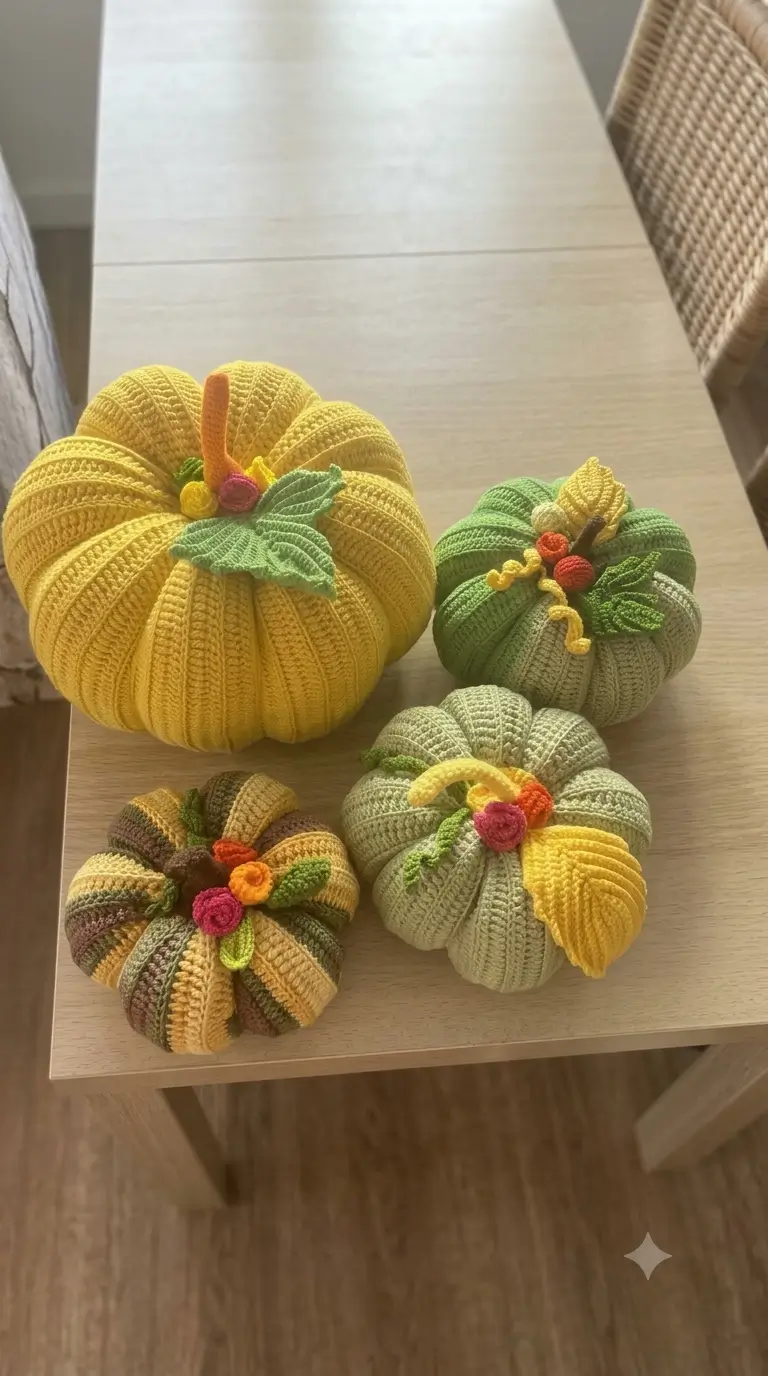
Introduction
Eight sculpted valleys are what stop this crochet pumpkin from reading as a yellow ball. This crochet pumpkin amigurumi pattern uses Aran-weight yarn, a 3.5 mm hook, and firm stuffing to build an approximately 11.5 × 13 cm display piece with leaves, berries, and a curled vine. You control the groove depth during finishing; the maker then balances the crown details so the pumpkin sits flat. Skill level: easy/intermediate. Use it for tabletop autumn decor.
The Design: What Makes This Ribbed Pumpkin Different
Pumpkin anatomy is mostly silhouette: a low body, radiating grooves, and a narrow crown. This ribbed crochet pumpkin pattern uses a 42-stitch maximum because a broad middle gives enough surface for eight external sculpting channels without making each lobe too narrow. The body is closed before the grooves are pulled, so filling can be redistributed between wraps. A tubular stem adds vertical contrast; two flat leaves and three small rosette accents keep the crown wider than the stem while leaving the center visible. For fall crochet pumpkin decor, that proportion matters because oversized leaves can hide the rib structure from above. The main mistake is tightening one shaping strand more than the others. That produces one compressed valley and several swollen lobes, particularly in smooth Aran yarn. The same crochet pumpkin amigurumi pattern keeps every sculpting wrap under similar hand tension.
Project Info at a Glance
| Skill Level | Time | Finished Size | Hook | Best For |
|---|---|---|---|---|
| Easy/Intermediate | Not reported by the core sizing reference | Approx. 11.5 cm high × 13 cm wide | 3.5 mm | Tabletop autumn and harvest displays |
Materials and Tools
Yarn
- Mustard yellow, sage, cream, or pumpkin orange — Aran/medium-weight yarn — approximately 56 g for the body — Adlibris Cotton Aran or a similar smooth cotton/acrylic yarn.
- Sage or olive green — matching Aran yarn — approximately 3 g for a simple stem, plus 5–8 g if two large photo-style leaves are added.
- Coral, pink, yellow, orange, and brown — matching yarn scraps — approximately 2–4 g of each for rosette or berry accents.
- Matching body yarn — reserve approximately 2.5–3 m for the external rib-sculpting strand.
Tools
- 3.5 mm crochet hook
- Polyester fiberfill
- Locking stitch marker
- 12–15 cm long tapestry or doll needle for the sculpted grooves
- Standard yarn needle
- Dressmaking pins for crown placement
- Scissors
No safety eyes are used. The photograph shows decorative pumpkins without faces, so plastic eye components would change the intended design.
Abbreviations
- MR — magic ring
- sc — single crochet
- inc — work 2 sc in one stitch
- dec — single crochet decrease
- sl st — slip stitch
- ch — chain
- BLO — back loop only
- FLO — front loop only
- hdc — half double crochet
- dc — double crochet
An invisible decrease catches only the front loops of the next two stitches before completing one single crochet, reducing the visible bump on a stuffed surface.
Pattern — Step by Step
Work the pumpkin body in a continuous spiral unless a section says otherwise. Place a locking marker in the first stitch of every round and move it upward after each completed round. The crochet pumpkin amigurumi pattern below uses a 42-stitch maximum, matching the large-body stitch rule while keeping the finished piece practical for a tabletop arrangement.
Pumpkin Body — Make 1
Yarn: mustard yellow, sage green, cream, tan, or pumpkin orange. Construction basis: standard six-stitch amigurumi geometry; size and yarn reference: Nea Creates, Perfect Crochet Pumpkin.
R1: 6 sc in MR (6)
R2: inc × 6 (12)
R3: (1 sc, inc) × 6 (18)
R4: (2 sc, inc) × 6 (24)
R5: (3 sc, inc) × 6 (30)
R6: (4 sc, inc) × 6 (36)
R7: (5 sc, inc) × 6 (42)
R8: sc around (42)
R9: sc around (42)
R10: sc around (42)
R11: sc around (42)
R12: sc around (42)
R13: sc around (42)
R14: sc around (42)
R15: (5 sc, dec) × 6 (36)
R16: (4 sc, dec) × 6 (30)
R17: (3 sc, dec) × 6 (24)
Begin filling the body. Place stuffing against the outer wall first and keep the center slightly less dense; this gives the sculpting strand room to compress the middle later.
R18: (2 sc, dec) × 6 (18)
R19: (1 sc, dec) × 6 (12)
Add the final stuffing in small pieces. The body should resist a light thumb press without becoming hard.
R20: dec × 6 (6)
Fasten off and leave a 25 cm tail. Thread the tail through the front loops of the final six stitches, pull the opening closed, knot securely, and take the yarn end into the body.
Eight Sculpted Pumpkin Ribs
Yarn: 2.5–3 m of matching body yarn. Shaping reference: external pumpkin-shaping methods documented by Hooked by Robin and other spherical amigurumi pumpkin patterns.
Thread the long sculpting strand onto a doll needle. Insert the needle through the bottom center and bring it out through the top center. Carry the yarn down the outside of the pumpkin, return through the bottom center, and exit again at the crown.
Pull only until the surface forms a visible valley. Do not crush the stuffing. Repeat the wrap seven more times, spacing the strands at roughly 45-degree intervals so the body finishes with eight lobes.
Check the pumpkin from above after every second wrap. Adjust the strand position before tightening if two valleys have moved too close together. After all eight channels are balanced, take the needle through the center once more, secure the yarn beneath the pumpkin, and bury the end inside the filling.
For the multicolor lower-left look visible in the photograph, work surface slip stitches beside selected valleys using tan, olive, brown, or mustard yarn. Vertical surface accents preserve the direction of the photographed ribbing better than changing yarn color on ordinary horizontal body rounds.
Stem — Make 1
Yarn: olive, ochre, tan, or brown. Construction reference: tubular pumpkin stems published by AmiLoops and Easy Breezy Crochet.
R1: 6 sc in MR (6)
R2: inc × 6 (12)
R3: sc around (12)
R4: sc around (12)
R5: sc around (12)
R6: sc around (12)
R7: sc around (12)
R8: sc around (12)
R9: dec × 6 (6)
Add only a narrow cylinder of stuffing. Too much filling makes the stem rigid and prevents the slight bend visible on the photographed yellow pumpkin.
Fasten off. Leave a 30 cm tail for attaching the stem to the crown.
Leaves — Make 2
Yarn: sage, olive, yellow-green, or mustard. Photo reference: pointed layered leaves around each pumpkin crown; construction basis: flat crochet leaf methods.
Foundation: ch 12.
Row 1: Starting in the second ch from the hook, sl st, sc, hdc, 5 dc, hdc, sc, 3 sc in the final ch. Continue down the opposite side of the foundation chain: sc, hdc, 5 dc, hdc, sc, sl st (22).
Fasten off and leave a 25 cm sewing tail. Thread a contrasting or matching strand from the base toward the tip with surface slip stitches to imitate the raised center vein visible on the photographed leaves.
Make the second leaf in the same color for a restrained crown, or use mustard and green together to reproduce the mixed-color styling seen on the smaller pumpkins.
Rosette or Berry Accents — Make 3
Yarn: coral, raspberry, yellow, orange, or brown. Photo reference: small round accents clustered beside the stem.
R1: 6 sc in MR (6)
R2: inc × 6 (12)
R3: (1 sc, inc) × 6 (18)
Sl st in the next stitch and fasten off. Leave a 20 cm tail.
For a flatter floral disc, press the circle flat before sewing. For a raised berry shape, run the sewing tail around the outer edge, pull gently to cup the circle, then place a pea-sized amount of fiberfill beneath it while attaching it to the crown. Mixing one raspberry, one orange, and one yellow accent closely matches the color logic of the large mustard pumpkin in the photograph.
Curly Tendril — Make 1
Yarn: yellow, sage, or olive. Construction reference: chained pumpkin tendrils used in published amigurumi pumpkin patterns.
Foundation: ch 26.
Row 1: Starting in the second ch from the hook, work 2 sc in each chain across (50).
The doubled stitch density forces the chain into a natural spiral









